Troubleshooting
Problem
Environment
Note: This document primarily discusses using a Remote Output Queue to print to a Windows print queue; however, a *LAN 3812 device description that uses the unsupported LPR print driver (TSPLPRD) utility can also be used. *LAN 3812 PJL, SNMP, or Lexlink device descriptions cannot be used to print to a Windows print queue because Windows does not have support for receiving spooled files using the PJL, SNMP, or Lexlink protocols. However, *LAN 3812 IPP device descriptions can be used instead, assuming the Windows PC or Server has been setup to receive spooled files using the Internet Print Protocol (IPP).
Requirements for using a Remote Output Queue (RMTOUTQ) include the following:
| o | Having a TCP/IP interface configured and started on the IBM System i, |
| o | Having a TCP/IP address assigned to the printer or remote host, |
| o | Having a Line Print Daemon (LPD) TCP/IP process enable and running on the internal or external print server or remote host, and |
| o | Either having a print queue configured on the internal or external print server, which is typically automatic when LPD is enabled on a print server, or having a print queue configured and shared on the remote host. |
Resolving The Problem
-
Installing and Configuring the Windows TCP/IP Print Server (Windows 7) - Configuring the Windows Print Queue (Windows 7)
-
Installing and Configuring the Windows TCP/IP Print Server (Windows XP and Earlier) -
Configuring the Windows Print Queue (Windows XP and Earlier) - Configuring a Remote Output Queue to a Windows Print Queue (Instructions)
- Configuring a Remote Output Queue to a Windows Print Queue (Example)
- Configuring a Dummy Device Description to Use with a Remote Output Queue
- Changing a Remote Output Queue Description
- Alternative: Configuring a *LAN 3812 DEVD that Uses the LPR Print Driver (TSPLPRD) Utility
- Additional Information (References)
-
The TCP/IP Print Server must be installed and started on the Windows PC or Server. It is also recommended that it be set up to start automatically so the Remote Output Queue will be able to send spooled files to the Windows print queue whenever the Windows PC or Server is up and running. Otherwise, the TCP/IP Print Server must be started manually each time a spooled file is sent to the Windows print queue.
The TCP/IP Print Server or Print Service for Unix is an optionally installed component of Windows; therefore, it might have to be installed by going into the Windows Control Panel, double-clicking on Add or Remove Programs, clicking on Add/Remove Windows Components, and installing the proper component. In Windows 7, the TCP/IP Print Server is installed by selecting the Other Network File and Print Services component and the Print Services for Unix subcomponent.
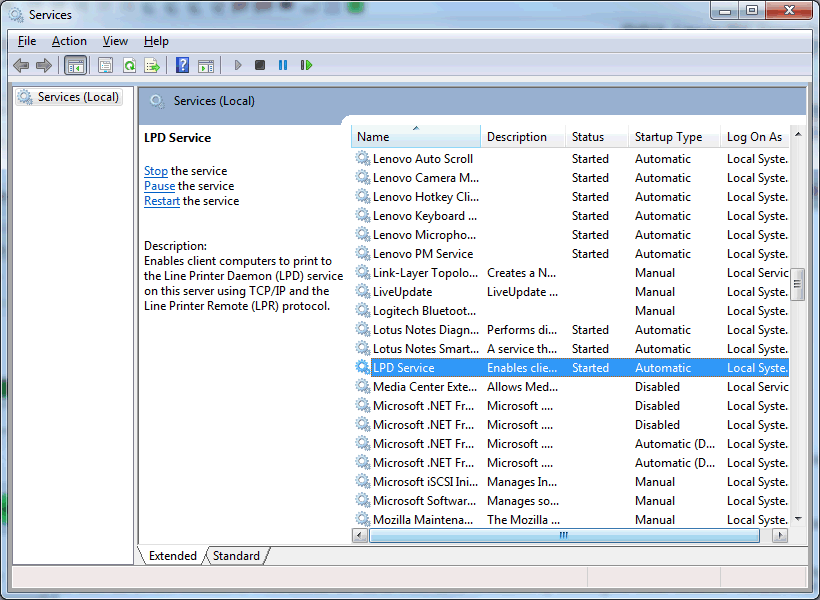
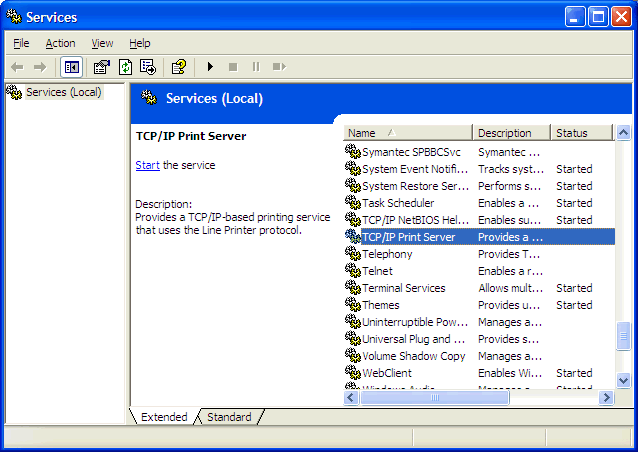
Note: The TCP/IP Print Server component is not available with all versions of Windows, but it is available in Windows 7. If this is unavailable, a third-party Line Printer Daemon (LPD) program must be installed and configured on the Windows PC.1 To see if the TCP/IP Print Server is installed, open Control Panel by click on the Start button  , and then, on the Start menu, clicking Control Panel.
2 Type "services" in the Search Control Panel bar, then click on View local services under Administrative Tools.

3 Scroll down the list of installed services, or click in the list and type "TCP", to see if LPD Service is listed, and whether the status is set to Started.

If the LPD Service is installed, but not started or not setup to start automatically, skip to Step 9.5 If the LPD Service is not listed, then it must first be installed on the Windows PC or Server. Go back to Control Panel, click the back arrow, and click on Uninstall a Program under Programs.

6 Click on Turn Windows features on or off.

7 Expand Print and Document Services, select LPD Print Service, and then click OK.

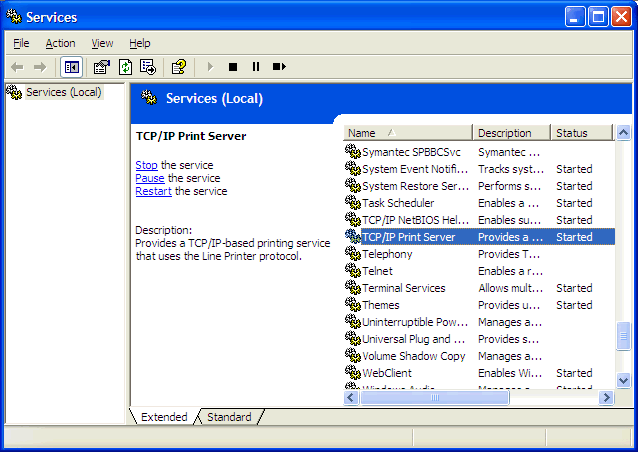
8 After the TCP/IP Print Server has been successfully installed, return to the Windows Services and verify that the TCP/IP Print Server is now listed.

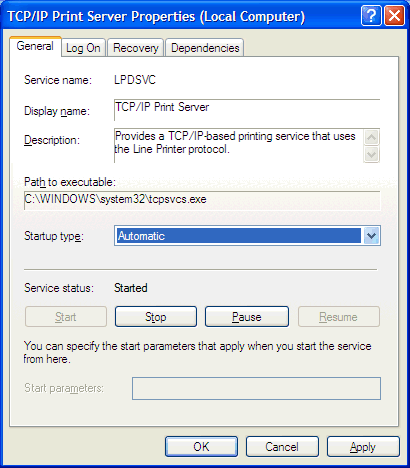
9 Right click on the LPD Service and select Properties from the context or pop-up menu. Set the Startup type to Automatic, click Start, and then click OK.

10 Set the Startup type to Automatic, click on the Start button to start this service (if it is not already started) and then click on the OK button.

11 If the LPD Service is started, and the Startup Type is set to automatic, then the Windows PC or Server is now ready to receive spooled files using the TCP/IP Line Printer Requester (LPR) protocol.
The Windows print queue must be setup and shared on the Windows PC or Server. It is also recommended that it be set up to start automatically so the Remote Output Queue will be able to send spooled files to the Windows print queue whenever the Windows PC or Server is up and running. Otherwise, the TCP/IP Print Server must be started manually each time a spooled file is sent to the Windows print queue.
The TCP/IP Print Server or Print Service for Unix is an optionally installed component of Windows; therefore, it might have to be installed by going into the Windows Control Panel, double-clicking on Add or Remove Programs, clicking on Add/Remove Windows Components, and installing the proper component. In Windows 2000, Windows 2003 Server, and Windows XP Professional, the TCP/IP Print Server is installed by selecting the Other Network File and Print Services component and the Print Services for Unix subcomponent.
Note: The TCP/IP Print Server component is not available with all versions of Windows, but it is available in Windows 7. If this is unavailable, a third-party Line Printer Daemon (LPD) program must be installed and configured on the Windows PC.
| 1 | If the Windows print queue has already been setup, but not yet shared, then proceed to the sub-section titled Sharing an Existing Windows Print Queue. |
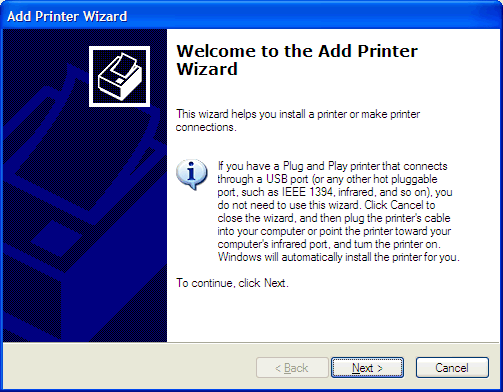
| 2 | If the Windows print queue has not yet been setup, then click on the Start button Note: If the printer manufacturer has provided a printer installation program, use that program to install the printer and then proceed to the sub-section titled Sharing an Existing Windows Print Queue. |
| 3 | Click on "Add a local printer".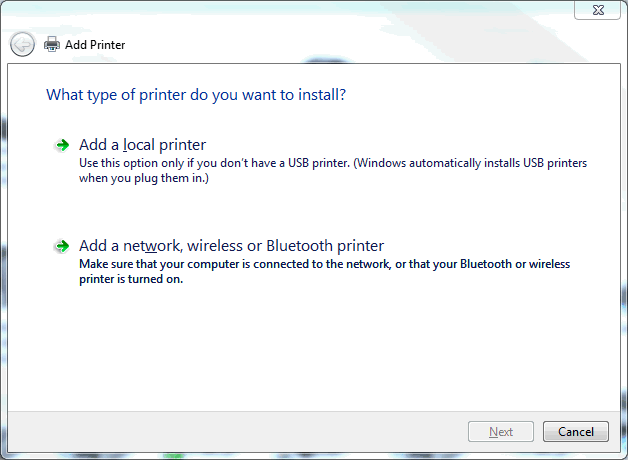 |
| 4a | If the print queue will point to a parallel or USB attached printer, select it from the list next to "Use an existing port" and click on the Next button. |
| 4b | If the print queue will point to a Local Area Network (LAN) attached printer, select "Create a new port", set the "Type of port" to Standard TCP/IP Port and click on the Next button Type in the printer Hostname or IP address and let Windows automatically fill in the Port name, then click on the Next button  |
| 4c | If you intend to print to a file on the Windows PC, and want to be prompted each time for the file name, select FILE: from the list next to "Use the following port" and click on the Next button Note: If the Windows print queue is setup to point to FILE:, then when a spooled file is sent to the print queue the following Print to File dialog box will appear on the Windows PC or server:  Someone on that Windows PC or server will then have type in the path and file name to store the print data, such as c:\prt2file.txt, and click on the OK button for each spooled file printed. |
| 4d | If you intend to print to a file on the Windows PC, but want to print to the same file each time without being prompted, select "Create a new port", set the "Type of port" to Local Port and click on the Next button Type the complete file name including path, file name and an extension appropriate for the type of output to be produced, for example: C:\Users\user-name\Documents\Prt2File.txt C:\Users\user-name\Documents\Prt2File.pdf C:\Users\user-name\Documents\Prt2File.pcl C:\Users\user-name\Documents\Prt2File.tiff and then click on the OK button.  Note: With Windows 7, verify that your user is authorized to write to the path that is specified. |
| 5 | If prompted to install the printer driver, select the printer manufacturer and printer model from the list, or click on the Have Disk button if you have downloaded a printer driver from the printer manufacturer web site, or if you have an install CD containing the printer driver, then click on the Next button If prompted to choose which version of the driver to use, choose whether to use the driver that is currently installed, or to replace the current driver, then click on the Next button  Type a printer name for the new Windows print queue, then click on the Next button.  Type a share name for your Windows print queue, then click on the Next button  Note: Write down or take note of the share name used because this must be specified in the Remote printer queue (RMTPRTQ) parameter in the Remote Output Queue. Include whether it is typed all in uppercase, all in lowercase or in mixed-case (in other words, the Windows share name is case sensitive). This is used to tell the Windows PC or Server which print queue to use for a specific Remote Output Queue because several Windows print queues can be setup and shared on a single Windows PC, and Remote Output Queues can be setup to print to any one of those print queues. Once you have successfully added the printer, choose whether to set this as the default printer and whether to print a test page. If the print queue is set up to point to a parallel or USB attached printer or to a Local Area Network (LAN) attached printer, then it is recommended that you click on the Print a test page button and verify that the Windows PC or Server has successfully printed to this printer. If it is set up to generate a file on the Windows PC or Server instead, then printing a Windows Test Page should not be necessary.  Note: If there are any problems printing from the Windows PC or Server to the printer, you must get assistance from the printer manufacturer, your help desk, or your third-party vendor because this is beyond the scope of the IBM i Global Support Center (iGSC). |
| 6 | When finished, click on the Finish button. |
Sharing an Existing Windows Print Queue
To share an existing Windows print queue, click on the Start button

Note: Write down or take note of the share name used because this must be specified in the Remote printer queue (RMTPRTQ) parameter in the Remote Output Queue. Include whether it is typed all in uppercase, all in lowercase or in mixed-case (in other words, the Windows share name is case sensitive). This is used to tell the Windows PC or Server which print queue to use for a specific Remote Output Queue because several Windows print queues can be setup and shared on a single Windows PC, and Remote Output Queues can be setup to print to any one of those print queues.
-
The TCP/IP Print Server must be installed and started on the Windows PC or Server. It is also recommended that it be set up to start automatically so the Remote Output Queue will be able to send spooled files to the Windows print queue whenever the Windows PC or Server is up and running. Otherwise, the TCP/IP Print Server must be started manually each time a spooled file is sent to the Windows print queue.
The TCP/IP Print Server or Print Service for Unix is an optionally installed component of Windows; therefore, it might have to be installed by going into the Windows Control Panel, double-clicking on Add or Remove Programs, clicking on Add/Remove Windows Components, and installing the proper component. In Windows 2000, Windows 2003 Server, and Windows XP Professional, the TCP/IP Print Server is installed by selecting the Other Network File and Print Services component and the Print Services for Unix subcomponent.
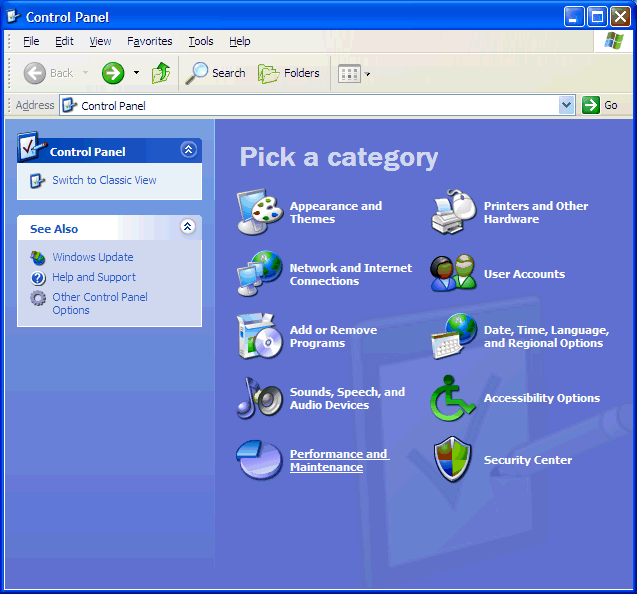
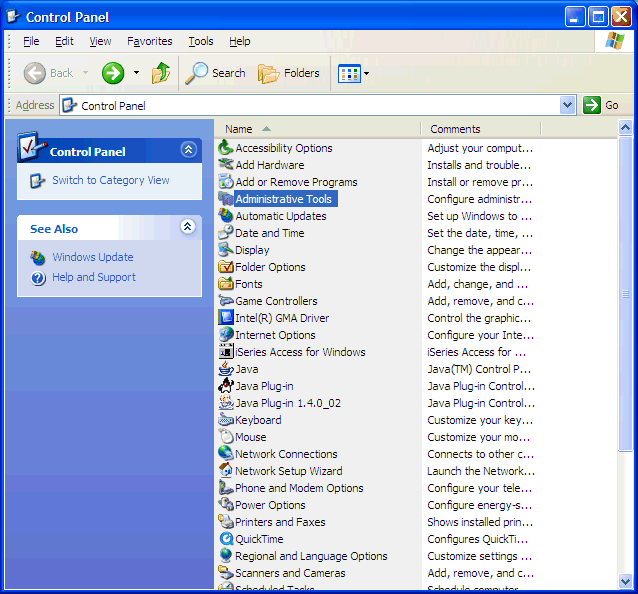
Note: The TCP/IP Print Server component is not available with all versions of Windows, but it is available in Windows NT, Windows 2000, Windows 2003 Server, and Windows XP. If this is unavailable, a third-party Line Printer Daemon (LPD) program must be installed and configured on the Windows PC.1 To see if the TCP/IP Print Server is installed, click on the Windows Start button and click on Control Panel. 2a If using the Category View, click on Performance and Maintenance.
and then click on Administrative Tools.

2b If using the Classic View, double-click on Administrative Tools.
3 Next, double-click on Services.

4 Scroll down the list of installed services and see if TCP/IP Print Server is listed and whether the status is set to Started.

5 If the TCP/IP Print Server is not listed, then it must first be installed on the Windows PC or Server. This can be done by going back to the Windows Control Panel and clicking on Add or Remove Programs, then clicking on Add/Remove Windows Components.

Select Other Network File and Print Services and click on the Next button. Windows might need to use the installation CD for your particular version of Windows, so have that ready before clicking on the Next button.
Note: Selecting Other Network File and Print Services and then clicking on the Details button will show the Print Services for Unix as a subcomponent.

6 After the TCP/IP Print Server has been successfully installed, return to the Windows Services (under Administrative Tools) and verify that the TCP/IP Print Server is now listed. If so, right-click on the TCP/IP Print Server and select Properties from the context or pop-up menu.
7 Set the Startup type to Automatic, click on the Start button to start this service (if it is not already started) and then click on the OK button.
The Windows PC or Server is now ready to receive spooled files using the TCP/IP Line Printer Requester (LPR) protocol.
-
The Windows print queue must be setup and shared on the Windows PC or Server. It is also recommended that it be set up to start automatically so the Remote Output Queue will be able to send spooled files to the Windows print queue whenever the Windows PC or Server is up and running. Otherwise, the TCP/IP Print Server must be started manually each time a spooled file is sent to the Windows print queue.
The TCP/IP Print Server or Print Service for Unix is an optionally installed component of Windows; therefore, it might have to be installed by going into the Windows Control Panel, double-clicking on Add or Remove Programs, clicking on Add/Remove Windows Components, and installing the proper component. In Windows 2000, Windows 2003 Server, and Windows XP Professional, the TCP/IP Print Server is installed by selecting the Other Network File and Print Services component and the Print Services for Unix subcomponent.
Note: The TCP/IP Print Server component is not available with all versions of Windows, but it is available in Windows NT, Windows 2000, Windows 2003 Server, and Windows XP. If this is unavailable, a third-party Line Printer Daemon (LPD) program must be installed and configured on the Windows PC.
Notes:1 If the Windows print queue has not yet been setup, then skip to Step 5, Sharing Tab.
If not, but the printer manufacturer has provided a printer installation program, use that program to install the printer and then skip to Step 5, Sharing Tab.2 If the Windows print queue has not yet been setup, then click on the Windows Start button and click on Printers and Faxes (or just Printers depending on the version of Windows). Click on Add a Printer and proceed through the dialog boxes to configure the print queue.
3 Select "Local printer attached to this computer" and click on the Next button.

4a If the print queue will point to a parallel or USB attached printer, select it from the list next to "Use the following port" and click on the Next button

4b If the print queue will point to a Local Area Network (LAN) attached printer, select "Create a new port", set the "Type of port" to Standard TCP/IP Port and click on the Next button

Proceed through the Add Standard TCP/IP Printer Port Wizard.

Type in the printer IP address...

or type in the printer host name...

and click on the Next button. Complete the remainder of the Add Standard TCP/IP Printer Port Wizard, clicking on the Finish button on the final screen.

4c If you intend to print to a file on the Windows PC, and want to be prompted each time for the file name, select FILE: from the list next to "Use the following port" and click on the Next button.

4d If you intend to print to a file on the Windows PC, but want to print to the same file each time without being prompted, select "Create a new port", set the "Type of port" to Local Port and click on the Next button.

Type the complete file name including path, file name and an extension appropriate for the type of output to be produced, for example:
C:\Documents and Settings\Administrator\My Documents\Prt2File.txt
C:\Documents and Settings\Administrator\My Documents\Prt2File.pdf
C:\Documents and Settings\Administrator\My Documents\Prt2File.pcl
C:\Documents and Settings\Administrator\My Documents\Prt2File.tiff
and then click on the OK button.

5 Select the printer manufacturer and printer model from the list, or click on the Have Disk button if you have an install CD containing the printer driver or have downloaded the driver, then click on the Next button.

Type a name for your Windows printer, then click on the Next button.

Type a share name for your Windows print queue, then click on the Next button.

Complete the remainder of the Add Printer Wizard, clicking on the Finish button on the final screen.

6 General Tab
If the print queue is set up to point to a parallel or USB attached printer or to a Local Area Network (LAN) attached printer, then print a Windows Test Page and verify that the Windows PC or Server has successfully printed to this printer. If it is set up to point to FILE: to generate a file on the Windows PC or Server instead, then printing a Windows Test Page should not be necessary.
The Windows Test Page can be printed by right-clicking on the printer, selecting Properties from the context or pop-up menu, and then clicking on the Print Test Page button.
The Windows Test Page can also be printed while finishing up with the Add Printer Wizard.
Note: If there are any problems printing from the Windows PC or Server to the printer, you must get assistance from the printer manufacturer, your help desk, or your third-party vendor because this is beyond the scope of IBM® iSeries® Software Support.7 Sharing Tab
After the Windows print queue has been added and a Windows Test Page has successfully been printed, right-click on the printer and select Sharing from the context or pop-up menu. Click on Share this printer, type the Share name, and then click on the OK button.
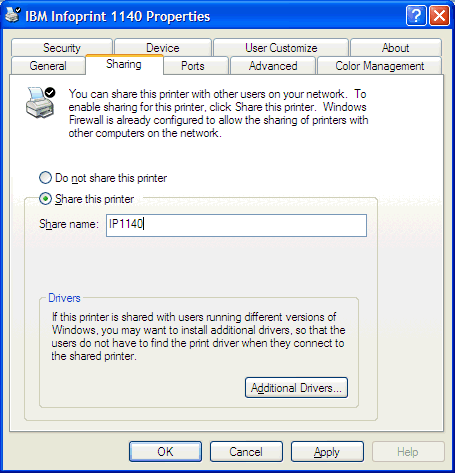
The Share Name can also be specified while configuring the Windows print queue using the Add Printer Wizard.
Note: Write down or take note of the share name used because this must be specified in the Remote printer queue (RMTPRTQ) parameter in the Remote Output Queue. Include whether it is typed all in uppercase, all in lowercase or in mixed-case (in other words, the Windows share name is case sensitive). This is used to tell the Windows PC or Server which print queue to use for a specific Remote Output Queue because several Windows print queues can be setup and shared on a single Windows PC, and Remote Output Queues can be setup to print to any one of those print queues.1 If the Windows print queue is setup to point to FILE:, then when the spooled file is sent to the print queue the following Print to File dialog box will appear on the Windows PC or server:

Type in the path and file name to store the print data, such as c:\prt2file.txt, and click on the OK button. The print data will be stored in that file on the PC or server.2 If the Windows print queue is setup to point to a parallel or USB attached printer or to a printer on the network, then the Print to File dialog box will not be shown. The print data will be sent to the Windows print queue, and then it should print out on the printer.
 Requirements and Restrictions
Requirements include a TCP/IP interface configured in the operating system, a TCP/IP address on the printer side, and a Line Print Daemon (LPD) TCP/IP process running on the print server. Restrictions include no page range printing. Controlling the output can also be a problem because of the lack of control over the sending of spooled files. Once a spooled file has started sending, a user may have a tough time stopping the printing from the operating system side. Putting the spooled file on hold or deleting it may not be successful. For a more complete listing of restrictions, please refer to the document:
N1019659: Capabilities and Limitations of Remote Output Queues (RMTOUTQs)
- Recommended Fixes (PTFs) and Group PTFs
There are no required PTFs to print using a RMTOUTQ; however, getting the latest print-related TCP fixes for the operating system will typically help you avoid problems when using RMTOUTQs.
For a list of the latest Print PTFs, refer to the Recommended Fixes Web site which is available at:
http://www-912.ibm.com/s_dir/slkbase.nsf/recommendedfixes
For information on the Print and TCP/IP Group PTFs, refer to the PSP - Group PTFs Web site which is available at:
http://www-912.ibm.com/s_dir/sline003.NSF/GroupPTFs?OpenView&view=GroupPTFs
Output Queue and Library (OUTQ)
The output queue name can be any name that you choose. It is recommended that you set the output queue library to QUSRSYS in case you need to use a dummy device description for some of your applications. For instructions on creating a dummy device description, please refer to the following document:
N1010256: Creating a Dummy Device Description to Use with a Remote Output Queue (RMTOUTQ)
Remote System (RMTSYS)
When configuring a Remote Output Queue to a Windows print queue, you can specify the TCP/IP address, the host name, or the DNS name for that particular Windows PC or server. If a TCP/IP address is used, set the Remote System (RMTSYS) parameter to *INTNETADR and then specify the printer's TCP/IP address in the Internet Address (INTNETADR) parameter, which comes later on in the output queue description. If a host name or DNS name is used, that name should be entered in the Remote System (RMTSYS) parameter.
If a TCP/IP address is used, verify that the operating system can reach the Windows PC or server by using the PING or Verify TCP/IP Connection (VFYTCPCNN) command with that TCP/IP address. If a host name or DNS name is used, verify that the operating system can reach the Windows PC or server by using the PING or Verify TCP/IP Connection (VFYTCPCNN) command with that host name or DNS name.
Remote Printer Queue (RMTPRTQ)
This specifies the LPR queue name that the LAN-attached printer or LAN print server is expecting for LPD (or Line Printer Daemon) print requests. The LPR queue name is hardware specific. This value is typically case sensitive as well, so it should be specified in single quotes.
For a list of recommended values for the Remote Printer Queue (RMTPRTQ) parameter, refer to the following document:
N1010172: Recommended Remote Printer Queue Values for Remote Output Queues (RMTOUTQs)
Note: If the correct RMTPRTQ parameter is not set to correct LPR queue name, or if it is specified in the wrong case, then the RMTOUTQ will be unable to connect to the Windows PC or server and therefore the spooled file will stay in SND (Sending) status and will not print.
Writers to Autostart (AUTOSTRWTR)
This specifies the number of remote writers that will be started automatically by the system. It is recommended that this be set to 1, so the remote writer will automatically be started after an IPL, after restarting the QSYS subsystem, or after making a change to the output queue description. If not, the writer must be started manually using the Start Remote Writer (STRRMTWTR) command.
Note: If configuring a dummy device description for use with your Remote Output Queue, then the Writers to autostart (AUTOSTRWTR) parameter should initially be set to the default value of *NONE. If the Remote Output Queue has already been configured with AUTOSTRWTR(1), then use the End Writer (ENDWTR) command to end the remote writer before creating the dummy device description. After the Remote Output Queue has been created in library QUSRSYS and the remote writer is ended, use the Create Device Desc (Printer) (CRTDEVPRT) command to create the dummy device description, then use the Change Output Queue (CHGOUTQ) command to set the AUTOSTRWTR parameter to 1, for example CHGOUTQ OUTQ(WINPRT01) AUTOSTRWTR(1). This ensures that the printer device description is fully associated with the output queue. Otherwise, the Work with Spooled Files (WRKSPLF) command can fail to find the spooled files in the Remote Output Queue when the device name is specified in the Print device portion of the Select files for (SELECT) parameter.
Connection Type (CNNTYPE)
This must be set to *IP. This indicates that the Remote Output Queue will communicate using TCP/IP.
Destination Type (DESTTYPE)
In this particular case, this must be set to *OTHER. This should be set to *OTHER when printing operating system spooled files to printers that are attached to the LAN/WAN using a print server, a PC, or a Unix server, and it should be set to *OS400 when sending spooled files from one IBM® OS/400® or IBM® i5/OS® system to another.
Host Print Transform (TRANSFORM) or Transform SCS to ASCII (TRANSFORM)
This needs to be set to *YES so the OS/400 or i5/OS system's Host Print Transform (HPT) function will convert both SCS and AFPDS spooled files to the printer's data stream. This would instead be set to *NO if using the TSPRWPR utility to get page range support with your remote output queue. For more information on the TSPRWPR utility, please refer to the following document:
N1019686: TSPRWPR Remote Writer Page Range Support Exit Program
User Data Transform and Library (USRDTATFM)
This specifies the qualified name of a user-defined data program that is used to transform the spooled file data. This is set to *NONE unless using the TSPRWPR utility to get page range support with your remote output queue (as mentioned above).
Manufacturer Type and Model (MFRTYPMDL)
This indicates the type of ASCII printer being used. This value is used by HPT to determine what ASCII controls to use when converting the spooled file from SCS or AFPDS to ASCII. For a list of what manufacturer type and model (MFRTYPMDL) values to use for various printers, please refer to the following document:
N1019605: Information on Printers from Various Manufacturers
Note: Remote output queues (RMTOUTQ) do not have a parameter to select the page size. Therefore, Host Print Transform (HPT) selects a default page size based on the manufacturer type and model chosen in the output queue description. If a page size other than the default is needed, the page size can be implied by one of the special settings for the MFRTYPMDL parameter, such as *WSCSTLEGAL for 8.5 x 14.0 inch or legal sized paper, and the manufacturer type and model can be implied by using a system-supplied or modified workstation customizing object (WSCST). For more information, please refer to the following documents:
N1019620: Forcing a Remote Output Queue (RMTOUTQ) to Select a Particular Paper Size
N1019698: Printer Model Settings for Host Print Transform (HPT)
Workstation Customizing Object (WSCST)
This is typically set to *NONE, but it can be used to specify a system-supplied or modified workstation customizing object (WSCST).
Internet Address (INTNETADR)
The Internet Address (INTNETADR) parameter must be set to the TCP/IP address of that particular Windows PC or server when the Remote System (RMTSYS) parameter has been set to *INTNETADR. Type the TCP/IP address without leading zeros (for example, use 192.186.10.2 rather than 192.186.010.002).
Destination options (DESTOPT)
This specifies the destination-dependent options. This is typically set to 'XAIX' (all uppercase), unless using V4R3 (R430) or earlier versions of OS/400, in which case it is typically set to 'XAUTOQ XAIX' (all uppercase).
The XAIX value specifies that the remote writer is to send the spooled file to the printer multiple times if the number of copies is greater than 1. It is recommended to use the XAIX value in the destination options (DESTOPT) parameter, but there are times when it should not be used. With XAIX specified, the remote writer opens the connection to the printer and sends down multiple copies of the print data and control file pair. Each control file contains one print command for the data file that preceded it. This method is required for printers that start printing the data right away. However, there are some print servers that will close the connection after the first copy is sent. This is an unexpected close, resulting in retrying to send from the beginning, which causes the remote writer to loop forever and causes the spooled file to be printed indefinitely. In this case, XAIX should not be used. When XAIX is not specified, the data file and control file will be sent once, but the control file will contain multiple print commands. This reduces network traffic, but can only be used with servers that can buffer all the data before knowing how many copies to print. Therefore, without XAIX specified, the print server might or might not print multiple copies of the operating system spooled file.
The XAUTOQ value specifies that the remote writer is to save the *USERASCII data stream in an LPDxxxxx spooled file whenever the print server, PC, or Unix server times out; then, the LPDxxxxx spooled file can be sent without further transformation to ASCII after the writer makes another connection to the printer. Without XAUTOQ processing, large operating system spooled files could stay in SND status indefinitely.
Note: The XAUTOQ processing is done automatically at R440 OS/400 and above, so XAUTOQ must be specified only when using V4R3 (R430) or earlier versions of the operating system.
Print separator page (SEPPAGE)
This specifies whether to request a separator page (or TCP/IP trailer page) when printing on a remote system. This setting can be overridden by the print server, PC, or Unix server, so there is no guarantee that setting the print separator page (SEPPAGE) parameter to *YES will result in getting a TCP/IP trailer page, just as there is no guarantee that setting the print separator page (SEPPAGE) parameter to *NO will result in not getting a TCP/IP trailer page.
The following is an example of a Remote Output Queue to a Windows print queue. The > indicates important parameters to set. The Remote Output Queue can be configured using the Create Output Queue (CRTOUTQ) command. Type CRTOUTQ on an operating system command line, press the F4 (Prompt) Key, fill in the following parameters and then press the Enter key to create the Remote Output Queue:
| Output queue . . . . . . . . . . > WINPRT01 Name Library . . . . . . . . . . . > QUSRSYS Name, *CURLIB Maximum spooled file size: Number of pages . . . . . . . *NONE Number, *NONE Starting time . . . . . . . . Time Ending time . . . . . . . . . Time + for more values Order of files on queue . . . . *FIFO *FIFO, *JOBNBR Remote system . . . . . . . . . > Windows PC/Server host name or *INTNETADR Remote printer queue . . . . . . > Windows print queue share name (case sensitive) Writers to autostart . . . . . . 1 1-10, *NONE Queue for writer messages . . . QSYSOPR Name Library . . . . . . . . . . . *LIBL Name, *LIBL, * Connection type . . . . . . . . > *IP *SNA, *IP Destination type . . . . . . . . > *OTHER *OS400, *OS400 Host print transform . . . . . . > *YES *YES, *NO Manufacturer type and model . . > Press F4 (Prompt) or refer to document N1019605: Information on Printers from Various Manufacturers Workstation customizing object > *NONE Name, *NONE Library . . . . . . . . . . . Name, *LIBL, *CURLIB Internet address . . . . . . . . > Windows PC/Server TCP/IP Address (not used with a host name) Destination options . . . . . . > XAIX Text 'description' . . . . . . . > 'RMTOUTQ to a Windows Print Queue' |
Notes:
| 1 | Set the Remote system (RMTSYS) parameter to the host name of the Windows PC or Server, or if using a TCP/IP address, then set it to *INTNETADR and set the Internet address (INTNETADR) parameter to the TCP/IP address. |
| 2 | Older versions of the operating system might refer to the Host print transform (TRANSFORM) parameter as Transform SCS to ASCII. |
Dummy device descriptions are typically used when printing from applications that do not support printing directly to an output queue, but only to a printer device description (including Query/400 and the IBM System/36 Environment). They are also useful when moving spooled files from one printer to another from the Work with Output Queue (WRKOUTQ) or Work with Spooled Files (WRKSPLF) commands, or when using Operations Navigator to drag and drop spooled files from one printer to another.
| Caution: If dummy device descriptions are used with RMTOUTQs and a system save is performed and later a system restore is performed, the dummy device description will be restored as a *VRT 3812 printer device description with a normal output queue, but the RMTOUTQ will not be restored. This occurs because the output queue will already exist as a normal output queue at the time that the RMTOUTQs would normally be restored. When using RMTOUTQs with dummy device descriptions, it is recommended that the RMTOUTQs be fully documented so they can be re-created correctly after performing a system restore. |
This information can also be found in the following document:
N1010256: Creating a Dummy Device Description to Use with a Remote Output Queue (RMTOUTQ)
Use the following steps to create a dummy device description:
| 1. | Before a dummy device description can be created, the Remote Output Queue (RMTOUTQ) must reside in the QUSRSYS library. If not, creating the dummy device description will cause you to have two output queues of the same name -- one in the current library for the remote output queue and one in QUSRSYS. Use the following Work with Objects (WRKOBJ) command to verify that the remote output queue is in library QUSRSYS: WRKOBJ OBJ(*ALL/output-queue) OBJTYPE(*OUTQ) |
| 2. | To move the RMTOUTQ to library QUSRSYS, first use the following End Writer (ENDWTR) command with the When to end writer (OPTION) parameter set to *IMMED to end the writer immediately: ENDWTR WTR(output-queue) OPTION(*IMMED) Then issue the following Move Object (MOVOBJ) command: MOVOBJ OBJ(outq-library/output-queue) OBJTYPE(*OUTQ) TOLIB(QUSRSYS) |
| 3. | If the RMTOUTQ was configured with the Writers to autostart (AUTOSTRWTR) parameter set to 1, then the remote writer should be ended prior to creating the dummy device description. This is to ensure that the output queue is properly associated with the printer device description that is created. If the writer was not ended for Step 2 above, then use the following End Writer (ENDWTR) command with the When to end writer (OPTION) parameter set to *IMMED to end the writer immediately: ENDWTR WTR(output-queue) OPTION(*IMMED) Note: If the remote writer is not ended before configuring the dummy device description, then the Work with Spooled Files (WRKSPLF) command might fail to find the spooled files in the remote output queue when the device name is specified in the Print device portion of the Select files for (SELECT) parameter. |
| 4. | Use the following Create Device Desc (Printer) (CRTDEVPRT) command to create a device description with the same name as the remote output queue: CRTDEVPRT DEVD(output-queue-name) DEVCLS(*VRT) TYPE(3812) MODEL(1) ONLINE(*NO) FONT(011) Note: The remote writer uses the settings in the output queue description, not the device description, so there is no need to vary on the *VRT 3812 dummy device description and no need to set the Online at IPL (ONLINE) parameter to *YES. If the *VRT dummy device description is created with the Attached controller (CTL) parameter left blank, attempting to vary on the device will result in error message CPD2609 "Device &25 configuration not valid. Reason code &1" with RC2301, which indicates that device that is not attached to a controller description cannot be varied on. |
| 5. | If the RMTOUTQ was configured with the Writers to autostart (AUTOSTRWTR) parameter set to 1, then issuing the above CRTDEVPRT command should automatically restart the remote writer. If not, then the remote writer can be started using the following Start Remote Writer (STRRMTWTR) command: STRRMTWTR WTR(output-queue) |
| 6. | Creating the dummy device description should result in message CPI2611 "Output queue &1 in &2 already exists." This indicates that the printer device description is associated with the remote output queue that has already been created. If this message is not received, it most likely means that the remote output queue was not in library QUSRSYS and the Create Device Desc (Printer) (CRTDEVPRT) command has created a second output queue (but not a remote output queue) with the same name in library QUSRSYS. The problem with this is that applications typically send spooled files to the output queue in library QUSRSYS; however, because this is not a remote output queue, the spooled files are not sent to the printer. |
| 7. | If working in the System/36 Environment, use the Display System/36 Configuration (DSPS36) command to verify the System/36 printer IDs. The Change System/36 Configuration (CHGS36) command can be used to change the System/36 printer IDs or to assign a new System/36 printer ID to point to the new dummy device description. Note: When a printer is specified in the //PRINTER OCL statement, you are using the System/36 printer ID for that printer. The System/36 Environment then uses a print file in library #LIBRARY that has the same name as the printer ID. If the output is not going to the correct printer, specify the output queue name on the //PRINTER OCL status or use the Change Printer File (CHGPRTF) command to point the printer file directly to the remote output queue: CHGPRTF FILE(#LIBRARY/system-36-printer-id) OUTQ(outq-library/output-queue) |
Additional Notes:
| 1. | Do not use the Vary Configuration (VRYCFG) or the Work with Configuration Status (WRKCFGSTS) commands to vary on the printer device description. The remote writer uses the settings in the output queue description, not the device description, so there is no need to vary on the *VRT 3812 dummy device description. If the *VRT dummy device description is created with the Attached controller (CTL) parameter left blank, attempting to vary on the device will result in error message CPD2609 "Device &25 configuration not valid. Reason code &1" with RC2301, which indicates that device that is not attached to a controller description cannot be varied on. |
| 2. | Do not use the Start Print Writer (STRPRTWTR) command or Option 1 (Start) from the Work with Writers (WRKWTR) command to start the writer. Use the Start Remote Writer (STRRMTWTR) command instead to start a writer using the remote output queue. |
| 3. | RMTOUTQs use remote writers, not printer writers. However, the WRKWTR command defaults to WTR(*PRT), which only shows all of the active and inactive printer writers. Therefore, using the WRKWTR command without any parameters will show the writer to be in END status, even when the remote writer is started. |
| 4. | The settings in the dummy device description have no affect on how the remote writer communicates with the printer or on how the operating system formats spooled files for the printer. This includes, but is not limited to, the settings for the Online at IPL (ONLINE), Attached controller (CTL), Font identifier (FONT), Message queue (MSGQ), and Host print transform (TRANSFORM) parameters. For example, to control which message queue is used for all writer messages, the message queue must be specified in the MSGQ parameter in the output queue description, not in the MSGQ parameter in the dummy device description. |
| 5. | To determine if the remote writer is started, use the Work with Writers (WRKWTR) command with the Writer (WTR) parameter set to *ALL. For example, the WRKWTR WTR(*ALL) command shows all active writers rather than showing only all active and inactive printer writers. |
After a Remote Output Queue (RMTOUTQ) has been configured, there is no need to delete and recreate the RMTOUTQ to make any changes. The RMTOUTQ description can be changed by doing the following:
| 1. | Use the End Writer (ENDWTR) command with the When to end writer (OPTION) parameter set to *IMMED to end the writer immediately. |
| 2. | Use the Work with OUTQ Description (WRKOUTQD) command to display the RMTOUTQ's current settings. |
| 3. | Verify that the status shows that a writer is not active to this output queue. |
| 4. | Press the F13 (Change) Key to run the Change Output Queue (CHGOUTQ) command. |
| 5. | Make the desired changes to the RMTOUTQ description. Press the Enter key or the F16 (Command complete) key when finished. Note: The F9 (All parameters) and Page Down keys can be used to get to all of the desired parameters. |
| 6. | If needed, use the Start Remote Writer (STRRMTWTR) command to restart the writer. |
N1019686: TSPRWPR Remote Writer Page Range Support Exit Program
The TSPLPRD exit program is an unsupported utility that can be used to configure a *LAN 3812 printer device description to send spooled files to an ASCII printer using LPR/LPD. RMTOUTQs also send using LPR/LPD, but the TSPLPRD exit program uses a printer writer, rather than a remote writer. For more information on the unsupported TSPLPRD LPR print driver exit program, refer to the following documents:
N1019586: Configuring a *LAN 3812 Device Description that Uses the LPR Print Driver (TSPLPRD) Exit Program
N1019586: Configuring a *LAN 3812 Device Description that Uses the LPR Print Driver (TSPLPRD) Exit Program
N1019443: Configuring a Remote Output Queue (RMTOUTQ) to a Label or Receipt Printer
N1010172: Recommended Remote Printer Queue Values for Remote Output Queues (RMTOUTQs)
N1019659: Capabilities and Limitations of Remote Output Queues (RMTOUTQs)
N1019713: Using Host Print Transform (HPT) with a Remote Output Queue (RMTOUTQ)
N1010256: Creating a Dummy Device Description to Use with a Remote Output Queue (RMTOUTQ)
N1010092: Controlling the TCP/IP Trailer Page Using the Print Separator Page (SEPPAGE) Parameter
N1019582: Getting Support for Form Types in a RMTOUTQ
N1019620: Forcing a Remote Output Queue (RMTOUTQ) to Select a Particular Paper Size
N1019605: Information on Printers from Various Manufacturers
N1019698: Printer Model Settings for Host Print Transform (HPT)
Was this topic helpful?
Document Information
Modified date:
26 January 2021
UID
nas8N1018931