IBM Support

Configuring RADIUS for secure ID authentication in WebSphere DataPower

White Papers


Abstract

This article provides Remote Authentication Dial-In User Service (RADIUS) client set up and AAA configuration on WebSphere DataPower, which authenticates users with RSA SecurID key fob token codes through the WS-Trust protocol. The article describes how to configure the RADIUS integration in DataPower. Set up for the RSA SecurID and RADIUS servers with credential mapping is not provided in this article. This article assumes that RADIUS and SecurID have already been set up on the backend.

Content

Introduction

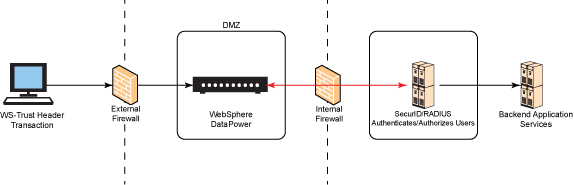
If your organization leverages RADIUS and SecurID authentication for authenticating or authorizing users to consume services externally, outside of your secured enterprise, this article helps you set up a Remote Authentication Dial-In User Service (RADIUS) client and AAA configuration in WebSphere DataPower (hereafter called DataPower). DataPower is positioned as an industry-secured gateway to authenticate users with RSA SecurID key fob token codes through the WS-Trust protocol. This article covers the following:

Note: The set up for the RSA SecurID and RADIUS servers with backend credential mapping is not provided in this article. This article assumes that RADIUS and SecurID have has already been set up on the backend.

Figure 1 shows the high-level architecture of a WS-Trust client user authentication, which authenticates and authorizes users via RADIUS and SecurID through DataPower.

Figure 1. Architecture of WS-Trust authenticationArchitecture of WS-Trust authentication

DataPower provides security policy enforcements and transformation for XML and Web services for RADIUS among other security protocols, such as LDAP, Kerberos, Active Directory, and SAML queries.

Organizations can choose to use RADIUS and SecurID due to its two-factor authentication security token, utilizing time-synchronous generated token codes only held by the user who is authorized to access exposed services from within the organization. The RSA SecurID hardware-based authenticator contains authentication for a username and a PIN, plus a 60-second, 6-digit generated code. Users need to provide this code to access authorized services from within an organization.

Requirements

At this current time, this article does not provide a RADIUS and SecurID key fob token generator. Therefore, this article assumes that the RADIUS server and SecurID have already been set up for the backend policy enforcement point.

If there is a RADIUS and SecurID configuration set up for your environment, you needs cURL installed and configured to execute an end-to-end demonstration test.

Additional notes

  • While working with the SecurID and RADIUS team, keep in mind authorization can be performed on both on the RADIUS server or the DataPower appliance. Authorization configuration on the backend is not covered in this article.
  • Firewalls illustrated in Figure 1 presume that one IP address opened from the DataPower appliance (which is situated in the DMZ) to the RADIUS server (which is situated within the internal network). This can require approval from the infrastructure security and network team.
  • There are no best practice notices for RADIUS in this document, but RADIUS and SecurID teams can reference the following technote for best practices: RADIUS Protocol Security and Best Practices.

Setting up the RADIUS client

This section provides the RADIUS client configuration on DataPower.

RADIUS connection set up on DataPower

The following RADIUS parameters consist of a short description of the fields found on the RADIUS client configuration on DataPower:

  • Nas Identifier: This is usually a fully qualified domain name, canbe used in place of an IP address to identify a RADIUS client within some RADIUS domains. For our purposes, we do not need one.
  • Number: This is the number of relative positions of the RADIUS server within the list of all RADIUS servers known to the client implementation. The lower the number, the more preferred the server (closer to the top of this list).
  • Server Address: This is the IP address of the RADIUS server.
  • Server Port: This is the remote port monitored by RADIUS.
  • Secret: This is the password used to login to the RADIUS server.
  1. The RADIUS configuration is only configured in the Default domain. Once you log into the web GUI, click Administration > Access > RADIUS Settings, as shown in Figure 2.
    Figure 2. Configuring the RADIUS settings Configuring the RADIUS settings page
  2. Click the AAA/RBM Servers tab (Figure 3) to add the RADIUS servers that is used.
    Figure 3. Adding the RADIUS serversAdd the RADIUS servers
  3. Click Add to add the first primary server (if you have a primary or secondary RADIUS server set up), as shown in Figure 4.
    Figure 4. Adding the RADIUS server address/port/secret Adding the RADIUS                     server address/port/secret
  4. Locate the correct RADIUS server for the appliance that is being assigned and input the parameters specified, as shown in Figure 5.
    Figure 5. RADIUS Server parameters entryRADIUS Server                     parameters entry

Assigning the static route assignment for the RADIUS connectivity

Figure 6 shows a sample Juniper Steel-Belted RADIUS server user console.

Figure 6. Steel-Belted RADIUS client applicationSteel-Belted RADIUS                     client application

Notice that an IP address is specified on the RADIUS configuration. The RADIUS administrator can choose to input all four Ethernet interfaces. However, if only one Ethernet interface is used, then incoming authentication must be from the enlisted IP address on RADIUS. Due to the specific IP address required by RADIUS, you need to assign static routes on DataPower so that all outbound transactions use the IP address used for RADIUS communication.

DataPower dynamically utilizes any of the four Ethernet interfaces that are enabled on the appliance (least weighted connection), and might use one of the three other Ethernet interfaces that are not specified on the RADIUS server. It causes connectivity failure. For example, if IP 192.168.1.52 is given to the RADIUS and SecurID team, then "eth4" (which was assigned IP 192.168.1.52) needs the primary and secondary RADIUS server static route input, so only eth4 communicates to the RADIUS servers.

If you do not put a static route in place, then DataPower can choose to use one of the other Ethernet interfaces. This is not allowed to communicate to the RADIUS server, and RADIUS authentication on DataPower fails. Static route assignments to the Ethernet interface being used to communicate to the RADIUS server are set by the following:

  1. Navigate to the Ethernet Interface section of the appliance as shown in Figure 7. Select Network > Interface > Ethernet Interface, or type in Ethernet Interface in the search field.
    Figure 7. Ethernet interface configurationEthernet interface                     configuration
  2. Select the interface that is communicating with the RADIUS server. This is the IP or host name given to the RADIUS and SecurID team, who assign the previously mentioned IP or host name to RADIUS and SecurID. Click on the Static Routes tab as shown in Figure 8.
    Figure 8. DataPower static routes on the Ethernet 4 interfaceDataPower static                     routes on the Ethernet 4 interface
  3. Click Add. Enter the following parameters (see Figure 9):
    • Destination: IP address of the RADIUS server with its /CIDR notation.
    • Gateway: Cross reference the RADIUS server IP to its gateway IP from the table shown in Figure 8.
    • Metric: 0 as its preference value.
    Figure 9. DataPower static route entry for the RADIUS Server parametersDataPower static                     route entry for the RADIUS Server parameters
  4. Once the parameters have been entered, click Apply, then Apply your static route configuration, and select Save Config.

Testing RADIUS

DataPower provides a testing client to test your RADIUS connection. To test:

  1. Log into the appliance under the Default domain.
  2. Navigate to the RADIUS Settings again (Objects > Access Settings > RADIUS Settings, or type in RADIUS in the search field). Click Test RADIUS on the right side of the RADIUS Settings page, as shown in Figure 10.
    Figure 10. DataPower test RADIUS linkDataPower test                     RADIUS link
  3. Once the Test RADIUS prompt opens, enter your user name and SecurID (your PIN and SecurID), as shown in Figure 11.
    Figure 11. DataPower Test Radius pageDataPower Test                     Radius page
  4. Click the Test RADIUS button.
  5. Click Confirm as shown in Figure 12.
    Figure 12. DataPower confirm test Radius execution pageDataPower confirm                     test Radius execution page
  6. You receive a completed successfully prompt (Figure 13) if the authentication was passed successfully. If not, proceed to the next section on troubleshooting.
    Figure 13. DataPower Test Radius action completed pageDataPower Test                     Radius action completed page

Troubleshooting RADIUS

There are a few things to consider when troubleshooting RADIUS integration for DataPower. There are some preliminary factors that can cause your RADIUS connection to not authenticate your username:

  • SecurID: You can have forgotten to enter your PIN with your SecurID code. Do not forget that you are needed to enter your PIN and secure ID code from your key fob.
  • TCP Connection Test: Make sure that DataPower can ping (TCP connection) the RADIUS server and port (Control Panel > Troubleshooting Panel Icon > TCP Connection Test).
    Note: You cannot be able to do a Remote Host ping because the firewall opened only allows port 1812 to be opened.
  • Static Route:: You can need a static route in place if you have not already specified the correct Ethernet interface to communicate with the specific RADIUS server.
  • Firewall: Check with the SecurID administrator or team on whether they see authentications hitting their servers if you still cannot ping the IP and port. If they cannot see any transaction coming from any of the DataPower Ethernet interfaces, then you might need to open a firewall.

Configuring basic XML firewall with RADIUS AAA

After completing the RADIUS client setup, the service can be developed for applications that is authenticating SecurID users. To create a basic level XML firewall with AAA authentication for a RADIUS service:

XML firewall configuration with RADIUS AAA

  1. Select the Access Control (AAA) as shown in Figure 14 and click Next.
    Figure 14. DataPower XML Firewall WizardDataPower XML                     Firewall Wizard
  2. Name the firewall service and click Next as shown in Figure 15.
    Figure 15. DataPower Create AAA Firewall Service pageDataPower Create                     AAA Firewall Service page
  3. Select loopback-proxy as shown in Figure 16 and click Next.
    Figure 16. DataPower AAA firewall typeDataPower AAA                     firewall type
  4. For simplifying network bottlenecks, use the dynamic IP address 0.0.0.0 for the Device Address (which is not advised to be used in production) and choose a port that is opened on the appliance to be used. For the example, we are by using port "1234" as shown in Figure 17.
    Figure 17. DataPower AAA firewall front end and port assignmentDataPower AAA                     firewall front end and port assignment
  5. In the "Create an AAA Firewall Service" section, click the plus sign (+) Create a new AAA Policy icon as shown in Figure 18.
    Figure 18. DataPower AAA firewall policyDataPower AAA                     firewall policy
  6. Enter a name for the AAA Policy and click Create. The example uses RADIUS-Demo-AAA-Policy as shown in Figure 19.
    Figure 19. DataPower AAA firewall policy name assignmentDataPower AAA                     firewall policy name assignment
  7. Select Password-carrying UsernameToken Element from WS-Security Header as shown in Figure 20 and click Next.
    Figure 20. DataPower AAA firewall access control policy identification method selectionDataPower AAA                     firewall access control policy identification method                     selection
  8. Select Use specified RADIUS Server as shown in Figure 21 and click Next.
    Figure 21. DataPower AAA firewall access control policy method selectionDataPower AAA                     firewall access control policy method selection
  9. Select Local Name of Request Element as shown in Figure 22 and click Next.
    Figure 22. DataPower AAA firewall access control policy resource identification method selectionDataPower AAA                     firewall access control policy resource identification method                     selection
  10. Select Allow Any Authenticated Client as shown in Figure 23 and click Next.
    Figure 23. DataPower AAA firewall access control policy to allow any authenticated client selectionDataPower AAA                     firewall access control policy to allow any authenticated client                     selection
  11. Ensure that the defaults are used in the last page, click Commit (Figure 24), and click Done on the page that follows.
    Figure 24. DataPower AAA firewall commit pageDataPower AAA                     firewall commit page
  12. Click Next in the AAA Information page as shown in Figure 25. Ensure that the AAA policy you just created is selected in the field. Click Commit and Done on the pages that follow.
    Figure 25. DataPower AAA firewall policy information pageDataPower AAA                     firewall policy information page

    Note: Ensure you select Save Config after you complete this step.

    Your completed XML firewall with RADIUS AAA authentication looks like Figure 26.

    Figure 26. DataPower XML firewall completed sample pageDataPower XML                     firewall completed sample page

    The Processing Policy for the AAA Policy looks like Figure 27.

    Figure 27. DataPower XML firewall completed AAA processing policy pageDataPower XML                     firewall completed AAA processing policy page

Testing the SecurID key fob code

After creating the AAA XML firewall, you can conduct an authentication test:

  1. Figure 28 shows an RSA SecurID key fob with the secure token displayed.
    Figure 28. RSA SecurID key fob containing code to be authenticatedRSA SecurID key fob                     containing code to be authenticated
  2. Figure 29 shows a sample WS-Trust SOAP file to enter your username and password to authenticate against the service. You see that a username and the PIN and securID token code presented on the key fob were saved in the file.
    Figure 29. Sample WS-Trust XML fileSample WS-Trust XML                     file

    Create the aaa.xml file as shown in Listing 1.

    Listing 1. aaa.xml file to be used as the client side authentication and executed by cURL
      <?xml version="1.0" encoding="UTF-8"?> <soapenv:Envelope xmlns:wsse=http://docs.oasis-open.org/wss/2004/01/  oasis-200401-wss-wssecurity-secext-1.0.xsd xmlns:soapenv="http://schemas.xmlsoap.org/soap/envelope/"> <soapenv:Header> <wsse:Security> <wsse:UsernameToken> <wsse:Username></wsse:Username> <wsse:Password></wsse:Password> </wsse:UsernameToken> </wsse:Security> </soapenv:Header> <soapenv:Body>       <msg>Authentication Passed</msg> </soapenv:Body> </soapenv:Envelope>
  3. Once you have saved the aaa.xml file, you are ready to run the file against the DataPower service. By executing curl –data-binary @aaa.xml http://<IP_of_appliance>:1234, a successful authentication returns the full SOAP message as shown in Figure 30.
    Figure 30. cURL execution sample cURL execution                     sample
  4. If the authentication is successful, you can see the results of the complete transactions in the system logs from the DataPower WebGUI as shown in Figure 31.
    Figure 31. DataPower log of completed transactionsDataPower log of                     completed transactions

Conclusion

In this article, you learned how to configure a RADIUS client on DataPower, test the connectivity for the RADIUS client, and configure a RADIUS AAA firewall gateway. The article also demonstrated a RADIUS authentication attempt by using the SecurID key fob through the AAA firewall.

Acknowledgments

The author (Will Liao) would like to thank Andrew Das for his guidance and support in ensuring the accuracy of the content in this article.

RSA SecurID Ready Implementation GuideWebSphere DataPower Information Center: Configuring RADIUS settingsRADIUS Attribute – NAS IdentifierWebSphere DataPower SOA Appliances documentationIBM Redbook: IBM WebSphere DataPower SOA Appliances Part II: Authentication and AuthorizationRADIUS Protocol Security and Best Practices
[{"Business Unit":{"code":"BU059","label":"IBM Software w\/o TPS"},"Product":{"code":"SS9H2Y","label":"IBM DataPower Gateway"},"Component":"","Platform":[{"code":"PF025","label":"Platform Independent"}],"Version":"","Edition":"","Line of Business":{"code":"LOB45","label":"Automation"}}]

Document Information

More support for:
IBM DataPower Gateway

Document number:
1109541

Modified date:
03 July 2023

UID

ibm11109541

Manage My Notification Subscriptions