Release Notes
Abstract
This document describes the steps that are required to manually create and configure a JDBC data source in WebSphere Application Server for the InfoSphere Information Analyzer Analysis Database in InfoSphere Information Server, Version 11.7.0. If the analysis database that you are planning to use is a database that was not created during the installation process of InfoSphere Information Analyzer, Version 11.7, then you must complete this task.
Note: If the analysis database that you are planning to use was created during the installation process of InfoSphere Information Analyzer, version 11.7, then this JDBC data source was created automatically and you do not have to complete this task.
Content
The process that applies to your profile must be repeated for each additional analysis database that is created and referenced by InfoSphere Information Analyzer.
WebSphere Application Server Liberty (LWAS) profile - DB2
The following steps are required to create a JDBC data source in the WebSphere Application Server Liberty profile for any InfoSphere Information Analyzer analysis database (sometimes referred to by its default name "IADB"). The database type must be DB2, These steps can be performed while Information Server is running but a restart will be required after completing the steps.
Complete the following steps
- Create the variables for the analysis database connectivity and user details in the file, bootstrap.properties.
- Encrypt the user password for the analysis database.
- Create the JDBC data source for the analysis database in the file, iadb.dataSources.xml.
Each of these steps is described in detail below:
- Create the appropriate variables for the new analysis database in the file InformationServer\wlp\usr\servers\iis\bootstrap.properties.
Create variables with unique names for the following in the bootstrap.properties file:
database host (example: ia.db.hostname=iadb_host)
database port ( example: ia.db.port=50000)
database name (example: ia.db.name=iadb1)
database user (example: ia.db.username=iauser)
database user password* (example: ia.db.password=<ENCRYPTED>)
* The actual value for the password variable will be set and encrypted in the following step.
- Encrypt the analysis database user password using the AppServerAdmin command:
For example, on Windows:
C:\IBM\InformationServer\ASBServer\bin\AppServerAdmin.bat -was -file C:\IBM\InformationServer\wlp\usr\servers\iis\bootstrap.properties -key ia.db.password value<iauser password> - Configure a new analysis database entry in the file InformationServer\wlp\usr\servers\iis\iadb.dataSources.xml
- 1) Copy and paste the existing <dataSource> entry in iadb.dataSources.xml to use as template:
<dataSource jndiName="jdbc/IADB"
id="DataSource_IADBDataSource" jdbcDriverRef="iadb_db2Driver"
isolationLevel="TRANSACTION_READ_COMMITTED"
beginTranForResultSetScrollingAPIs="true"
connectionManagerRef="ConnectionPool_IADBDataSource">
<properties.db2.jcc
databaseName="${ia.db.name}"
portNumber="${ia.db.port}"
driverType="4"
serverName="${ia.db.hostname}"
password="${ia.db.password}"
user="${ia.db.username}"/>
</dataSource>
- 2) In the new <dataSource> entry, replace the following variable names with the corresponding variable names for the new analysis database and user that you created in the bootstrap.properties file:
- ia.db.name
- ia.db.hostname
- ia.db.port
- ia.db.username
- ia.db.password
- 3) In the new <dataSource> entry, provide unique names for the following:
- jndiName
- id
- connectionManagerRef
- 4) Copy and paste the existing <connectionManager> entry in the file iadb.dataSources.xml:
<connectionManager
agedTimeout="7200"
connectionTimeout="180"
id="ConnectionPool_IADBDataSource"
maxPoolSize="100"
minPoolSize="1"
purgePolicy="FailingConnectionOnly"/>
- 5) In the new <connectionManager> entry, set id to the same value as specified for
connectionManagerRef in the new <dataSource> entry
Shut down and restart InfoSphere Information Server
After you restart InfoSphere Information Server, the newly created JDBC data source should be populated into the JDBC Data Source dropdown list in the InfoSphere Information Analyzer client (Home>Analysis Settings>Analysis Database tab).
WebSphere Application Server Network Deployment (WAS ND) profile - DB2
The following steps are required to create a JDBC data source in WebSphere Application Server Network Deployment for any InfoSphere Information Server Analysis Database. The database type must be DB2.
* The illustrations shown here reflect WebSphere Application Server, version 8.5.5.1.
Before you start
InfoSphere Information Analyzer must already be installed. During the installation process, a JDBC provider is created on the services tier. This JDBC provider can be used to create additional JDBC data sources for additional InfoSphere Information Analyzer analysis databases.
Complete the following steps
- Log in to the WebSphere Application Server administrative console.
- Create the authentication alias.
- Create the JDBC data source.
Each of these steps is described in detail below:
1. Log in to the WebSphere Application Server administrative console
2. Create the authentication alias for the analysis database
1) In the WebSphere Application Server administrative console, click Security>Global Security>Java Authentication and Authorization Service>J2C authentication data.

2) In Global security > JAAS - J2C authentication data, uncheck Prefix new alias names with the node name of the cell.
3) Click Apply. Do not click Save at this point.
4) Click New.... In the General Properties section, configure the IADB credentials in the following steps.

5) In the Alias text field, specify a unique descriptive name as an Alias (for example," IADB_Credentials").
6) In the User ID and Password text fields, specify the user credentials for the IADB user.
7) Optionally, enter a description for the authentication alias.
8) Click OK.

9) Click Save to save directly to the master configuration.

3. Create the JDBC data source for the analysis database
1) Go to Resources>JDBC>Data Sources to start the "Create a data source" guided activity.
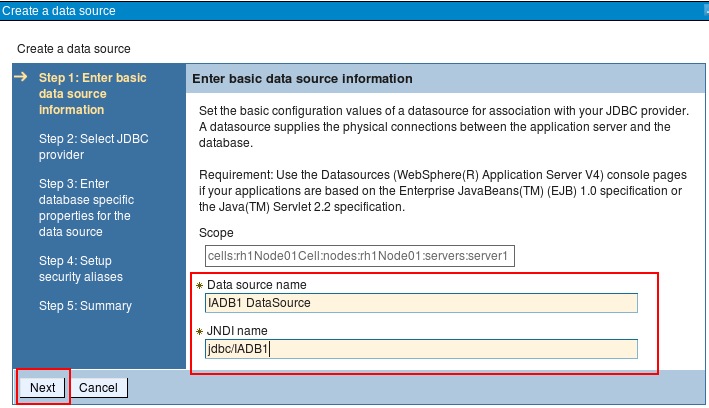
2) Select the relevant Node:*, Server* entry in the Scope drop down list and click New...

3) In Step 1: Enter basic data source information, specify a unique Data source name (e.g., IADB1_DataSource) and a unique JNDI name (e.g., jdbc/IADB1).
4) Click Next.
5) In Step 2: Select JDBC provider, choose Select an existing JDBC provider.
6) Select IADB JDBC Provider from the JDBC provider dropdown list.
7) Click Next.

8) In Step 3: Enter database specific properties for the data source and specify the IADB connectivity details:
- Driver Type = 4
Database Name = <IADB name>
Server Name = <IADB database server name>
Port Number = <IADB database server port>
10) Click Next.

11) In Step 4: Setup security aliases, from the Component-managed authentication alias dropdown list box, select the previously created authentication alias (e.g., IADB_Credentials).
12) Leave the other alias text fields blank and click Next.

13) In Step 5: Summary, review the data source summary and verify all entered values are correct.
14) Click Finish.

15) Click Save directly to the master configuration.

Shutdown and Restart Information Server
After restarting Information Server, the newly created JDBC data source should be populated into the
JDBC Data Source dropdown list in the IA client (Home>Analysis Settings>Analysis Database tab).
Step1 :
Open the iadb.dataSources.xml from below path
C:\IBM\InformationServer\wlp\usr\servers\iis\iadb.dataSources.xml
copy these lines and paste inside iadb.dataSources.xml
example:
<server>
keep the existing lines as it is and copy below lines and paste inside iadb.dataSources.xml
</server>
<jdbcDriver id=“iadb_OracleDriver” libraryRef=“iis” javax.sql.ConnectionPoolDataSource=“com.ibm.isf.jdbcx.oracle.OracleDataSource”/>
<dataSource jndiName=“jdbc/IADBORACLE”
id=“DataSource_ORACLEIADBDataSource” jdbcDriverRef=“iadb_OracleDriver”
isolationLevel=“TRANSACTION_READ_COMMITTED”
beginTranForResultSetScrollingAPIs=“true” connectionManagerRef=“ConnectionPool_ORACLEDataSource”>
<properties.oracle databaseName=“IADB” portNumber=“1521” driverType=“4"
serverName=“iis-oracle12c-ug.fyre.ibm.com” password=“ibm_0123" user=“iauser”/>
</dataSource>
<connectionManager agedTimeout=“7200" connectionTimeout=“180” id=“ConnectionPool_ORACLEDataSource” maxPoolSize=“100” minPoolSize=“1" purgePolicy=“FailingConnectionOnly”/>
Note :Just change database ,serverName ,password and username accordingly for the source which you are connecting
Step2 :
Include the below line in server.xml under location=“dataSources.xml
C:\IBM\InformationServer\wlp\usr\servers\iis\server.xml
<include location=“iadb.dataSources.xml” optional=“true”/>
Step 3 :
stop datastage
stop asbagent
stop was server
start datastage
start asbagent
start was server
Step 4 :
Go to project properties in IA Thick client
->Add data source from your oracle source which you have imported from IMAM
->validate Analysis Engine
->Go the Analysis Database -> select JDBC datasource to jdbc/IADBORACLE from dropdown -> validate it ->and save all.
Related Information
Was this topic helpful?
Document Information
Modified date:
01 April 2019
UID
swg27041740