White Papers
Abstract
This white paper intends to provide you with a comprehensive guide to successfully get started with the usage of IBM Rational Rhapsody in Ada.
Content
Author: Jose Peter, Rashmit D Singh
Table of Contents:
Introduction
IBM Rational Rhapsody Developer is a visual development environment for embedded, real time or technical application software development based on the Unified Modeling Language (UML). It helps to improve productivity throughout the embedded software development lifecycle—from requirements capture to implementation, test and deployment. Now you can reduce time-to-market of new products with automated software development processes, early validation and enhanced model testing.
The white paper intends to provide you with a comprehensive guide to successfully get started with the usage of Rational Rhapsody in Ada. This is a not a comparative study against Rhapsody available in other languages such as C, C++, Java or C#. Its purpose is to merely serve as an aid in deploying the product and understand the basic working of the set up.
While the white paper illustrates and discusses certain Ada95 functionalities, it does not intend to go into the specific depths of Ada Programming Language. By the end of this paper you will be able to setup Rhapsody in Ada, understand the compilers used, be able to decipher the generated code and customize it etc amongst other things.
Overview of Ada
Ada is a programming language designed to support the construction of long-lived, highly reliable software systems. The language includes facilities to define packages of related types, objects, and operations. The packages may be parameterized and the types may be extended to support the construction of libraries of reusable, adaptable software components. The operations may be implemented as subprograms using conventional sequential control structures, or as entries that include synchronization of concurrent threads of control as part of their invocation.
The language treats modularity in the physical sense as well, with a facility to support separate compilation.
The language includes a complete facility for the support of real-time, concurrent programming. Errors can be signaled as exceptions and handled explicitly. The language also covers systems programming; this requires precise control over the representation of data and access to system-dependent properties. Finally, a predefined environment of standard packages is provided, including facilities for, among others, input-output, string manipulation, numeric elementary functions, and random number generation.
The significant language features include:
- Packages - Data types, data objects, and procedure specifications can be encapsulated into a package. This supports the program design of data abstraction.
- Exception Handling - Ada has very good exception handling capabilities which allow the program to handle its own run-time errors.
- Generic Program Units - It is possible to write a procedure (for example, a sorting procedure) which does not require a data type to be specified..
- Parallel / Concurrent Processing - Ada supports parallel and concurrent execution of tasks.
Ada 95 will Add
- Support for object-oriented programming
- More flexible libraries
- Better control mechanisms for shared data
Ada 2005 will Add
- Interface and multiple inheritance
- Larger library including facilities for containers
- Ravenscar profile
Ada 2012 will Add
- Contract base programming
- Concurrency and multicore support
- Container enhancement
IBM Rational Rhapsody in Ada
Before you install this product, you must have the following software on your system:
1] An Ada compiler, such as GNAT. Read the next section for more information.
2] Java 2 SDK (required by the code generator). You can download an SDK from the IBM developerWorks. Now for some time, Rhapsody and Ada code generator use a Java Virtual Machine which is provided by Rhapsody. Rhapsody still prompts for a Java Path during Installation. You must have a java SDK only to install ada code generator. The Ada code generator will use the Java SDK located at <Rhp_Install_Dir>\jre which is installed by Rhapsody.
Note: You must have installed the required compiler necessary to generate code before installing Rhapsody. During Install, it prompts you to identify the path to the compiler.
Once installed, you can launch it in different ways depending on your Operating System.
Windows
To start the Rational Rhapsody product in Windows: Select Start > Programs > IBM Rational > IBM Rational Rhapsody Version# > Rhapsody Development Edition > Rhapsody in Ada; or, if available, click the Rhapsody in Ada icon on your the desktop.
Linux
To start the Rational Rhapsody product in Linux, use these steps:
- From the Terminal, browse to the Rational Rhapsody home directory.
- Execute the RhapsodyInAda script. For example:
  [RhapsodyUser@MyHostMachine]# cd /home/Rhapsody
  [RhapsodyUser@MyHostMachine Rhapsody]# ./RhapsodyInAda
In this example, “RhapsodyUser” is the username, “MyHostMachine” is the host machine and
“/home/Rhapsody” is the installation directory.
Supported Compilers
The code generator has been tested against the following Ada compilers
- AdaCore’s GNAT 3.15p
- AdaCore’s GNAT Pro 6.0.2
- AdaCore’s GNAT Pro 7.1.1
- AONIX ObjectAda Enterprise Edition 8.4
If you need to use another compiler, you can customize IBM Rational Rhapsody, in order to generate appropriate files to compile the project.
Warning:
If user uses AdaCore’s GNAT 3.15p compiler with the default installation path, the compilation will fail, because the path contains a white space which is not recognised by the compiler. In this case, IBM Rational Rhapsody must be installed into another path which doesn’t contain white spaces.
GNAT
If you have worked with Ada, the chances are that you are already familiar with GNAT. GNAT is a free-software compiler for the Ada programming language. It also forms a part of the GNU Compiler Collection. It supports all versions of the Ada language.
- Ada 2012
- Ada 2005
- Ada 95 and
- Ada 83
Originally its name was an acronym that stood for GNU NYU Ada Translator, but that name no longer applies. The front-end and run-time are written in Ada. GNAT can be found on the main GNU ftp server: http://ftp.gnu.org/gnu/gcc/(via http) and ftp://ftp.gnu.org/gnu/gcc/ (via FTP). It can also be found on the ftp.gnu.org mirrors.
Additional Information
The GNAT Ada compiler includes an Ada front-end, the GCC code generator, the binder, linker, and run-time library. All of these components, except for the code generator, are written in Ada, and are completely target-independent. The code generator is the GCC back-end. The interface between the front-end and the GCC back-end is a tree transducer, which translates the language-specific intermediate representation produced by the Ada front-end into the language-independent tree language that GCC expects.
Features of the GNAT Pro Ada Compiler
- GCC code generator
- Project manager facility
- Automatic make facility (gnatmake)
- Ability to build standalone static and dynamic libraries
- Interfacing to C, C++, and Java
- Detection of uninitialized variables
- Support for style checking
- Fine-grained control of program elaboration
- Choice between zero-cost and longjmp/setjmp exceptions
- Ability to view how Ada constructs are compiled
- Ability to view memory layout of types and objects
- Machine code insertions
- Extensive set of warnings to catch likely errors
- Informative error messages
- Flexible file naming support
- Support for programmatic debug control
Code Generation
The Ada code generator is able to generate executable Ada code from a Rhapsody model. Each Rhapsody element will have an equivalent representation in Ada. For example, a Rhapsody package will generate Ada files which contain Ada package definition. Ada code generator will generate different code depending on the selected language. The language can be selected at component level with the property Ada_CG::Component::AdaVersion. The language selection will enable generating code for the concepts and features which are characteristic of each language. For example, a tagged record type can be generated in Ada95, but will never be generated in Ada 83. In this white paper, we will use the default Ada language: Ada95.
To illustrate Ada Code Generator capabilities, we will create a Hello world project. Usually hello world program is used to make the simplest program as possible to run a first program. Here we will do the most complicate model which just displays “hello world”. We will use the most common elements of Rhapsody in order to illustrate what kind of code is generated, and how we can control their generation.
- In a first step, we will just use the default main file.
- Then we will create a hello world model with a single package.
- Then we will create a class which will say “hello world”.
- Finally we will add a statechart on the class which will give a particular behavior to the class.
This small project will show you the basics to generate Ada code as wanted, by selecting appropriate properties, and to build an executable file.
I. Create a simple sample program
Create the project Hello_World_Project and generate the code. You can see that even if the model is empty, some files (shown below) are already generated.

- Readme.txt is just here to know the date of code generation
- MainDefaultComponent.adb is the main file
- MappingFile.txt is not useful for this purpose
- DefaultComponent.bat is a batch file which will invoke the compiler to build the project
- Gnat.adc is used by gnat compiler
As mentioned above, MainDefaultCompenent.adb file is the default Main file. This file is automatically generated and contains an operation which will be the default entry point.
In order to open this file, you must go on configuration menu and select “Edit Configuration Main File”.

This file does not contain a lot of code. But it is possible to add some user code.
To do that we must go to initialization tab of configuration’s features. In Initialization code textbox add the following code:
  Declare
     C : character;
  begin
     put_line(“hello world”);
     Get(c);
  End;

Generate
Now, the user code is present in the main file.

Build the project.

An error appears. A with clause to Ada.Text_IO is missing. We should generate it. Double click the error message: the configuration’s feature window is opened. Go to properties tab and update the property Ada_CG::Configuration::ImplementationProlog with:
With Ada.Text_IO;
Use Ada.Text_IO;
Generate
The with clause is now generated just after the header.
Build.
There are no more errors, and an executable file is created.
Run
![]()
You get your first hello world program.
You can press a key and press enter to exit the program.
II. Generate a package
Create a package “Hello_World_Pkg”.
Generate the code.
In output log window, you can see that a file which has the name of the package has been generated. This is the specification file of the package.
Open the generated file.
You can see that the file contains a header and the definition of an Ada package. The package name in the file is the name of the Rhapsody package. Here, only one file is generated, because the package is empty.
Now create a variable Hello_world_String in the Hello_World_Pkg package. In the feature window of the variable, set the type to String, and initial value to “Hello World”.
Generate
You can see now that a file Hello_World_Pkg.adb is also generated
Open the files
Now the specification file contains the declaration of the variable, and the declaration of a mutator and accessor of this variable.
These elements are declared in the public part of the package. But it is possible to generate the variable in the private part. Set its visibility to private, by setting the property Ada_CG::Attribute::Visibility to private.
You can see that the variable has been moved to the private part of the specification file.
Now create a function “Print_Hello_World”.
Generate the code.
In the files, you have the declaration of a procedure in the specification file, and its implementation in the body file. You can see that the implementation is null.

We will now use roundtrip to add the implementation of the function, and to update the model. This feature enables to update the model, if you save modification in the file. In the file you will add user code manually, in order to define your own implementation.
Add the following text in Implementation body section
Put_line(Hello_World_String);
Save the file
The Roundtrip is launched, the model is updated, and the files are regenerated. Now open the features window of the function. You can see that the text that you manually added in the file, is added in the model.
What we want to do is to call the Print_Hello_World function.
To do that we must go to initialization tab of configuration’s features. In Initialization code textbox replace the present code by the following one:
Declare
C : character;
begin
Hello_World_Pkg.Print_Hello_World;
Get(c);
End;
Generate
Now, the user code is present in the main file.
Build the project.
An error appears. A with clause to the Hello_World_Pkg package is missing. We should generate it. Double click the error message: the configuration’s feature window is opened. Go to properties tab and update the property Ada_CG::Configuration::ImplementationProlog with With Hello_World_Pkg;
Generate
The with clause is now generated just after the header.

Build.
A new error appears, because a with clause is missing on “Hello_World_Pkg” package. To fix this error, we need to add a with clause and a use clause. The best way is to generate them in body file. We will add first some new elements to the model to represent the elements that we need from the Ada predefined library.
- Create a package called “Ada”.
- Set the property CG::Package::UseAsExternal to true
- Add a Text_IO class in this package.
- Add a dependency from Hello_World_Pkg to Text_IO class.
- Add stereotype “usage” on the dependency.

Generate.
A with clause is generated in the specification file. This is not the place we want. We will set its usage to “implementation” in general features of the dependency.
Generate
Now the with clause is generated in body file.
Set the property Ada_CG::Dependency::CreateUseStatement to “use”
Generate
Now a use clause is also generated
Build
Run

In a Rhapsody package you can define variables, functions, type, nested packages, and dependencies. All these elements will be generated in Ada file. You can control the way they will be generated with some stereotype, options or properties in the feature of the element. We did not see all the use cases here, but this gives you a short over view of what is possible.
III. Generate a class
A Rhapsody package is a very basic element which enables to design very simple models. Using the classes enables to create more complex model. The next section will show the kind of code which is generated from Rhapsody classes.
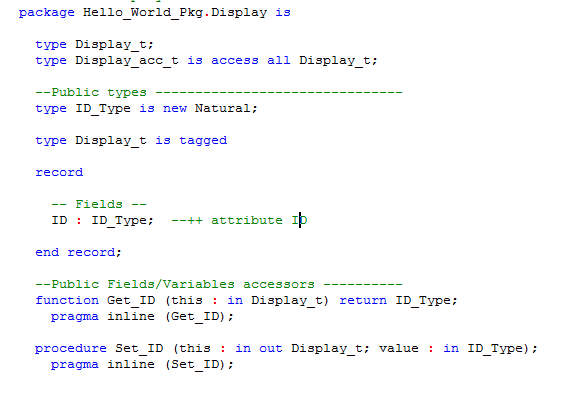
Create a class called “Display” in the Hello_World_Pkg package.
Generate the code
Edit the file.
You can see that the file contains also a package which name is the name of the class.
It also contains several types.
- A tagged record type
- An access to the tagged record type.
The tagged record type is used to instantiate the class. It will contain the attributes of the class. The methods associated to the class will have at least one argument of the class tagged record type.
Add a new type “ID_Type”.
Set the kind of the type to “typedef”. In detail tab, set its type to “Natural”
Add a new attribute ID of type ID_Type.
Generate
The attributes appears in the tagged record type.
Add attribute ID_count of type ID_Type.
Set its initial value to 0.
Check the “static” check box, to set it as static.
Add attribute Class_Name of type String.
Set initial value to “Display”.
Set it as static.
Set the property Ada_CG::Attribute::Visibility to Body
You can see that this attribute is declared in body file. You can also see that some accessor and mutator are also generated for it. But we decide that they are not useful. We will set the following properties
- Ada_CG::Attribute::AccessorGenerate = false
- Ada_CG::Attribute::MutatorGenerate = never
By this way, mutator and accessor will not be generated anymore.
Add a constructor
Set its implementation to
This.ID := ID_Count;
ID_Count := ID_Count + 1;
Print(this);
Create an operation “Print”.
Add implementation
Put_line(Class_Name & " ID " & ID_Type'image(this.ID) & " : test ");
Hello_World_Pkg.print_Hello_World;
Add a dependency to Ada.Text_IO, like we did above.
We have created a new class, and we want to use it. For that we need to instantiate it. The easiest way to do it, is to set initial instance in configuration’s feature on initialization tab. Check the class Display.
Generate.
On main file, you will see that an instance of display class has been generated and the call of initialize operation has been automatically generated.
Build
Run
IV. Generate a statechart
Rhapsody in Ada allows designing state charts which define the behavior of a class. This diagram show states and transitions which can be triggered by events or triggered operations. The Ada code generator will generate a lot of additional code, in order to manage events generation and state transition. The generated code depends on the framework which is used. There are 2 possible frameworks:
- FWK83, which is compatible with all Ada language. But it has some limitations
- newFWK95, which is compatible with Ada95 and newer
There is another possible FWK95, which is not maintained any more, and which has less features than newFWK95. It is not recommended to use it.
- Add a state “asleep”
- Add code for entry state
- Add a state “says_Hello”
- Add code for entry state
- Add default transition on asleep state
- Add transition between asleep state and says_hello state
- Add an event “wakeup” on this transition
- Add transition between says_hello state and asleep state
"put_line(“I am sleeping”);
“Hello_World_Pkg.Print_Hello_World;
Generate the code
You can see that the files of display class contain now a lot of code. You can also see that the main file has also changed, because we need to initialize the behavioral framework, and start the class behavior. We will update the main class in order to send the wakeup event too.
Change the initialization code of the configuration as below:
declare
c : character;
begin
put_line(“press a key, then press enter, to wake up me”);
loop
get(c);
Hello_World_Pkg.Display.Gen_Hello_World_Pkg_wakeup(p_display.all);
end loop;
end;
Generate
Build
Run
When you press a key and then press enter, a wakeup event is sent to the instance of the Display class. The display class will say “Hello world”, then it will go back to sleep
V. A Sneak Peek into the code structure
Create a TestProject having a TestPackage with a TestClass. Create a testAttribute and testOperation in the TestClass class. When you generate the code of the class in ADA, it generates an .ads and a .adb file.
1] .ads file - This file contains the specification of the class.
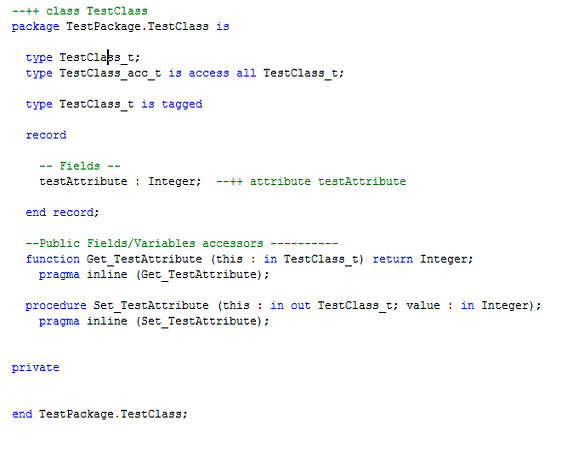
[Fig-1]
2] .adb file – This file contains the implementation/definition of the class.
Note: If there is no attribute/operation in the class, this file will not be generated (As the diagram depicts below)

[Fig-2]
![]() Name of the specification and the implementation file is same as the name of the class for which the code is generated.
Name of the specification and the implementation file is same as the name of the class for which the code is generated.
The generated code of class is represented as Ada Package and also captures the package specification. The name of the Ada package is same as the name of the class.

[Fig-3]
The specification also includes two new types which are public:
- Record type : TestClass_t
- Access to the Record : TestClass_acc_t
This record type (testClass_t) is important, because it represents the class type, and will be used to instantiate the class. The testClass_acc_t is also important, because it will enable to create variables which will handle the instance of the class.
![]() To make the Record type as Private Ada_CG.Class.Visibility property can be used.
To make the Record type as Private Ada_CG.Class.Visibility property can be used.
Now, focusing on the Attributes, The code generation of attributes depends on whether it is ‘Static’ or ‘Non static’. By default, a mutator and accessor are created for each attribute.
a) Non Static Attributes
The non static attributes are declared inside class tagged record type.

[Fig-4]
Note: There are 2 meanings for the word “package”: Rhapsody package and Ada package. Rhapsody package is translated into an Ada package which contains some variables, operations and types. Rhapsody class is also translated into an Ada package, which will also contain a tagged record type, which will contain the non static attributes.
When non-static attributes are added to a package, these attributes are handled as static attributes. Add a variable in the TestPackage and generate the code.

![]() By default, a mutator and accessor are created for each attribute.
By default, a mutator and accessor are created for each attribute.
The accessor and mutator are generated in the public part of the package specification by default, but they can be moved to private part by clicking the “Private” radio button on the features page. More of this can be seen in the Accessor and mutator section later.
b) Static Attributes
Add an attribute in the TestClass say testStaticAttibute and regenerate the code of the TestClass.

[Fig-5]
By default, the static variables are Public. To make it Private, you can use the property Ada_CG.Attribte.Visibility. The static attributes are generated just after the record of the non static variables.

![]() To generate the static attributes before the record of non static attributes, the property Ada_CG.Attribute.DeclarationPosition can be used.
To generate the static attributes before the record of non static attributes, the property Ada_CG.Attribute.DeclarationPosition can be used.
After setting the property as BeforeClassRecord, the code generated for the static attribute is before the records (non-static attributes):

The resultant Ada code can be seen below:

c) Accessor and Mutator
By default it gets generated for each attribute.


[Fig-6]
The difference between the Accessors and Mutators of a static and non static attribute is: in case of Non static attributes, ‘this’ pointer is a parameter and is used to pass in an instance of the type being affected.
![]() For a singleton class, this is not true as only one instance of the class is created.
For a singleton class, this is not true as only one instance of the class is created.
It is also possible to not generate accessors and mutators by setting properties Ada_CG::Attribute::AccessorGenerate and Ada_CG::Attribute::MutatorGenerate on the attribute.
Let us now consider the structure for Operations.
The operations are generated in Ada code as functions if there is a return type or else it is generated as Procedure. Add another operation testOperation1 in the TestClass with return type int. Generate code to observe the difference. The same can be seen even in the Accessor and Mutators.


[Fig-7]
The implementation code of the class can be added in the Features of the Operation. Right click testOperation and select the implementation tab. Local variables can be added directly in the first text area and the logical part can be added in the Operation body. This can be seen in [Fig-8] below.
![]() Check the Ada_CG::Operation::LocalVariablesDeclaration property of the testOperation. It can be noticed that it is updated with the declaration you just set in the implementation tab.
Check the Ada_CG::Operation::LocalVariablesDeclaration property of the testOperation. It can be noticed that it is updated with the declaration you just set in the implementation tab.
The testOperation custom code should be like the below:
procedure testOperation (this : in out class_0_t) is
c : character;
begin
ada.text_io.put_line("I am testOperation");
ada.text_io.put_line("press a key, then enter");
get(c);
gen_TestPackage_ev2(this);
end;

[Fig-8]
After generating the code, testOperation in the implementation file (.adb) will look as:

[Fig-9]
In the testOperation body, the implementation provided by the user has been used in the generated code. The testOperation operation is an operation which will be called for a particular instance of the class, because it has a “this” argument which has the type of the class. You can change the signature of this operation, and control the type of “this” argument with the following properties:
Ada_CG::Operation::ThisByAccess = true

Ada_CG::Operation::ThisAccessTypeUsage = regular

Static operation
An operation can be also static. This means that the “this” argument will not be generated. For that you must check the “static” box in operation features.


![]() These are examples to show that we can control code generation. You may remove all these options and come back to default properties settings, to continue the demonstration.
These are examples to show that we can control code generation. You may remove all these options and come back to default properties settings, to continue the demonstration.
Use of Ada library
Each Ada implementation provides a predefined Ada library. It provides a lot of facilities which are structured into several packages. Rhapsody in Ada provides a model of this predefined Ada library which can be loaded from File menu. It can help to create some dependencies. In our case, we want to print some messages on standard output window. For that we must use Ada.Text_IO package.
- In order to execute the “put” instruction in your operation, you will need to add a with clause to Ada.text_IO package on start of declaration
- Add the ada library model : menu file>add Ada Standard libraries
- Create a dependency from testClass to Ada::Text_io class
- Set stereotype “usage” on the dependency
Create a State chart in the TestClass as follows and generate the code for the TestClass.

[Fig-10]
The following packages are now included in the code generated in the .ads file

Each state has an ID defined in the specification file.

In order to build the project, you may need to build FWK after the first time you installed Rhapsody. For that you can go to menu code>build framework.

In this way the ouput at the end of the section should be:
| enter state 0 |
| I am testOperation |
| press a key, then enter |
| a |
| enter state 1 |
Notes and Warnings
General Limitations
Active classes must be defined to be private.
Limitations for Ada 83
When creating a model for Ada 83, the following guidelines should be followed.
- Do not create virtual operations.
- Do not create abstract operations.
- Do not create abstract classes.
- Do not use generalizations.
GNATVxWorks support for RiA
Animation is not supported.
RiA Linux Installation limitation
If you have selected the GNAT VxWorks compiler during installation, Rhapsody will display an error message that it cannot find GNATVx.
Rational Rhapsody with Apex limitations
- Only Ada95 and new FWK95 are supported.
- Rhapsody is only able to create subsystem, and view, and generate code in a view respecting Apex naming convention. It can also run an Apex link command, with the build / rebuild item of Code menu. All other Apex commands aren’t available.
Conclusion
A Rhapsody class is represented by an Ada package which contains a tagged record type. This Ada package will contain all elements which are described in the Rhapsody class like attributes, operations, types, and many other elements.
Additional code is automatically generated, like accessor mutator for attributes, or instance argument for class operations. Code for statechart management is also automatically generated. It is also possible to control code generation, by modifying some properties on the elements.
In General, all what you draw in the Rhapsody model will be generated, and you will always find a property that will allow to generate it as you want, in an Ada point of view.
References
The following were used in references or as other sources of information:
http://public.dhe.ibm.com/software/dw/demos/rhapsodyada/transcript.pdf
http://c2.com/cgi/wiki?AdaLanguage
http://www.adacore.com/gnatpro/toolsuite/compilation/
THE INFORMATION CONTAINED IN THIS DOCUMENT IS PROVIDED FOR INFORMATIONAL PURPOSES ONLY. WHILE EFFORTS WERE MADE TO VERIFY THE COMPLETENESS AND ACCURACY OF THE INFORMATION CONTAINED IN THIS DOCUMENT, IT IS PROVIDED "AS IS" WITHOUT WARRANTY OF ANY KIND, EXPRESS OR IMPLIED. IN ADDITION, THIS INFORMATION IS BASED ON IBM’S CURRENT PRODUCT PLANS AND STRATEGY, WHICH ARE SUBJECT TO CHANGE BY IBM WITHOUT NOTICE. IBM SHALL NOT BE RESPONSIBLE FOR ANY DAMAGES ARISING OUT OF THE USE OF, OR OTHERWISE RELATED TO, THIS DOCUMENT OR ANY OTHER DOCUMENTATION. NOTHING CONTAINED IN THIS DOCUMENT IS INTENDED TO, NOR SHALL HAVE THE EFFECT OF, CREATING ANY WARRANTIES OR REDOCUMENTS FROM IBM (OR ITS SUPPLIERS OR LICENSORS), OR ALTERING THE TERMS AND CONDITIONS OF ANY AGREEMENT OR LICENSE GOVERNING THE USE OF IBM PRODUCTS OR SOFTWARE. |
|---|
Original Publication Date
23 October 2014
Product Synonym
Rational Rhapsody
Was this topic helpful?
Document Information
Modified date:
27 May 2022
UID
swg27043868