Product Documentation
Abstract
The server comes with three hot-swap processor fans (labeled and numbered 1, 2, and 3) in the front of the processor housing assembly at the front of the server, and three hot-swap I/O fans (labeled and numbered 4, 5, and 6) behind the hot-swap drive ba
Content
The server comes with three hot-swap processor fans (labeled and numbered 1, 2, and 3) in the front of the processor housing assembly at the front of the server, and three hot-swap I/O fans (labeled and numbered 4, 5, and 6) behind the hot-swap drive bays. Each fan has an LED; the fan LEDs are amber in color. A fan LED is lit only when the fan needs replacement.
Notes:
- The illustrations in this section might differ slightly from your hardware.
- You do not need to turn off the power to the server to replace a fan.
- Replace a fan that has failed as soon as convenient to maintain the redundant cooling capability.
- The top cover is in place during normal operation. If the server is on, do not leave the top cover off for more than 30 minutes at a time.
| Replacing a fan |
|---|
- Determine which fan you will replace.
- Remove the front bezel.
- Pull out the fastener (1) in the top center of the processor fan (2). This places the fastener in the unlocked position.
- Pivot the fan downward and remove it from the server.
- Insert the replacement fan in the fan bay. Align the bottom tabs of the fan (2) with the matching slots in the server chassis.
- Pivot the fan in an upward position.
- When you have the fan correctly seated in the fan bay, press on the fastener in the center of the fan to secure the fan in the server.
Note: When you correctly seat the fan in the chassis, the fan blades begin to spin. The fan LED goes out a few seconds after the new fan is installed.
- Install any other options for the server.
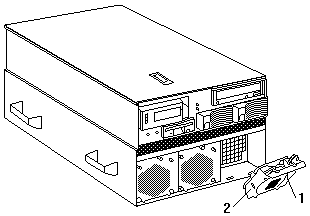
| Replacing an I/O fan |
|---|
- Determine which fan you will replace.
- Remove the top cover.

- Pull up the fastener (1) in the center of the fan (2). This places the fastener in the unlocked position.
- Lift the fan out of the server.
- Insert the replacement fan in the fan bay.
Align the connector on the bottom of the fan with the matching connector in the server chassis. When you have the fan correctly seated in the fan bay, press down on the fastener in the center of the fan to secure the fan in the server.
Note: When you correctly seat the fan in the chassis, the fan blades begin to spin. The fan LED goes out a few seconds after the new fan is installed.
- Install any other options for the server.
Document Location
Worldwide
[{"Type":"HW","Business Unit":{"code":"BU016","label":"Multiple Vendor Support"},"Product":{"code":"HW18W","label":"Older System x->xSeries 370"},"Platform":[{"code":"PF025","label":"Platform Independent"}],"Line of Business":{"code":"","label":""}},{"Type":"HW","Business Unit":{"code":"BU016","label":"Multiple Vendor Support"},"Product":{"code":"HWN07","label":"Older System x->Netfinity 8500R"},"Platform":[{"code":"PF025","label":"Platform Independent"}],"Line of Business":{"code":"","label":""}}]
Was this topic helpful?
Document Information
Modified date:
24 January 2019
UID
ibm1MIGR-45635