Scenario: Combining NAT and IP filtering
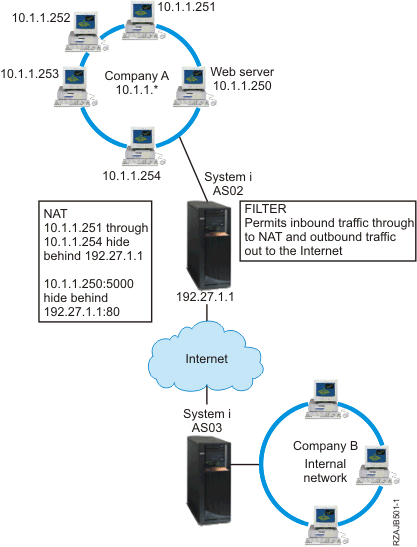
In this scenario, your company combines network address translation (NAT) and IP filtering together. Your company wants to hide its personal computers and Web server behind a single, public IP address and wants to allow other companies to access the Web server.
Situation
Your business has a moderately sized internal network that uses a IBM® i model as its gateway. You want to transfer all Web traffic from the gateway system to a dedicated Web server behind the gateway. The Web server runs on port 5000. You want to hide all of your private personal computers and the Web server behind an address on the IBM i interface, AS02 in the following figure. You also want to allow other companies to access the Web server. What should you do?
Solution
You can use IP filtering and NAT together to configure your personal computers and Web server:
- Hide NAT to hide your personal computers behind a public address, 192.27.1.1, so they can access the Internet.
- Port-mapped NAT to hide your Web server address, 10.1.1.250, and port number, 5000, behind a public address, 192.27.1.1, and port number, 80. Notice that both NAT rules are hidden behind 192.27.1.1. This is acceptable as long as the addresses you are hiding do not overlap. The port-mapped NAT rule only allows externally initiated traffic on port 80 to access your system. If the externally initiated traffic does not match the exact address and port number, NAT will not translate it and the packet will be discarded.
- Rules that filter all inbound traffic destined for your private network through to NAT and any outbound traffic out to the Internet.
Configuration
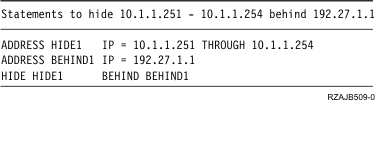
- The set of addresses that you want to hide: 10.1.1.251 through 10.1.1.254.
- The interface address behind which you want to hide the set of addresses: 192.27.1.1.
To use the Address Translation wizard, follow these steps:
- In IBM Navigator for i, expand , and click Packet Rules.
- In the Packet Rules panel, click Actions and select Rules Editor.
- From the Welcome Packet Rules Configuration dialog, select Create a new packet rules file, and click OK.
- If the Getting Started dialog pops up, read the instructions and click OK.
- From the Wizards menu, select Address Translation, and follow the wizard's instructions to configure the hide address translation packet rules.
This packet rule hides your four personal computers behind a public address so that they can access the Internet. Your hide NAT packet rule looks like the following example.
To configure the port-mapped NAT, follow these steps:
- Access the Packet Rules Editor from IBM Navigator for i.
- Create a defined address for the Web server address and port 5000.
- From the Insert menu, select Address.
- On the General page, enter Web250 in the Address name field.
- Select IP addresses in the Defined address list. Then click Add and enter the IP address of the Web server 10.1.1.250 in the field.
- Click OK.
- Create a defined address to represent the public address 192.27.1.1.Note: Because you already created a defined address to represent the public address 192.27.1.1 when you configured the hide NAT packet rules, you can omit this step for this particular scenario and skip to Step 4. However, if you use these instructions to configure the port-mapped NAT for your own network and you did not configure the hide NAT packet rules, then continue with the instructions for this step:
- From the Insert menu, select Address.
- On the General page, enter or select BEHIND1 in the Address name field.
- Select IP addresses in the Defined address list. Then click Add and enter 192.27.1.1 in the IP addresses edit field.
- Click OK.
- Create the port-mapped NAT rule:
- From the Insert menu, select Hide.
- On the General page, select Web250 from the Hide address name list.
- Select BEHIND1 from the Behind address name list.
- Select Allow inbound connections, and enter 5000 in the Hide port field.
- Enter 80 in the Behind port field.
- Enter 16 and select seconds in the Timeout fields.
- Enter 64 in the Maximum conversations field.
- Select OFF from the Journaling list.
- Click OK.
This port-mapped NAT hides your Web server address and port number behind a public address and port number. Notice that both NAT rules are hidden behind one common IP address. This is acceptable as long as the addresses you are hiding do not overlap. This port-mapped NAT rule only allows externally initiated traffic on port 80 to access your system.
The port-mapped NAT rule looks like the following example:
ADDRESS Web250   IP = 10.1.1.250
ADDRESS BEHIND1   IP = 192.27.1.1
HIDE Web250:5000   BEHIND BEHIND1:80   TIMEOUT = 16   MAXCON = 64   JRN = OFF
To create the filter rules described in this scenario, follow these steps:
- Access the Packet Rules Editor from IBM Navigator for i.
- Create a filter rule to permit inbound traffic destined for your
private network.
- From the Welcome Packet Rules Configuration dialog, select Create a new packet rules file, and click OK.
- From the Insert menu, select Filter.
- On the General page, enter external_rules in the Set name field.
- Select PERMIT from the Action list.
- Select INBOUND from the Direction list.
- Select = and * from the Source address name lists.
- Select = and enter 192.27.1.1 in the Destination address name fields.
- Select OFF from the Journaling list.
- On the Services page, select Service.
- Select TCP from the Protocol list.
- Select = and * from the Source port lists.
- Select = and * from the Destination port lists.
- Click OK.
- Create a filter rule to permit outbound traffic from your private
network to the Internet:
- From the Welcome Packet Rules Configuration dialog, select Open an existing packet rules file, and click OK.
- From the Open File dialog, select the external_rules file, and click Open.
- From the Insert menu, select Filter.
- On the General page, select external_rules from the Set name list.
- Select PERMIT from the Action list.
- Select OUTBOUND from the Direction list.
- Select = and enter 192.27.1.1 in the Source address name fields.
- Select = and * from the Destination address name lists.
- Select OFF from the Journaling list.
- On the Services page, select Service.
- Select TCP from the Protocol list.
- Select = and * from the Source port lists.
- Select = and * from the Destination port lists.
- Click OK.
- Define a filter interface for the filter set that you created:
- From the Insert menu, select Filter interface.
- Select Line name and select TRNLINE from the Line name list.
- On the Filter Sets page, select external_rules from the Filter set list, and click Add.
- Click OK.
These filters, in conjunction with the HIDE statement, permit any inbound traffic destined for your private network through to NAT and any outbound traffic out to the Internet. However, NAT enables only externally initiated traffic on port 80 to enter the system. NAT does not translate externally initiated traffic that does not match the port-mapped NAT rule. The filter rules look like the following example:
FILTER SET external_files   ACTION = PERMIT   DIRECTION = INBOUND   SRCADDR = *   DSTADDR = 192.27.1.1
   PROTOCOL = TCP   DSTPORT = *   SRCPORT = *   JRN = OFF
FILTER SET external_files   ACTION = PERMIT   DIRECTION = OUTBOUND   SRCADDR = 192.27.1.1   DSTADDR = *
   PROTOCOL = TCP   DSTPORT = *   SRCPORT = *   JRN = OFF
This statement binds (associates) the 'external_rules' filter set with the correct physical interface.
FILTER_INTERFACE LINE = TRNLINE SET = external_filesAfter you finish creating these filter rules, you should verify them to ensure they will be activated without errors. After that, you can activate them.