Integration with CA SiteMinder

This section provides instructions for integrating IBM® IBM Spectrum LSF Application Center with CA SiteMinder for single sign-on authentication. The integration involves installing IBM HTTP Server (included in the IBM Spectrum LSF Application Center package) and CA SiteMinder Web agent on the same host.

This document applies to an installation with the following products. The installation has been tested with the following product versions:
  • CA SiteMinder r12.5
  • CA SiteMinder Policy Server v6.0 SP6
  • CA SiteMinder Web Agent r6.x QMR6
  • IBM HTTP Server version 8.5.5 (included in the IBM Platform Application Center 9.1.3 package)
  • IBM Platform Application Center 9.1.3
  • IBM Platform Process Manager 9.1.2
  • IBM Platform Analytics 9.1.1 or 9.1.2

Integration limitations

Platform Application Center does not support single sign-on with CA SiteMinder when using the IBM Spectrum LSF Application Center RESTful Web Services APIs.

How the integration works

This document assumes you have a similar installation scenario. The following describes how single sign-on and user authentication works in this type of installation.

  1. The end user sends a request to the IBM HTTP Server.
    • If the request includes the CA SiteMinder cookie, the CA SiteMinder Web Agent verifies this cookie with the CA SiteMinder Policy Server and identifies whether the URL is protected. If everything is valid, access is granted to the resources.
    • If the request does not include the CA SiteMinder cookie for protected resources, the SiteMinder Web Agent requests a user name and password to authenticate with the CA SiteMinder Policy Server. If authentication is successful, access is granted to the resources.
  2. The CA SiteMinder Web Agent sends the authentication information to the CA SiteMinder Policy Server.

    The CA SiteMinder Policy Server performs the authentication and verifies the URL to determine the response to the Web Agent.

  3. The CA SiteMinder Policy Server authenticates the user by connecting with the Authentication Server.
  4. If authentication is successful or the resources are unprotected, the SiteMinder Web Agent redirects to the original accessing URL on the IBM Spectrum LSF Application Center web server.
  5. When IBM Spectrum LSF Application Center is used with Platform Process Manager, IBM Spectrum LSF Application Center invokes the Platform Process Manager API to display flow definition and flow information.
  6. When IBM Spectrum LSF Application Center is used with Platform Analytics, the Platform Analytics Report Builder invokes the Platform Application Center-Platform Analytics web service to get the Report Builder information from the IBM Spectrum LSF Application Center database.

Requirements

  • CA SiteMinder:
  • CA SiteMinder Policy Server:
  • CA SiteMinder Web Agent:
  • IBM HTTP Server:
    • IBM HTTP Server version 8.5.5 is included in the IBM Spectrum LSF Application Center 9.1.2b package.
    • IBM HTTP Server can be installed on the following platforms: AIX, HP-UX, Linux, Solaris, Windows. To install IBM HTTP Server on an operating system other than Linux, contact IBM.
    • The IBM HTTP Server and SiteMinder Web Agent must be installed on the same host.
    • IBM HTTP Server can be installed on any host and does not need to be installed on the same host as the IBM Spectrum LSF Application Center web server.
  • You have read and are familiar with the IBM Spectrum LSF Application Center, Platform Process Manager, and Platform Analytics documentation.

Configure the CA SiteMinder Policy Sever

You need to configure the CA SiteMinder Policy Server to connect to IBM Spectrum LSF Application Center.

Procedure

  1. Log in to the CA SiteMinder Policy Server.

    Connect to the CA SiteMinder Policy Server (for example: http://siteminder_hostname/siteminder), click Administer Policy Server, and log in.

    After logging in, you should see a window similar to the following:

  2. Create and configure an agent for Platform Application Center
    1. In the System tab, System Configuration, right-click Agents, and select Create Agent.

      For example:

    2. In the SiteMinder Agent Dialog, enter the agent name and description.
      • Name: You can use any name for the agent name.
      • Support 4.x agents: Ensure the checkbox for Support 4.x agents is not selected.

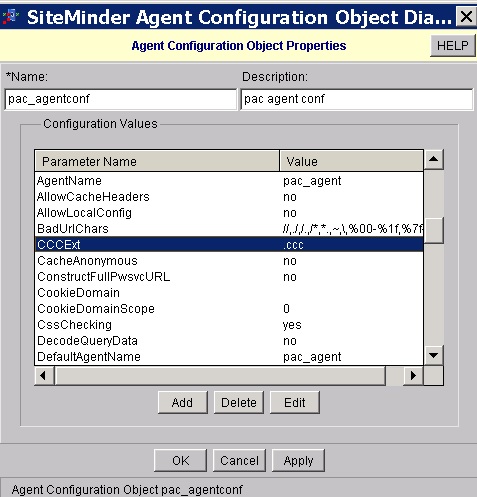
  3. Create and configure an agent configuration object
    1. In the System tab, System Configuration, right-click Agent Conf Objects, and select Create Agent Conf Object.

      For example:

    2. In the SiteMinder Agent Configuration Object Dialog, enter the agent configuration object name and description.
      • Name: You can use any name for the agent configuration object name.
      • Configuration Values: Click the Add button to add configuration parameters. The parameter DefaultAgentName is required.
      For details, refer to the CA SiteMinder Policy Design Guide: https://support.ca.com/cadocs/0/CA%20SiteMinder%20r6%200%20SP6-ENU/Bookshelf_Files/PDF/siteminder_ps_config_enu.pdf
  4. Create and configure a host configuration object
    1. In the System tab, System Configuration, right-click Host Conf Objects, and select Create Host Conf Object.

      For example:

    2. In the SiteMinder Host Configuration Object Dialog, enter the host configuration object name and description.
      • Name: You can use any name for the host configuration object name.
      • Configuration Values: Add parameters in the General tab.
      For details, refer to the CA SiteMinder Policy Design Guide: https://support.ca.com/cadocs/0/CA%20SiteMinder%20r6%200%20SP6-ENU/Bookshelf_Files/PDF/siteminder_ps_config_enu.pdf
  5. Create and configure user directories
    1. In the System tab, System Configuration, right-click User Directories, and select Create User Directory.

      For example:

    2. In the SiteMinder User Directory Dialog, enter the user directory name and description.
      • Name: You can use any name for the user directory name.
      • Configure the user directory in the Directory Setup tab.
      For details, refer to the CA SiteMinder Policy Design Guide: https://support.ca.com/cadocs/0/CA%20SiteMinder%20r6%200%20SP6-ENU/Bookshelf_Files/PDF/siteminder_ps_config_enu.pdf
  6. Create and configure the authentication scheme
    1. In the System tab, System Configuration, right-click Authentication Schemes, and select Create Authentication Scheme.

      For example:

    2. In the SiteMinder Authentication Scheme Dialog, enter the name and description.
      • Name: You can use any name for the authentication scheme.
      • Configure the authentication scheme.
      For details, refer to the CA SiteMinder Policy Design Guide: https://support.ca.com/cadocs/0/CA%20SiteMinder%20r6%200%20SP6-ENU/Bookshelf_Files/PDF/siteminder_ps_config_enu.pdf

      For example:

  7. Create and configure domains
    1. In the Domains tab, right-click Domains, and select Create Domain.

      For example:

    2. In the SiteMinder Domain Dialog, enter the name, description, and other properties.
      • Name: You can use any name for the domain.
      • Configure the domain.
      For details, refer to the CA SiteMinder Policy Design Guide: https://support.ca.com/cadocs/0/CA%20SiteMinder%20r6%200%20SP6-ENU/Bookshelf_Files/PDF/siteminder_ps_config_enu.pdf

      For example:

  8. Create a realm in the domain
    1. In the Domains tab, under the Platform Application Center domain you created, right-click Realms, and select Create Realm.

      For example:

    2. In the SiteMinder Realm Dialog, enter the name, description, and other properties.
      • Name: You can use any name for the realm.
      • Resource Filter: Ensure you configure the resource filter to the following value: /platform/framework/login/
      • Configure the realm.
      For details, refer to the CA SiteMinder Policy Design Guide: https://support.ca.com/cadocs/0/CA%20SiteMinder%20r6%200%20SP6-ENU/Bookshelf_Files/PDF/siteminder_ps_config_enu.pdf

      For example:

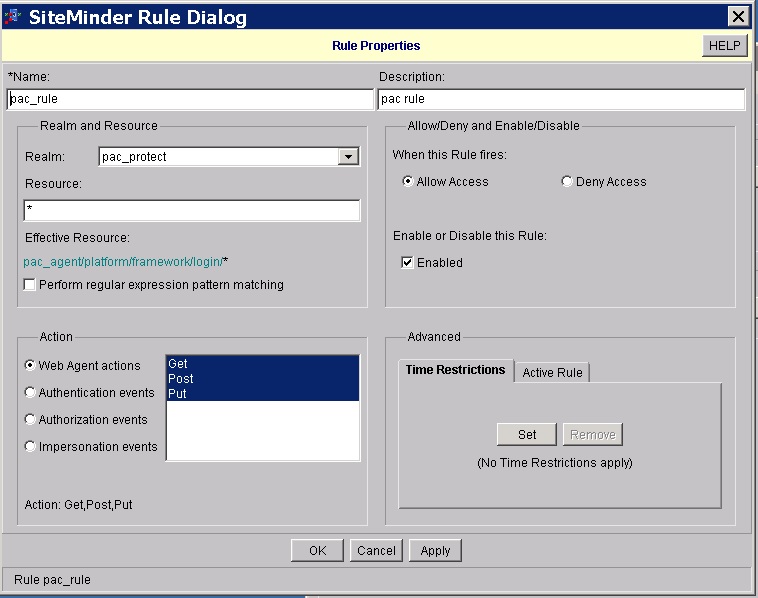
  9. Create and configure a rule in the realm
    1. In the Domains tab, under the Platform Application Center domain you created, right-click the realm you created, and select Create Rule under Realm.

      For example:

    2. In the SiteMinder Rule Dialog, enter the name, description, and other properties.
      • Name: You can use any name for the rule.
      • Resource: Ensure you configure the resource to the following value: *
      • Configure the rule.
      For details, refer to the CA SiteMinder Policy Design Guide: https://support.ca.com/cadocs/0/CA%20SiteMinder%20r6%200%20SP6-ENU/Bookshelf_Files/PDF/siteminder_ps_config_enu.pdf

      For example:

  10. Create a policy in the domain
    1. In the Domains tab, under the Platform Application Center domain you created, under the realm you created, right-click Policies, and select Create Policy.

      For example:

    2. In the SiteMinder Policy Dialog, enter the name, description, and other properties.
      • Name: You can use any name for the policy.
      • Configure the policy.
      For details, refer to the CA SiteMinder Policy Design Guide: https://support.ca.com/cadocs/0/CA%20SiteMinder%20r6%200%20SP6-ENU/Bookshelf_Files/PDF/siteminder_ps_config_enu.pdf

      For example:

  11. Configure cookie persistence

    Perform this step only if you want to use single sign-on across multiple browser sessions.

    Persistent cookies remain valid for the configured maximum session timeout plus seven days. Many browsers delete the web browser cookie file after the cookie expires but different browsers may handle cookie persistence in different ways.

    Refer to the topic SiteMinder Browser cookies in the CA SiteMinder documentation for more details on cookie persistence: http://support.ca.com/cadocs/0/CA%20SiteMinder%20r12%205-ENU/Bookshelf_Files/HTML/idocs/index.htm?toc.htm?1525273.html

Install and configure IBM HTTP Server

The IBM HTTP Server package is included in the IBM Spectrum LSF Application Center package. If you have a different operating system than Linux, contact IBM for the correct IBM HTTP Server package for your operating system type.

Procedure

  1. Install IBM HTTP Server
    1. Untar the package pac9.1.3_standard_linux-x64.tar.Z.
    2. Go into the directory pac9.1.3_standard_linux-x64.
    3. Set the IBM HTTP Server installation directory variable $IHS_INSTALLATION_DIR to the directory in which you want to install IBM HTTP Server. For example:
      • For csh or tcsh:

        setenv IHS_INSTALLATION_DIR /opt/IBM

      • For sh, ksh or bash:

        export IHS_INSTALLATION_DIR=/opt/IBM

    4. Run the script ihsinstall.sh script to install IBM HTTP Server.
    5. Check your directory structure after installation. You should be able to see a structure similar to the following. In this example, the installation directory is /opt/IBM/HTTPServer:
      drwxr-xr-x 3 root root 4096 Dec  1 00:15 bin/
      drwxr-xr-x 2 root root 4096 Nov 29 10:22 build/
      drwxr-xr-x 2 root root 4096 Nov 10 21:28 cgi-bin/
      drwxr-xr-x 2 root root 4096 Nov 29 10:22 codeset/
      drwxr-xr-x 2 root root 4096 Dec  2 03:31 conf/
      drwxr-xr-x 3 root root 4096 Nov 29 10:22 error/
      drwxr-xr-x 2 root root 4096 Nov 29 10:22 example_module/
      drwxr-xr-x 4 root root 4096 Nov 29 10:22 gsk8/
      drwxr-xr-x 3 root root 4096 Nov 29 10:22 htdocs/
      drwxr-xr-x 3 root root 4096 Nov 29 10:22 icons/
      drwxr-xr-x 2 root root 4096 Nov 29 10:22 include/
      drwxr-xr-x 4 root root 4096 Nov 29 10:22 java/
      drwxr-xr-x 2 root root 4096 Nov 29 10:22 lafiles/
      drwxr-xr-x 2 root root 4096 Nov 29 10:22 lib/
      drwxr-xr-x 2 root root 4096 Dec  2 03:56 logs/
      drwxr-xr-x 4 root root 4096 Nov 10 21:28 man/
      drwxr-xr-x 4 root root 4096 Nov 29 10:22 modules/
      drwxr-xr-x 9 root root 4096 Nov 10 21:28 properties/
      drwxr-xr-x 2 root root 4096 Nov 29 10:22 readme/
      drwxr-xr-x 2 root root 4096 Nov 29 10:22 uninstall/
      drwxr-xr-x 2 root root 4096 Nov 29 10:22 util/
      -rwxr-xr-x 1 root root   24 Nov 10 21:28 version.signature*
  2. Configure IBM HTTP Server to connect to IBM Spectrum LSF Application Center
    1. On the IBM HTTP Server host under the IBM HTTP Server installation directory, modify the file conf/plugin-cfg.xml to enable IBM HTTP Server to connect to IBM Spectrum LSF Application Center.
      • In <VirtualHostGroup Name=”default_host”>, check that <VirtualHost Name=”8080”> is the connection port used by IBM Spectrum LSF Application Center.

        For example:

        <VirtualHostGroup Name="default_host">
             <VirtualHost Name="*:80"/>
             <VirtualHost Name="*:443"/>
             <VirtualHost Name="*:18080"/>
             <VirtualHost Name="*:18443"/>
             <VirtualHost Name="*:8080"/>
        </VirtualHostGroup>
      • Under <Server>, <Transport …>, check the HostName and Port attributes to make sure the correct IBM Spectrum LSF Application Center web server host IP address and connection port are specified. The port number must match the port number specified in <Virtual Host Name=”…>

        For example:

        <Server CloneID="hostA" ConnectTimeout="0" ExtendedHandshake="false" 
        MaxConnections="-1" Name="default_node_platform1" ServerIOTimeout="900" 
        WaitForContinue="false">
             <Transport Hostname="hostA" Port="8080" Protocol="http"/>
        </Server>
        <PrimaryServers>
             <Server Name="default_node_platform1"/>
        </PrimaryServers>
  3. Change the IBM HTTP Server default port Optional. Only perform this step if you do not want to use the default port of 80 for IBM HTTP Server.
    1. On the IBM HTTP Server host, open the file /opt/IBM/HTTPServer/conf/httpd.conf.
    2. Modify the following parameters to the port number you want to change the default port to. Both parameters should have the same port number. For example, change the following:
      Listen 80

      to port 8888:

      Listen 8888

Install and configure the CA SiteMinder Web Agent

Procedure

  1. Install the CA SiteMinder Web Agent Install the CA SiteMinder Web Agent on the same host as IBM HTTP Server is installed according to the instructions in the CA SiteMinder Web Agent Installation Guide for Apache-based Servers at: http://support.ca.com/cadocs/0/CA%20SiteMinder%20r12%205-ENU/Bookshelf_Files/PDF/siteminder_wa_install_apache_enu.pdf
  2. Configure CA SiteMinder Web Agent to connect to the IBM HTTP Server
    1. Run the configuration bin file to configure the CA SiteMinder Web Agent in interactive mode. For example:
      $ cd /opt/netegrity/webagent/install_config_info
      $ ./nete-wa-config.bin -i console
    2. Configure the Web Agent according to the bolded values in this example. In the sections where you have created a domain, realm, host configuration object, etc, with different names, replace with your own names.
      ====================================================
      Host Registration
      -----------------
      
      Select '1' to register this Agent with the Policy Server.
      Select '2' to register later.
      Select '3' to enable Cryptographic Hardware configuration.
      
      Note:  You cannot select choice 1 and 2 at the same time.
      
          1- Yes, I would like to do Host Registration now.
          2- No, I would like to do Host Registration later.
          3- Enable PKCS11 DLL Cryptographic Hardware.
      
      ENTER A COMMA-SEPARATED LIST OF NUMBERS REPRESENTING THE DESIRED CHOICES, OR
         PRESS <ENTER> TO ACCEPT THE DEFAULT:1
      ========================================================================
      Admin Registration
      ------------------
      
      Enter the name of an administrator who has the right to register trusted hosts 
      with the Policy Server.
      This entry must match the name of an administrator defined in the Policy Server. 
      Admin User Name (DEFAULT: ):YourSiteMinderAdminName
      Enable Shared Secret Rollover (y/n) (DEFAULT: n):n
      ========================================================================
      Admin Registration
      ------------------
      *Enter the password of an administrator who has the right to register trusted
         hosts with the Policy Server. This entry must match the name of an
         administrator defined in the Policy Server.:*YourSiteMinderAdminPassword
      ===============================================================================
      Confirm Admin Password: YourSiteMinderAdminPassword
      ===============================================================================
      Trusted Host Name and Configuration Object
      ------------------------------------------
      
      Specify the name of the host you want to register with the Policy Server.
      Enter the name of the host configuration object.  The name must match a host 
      configuration object name already defined on the Policy Server.
      
      Trusted Host Name (DEFAULT: ):Yourhostname
      Host Configuration Object (DEFAULT: ):pac_hostconf
      ===============================================================================
      Policy Server IP Address
      ------------------------
      Enter the IP Address of the Policy Server where you are registering this host.
        Multiple IP addresses must separate by comma.  The IP address should be in the 
      form <server_address:port>, where the port represents a Policy Server behind 
      the firewall.
      For example:
      111.12.12.2:1234 or myserver:1234
      NOTE:  Include the port number in the IP address only if your Policy Server is 
      behind a firewall.
      Policy Server IP Address (DEFAULT: ): 9.21.62.29
      ===============================================================================
      Host Configuration file location
      --------------------------------
      Enter a file name and location to store Host Configuration information or accept 
      the default location /opt/netegrity/webagent/config and filename SmHost.conf.
      
      Enter file name (DEFAULT: SmHost.conf):
      Enter location (DEFAULT: /opt/netegrity/webagent/config):
      =========================================================================
      Select Web Server(s)
      --------------------
      Select which Web Server(s) you want to configure as a Web Agent.
      You will have to enter a path for each selected web server.
      Note:   If you have an Apache-based Web server, please select the Apache Web 
      Server option.
      
          1- Apache Web Server
          2- Domino Web Server
          3- iPlanet or Sun ONE Web Server
      
      ENTER A COMMA-SEPARATED LIST OF NUMBERS REPRESENTING THE DESIRED CHOICES, OR
         PRESS <ENTER> TO ACCEPT THE DEFAULT:1
      ===============================================================================
      Apache Web Server path
      ----------------------
      
      Enter the root path of where Apache Web server installed.
      Please enter path (DEFAULT: ): /opt/IBM/HTTPServer
      ===============================================================================
      Apache Web Server Failure
      -------------------------
      Unable to find a version of Apache webserver: /opt/IBM/HTTPServer.
      Note:  If you have any other Apache Web servers that may not be detected by the
      Wizard, please select choice "2".
      
          1- I would like to re-enter the Apache Server Root.
          2- I would like to enter a specific configuration path.
          3- I don't have an Apache Web server.
      
      ENTER THE NUMBER OF THE DESIRED CHOICE, OR PRESS <ENTER> TO ACCEPT THE
         DEFAULT:2
      ===============================================================================
      Apache Web Server path
      ----------------------
      
      Please enter the configuration path for Apache Web server.
      Please enter path (DEFAULT: ): /opt/IBM/HTTPServer/conf
      
      ===============================================================================
      Apache Version
      --------------
      Please select a choice for the Apache version.
          1- Apache version 1.x
          2- Apache version 2.x
      
      ENTER THE NUMBER FOR YOUR CHOICE, OR PRESS <ENTER> TO ACCEPT THE DEFAULT:2
         ===============================================================================
      Apache Server Type
      ------------------
      Please select one of the following appropriately match your previous selection
          1- Strong Hold
          2- Oracle 9.0.3 or 10g
          3- IBM HTTP Server
          4- Covalent Enterprise-Ready Apache or FastStart Server
          5- HP Apache
          6- HTTP Apache
      
      ENTER THE NUMBER FOR YOUR CHOICE, OR PRESS <ENTER> TO ACCEPT THE DEFAULT:3
         ===============================================================================
      Select Web Server(s)
      --------------------
      	    1- [x] IBM HTTP Server 2.0
      Select which web server(s) you wish to configure/reconfigure as Web
         Agent(s).Enter a comma-separated list of numbers representing the desired
         choices.:1
      ===============================================================================
      Agent Configuration Object
      --------------------------
      Enter the name of an Agent Configuration Object that defines the configuration 
      parameters which the Web Agent will use for IBM HTTP Server 2.0.
      Agent Configuration Object (DEFAULT: AgentObj):pac_agentconf
      ===============================================================================
      SSL Authentication
      ------------------
      The following SSL configurations are available for this web server.  If the Web 
      Agent will be providing advanced authentication, select which configuration it 
      will use to configure IBM HTTP Server 2.0.
          1- HTTP Basic over SSL
          2- X509 Client Certificate
          3- X509 Client Certificate and HTTP Basic
          4- X509 Client Certificate or HTTP Basic
          5- X509 Client Certificate or Form
          6- X509 Client Certificate and Form
          7- No advanced authentication
      
      ENTER THE NUMBER FOR YOUR CHOICE, OR PRESS <ENTER> TO ACCEPT THE DEFAULT:
         :7
      ===============================================================================
      Self Registration
      -----------------
      If this Web Agent is providing Self Registration for DMS2, select 'Yes'.  
      Otherwise, select 'No'.
          1- Yes, I would like to configure Self Registration
          2- No, I don't want to configure Self Registration
      ENTER THE NUMBER FOR YOUR CHOICE, OR PRESS <ENTER> TO ACCEPT THE DEFAULT:
         :2
      Please enter a choice.
        ->1- Continue
          2- Previous
          3- Cancel
      
      ENTER THE NUMBER OF THE DESIRED CHOICE, OR PRESS <ENTER> TO ACCEPT THE
         DEFAULT:1
      ==========================================================================
      Installing.
      
       [==========|============|==========|===========]
       [------------------|------------------|------------------|------------------]
      
      ===============================================================================
      Configuration Complete
      ----------------------
      Congratulations! CA SiteMinder Web Agent v6QMR5 has been successfully
      configured.
  3. Configure IBM HTTP Server to connect to CA SiteMinder Web Agent
    1. Enable CA SiteMinder Web Agent in IBM HTTP Server. Edit the file /opt/IBM/HTTPServer/conf/WebAgent.conf, and set the EnableWebAgent parameter value to YES.

      EnableWebAgent="YES"

    2. Edit the file opt/IBM/HTTPServer/conf/httpd.conf, and modify the following line under Dynamic Shared Object(DSO) Support: Change from:
      LoadModule sm_module /opt/netegrity/webagent/bin/libmod_sm20.so

      To:

      LoadModule sm_module /opt/netegrity/webagent/bin/libmod_sm22.so
    3. Edit the opt/IBM/HTTPServer/bin/apachectl file to source the CA SiteMinder Web Agent environment. Add the line which sources the web agent environment as the first uncommented line in the file. For example, if you installed the CA SiteMinder Web Agent in /opt/netegrity/webagent, add the following line in the file:

      . /opt/netegrity/webagent/nete_wa_env.sh

    4. Restart the IBM HTTP Server. For example:

      $ cd /opt/IBM/HTTPServer/bin

      $ ./apachectl stop

      Wait several seconds, then run the start command:

      $ ./apachectl start

    5. Restart IBM Spectrum LSF Application Center, then connect to Platform Application Center with a browser by using the IBM HTTP Server URL. The format is: http:// IBM_httpserver_host_name/platform

Configure HTTPS for IBM HTTP Server and IBM Spectrum LSF Application Center

The instructions provided use /opt/IBM/HTTPServer as the installation location for IBM HTTP Server. Replace with your actual installation directory.

Before you begin

Before enabling HTTPS, make sure users can connect to Platform Application Center by using the IBM HTTP Server URL and authenticating through CA SiteMinder.

Procedure

  1. Enable HTTPS in IBM Spectrum LSF Application Center hosts
    1. Log on to IBM Spectrum LSF Application Center web server as root.
    2. Source the IBM Spectrum LSF Application Center Environment /opt/pac/profile.platform
    3. Use the pmcadmin command to enable HTTPS.

      $ pmcadmin https enable –-password changeit

    4. Add CMS providers to the java.security file.
      1. Open the Java security file:

        /opt/pac/jre/linux-x86_64/lib/security/java.security of the IBM JRE.

      2. Add security.provider.8, security.provider.9, security.provider.10 as follows:
        security.provider.1=com.ibm.jsse2.IBMJSSEProvider2
        security.provider.2=com.ibm.crypto.provider.IBMJCE
        security.provider.3=com.ibm.security.jgss.IBMJGSSProvider
        security.provider.4=com.ibm.security.cert.IBMCertPath
        security.provider.5=com.ibm.security.sasl.IBMSASL
        security.provider.6=com.ibm.xml.crypto.IBMXMLCryptoProvider
        security.provider.7=com.ibm.xml.enc.IBMXMLEncProvider
        security.provider.8=org.apache.harmony.security.provider.PolicyProvider
        security.provider.9=com.ibm.security.jgss.mech.spnego.IBMSPNEGO
        security.provider.10=com.ibm.security.cmskeystore.CMSProvider
    5. Copy the IBM Spectrum LSF Application Center generated keystore file to shared location which will need to be imported to IBM HTTP Server Keystore.

      cp $GUI_CONFDIR/security/key.jks /share/key.jks

  2. Create the CMS keystore and stash file in IBM HTTP Server

    The parameters for the command are:

    -pw password

    -db kdb_file_path

    -stash to create the sth file

    For example:

    $ cd /opt/IBM/HTTPServer/bin
    $ ./gskcapicmd -keydb -create -db /share/key.kdb -pw changeit -stash
    $ ls -al /share/key.*
    -rw------- 1 root root  88 Nov 27 07:59 key.crl
    -rw------- 1 root root  88 Nov 27 07:59 key.kdb
    -rw------- 1 root root  88 Nov 27 07:59 key.rdb
    -rw------- 1 root root 129 Nov 27 07:59 key.sth
  3. Import the IBM Spectrum LSF Application Center Certificate into CMS Keystore
    1. Login to IBM HTTP Server host as root
    2. Import the IBM Spectrum LSF Application Center certificate into the IBM HTTP Server keystore.

      The parameters for the command are:

      -db Platform Application Center keystore file

      -pw Platform Application Center keystore password

      -target IBM HTTP Server keystore kdb file

      -target_pw IBM HTTP Server keystore kdb password

      For example:

      $ cd /opt/IBM/HTTPServer/bin

      $ ./gskcmd -cert -import -db /share/key.jks -pw changeit -target /share/key.kdb -target_pw changeit

    3. Set the IBM Spectrum LSF Application Center certificate as the default certificate for the IBM HTTP Server keystore.

      The parameters are:

      -setdefault is to set the certificate as the default

      -pw is the IBM Spectrum LSF Application Center keystore password

      -label is the certificate label

      For example:

      $ ./gskcmd -cert -setdefault -db /share/key.kdb -label "default" -pw changeit

  4. Enable HTTPS in IBM HTTP Server
    1. Login to IBM HTTP Server host as root
    2. Edit the /opt/IBM/HTTPServer/conf/httpd.conf file and uncomment the following lines to enable SSL:
      LoadModule ibm_ssl_module modules/mod_ibm_ssl.so
      Listen 443
      <VirtualHost *:443>
      SSLEnable
      </VirtualHost>
      KeyFile /share/key.kdb
      SSLDisable
      # End of example SSL configuration

      In the lines that you uncommented, check the following:

      • Check that KeyFile points to the location of the CMS Keystore kdb file.
      • If you do not use 443 as the HTTPS port, change 443 to your port number.
    3. Edit the file /opt/IBM/HTTPServer/conf/plugin-cfg.xml
      <Transport Hostname="hostA" Port="8443" Protocol="https">
          <Property Name="keyring" Value="/share/key.kdb" />
          <Property Name="stashfile" Value="/share/key.sth" />
      </Transport>
      In <Transport…>:
      • Check that Hostname is the Platform Application Center host name or IP address
      • Port is the Platform Application Center HTTPS port. By default it is 8443.
      • Make sure Protocol=”https”
      • In Property Name=”keyring”, make sure it is the correct path to CMS keystore file.
      • In Property Name=”stashfile”, make sure it is the correct path to the stash file you created in previous steps
  5. Configure IBM Spectrum LSF Application Center to use the same KeyStore as IBM HTTP Server
    1. Log on to the IBM Spectrum LSF Application Center web server as root.
    2. Open the file $GUI_CONFDIR/server_https.xml and edit <keystore…> to indicate the location of your keystore file.

      IBM HTTP Server and IBM Spectrum LSF Application Center use the same CMS keystore:

      keyStore id="defaultKeyStore" location="/share/key.kdb" type="CMSKS" provider="IBMCMSProvider" password="changeit" />

  6. Restart IBM Spectrum LSF Application Center
    1. Log on to IBM Spectrum LSF Application Center web server as root.
    2. Source the Platform Applicatin Center Environment

      . /opt/pac/profile.platform

    3. Stop and Start service

      $ pmcadmin stop

      $ pmcadmin start

  7. Restart the IBM HTTP Server
    1. Login to IBM HTTP Server host

      $ cd /opt/IBM/HTTPServer/bin

      $ ./apachectl stop

    2. Wait several seconds, then run the start command:

      $ ./apachectl start

  8. Connect using IBM HTTP Server URL: https://ibm_http_server_host/platform

Configure the HTTP header variable

Procedure

  1. Set the parameter PrincipalRequestHeader in $GUI_CONFDIR/pmc.conf to the same user variable that CA SiteMinder uses to set the user name in the HTTP header.

    The default value is REMOTE_USER.

  2. Restart IBM Spectrum LSF Application Center for changes to take effect.

Configure Platform Analytics to work with IBM HTTP Server and IBM Spectrum LSF Application Center

You need to enable two trusted hosts in Platform Analytics. The IBM HTTP Server host and the IBM Spectrum LSF Application Center web server host.

Procedure

  1. Log in to the Platform Analytics Reporting Server as the Tableau administrator.
  2. Go into the bin directory.

    $ cd C:\Program Files (x86)\Tableau\Tableau Server\tableau_version\bin

  3. Run the following commands on the command line replacing PAC_SERVER_IP with the IP address of your IBM Spectrum LSF Application Center web server and IBM_HTTPServer_IP with the IP address of your IBM HTTP Server.

    If IBM Spectrum LSF Application Center and IBM HTTP Server are installed on the same host, specify only one IP address in this command.

    > tabadmin set wgserver.trusted_hosts "PAC_SERVER_IP, IBM_HTTPServer_IP"
    > tabadmin set wgserver.unrestricted_ticket true
    > tabadmin dbpass <changeit>
    > tabadmin config
    > tabadmin restart
  4. Edit the c:\IBM\Platform Analytics\report\conf\rptbuilder.conf Platform Analytics Report Builder configuration file and change the value of the PACServerUrl parameter to http://IBM_HTTP_SERVER _IP_address:80/platform
  5. Start the Platform Analytics Report Builder.

    > C:\IBM\Platform Analytics\report\bin\perfadmin start parb

  6. Verify that the Platform Analytics Report Builder service started.

    > C:\IBM\Platform Analytics\report\bin\perfadmin list