Getting Started with Java Integration Stage API Samples
This document describes end-to-end scenarios using Java Integration stage with sample jobs and Java code
on IBM® Information Server® DataStage®.
The Java Integration stage API Samples consists of the following directory layout:
  samples
   +--- LICENSE, build.xml, Sample.dsx
   +--- lib  // contains Java Integration stage API jar
   +--- docs // contains documentation - SampleGettingStarted.html
   |      |
   |      +--- images  // images for html documentation
   |
   +--- javadoc // sample code javadoc (will be created when building samples)
   +--- src  // contains sample Java code
   +--- data // contains input data file used in sample jobs
Preparing Java Sample Code
Before you begin
Prepare the environment with following installation:
Apache Ant 1.6.5 or higher with Java 6 JDK
If you are compiling Java sample code on domain tier, Java 6 JDK is installed with IBM® WebSphere® Application Server:
e.g. /opt/IBM/WebSphere/AppServer/java
Copy JavaIntegration_Samples.zip from <ISDIR>/Clients/Samples/Connectors/ directory
Unzip JavaIntegration_Samples.zip
Compile Java sample code and create jar file to deploy
Change directory to unzipped samples directory
Execute ant clean build
Samples.jar will be created in samples/jars directory.
Deploying Java Sample Code
Copy samples/jars/Samples.jar to somewhere on engine tier.
Copying input data files used in the sample jobs
Copy samples/data directory to somewhere on engine tier.
Importing Java Integration Stage Samples
Copy samples/Sample.dsx to client tier.
From client tier, launch DataStage Designer.
Import job from designer.
Designer menu -> Import -> DataStage Components
Select copied Sample.dsx and import jobs.
You should see 6 jobs and 1 parameter set in repository.
You cannot import the Sample.dsx file from a non-English client tier as it is.
To import the Sample.dsx file from a non-English client tier,
you need to copy the file, open it in a text editor and edit it.
For example, to import the Sample.dsx file on Japanese Windows machine,
you need to use the following steps:
Copy the Sample.dsx file and open the file in a text editor.
In the CharacterSet="CP1252" line, set your client code page as "CP932". (Note: Japanese client code page is CP932.)
JavaPackTransformer is a sample job for JavaPack compatibility.
It reads a row having empno(Integer), firstname(VarChar), lastname(VarChar), hireDate(Date),
edLevel(SmallInt), salary(Double), bonus(Double) and lastUpdate(Time) columns, converts the
firstname and lastname value to uppercase.
If firstname column of the input row contains the character '*', the row is rejected.
Transformer is a sample job for column-based transformer stage.
It reads a row having empno(Integer), firstname(VarChar), lastname(VarChar), hireDate(Date),
edLevel(SmallInt), salary(Double), bonus(Double) and lastUpdate(Time) columns, converts the firstname
and lastname value to uppercase.
If firstname column of the input row contains the character '*', the row is rejected.
In rejected records,"ERRORTEXT" and "ERRORCODE" fields are added to show the rejected reason.
JavaBeansTransformer is a sample job for bean-based transformer stage.
It reads a row having empno(Integer), firstname(VarChar), lastname(VarChar), hireDate(Date),
edLevel(SmallInt), salary(Double), bonus(Double) and lastUpdate(Time) columns, converts the firstname
and lastname value to uppercase.
If firstname column of the input row contains the character '*', the row is rejected.
In rejected records,"ERRORTEXT" and "ERRORCODE" fields are added to show the rejected reason.
IntValueGenerator is a sample job for column-based source stage.
The job has 1 Integer column.
It writes rows to an output link. The number of rows to generate is specified as the user's custom stage property "NumOfRecords" value in the Java Integration stage and is fetched using the Configuration.getUserProperties() method.
Default value is 10.
End-of-wave marker is written based on the user's custom output link property "WaveCount".
Based on the specified value, end-of-wave marker is written after specified number
of records.
Default value is 5.
Generated value for Integer columns are the incremented integer value starts from 0.
If the job is running on multi-node environment, generation is distributed across
player nodes in round-robin method.
For example, if job is running on 3 nodes and "NumOfRecords" is set to 10, records
are generated as follows:
RCP is a sample job for column-based transformer stage using Runtime Column Propagation (RCP).
It reads a row having empno(Integer), firstname(VarChar), lastname(VarChar), hireDate(Date), edLevel(SmallInt),
salary(Double), bonus(Double) and lastUpdate(Time[microseconds])columns, converts the firstname and lastname
value to uppercase.
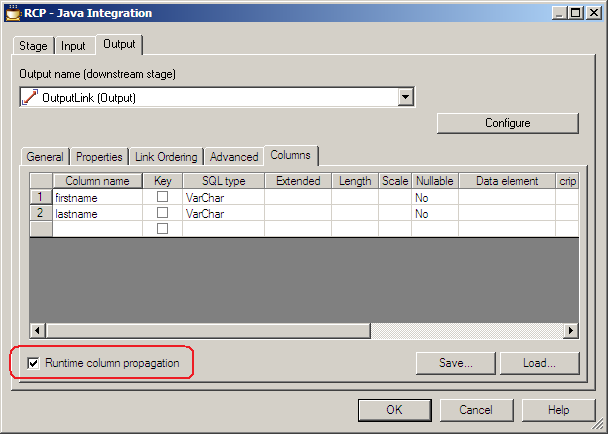
There is only "firstname" and "lastname" column defined in the output link (Runtime column propagation check box is checked).
If RCP is on, all columns in input link will be propagated to output link. Columns other than "firstname" and "lastname" is sent to output link without any changes.
If RCP is off, only "firstname" and "lastname" will be sent to output link.
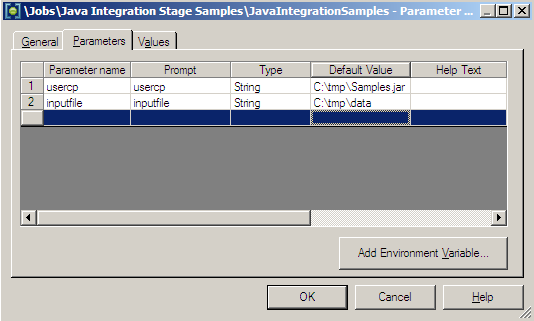
usercp is the parameter used in the Classpath property of the Java Integration stage.
inputfile is the parameter used in the File property of the Sequential File Stage.
Change parameter set values to appropriate value where you have placed Sample.jar and sample/data directory on engine tier.
Validating Modified Parameter Set Values
In order to check the validness of the parameter values, you can verify from the imported job.
Here is the example:
Open JavaPackTransformer job by double-clicking the job in the repository.
Double click on Sequential Stage icon which name is emplyee.
The File property value is the inputfile parameter defefined in the JavaIntegrationSamples parameter set configured in previous step.
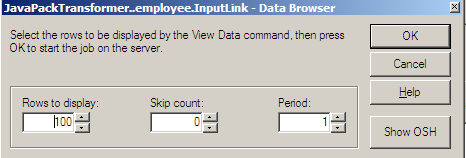
In order to check if the parameter value is a valid file path, click on View Data... button and check the contents of the input data file.
Resolve Job Parameter dialog will be launched, and shows the default value for inputfile parameter defined in JavaIntegrationSamples Parameter Set.
If the default value does not need to be changed, click on "OK". If not, change the value and click on "OK".
Click on "OK" button for Data Browser dialog.
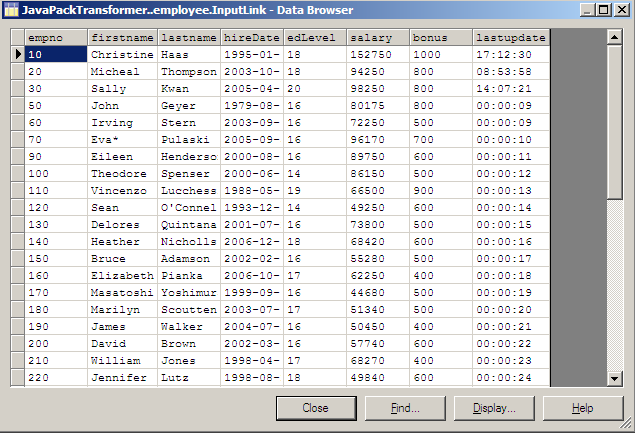
You should see the contents of the input data file (data/employee.txt) if the file path is configured correctly.
Double click on Java Integration stage icon which name is JavaPackTransformer.
Java Integration stage has following parameter defined:
The Classpath property value is the usercp parameter defefined in the JavaIntegrationSamples parameter set configured in previous step.
In order to check if the parameter value is a valid classpath, click on Select helper button to list the user class included in the jar file specified in the Classpath property.
Resolve Job Parameter dialog will be launched, and shows the default value for usercp parameter defined in JavaIntegrationSamples Parameter Set.
If the default value does not need to be changed, click on "OK". If not, change the value and click on "OK".
You should see the list of the user class included in the jar file, if the classpath value is configured correctly.
Select JavaPackTransformer(it should be selected by default) and click on "OK", or "Cancel".
JavaPackTransformer is a sample testcase to test JavaPack compatibility.
The job has 1 input link and 2 output link (including 1 reject link).
It reads a row having empno(Integer), firstname(VarChar), lastname(VarChar), hireDate(Date),
edLevel(SmallInt), salary(Double), bonus(Double) and lastUpdate(Time) columns, converts the
firstname and lastname value to uppercase.
If firstname column of the input row contains the character '*', the row is rejected.
Input data file (data/employee.txt) is read by Sequential File Stage and sent to input link of the JavaIntegration.
Java Integration stage transforms the input data and sends the data to output link and reject link.
Parameter set should be configured successfully in previous step, so there is no additional steps required for this job.
You can compile and execute the job.
Job should be executed successfully without any warning messages.
Transformer is a sample job for column-based transformer stage.
The job has 1 input link, 1 output link and 1 reject link.
It reads a row having empno(Integer), firstname(VarChar), lastname(VarChar), hireDate(Date),
edLevel(SmallInt), salary(Double), bonus(Double) and lastUpdate(Time) columns, converts the firstname
and lastname value to uppercase.
If firstname column of the input row contains the character '*', the row is rejected.
In rejected records,"ERRORTEXT" and "ERRORCODE" fields are added to show the rejected reason.
Input data file (data/employee.txt) is read by Sequential File Stage and sent to input link of the JavaIntegration.
Java Integration stage transforms the input data and sends the data to output link and reject link.
Parameter set should be configured successfully in previous step, so there is no additional steps required for this job.
You can compile and execute the job.
Job should be executed successfully without any warning messages.
JavaBeansTransformer is a sample job for bean-based transformer stage.
The job has 1 input link, 1 output link and 1 reject link.
It reads a row having empno(Integer), firstname(VarChar), lastname(VarChar), hireDate(Date),
edLevel(SmallInt), salary(Double), bonus(Double) and lastUpdate(Time) columns, converts the firstname
and lastname value to uppercase.
If firstname column of the input row contains the character '*', the row is rejected.
In rejected records,"ERRORTEXT" and "ERRORCODE" fields are added to show the rejected reason.
Additional configurations are required if the Java code uses Java Bean to store the record.
You will need to specify the mapping JavaBeans property name and DataStage Column name.
Click on Configure button on stage editor.
Resolve Job Parameter dialog will be launched, and shows the default value for usercp parameter defined in JavaIntegrationSamples Parameter Set.
If the default value does not need to be changed, click on "OK". If not, change the value and click on "OK".
Column Mapping Editor will be displayed to user since Transformer code uses Java Bean
(InputBean and OutputBean) to store the record data.
Click on Browse Objects button on Column Mapping Editor.
Import Java Beans Properties dialog will be lauched.
Select all the objects in the beans and click "OK".
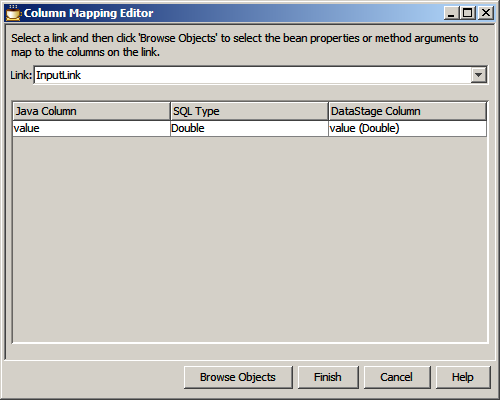
You can see the column mapping is defined.
By clicking Link combo box, you can swich input link and output link column mapping panel.
Click "Finish" button on Column Mapping Editor.
Select the Input tab and select "InputLink(employee)" from the Input name(upstream stage) drop down list. Verify that the Column Mapping and JavaBeans class properties are now defined.
You are now ready to compile and execute the job.
Job should be executed successfully without any warning messages.
IntValueGenerator is a sample job for column-based source stage.
The job has 1 output link, and 1 Integer column defined in output link. It writes rows to an output link.
The number of rows to generate is specified as the user's custom stage property "NumOfRecords" value in the Java Integration stage and is fetched using the
Configuration.getUserProperties() method.
Default value is 10.
End-of-wave marker is written based on the user's custom output link property "WaveCount".
Based on the specified value, end-of-wave marker is written after specified number
of records.
Default value is 5.
Generated values for Integer columns are the incremented integer values starts from 0.
If the job is running on multi-node environment, generation is distributed across
player nodes in round-robin method.
For example, if job is running on 3 nodes and "NumOfRecords" is set to 10, records
are generated as follows:
node 0 - 0, 3, 6, 9
node 1 - 1, 4, 7
node 2 - 2, 5, 8
Additional configurations are required since this job requires Custom properties.
Click on Configure button on stage editor.
Custom Property Editor will be displayed to user since "IntValueGenerator.java" code uses custom properties.
NumOfRecords: (Stage property) Total number of records to be generated.
WaveCount: (Output Link property) Number of records to be processed before writing end-of-wave marker.
Click on Property value field of Number of Records property.
Change the value to the number of records you want to generate, for example, 20.
Change to the output link property by selecting "OutputLink(Link)" from Scope combo box.
Click on Property value field of Wave Count property.
Change the value to the number of records you want to process before writing end-of-wave marker, for example, 10.
Click "Finish".
You will see NumOfRecords property in the Custom property field for Stage.
You will see WaveCount property in the Custom property field for Output Link.
You are now ready to compile and execute the job.
Job should be executed successfully without any warning messages.
RCP is a sample job for column-based transformer stage using Runtime Column Propagation (RCP).
It reads a row having empno(Integer), firstname(VarChar), lastname(VarChar), hireDate(Date), edLevel(SmallInt),
salary(Double), bonus(Double) and lastUpdate(Time[microseconds])columns, converts the firstname and lastname
value to uppercase.
There are only "firstname" and "lastname" columns defined in the output link (Runtime column propagation check box is checked).
If RCP is on, all columns in input link will be propagated to output link. Columns other than "firstname" and and "lastname" is sent to output link without any changes.
If RCP is off, only "firstname" and "lastname" will be sent to output link.
Parameter set should be configured successfully in previous step, so there is no additional steps required for this job.
You can compile and execute the job.
Job should be executed successfully without any warning messages.
Note:
If Runtime Column Propagation is disabled in your project, the Runtime column propagation check box is grayed out in RCP job.
It should be checked by default when importing this sample job.
If you want to enable Runtime column propagation check box, you can enable this function from Data Stage Administrator as follows:
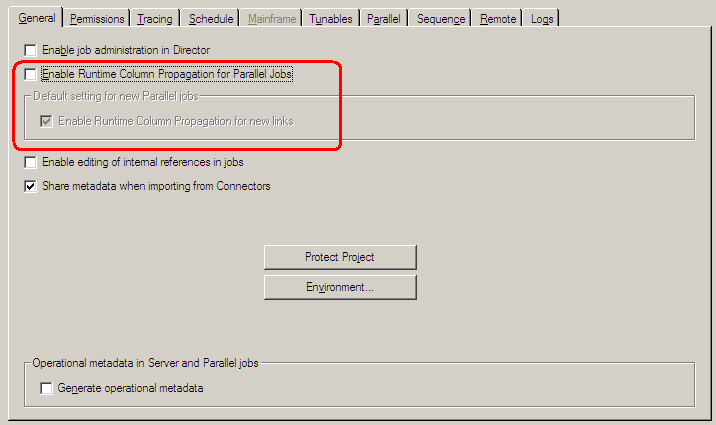
Launch DataStage Administrator and login to your server. Click "Properties" button. Enable Runtime Column Propagation on Prallel Jobs check box is unchecked by default.
Check on Enable Runtime Column Propagation on Prallel Jobs check box.
You can change default setting for new parallel jobs by the Enable Runtime Column Propagation for new links check box.
UserDefinedFunction is a sample job to invoke User-Defined Function (UDF).
The job has 2 input links and 1 output link.
UDF has double and input bean arguments to return output bean.
Additional configurations are required since User-Defined Function code uses Java Bean to store the record.
You will need to specify the mapping JavaBeans property name and DataStage Column name.
Click on Configure button on stage editor.
Column Mapping Editor will be displayed to user since UserDefinedFunction code uses Java Bean
(InputBean and UDFOutputBean) to store the record data.
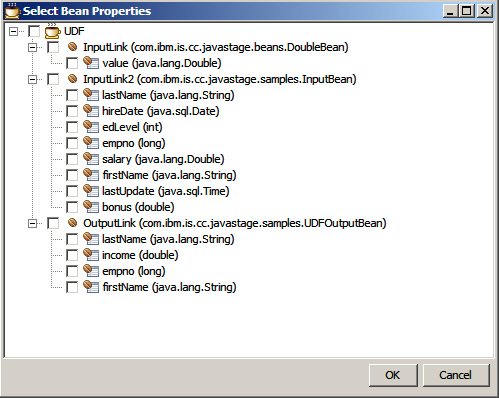
Click on Browse Objects button on Column Mapping Editor.
Import Java Beans Properties dialog will be lauched.
Select all the objects in the beans and click "OK".
You can see the column mapping is defined.
By clicking Link combo box, you can swich InputLink, InputLink2 and OutputLink column mapping panel.
Click "Finish" button on Column Mapping Editor.
You can verify that the Column Mapping and JavaBeans class properties are now defined.
OutputLink example:
You are now ready to compile and execute the job.
Job should be executed successfully without any warning messages.