

Before using this information and the product it supports, read the information in Appendix B. Notices.
This edition applies to Version 13.0 of IBM® Host On-Demand (IBM Host Access Client Package for Multiplatforms V7.0, program number 5724-I20) and to all subsequent releases and modifications until otherwise indicated in new editions.
Copyright International Business Machiens Corporation 2004, 2016.
The Macro Programming Guide guide helps you write better Host On-Demand macros. This book is written for Host On-Demand macro developers and ordinary users. There are three parts.
Macro basics describes basic concepts, introduces the tools, and gives a step-by-step description of how to record and play back a simple macro.
Developing macros describes in detail the capabilities of the Host On-Demand macro system.
The macro language describes the XML macro language.
The Macro Programming Guide is at the Host On-Demand online Knowledge Center at http://www-01.ibm.com/support/knowledgecenter/SSS9FA_13.0.0/com.ibm.hod.doc/doc/macro/macro.html.
The MySupport feature enables you to personalize your support view and register to receive weekly e-mail notifications alerting you to new patches, downloads, and other timely technical support information for IBM products. To register for MySupport, follow the instructions in the Technote found at the following URL:http://www.ibm.com/support/docview.wss?uid=swg21168680.
In addition to the Macro Proramming Guide, Host On-Demand also provides other sources of information to help you use the product. To access the documentation described here, go to the Host On-Demand library page at http://www.ibm.com/software/webservers/hostondemand/library.html. Most of the documentation is also included on the Host On-Demand product or Toolkit CD-ROMs.
The following typographic conventions are used in the Macro Programming Guide:
| Convention | Meaning |
|---|---|
| Monospace | Indicates text you must enter at a command prompt and values you must use literally, such as commands, functions, and resource definition attributes and their values. Monospace also indicates screen text and code examples. |
| Italics | Indicates variable values you must provide (for example, you supply the name of a file for file_name). Italics also indicates emphasis and the titles of books. |
| Return | Refers to the key labeled with the word Return, the word Enter, or the left arrow. |
| > | When used to describe a menu, shows a series of menu selections. For example, "Click File > New" means "From the File menu, click the New command." |
When used to describe a tree view,
shows a series of folder or object expansions. For example, "Expand
HODConfig Servlet > Sysplexes > Plex1 > J2EE Servers > BBOARS2"
means:
|
|
| Java |
In this book, Java means implemented in a 1.6 and later JVM. |
|
|
This graphic is used to highlight notes to the reader. |
|
|
This graphic is used to highlight tips for the reader. |
A Host On-Demand macro is a XML script that allows a Host On-Demand client to interact automatically with a host application running on a terminal emulator session (a 3270 Display session, a 5250 Display session, a VT Display session, or a CICS Gateway session). A Host On-Demand macro is usually written to perform a specific task or set of tasks involving a single host application.
Compared to a human operator, a macro interacts with a host application more quickly and with a smaller risk of error. A macro does not require that the person who runs it be trained in operating the host application. A macro can in many instances run unattended. A macro can be used again and again. A macro can be copied and distributed to multiple users. And most importantly, a macro can serve as a part of a broader solution to a customer requirement that involves both host applications and workstation applications.
An unsophisticated user can create a basic macro for automating a tedious or time-consuming interaction with a host application. The user navigates the host application to the screen at which he or she wishes to start, selects the Record Macro icon, and performs a task using the host application. For each application screen that the user visits, Host On-Demand records an impression of the application screen and the user's input to the application screen. When the user plays back the recorded macro starting at the same application screen as before, Host On-Demand recognizes each host application screen based on the previously recorded impression and repeats the actions that the human operator previously performed.
A more sophisticated user can add to or improve a recorded macro using the Host Access Macro Editor (Macro Editor). This tool, which is available by clicking an icon on the session panel, provides a graphical user interface (consisting of input fields, text boxes, checkboxes, and so on) with which a user can modify or add features to each screen interaction with the host application. Besides allowing a user to edit and enhance the macro's screen recognition behavior and user input, the Macro Editor provides features that allow a user to add more intelligent behavior to the macro, such as choosing between alternate paths through an application, skipping a screen that should not be processed, or backing up to a previous screen. And there are more powerful capabilities including the ability to read and process data from the session screen, to notify the operator of status, to prompt the operator for an important decision, to download or upload files from the host, and to automate the printing of application screens.
The Macro Editor also provides programming features. A user with programming experience can add functionality to a Host On-Demand macro by creating and manipulating variables, using arithmetic and logical expressions, writing if-then-else conditions, chaining to another macro, calling Java methods stored in external Java libraries, launching native applications, and writing trace information.
The Code Editor, a text editor that is launched from the Macro Editor, allows the user to view and modify the XML elements that make up the macro script, and also to cut and paste text through the system clipboard.
This book contains macro code samples throughout. The chapter Sample macro code contains an example of a macro that reads entries from a sample CICS database and writes them into a Microsoft Excel spreadsheet.
The Host On-Demand Deployment Wizard includes settings that enable system administrators to deploy macros to users in server libraries located at Web locations or on LAN or DVD-ROM drives.
For more information see "Creating and deploying server macro libraries" in the document Planning, Installing, and Configuring Host On-Demand.
A local user can save a macro in any location where they have write-access.
You can use Host On-Demand macros to integrate your Telnet-accessible applications with your workstation applications. Macros provide a path for data to flow into or out of your Telnet-accessible applications.
Host On-Demand includes two programming interfaces that allow you to drive macros:
This is a set of Java APIs that allows developers to integrate various pieces of the Host On-Demand client code, such as terminals, menus, and toolbars, into their own custom Java applications and applets.
For more information see the document Programmable Host On-Demand in the Host On-Demand documentation.
Session Manager APIs are JavaScript APIs for managing host sessions and text-based interactions with host sessions.
For more information see the document Session Manager API Reference in the Host On-Demand documentation.
The Host Access Toolkit is a separate product that provides programmatic control of the Host On-Demand client and other features, includes Java APIs for launching and interacting with Host On-Demand macros.
Because a macro is an easily transportable, unencrypted, text-based representation of interactions between a user and a host application, you should consider protecting your macros as valuable pieces of intellectual property.
In particular, you should consider not storing unencrypted passwords or other sensitive data in a macro script. Instead:
Although macros can be used with 3270 Display sessions, with 5250 Display sessions, with VT Display sessions, and with CICS Gateway sessions, this book focuses almost entirely on 3270 Display sessions and 3270 host applications.
This chapter describes the components that you will encounter as you use the macro capabilities of Host On-Demand. Here is an overview of the main components:
The remaining sections of this chapter describe these components in more detail. The final section of this chapter defines other macro terms that you might encounter in this book.
The Macro Manager is the umbrella term for all the macro user interfaces. There are three main interfaces: the Macro Manager toolbar, the Macro Editor, and the Code Editor.
The Macro Manager toolbar is a toolbar that contains icons for common macro operations. All of these icons can be used by macro developers, while at least one of the icons is also for users of macros (the Play macro icon). Figure 1 shows the Macro Manager toolbar. (For the purpose of illustration, this figure is inaccurate in one respect: it shows all the buttons on the toolbar enabled at the same time.)

To view the Macro Manager toolbar follow these steps:
Depending on your company's configuration of the display session, you might notice that a few of the icons on the Macro Manager toolbar also appear on the main toolbar. This placement is for extra convenience and should not cause you any concern. The icons work the same no matter which toolbar they appear on.
Here is a quick summary of the function of each part of the Macro Manager toolbar, from left to right. You will learn more about each of these functions later in the book.
To step through the process of recording and playing back a simple macro, see Recording and playing back a simple macro.
The Macro Editor (the full name is the Host Access Macro Editor) is a graphical user interface (with buttons, input fields, list boxes, and so on) for editing the parts of a macro. Figure 2 shows the Macro Editor.

You will probably use the Macro Editor for most of your macro development. It is more powerful (in terms of managing data more easily) than the Code Editor described in the next subsection, although it cannot do everything that the Code Editor can do.
To bring up the Macro Editor go to the Macro Manager toolbar.
Both the Macro Editor and the Code editor edit macros. Both tools read from and write to the same type of underlying macro source, an XML script. However, each tool is better for certain tasks.
The Macro Editor provides a graphical user interface that is powerful and user-friendly. It is the superior tool for creating and editing macros.
On the other hand, the Code Editor provides a text editor interface that allows you to edit directly the XML elements of which a macro is made. Figure 3 shows the Code Editor displaying a macro script.

You should use the Code Editor for more technical editing tasks, such as:
To bring up the Code Editor:
The macro runtime is the program module that plays back a macro when a user clicks the Play Macro icon. Specifically, the macro runtime reads the contents of the current macro script and generates the macro playback.
The Macro object is the Java instance that provides the capabilities underlying the Macro Manager Toolbar, the Macro Editor, the Code Editor, and the macro runtime.
The IBM Host Access Toolkit, a separately purchased product, provides programming access to the Macro object through the many methods in the Macro class. This book does not describe how to use IBM Host Access Toolkit.
Here are the definitions of a few other terms that you will encounter in this book.
| action | An action is an instruction that specifies some activity that the macro runtime is to perform when it plays back the macro (such as sending a sequence of keys to the session window, displaying a prompt in a popup window, capturing a block of text from the screen, and other actions). You can edit or create actions in the Macro Editor. You can view and modify individual action elements in the Code Editor. See Macro actions. |
| application screen | An application screen is a meaningful arrangement of characters displayed on the Host On-Demand session window by a host application. See Application screen. |
| descriptor | A descriptor is an instruction that describes one characteristic of an application screen. You can edit or create descriptors in the Macro Editor. You can view and modify individual descriptor elements in the Code Editor. See Introduction to the Description tab. |
| macro screen | A macro screen is a set of instructions that tells the macro runtime how to manage a particular visit to a particular application screen. See Macro screen. |
| macro script | A macro script is an XML script in which a macro is stored. You can edit a macro script directly using the Code Editor or indirectly using the Macro Editor. When you play a macro, the macro runtime executes the instructions in the script. See Macro script. |
| valid next screen | A valid next screen is a macro screen that, during macro playback, is a valid candidate to be the next macro screen to be processed. See Closer look at stage 1. |
The purpose of this chapter is to give you a hands-on introduction to the Macro Manager by stepping through three basic tasks:
You can follow these same steps yourself by starting a Host On-Demand 3270 Display session, connecting to an MVS system, and logging on to TSO. The ISPF Primary Option Menu is the first application screen to appear after you log on (see Figure 5).
Be sure to get permission from your systems administrator before doing this, and have an experienced ISPF user sitting next to you, if necessary.
This section shows you how to record a very simple macro. This macro changes the application screen from the ISPF Primary Option Menu to the Data Set List Utility screen (passing through the Utility Selection Panel screen on the way).
Before recording this macro, assure that:

If the Macro Manager toolbar is not displayed on your system, click View > Macro Manager.
For more information on the Macro Manager toolbar, see Macro Manager toolbar.
To record the macro follow these steps:


Some observations:
You can record interactions with more than one session into the same macro. This is an advanced feature (see Interacting with more than one session).
This section shows how to play back the macro that you just recorded. Before you start, go back to ISPF Primary Option Menu. This is the starting point for this macro.
Some observations:
Host On-Demand allows you to assign a macro to a particular keystroke combination. To assign the macro that you just recorded to a keystroke combination, follow these steps:
To play back the macro using the assigned key combination, follow these steps:
This chapter has two purposes, first to describe the general structure of a macro as it can be seen in an XML macro script, and second to show some of the connections between the Macro Editor and specific XML elements in the macro script.
A macro script is an XML script used to store a Host On-Demand macro. You can view and edit the XML text of a macro script by using the Code Editor (shown in Code Editor). The Macro Editor displays the same information that you see in the Code Editor, but the Macro Editor displays the information in a more user-friendly format, using listboxes, checkboxes, input fields, and the other controls of the graphical user interface (see Macro Editor).
Learning a little about the XML elements of the macro language will greatly increase your understanding of important topics, including the following:
Therefore this book frequently refers not only to the input fields, buttons, and listboxes of the Macro Editor but also to the corresponding XML elements in which the same information is stored.
To understand macro scripts you do not need to learn a great deal about XML, just the basics of the syntax. If your knowledge of XML syntax needs brushing up, you can learn more about it in XML syntax in the Host On-Demand macro language. However, almost all of what you need to know is covered in this subsection.
As you probably know already, an XML script consists of a collection of XML elements, some of which contain other XML elements, in much the same way that some HTML elements contain other HTML elements. However, unlike HTML, XML allows a program developer to define new XML elements that reflect the structure of the information that the developer wishes to store. The Host On-Demand macro language contains approximately 35 different types of XML elements for storing the information needed to describe a macro. This macro language is described at length in The macro language.
This book, when referring to an XML macro element, uses the element name enclosed in angle brackets. Examples: <HAScript> element, <screen> element.
Figure 8 shows an example of an XML element:
<SampleElement attribute1="value1" attribute2="value2">
...
</SampleElement>
The <SampleElement> element shown in the figure above contains the key components of every macro element. The first line is the begin tag. It consists of a left angle bracket (<), followed by the name of the XML element (SampleElement), followed by attribute definitions, followed by a right angle bracket (>). The second line consists of an ellipsis (...) that is not part of XML syntax but is used in the figure above to indicate the possible presence of other elements inside the <SampleElement> element. The third line is the end tag. It contains the name of the element enclosed in angle brackets with a forward slash after the first angle bracket (</Sample Element>).
In the begin tag, the attributes are specified by using the attribute name (such as attribute1), followed by an equals sign (=), followed by an attribute value enclosed in quotation marks (such as "value1"). Any number of attributes can occur in the begin tag.
If the macro element does not contain other XML elements then it can be written in the shorthand fashion shown in Figure 9:
<SampleElement attribute1="value1" attribute2="value2" />In the figure above the <SampleElement> element is written with a left angle bracket (<) followed by the name (SampleElement), followed by the attributes, followed by a forward slash and a right angle bracket (/>). Thus the entire XML element is written within a single pair of angle brackets.
A macro script consists of a single <HAScript> element that can contain up to three major types of subelements:
Figure 10 shows a conceptual view of a sample macro script containing three <screen> elements.

The figure above shows an <HAScript> element (HAScript) that contains instances of the major types of subelements: an <import> element (Import), a <vars> element (Variables), and three <screen> elements (Screen1, Screen2, and Screen3).
All macro scripts are structured like this, except that most have more screens. If there were 50 screens in the above macro, then the diagram above would look much the same, except that after Screen3 there would be additional screens: Screen4, Screen5, and so on, up to Screen50. (However, the order in which the screens are stored does not necessarily represent the order in which the screens are executed when the macro is played.)
The <HAScript> element is the master element of a macro script. (HAScript stands for Host Access Script.) It encloses the entire macro and also contains, in its begin tag, attributes that contain information applicable to the entire macro, such as the macro's name. For an example of an <HAScript> element see Figure 12.
The <import> element is used to import Java classes and is optional. Importing Java classes is an advanced topic that is not discussed until Creating an imported type for a Java class.
The <vars> element is used to declare and initialize variables belonging to one of the standard data types (boolean, integer, double, string, or field). Using standard variables is an advanced topic that is not discussed until Variables and imported Java classes.
The <screen> element is used to define a macro screen. The <screen> element is the most important of the elements that occur inside the <HAScript>. As you can see in Figure 10 above, a macro script is composed mostly of <screen> elements (such as Screen1, Screen2, and Screen3 in the figure). Also, most of the other kinds of XML elements in a macro script occur somewhere inside a <screen> element.
For the purpose of getting you acquainted with the Macro Editor, this section consists of a very simple comparison between the Macro tab of the Macro Editor and the <HAScript> element described in the previous section.
The Macro Editor has four tabs: Macro, Screens, Links, and Variables. The first tab, the Macro tab, corresponds very closely to the <HAScript> element. In fact, the Macro tab is the graphical user interface for some of the information that is stored in the attributes of the begin tag of the <HAScript> element.
Therefore, as the <HAScript> element is the master element of a macro script and contains in its attributes information that applies to the entire macro (such as the macro name), similarly the Macro tab is the first tab of the Macro Editor and provides access to some of the same global information.
Figure 11 shows the Macro Editor with the Macro tab selected.

In the figure above you can see that the Macro tab has input fields for Macro Name, Description, and other information, along with several checkboxes. You should notice two fields:
Figure 12 shows a sample <HAScript> element that contains the same information as is shown on the Macro tab in Figure 11 , as well as some additional information. In the Code Editor an <HAScript> element is written on a single line, but here the element is written on multiple lines so that you can see the attributes.
<HAScript
     name="ispf_ex1"
     description=" "
     timeout="60000"
     pausetime="300"
     promptall="true"
     author=""
     creationdate=""
     supressclearevents="false"
     usevars="false"
     ignorepauseforenhancedtn="false"
     delayifnotenhancedtn="0">

...

</HAScript>
In the <HAScript> element in the figure above you should notice that there is an attribute corresponding to each input field of the Macro tab shown in Figure 11. For example, the name attribute in the <HAScript> element (name="ispf_ex1") corresponds to the Macro Name field on the Macro tab. Similarly, the usevars attribute in the <HAScript> element (usevars="false") corresponds to the Use Variables and Arithmetic Expressions checkbox on the Macro tab.
This section describes the macro screen and its major subcomponents. The definition of macro screen depends on another term that needs defining, application screen.
An application screen is a meaningful arrangement of characters displayed on the Host On-Demand session window by a host application.
As you probably realize, you are already very familiar with the concept of an application screen. An example of an application screen is the ISPF Primary Option Menu, which is displayed in Figure 13. (This same application screen is displayed in Figure 5.)

In the figure above you can see that this application screen has menu selections displayed in a row across the top (Menu, Utilities, Compilers, Options, and so on), function key assignments displayed in a row across the bottom (F1=Help, F2=Split, and so on), a title near the top (ISPF Primary Option Menu), a list of options along the left side (0 through V), and an input field in which to type an option number or letter (Option ===>). When the user provides input, for example by typing a 3 (for Utilities) followed by the enter key, the ISPF application removes all these visible items from the session window and displays a different application screen.
A macro screen is a set of instructions that tell the macro runtime how to manage a visit to a particular application screen. A macro screen includes:
Although the concept is not very intuitive at this point, there might be in the same macro several macro screens that refer to the same application screen. Because of the way macro screens are linked to one another, the macro runtime might visit the same application screen several times during macro playback, processing a different macro screen at each visit.
Also, one macro screen might refer to more than one application screen. When several application screens are similar to each other, a macro developer might build a macro screen that handles all of the similar application screens.
Nevertheless, each macro screen corresponds to some application screen. When you record a macro, the Macro object creates and stores a macro screen for each application screen that you visit during the course of the recording. If you visit the same application screen more than once, the Macro object creates and stores a macro screen for each visit. Similarly, when you play back a recorded macro, the macro runtime processes a single macro screen for each application screen that it visits during the course of the playback.
A macro screen consists of a single <screen> element that contains three required subelements:
Each of the subelements is required, and only one of each can occur.
Figure 14 shows a conceptual view of a <screen> element:

The figure above shows a <screen> element (Screen1) that contains the three required subelements: a <description> element (Description), an <actions> element (Actions), and a <nextscreens> element (Valid Next Screens).
All <screen> elements are structured in this way, with these three subelements. (A fourth and optional type of subelement, the <recolimit> element, is discussed later in this book.)
The <screen> element is the master element of a macro screen. It contains all the other elements that belong to that particular macro screen, and it also contains, in its begin tag, attributes that contain information applicable to the macro screen as a whole, such as the macro screen's name.
The <description> element contains descriptors that enable the macro runtime to recognize that the <screen> element to which the <description> element belongs is associated with a particular application screen. The descriptors and the <description> element are described in Screen description and recognition.
The <actions> element contains various actions that the macro runtime performs on the application screen, such as reading data from the application screen or entering keystrokes. The actions and the <actions> element are described in Macro actions.
The <nextscreens> element (Valid Next Screens in Figure 14) contains a list of the screen names of all the <screen> elements that might validly occur after the current macro screen. The <nextscreens> element and the elements that it encloses are described in Screen Recognition, Part 2.
This section shows some of the ways in which the Screens tab of the Macro Editor is related to the XML <screen> element described in the previous section. Figure 15 shows the Macro Editor with the Screens tab selected:

In the figure above, notice that the Screens tab contains:
Currently the General tab is selected.
You should notice that there are two Screen Name fields on the Screens tab:
In the Screen Name listbox at the top of the Screens tab, you click the name of the macro screen that you want to work on (such as Screen1), and the Macro Editor displays in the subtabs the information belonging to that macro screen. For example, in Figure 15 the listbox displays the macro screen name Screen1 and the subtabs display the information belonging to Screen1. If the user selected another macro screen name in the listbox, perhaps Screen10, then the Macro Editor would display in the subtabs the information belonging to macro screen Screen10.
In the Screen Name input field under the General tab, you type the name that you want to assign to the currently selected macro screen. A screen name such as Screenx, where x stands for some integer (for example, Screen1), is a temporary name that the Macro object gives to the macro screen when it creates the macro screen. You can retain this name, or you can replace it with a more descriptive name that is easier to remember. (When all your macro screens have names such as Screen3, Screen10, Screen24, and so on, it is difficult to remember which macro screen does what.)
You have probably already noticed that the subtabs General, Description, and Actions on the Screens tab correspond to the main parts of the XML <screen> element described in the previous section. Specifically,
But what about the <nextscreens> subelement? For usability reasons the information belonging to the <nextscreens> element is presented in a higher-level tab, the Links tab. You can see the Links tab immediately to the right of the Screens tab in Figure 15.
Figure 16 shows the XML begin tag and end tag of a sample <screen> element named Screen1:
   <screen name="Screen1" entryscreen="true" exitscreen="false" transient="false">
   ...
   </screen>
In the figure above, the ellipsis (...) is not part of the XML text but indicates that the required elements contained inside the <screen> element have been omitted for simplicity. You should notice that the attributes in the begin tag correspond to fields on the General tab in Figure 15. For example, the name attribute (name="Screen1" ) corresponds to the Screen Name input field on the General tab, and the entryscreen attribute (entryscreen="true") corresponds to the Entry Screen listbox on the General tab.
Figure 17 shows the XML text for the entire <screen> element including the enclosed elements:
   <screen name="Screen1" entryscreen="true" exitscreen="false" transient="false">
      <description>
         <oia status="NOTINHIBITED" optional="false" invertmatch="false" />
      </description>
      <actions>
         <mouseclick row="4" col="15" />
         <input value="3[enter]" row="0" col="0" movecursor="true"
                   xlatehostkeys="true" encrypted="false" />
      </actions>
      <nextscreens timeout="0" >
         <nextscreen name="Screen2" />
      </nextscreens>
   </screen>
In the figure above you should notice that the <screen> element contains the required <description>, <actions>, and <nextscreens> elements.
You must choose the format that you want your macro to be stored in: either the basic macro format or the advanced macro format.
The basic macro format is the default format. It supports a basic level of function but it does not include support for expression evaluation, variables, or some other features supported by the advanced macro format. Nevertheless, you should choose the basic macro format initially unless you already know that you are going to use expressions and variables. You can easily switch your macro to the advanced macro format later on. (In contrast, if you start out with the advanced macro format it is much more difficult to switch your macro to the basic macro format.)
You indicate which format you want with the Use Variables and Arithmetic Expressions in Macro checkbox on the Macro tab of the Macro Editor:
The basic macro format:
In contrast the advanced macro format:
You must write strings and the two special characters single quote (') and backslash (\) differently in the macro depending on whether you have chosen the basic macro format or the advanced macro format. Also, some characters that are ordinary characters in the basic macro format are used as operators in the advanced macro format.
However, these rules affect only input fields located on the following tabs:
The input fields that are affected on these tabs are as follows:
For input fields on all other tabs than those listed above, always use the rules for the basic macro format.
The following two sections describe these differing rules.
If you have chosen the basic macro format, use the following rules for input fields on the Description tab, Actions tab, and Variables tab:
apple
banana
To be or not to be
John SmithNew Year's Day
c:\Documents and Settings\UserIf you have chosen the advanced macro format, use the following rules for input fields on the Description tab, Actions tab, and Variables tab:
'apple'
'banana'
'To be or not to be'
'John Smith''New Year\'s Day'
c:\\Documents and Settings\\UserYou can easily convert your macro from the basic macro format to the advanced macro format, just by checking the "Use Variables and Arithmetic Expressions in Macro" checkbox on the Macro tab. As a result the Macro object does the following:
That is, the Macro object will find all the strings in your macro and surround them with single quotes, and the Macro object will change all occurrences of ' and \ to \' and \\. Also, any operator characters will be treated as operators.
Converting your macro from the advanced macro format to the basic macro format can be very difficult. There are no automatic conversions when you uncheck the "Use Variables and Arithmetic Expressions in Macro" checkbox. The only automatic result is that the Macro object:
You yourself must change, one at a time, by hand, all the representations of strings and of the two special characters back to the basic representations. Also, you will have to delete any instances where advanced features have been used in the macro. If you do not do so then you might encounter errors or unexpected results when you try to save or run the script. Any remaining operator characters will be treated as literal characters rather than as operators.
The Macro object supports the following standard data types:
These types are described in the subsections below.
The boolean values true and false can be written with any combination of uppercase and lower case letters (such as True, TRUE, FALSE, falsE, and so on).
An example of a input field that requires a boolean value is the Entry Screen field on the General tab of the Screens tab. Enter true to set the condition to true or false to set the condition to false.
The boolean values are not strings and therefore never need to be enclosed in single quotes. To repeat, whether you use the basic macro format or the advanced macro format, booleans are always written true and false, not 'true' and 'false'.
However, string values are converted to boolean values in a boolean context (see Conversion to boolean). Therefore with the advanced macro format you could enter the string 'true' in a boolean field, because the Macro Editor would convert the string 'true' to the boolean value true.
Integers are written without commas or other delimiters. Examples:
10000
0
-140
The Macro Editor has a number of integer constants that are written using all uppercase characters. These values are treated as integers not strings. Examples:
Doubles are written without commas or other delimiters. Examples:
3.1416
4.557e5
-119.0431
A string is any sequence of characters and can include leading, trailing, or intervening blank characters. Strings in some input fields must be represented differently depending on whether the macro has been set to use the basic macro format or the advanced macro format. See Representation of strings and special characters, treatment of operator characters.
The following examples use the representation for the advanced macro format:
'apple'
'User4'
'Total number of users'
'   This string has 3 leading blanks.'
'This string has 3 trailing blanks.   '
Here are the same examples using the representation for the basic macro format.
apple
User4
Total number of users
   This string has 3 leading blanks.
This string has 3 trailing blanks.
Notice that with the basic macro format trailing blanks are still allowed but are difficult to detect. If in doubt see the representation of the string in the Code Editor.
See Field variables.
The value null is a reserved word, not a string. When used in place of an object belonging to an imported Java class, it has the same meaning as it does in the Java language.
Do not use null to signify an empty string. To signify an empty string, use a pair of single quotes ('') in the advanced macro format, or nothing at all in the basic macro format. If you use the value null in a string context (for example, by assigning it to a string variable), then the Macro Editor or the macro runtime will convert the value null to the string 'null'.
In order to use arithmetic expressions you must first check the "Use Variables and Arithmetic Expressions in Macro" checkbox on the Macro tab (see Representation of strings and special characters, treatment of operator characters).
The arithmetic operators are:
| Operator | Operation |
|---|---|
| + | Addition |
| - | Subtraction |
| * | Multiplication |
| / | Division |
| % | Modulo |
In an arithmetic expression the terms are evaluated left to right. The order of precedence of the operators is: *, /, %, +, -. For example, the result of :
4 * 2 + 16 / 8 - 1 * 2is 8. You can use parentheses to indicate the order in which you want expressions to be evaluated:
(4 * 2) + (16 / 8) - (1 * 2)    evaluates to 8
but
4 * (( 2 + 16) / (8 - 1)) * 2 evaluates to 20.571You can use an arithmetic expression almost anywhere that you can use an arithmetic value. Examples:
You can use the string concatenation operator '+' only if you check the "Use Variables and Arithmetic Expressions in Macro" checkbox on the Macro tab. See The basic macro format versus the advanced macro format.
The string operators are shown in the table below.
| Operator | Operation |
|---|---|
| + | Concatenate |
You can write a string expression containing multiple concatenations. The following examples use the string representation required for the advanced format (see Representation of strings and special characters, treatment of operator characters).
Expression:               Evaluates to:

'Hello ' + 'Fred' + '!'   'Hello Fred!'
'Hi' 'There'              (Error, a + operator is required to concatenate strings)
'Hi' + 'There'            'HiThere'
The conditional operators are:
| Operator | Operation |
|---|---|
| == | Equal |
| != | Not equal |
| > | Greater than |
| < | Less than |
| >= | Greater than or equal |
| <= | Less than or equal |
The logical operators are:
| Operator | Operation |
|---|---|
| && | AND |
| || | OR |
| ! | NOT |
If you are entering && in an HTML or XML editor you might have to enter &&
In a conditional expression the terms are evaluated left to right. The order of precedence of the operators is the same order in which they are listed in the tables above. You can use parentheses to indicate the order in which you want expressions to be evaluated. Examples:
Expression:                  Evaluates to:

(4 > 3)                      true
!(4 > 3 )                    false
(4 > 3) && (8 > 10)          false
(4 > 3) || (8 > 10)          true
A conditional expression can contain arithmetic expressions, variables, and calls to methods of imported Java classes.
Conditional and logical operators can be used only in two contexts:
If an item of data belongs to one standard data type (boolean, integer, double, or string) but the context requires a different standard data type, then when the data is evaluated (either when the Macro Editor saves the data or else when the macro runtime plays the macro) it is automatically converted to the standard data type required by the context, if possible.
Examples of context are:
However, if the data cannot be converted to the new data type (for example, the string 123apple cannot be converted to an integer) then an error occurs. The Macro Editor displays an error message. The macro runtime stops the macro playback and displays an error message.
The following subsections discuss the conversions that can occur for each standard data type.
The string 'true' (or 'TRUE', 'True', and so on) in a boolean context is converted to boolean true. Any other string in a boolean context (including 'false', '1', 'apple', and any other) is converted to boolean false.
'true' (in an input field that requires a boolean)  converts to true
'apple' (in an input field that requires a boolean) converts to falseA string in valid integer format and occurring in an integer context converts to integer.
'4096'                 converts to       4096
'-9' converts to -9A string in valid double format occurring in a double context converts to double.
'148.3' converts to 148.3An integer combined with a double results in a double:
10 + 6.4 evaluates to 16.4A boolean, integer, or double in a string context converts to a string. (Remember, the boolean values true and false are not strings. See Boolean data.)
'The result is ' + true                         evaluates to 'The result is true'
FALSE (in an input field that requires a string) converts to 'FALSE'
'The answer is ' + 15                           evaluates to 'The answer is 15'
22 (in an input field that requires a string)   converts to  '22'
('4.5' == .45e1)                                evaluates to true
14,52 (in an input field that requires a string) evaluates to'14,52'If the context requires a conversion but the format of the data is not valid for the conversion then the Macro Editor displays an error message. If the error occurs while a macro is playing then the macro runtime display an error message and terminates the macro with a run-time error.
'123apple'       in an integer context    Error
'22.7peach'      in a double context      Error
Any context that accepts an immediate value of a particular standard data type also accepts any entity of the same data type.
For example, if an input field accepts a string value, such as 'Standard Dialog', it also accepts:
Similarly, if an input field accepts a boolean value (true or false), it also accepts:
Recognizing this flexibility in the macro facility will help you write more powerful macros.
In the String descriptor and in several other descriptors and actions, a negative value for a row or column of the session window indicates an offset from the last row or the last column of the session window. The macro runtime calculates the row or column location as follows:
actual row    = (number of rows in text area)    + 1 + (negative row offset)
actual column = (number of columns in text area) + 1 + (negative column offset)
For example, if the session window has 24 rows of text then a row coordinate of -1 indicates an actual row coordinate of 24 (calculated as: 24 + 1 - 1). Similarly if the session window has 80 columns of text then a column coordinate of -1 indicates an actual column coordinate of 80 (calculated as 80 + 1 - 1).
The row calculation above ignores the OIA row. For example, if the session window is 25 rows high, it has only 24 rows of text.
The advantage of this convention is that if you want to specify a rectangle at the bottom of the session window, then this calculation gives the right result whether the session window has 25, 43, or 50 rows. Similarly, if you want to specify a rectangle at the right side of the session window, then this calculation gives the right result whether the session window has 80 columns or 132 columns.
The following tables shows the results for a few calculations:
| Negative value for row: | Actual value in session window with 24 columns of text (OIA row is ignored): | Actual value in session window with 42 columns of text (OIA row is ignored): | Actual value in session window with 49 columns of text (OIA row is ignored): |
| -1 | 24 | 42 | 49 |
| -2 | 23 | 41 | 48 |
| -3 | 22 | 40 | 47 |
| Negative value for column: | Actual value in session window with 80 columns: | Actual value in session window with 132 columns: |
|---|---|---|
| -1 | 80 | 132 |
| -2 | 79 | 131 |
| -3 | 78 | 130 |
Whether you make use of this convention or not, you should at least remember that a rectangular area with coordinates of (1,1) and (-1,-1) means the entire text area of the session window.
This section describes the activities that occur when the macro runtime processes a macro screen. Although this topic is tedious to read about it is important, and sooner or later you are likely to have a question about it. You might want to read through the the first part of this chapter (the Overview) now and skip the remaining parts until you have a specific question.
As an example, this chapter uses a scenario from a macro recorded in a previous chapter, Recording and playing back a simple macro. This macro contains only two macro screens, Screen1 and Screen2.
The scenario begins at the point at which the macro runtime has performed all the actions in Screen1 and is ready to search for the next macro screen to be processed.
Screen1 is the macro screen that handles the ISPF Primary Option Menu (see Figure 5). Table 9 shows a conceptual view of the contents of Screen1:
| XML element contained in <screen> element Screen1: | Contents of XML element: |
|---|---|
| <description> | Descriptors:
|
| <actions> | Actions:
|
| <nextscreens> | Names of macro screens that can validly occur after
this macro screen:
|
Screen2 is the macro screen that handles the Utility Selection Panel (see Figure 6). Table 10 shows a conceptual view of the contents of Screen2:
| XML element contained in <screen> element Screen2: | Contents of XML element: |
|---|---|
| <description> | Descriptors:
|
| <actions> | Actions (the host application pre-positions the text
cursor in the correct input field):
|
| <nextscreens> | Names of macro screens that can validly occur after
this macro screen:
|
During macro playback the macro runtime loops through the same three stages of activity again and again until the macro terminates:
Stage 1 requires a more detailed explanation than stage 2 or 3. Stage 1 itself contains three steps:
Each of these steps involves the list of valid next screens.
The list of valid next screens is just a list that can hold macro screen names. The macro runtime creates this list at the beginning of macro playback (before playing back the first macro screen), and discards this list after macro playback is complete. Initially the list is empty (except possibly for transient screens, which are described later in this chapter).
During macro playback, each time the macro runtime needs to determine the next macro screen to be processed, it performs the three steps 1(a), 1(b), and 1(c) using the list of valid next screens.
In stage 1 the macro runtime determines the next macro screen to be processed. As stated in the previous section, stage 1 includes three steps.
In step 1(a) the macro runtime collects the names of macro screens that can occur after the current macro screen, and adds these names to the list of valid next screens. There may be just one such screen on the list or several. In the example scenario, the macro runtime would look in the <nextscreens> element of Screen1, find one name (Screen2), and add that name to the list (see Table 9).
In step 1(b), the macro runtime periodically checks each macro screen on the list to determine whether it matches the application screen.
There is a time factor here. Because of an action that the macro runtime has just performed in the current macro screen (in Screen1, typing '3[enter]' as the last action of the <actions> element), the host application is in the process of changing the session window so that it displays the new application screen (the Utility Selection Panel) instead of the old application screen (ISPF Primary Option Menu). However, this change does not occur immediately or all at once. The change takes some hundreds of milliseconds and may require several packets of data from the host.
Therefore, during step 1(b), every time the OIA line or the session window's presentation space is updated, the macro runtime again checks the macro screen (or screens) named in the list of valid next screens to determine whether one of them matches the application screen in its current state.
Eventually the session window is updated to the extent that the macro runtime is able to match one of the macro screens on the list to the application screen.
In step 1(c), the macro runtime removes all the macro screen names from the list of valid next screens (except transient screens if any).
In stage 2, the macro runtime makes the selected macro screen (the one that matched the application screen in step 1(b)) the new current macro screen.
Finally, in stage 3, the macro runtime performs the actions in the <actions> element of Screen2.
At this point, if you are reading this book for the first time, you might want to skip the rest of this chapter and begin the next chapter. Later, if you have a question about how the macro runtime processes a macro screen, you can return to this chapter to learn more.
The rest of this chapter describes the same processing sequence as in the overview but provides more information about each step.
As stated earlier, stage 1 contains three steps: adding macro screen names to the list of valid next screens, doing screen recognition, and removing the macro screen names from the list of valid next screens.
In this step the macro runtime places the names of candidate macro screens on the list of valid next screens.
When a host application has displayed an application screen in the session window, and a user input has occurred, then usually only a few application screens (frequently just one) can occur next.
In the example scenario, the current macro screen is Screen1, the current application screen is the ISPF Primary Option menu, and the input is '3' plus the enter key (see Table 9). In this context, only one application screen can occur next, the Utility Selection Panel. Therefore the name of only one macro screen needs to be added to the list of valid next screens: Screen2.
But wait a minute, you say. The ISPF Primary Option Menu has about 30 different possible inputs (15 options, 6 menu selections, and 8 function keys). There should be 30 names of macro screens on the list, not just 1.
The reason that the list of valid next screens usually has only one or a few names on it is that the macro is executing a series of instructions that are aimed at accomplishing some specific task. In Screen1, the instructions are aimed at getting from the ISPF Primary Option Menu to the Utility Selection Panel. The necessary actions have been performed to make this transition occur ('3[enter]') and the macro screen is now just waiting for the expected application screen to appear.
This section describes how the macro runtime selects the macro screen names that it places on the list of valid next screens. There are two cases:
When macro playback begins, the list of valid next screens is empty (except possibly for transient screens, see Transient screens).
To get candidates for the first macro screen to be processed, the macro runtime searches the entire macro, finds each macro screen that is marked as an entry screen, and adds the names of these macro screens to the list.
The entry screen setting (an attribute of the <screen> element) exists for exactly this purpose, to mark macro screens that can occur as the first screen to be processed.
When a macro is recorded, the Macro object by default marks just the first macro screen to be recorded as an entry screen. After recording is complete, the macro developer can mark (or unmark) any macro screen as an entry screen, and there can be multiple entry screens.
Entry screens are described in more detail in Entry screens.
If no macro screen is marked as an entry screen, then the macro runtime uses all the macro screens in the macro as candidates for the first macro screen to be processed.
For subsequent macro screens (including the one immediately after the first macro screen), the macro runtime finds the names of the candidate macro screens listed in the <nextscreens> element of the current macro screen.
In the example scenario, Screen1 is the current macro screen, and its <nextscreens> element contains the name of one macro screen, Screen2 (see Table 9). Therefore the macro runtime adds Screen2 to the list.
However many macro screen names are listed in the <nextscreens> element, the macro runtime adds all of them to the list of valid next screens.
During macro recording, when the Macro object begins to record a new macro screen, it stores the name of that new macro screen (such as Screen2) in the <nextscreens> element of the macro screen that it has just finished recording (such as Screen1). Therefore each macro screen (except the last) of a recorded macro has the name of one macro screen stored in its <nextscreens> element.
Subsequently a macro developer can add or delete the name of any macro screen in the macro to or from the <nextscreens> element of any macro screen.
The <nextscreens> element is described in more detail in Valid next screens.
A transient screen is a screen that can occur at any point in the macro, that occurs unpredictably, and that always needs to be cleared. An example of a transient screen is an error screen that appears in response to invalid input.
The Macro object does not mark any macro screen as a transient screen during macro recording. However, subsequently the macro developer can mark any macro screen as a transient screen.
When macro playback begins, the macro runtime searches the macro, finds each macro screen that is marked as a transient screen, and adds the name of each transient macro screen to the list of valid next screens. These names remain on the list for the duration of the macro playback.
For more information on transient screens see Transient screens.
In this step the macro runtime matches one of the macro screens named in the list of valid next screens to the current application screen.
This process is called screen recognition because the macro runtime recognizes one of the macro screens on the list as corresponding to the application screen that is currently displayed in the session window.
The macro runtime evaluates the candidate macro screens in the order in which their names appear in the list of valid next screens.
If the macro runtime finds that one of the candidates matches the application screen, then the macro runtime immediately stops evaluating and goes on to the next step of removing the candidate names from the list (step 1(c)). The matching screen becomes the next macro screen to be processed (stage 2).
However, if the macro runtime evaluates each macro screen named in the list without finding a match, then the macro runtime stops evaluating, temporarily, and does nothing further until the session window is updated.
While the macro runtime is working on screen recognition, the host application is working on updating the session window with the new application screen. In the example scenario, the host application is updating the session window so that it displays the Utility Selection Panel (see Table 9 and Table 10). This process takes some hundreds of milliseconds and may require several packets of data from the host.
This situation explains why the macro runtime temporarily stops working on screen recognition until the screen is updated. If screen recognition has failed, the reason may be that the new application screen is incomplete. Therefore the macro runtime waits.
Each time that the OIA line is updated or the presentation space of the session window is updated, the macro runtime again makes a pass through the list of valid next screens, trying to find a match to the current application screen. If no match occurs then the macro runtime waits again.
The macro runtime may go through several cycles of waiting and re-evaluating before screen recognition succeeds.
Eventually enough of the new application screen arrives so that the macro runtime can match one of the macro screens named in the list to the new application screen.
The macro runtime determines whether a macro screen matches the current application screen by comparing individual descriptors in the macro screen to the current session window.
In the example scenario, the macro runtime find the name Screen2 on the list of valid next screens, retrieves Screen2, looks at its descriptors, and compares the descriptors with the session window.
Each macro screen contains a <description> element that itself contains one or more descriptors. A descriptor is a statement of fact about the session window (application screen in its current state) that can be either true or false. In the example scenario, Screen2 contains three descriptors:
When there are several descriptors in a <description> element, as here, the method that the macro runtime uses to evaluate the descriptors (as boolean true or false) and to combine their results into a single result (true or false) depends on some additional configuration information that is not described here.
However, in the example scenario, Screen2 is configured in the default manner, so that the macro runtime evaluates each of the three descriptors in turn. If all three are true, then the macro runtime concludes that the overall result is true, and that Screen2 matches the current application screen.
For more information about evaluating descriptors see Evaluation of descriptors.
You can set a timeout value that causes the macro runtime to terminate the macro if screen recognition does not occur before the timer expires (see Timeout settings for screen recognition).
You can set a recognition count that causes the macro runtime to terminate the macro or to jump to a specified macro screen if the macro runtime recognizes a macro screen, such as ScreenA, a number of times equal to the count (see Recognition limit (General tab of the Screens tab)).
After screen recognition has succeeded, the macro runtime immediately begins its next task, which is cleaning up the list of valid next screens (step 1(c)).
This is a simple step. The macro runtime removes the names of all the candidate macro screens, whether recognized or not, from the list of valid next screens.
If the list contains the names of transient screens, those names remain on the list (see Transient screens).
Stage 2 is simple. In stage 2 the macro runtime makes the successful candidate macro screen the new current macro screen.
In the example scenario, the macro runtime makes Screen2 the new current macro screen. The session window displays the new application screen, the Utility Selection Panel (see Table 9 and Table 10).
The macro runtime immediately begins stage 3.
In stage 3 the macro runtime performs the actions in the new current macro screen's <actions> element. If the new current macro screen does not contain an <actions> element or if the <actions> element is empty, then the macro runtime skips this stage.
Each macro screen typically contains an <actions> element that contains one or more actions to be performed. An action is an instruction that causes some type of activity, such as sending a sequence of keys to the session window, displaying a prompt in a popup window for the user, capturing a block of text from the screen, or some other activity.
In the example scenario Screen2 contains only one action:
Screen2 does not need an action to position the text cursor in the correct input field because the Utility Selection Panel automatically positions the text cursor there.
If the <actions> element contains multiple actions, the macro run time performs each macro action in turn in the order in which it occurs in the <actions> element.
For more information on actions see Macro actions.
Because the macro runtime executes actions much more quickly than a human user does, unforeseen problems can occur during macro playback that cause an action not to perform as expected, because of a dependency on a previous action.
To avoid this type of problem, the macro runtime by default inserts a delay of 150 milliseconds after every Input action or Prompt action in every macro screen, and a delay of 300 milliseconds after the last action of every macro screen (see Pause Between Actions (Macro tab)).
You should leave this feature enabled, although you can disable it if you want. You can change the delays from 150 milliseconds and 300 milliseconds to other values.
If you want to change the duration of the delay for a particular macro screen, you can do so (see Set Pause Time (General tab of the Screens tab)).
Also, for any particular action, you can increase the delay by adding a Pause action after the action (see Pause action (<pause> element)).
After the macro runtime has performed all the actions in the <actions> element of the current macro screen, the macro runtime immediately begins the processing cycle again, starting with step 1(a), and using the candidate macro screens listed in the <nextscreens> element of the new current macro screen.
The macro runtime terminates the macro when it finishes processing a macro screen that is marked as an exit screen.
In the example scenario Screen2 is marked as an exit screen (see Table 10).
The exit screen setting (an attribute of the <screen> element) exists for exactly this purpose, to mark macro screens that terminate the macro.
When a macro is recorded, the Macro object by default marks the last macro screen to be recorded as an exit screen. After recording is complete, the macro developer can mark (or unmark) any macro screen as an exit screen, and there can be multiple exit screens.
Exit screens are described in more detail in Exit screens.
This chapter discusses:
A descriptor is an XML element that occurs in the <description> element of a macro screen and that states an identifying characteristic of the application screen that the macro screen corresponds to.
For example, a macro screen named ScreenB might contain a String descriptor (<string> element) that states that row 3 of the application screen contains the string ISPF Primary Option Menu. During macro playback, when the macro runtime is determining which macro screen to process next, and when ScreenB is a candidate, the macro runtime compares the descriptor in ScreenB with the actual application screen. If the descriptor matches the actual application screen (row 3 of the application screen really does contain the string), then the macro runtime selects ScreenB as the next macro screen to be processed.
Screen recognition is the process that the macro runtime performs when it attempts to match a candidate macro screen to the current application screen.
As you may remember from How the macro runtime processes a macro screen, when the macro runtime needs to determine the next macro screen to be processed, the macro runtime places the names of candidate macro screens (usually found in the <nextscreens> element of the current macro screen) onto a list of valid next screens. Then, as the host application updates the session window with the new application screen, the macro runtime compares the descriptors of each macro screen on the list with the new application screen. Eventually the application screen is updated to the extent (for example, the string ISPF Primary Option Menu appears in row 3) that the macro runtime can match one of the macro screens on the list to the application screen. The matched macro screen becomes the next macro screen to be processed (see Overview of the entire process (all 3 stages)).
Screen description is the process of adding descriptors to the <description> element of a macro screen. You engage in screen description when you go to the Description tab of a macro screen and create or edit a descriptor (such as the String descriptor in the previous example). Likewise, the Macro object during macro recording creates one or more descriptors for each new macro screen that it creates (see Recorded descriptions).
The Description tab on the Screens tab of the Macro Editor gives you access to the information stored inside the <description> element of a macro screen. Figure 20 shows a sample Description tab:

In the figure above, the Screens tab of the Macro Editor is selected. The name of the currently selected screen, Screen2, is displayed in the Screen Name field at the top of the Screens tab. Below the Screen Name field are the General, Description, and Actions subtabs. The Description tab is selected.
As you look at Description tab in the figure above, you can see that it has an upper area and a lower area.
The upper area contains controls that operate on a single descriptor element considered as a whole. In particular, the Descriptor listbox situated in the upper left corner of the Description tab contains the name of the currently selected descriptor. In the figure above, the currently selected descriptor is a Field Counts and OIA descriptor at the top of the list. (Descriptors do not have names. Field Counts and OIA is the type of the descriptor.)
The lower area of the Description tab displays the contents of the currently selected descriptor. Because the currently selected descriptor is a Fields Counts and OIA descriptor, the lower area of the Description tab presents the contents appropriate to that type of descriptor. If the user created and selected another type of descriptor, such as a String descriptor, then the lower area would present the contents appropriate to a String descriptor.
Looking more closely at the lower area of the Description tab in Figure 20 , you can see that the Field Counts and OIA descriptor contains three tests of identity:
The macro runtime will apply these three tests of identity when it tries to match this macro screen to an application screen.
Caution: Although the Macro Editor presents the Fields Counts and OIA descriptor as a single descriptor containing three tests, in fact the macro language defines these three tests as three separate and independent descriptors. See Field Counts and OIA descriptor.
The lower area of the Description tab in Figure 20 also displays, for each of these three tests in the Field Counts and OIA descriptor, two more fields, labeled Option and Inverse Descriptor. You can ignore these two fields for now. They are described in the section Default combining method.
Looking again at the Descriptor listbox in Figure 20 , you should notice that only the first entry is an actual descriptor. The remaining selections, which are all enclosed in angle brackets and all begin with the word new, are for creating new descriptors. Here is the list from Figure 20:
Fields Counts and OIA
<new string descriptor>
<new cursor descriptor>
<new attribute descriptor>
<new condition descriptor>
<new variable update>
For example, if you clicked <new string descriptor>, the Macro object would create a new String descriptor and place it at the start of the list. The lower area of the Description tab would allow you to fill out the various fields that belong to a String descriptor (such as a row and column location and a character string). The Descriptor listbox would then look like this:
String descriptor(3, 29)
Fields Counts and OIA
<new string descriptor>
<new cursor descriptor>
<new attribute descriptor>
<new condition descriptor>
<new variable update>
In the figure above, the currently selected descriptor is now the String descriptor at the top of the list (the 3,29 stands for row 3, column 29). The Field Counts and OIA descriptor is now second on the list.
For information on how the macro runtime handles multiple descriptors, as in the figure above, see Evaluation of descriptors.
During macro recording the Macro object adds one or more descriptors to the new <description> element of each new macro screen that it creates.
For the first macro screen of the macro being recorded, the Macro object creates only one descriptor, a Field Counts and OIA descriptor with the following contents:
Therefore, when the recorded macro is played back (without having been revised in any way), the macro runtime matches the first macro screen to its corresponding application screen based entirely on whether the input inhibited indicator is cleared.
For every other application screen of the macro after the first application screen, the Macro object likewise creates only one descriptor, a Field Counts and OIA descriptor, but with different contents:
Therefore, when the recorded macro is played back (without having been revised in any way), the macro runtime matches every macro screen after the first one to its corresponding application screen based on whether the input inhibited indicator is cleared, whether the count of fields in the macro screen's description matches the number of fields in the application screen, and whether the count of input fields in the macro screen's description matches the number of input fields in the application screen.
The recorded descriptions work rather well for at least three reasons.
First, the three parts of the Field Counts and OIA descriptor can be applied unfailingly to every possible application screen. That is, every application screen has some number of fields (perhaps the number is 0), some number of input fields (perhaps 0), and an input inhibited indicator that is either set or cleared.
Second, the combination of a Number of Fields descriptor and a Number of Input Fields descriptor provides a pretty reliable description of an application screen, because application screens typically contain many fields. For example, the Utility Selection Panel shown in Figure 6 currently contains 80 fields of all types, 3 of which are input fields. The ISPF Primary Option Menu shown in Figure 5 currently contains 116 fields of all types, 3 of which are input fields. When application screens contain many fields, there is less chance of the macro runtime confusing two application screens with one another because each contains the same number of fields and the same number of input fields.
Third, and perhaps most important, during screen recognition the macro runtime compares the new application screen to a short list (usually a very short list) of macro screens called valid next screens (see Closer look at stage 1). Therefore a single macro screen need not be differentiated from every other macro screen in the macro, only from the other screens in the list of valid next screens. Frequently the list consists of a single macro screen.
Macro recording is a very useful feature because it quickly provides a framework for your macro. However, for some macro screens the recorded description might not be sufficient to allow the macro runtime to reliably distinguish one application screen from another similar application screen. In such cases you should improve the recorded description.
Often the most straightforward way to improve a recorded description is to add a String descriptor. For example, if the macro screen is for the Utility Selection Panel shown in Figure 6, then you might add a String descriptor specifying that the application screen contains the string 'Utility Selection Panel' somewhere in row 3. Of course you are not limited to using a String descriptor. Some situations might require that you use one or more of the other descriptors (such as a Cursor descriptor, Attribute descriptor, or Condition descriptor) to assure that the application screen is correctly recognized.
This section describes in detail how the macro runtime determines whether a macro screen matches an application screen.
Before you read through the following subsections, you should be aware of the following facts:
Here is an overview of the process.
For each individual descriptor in the macro description, the macro runtime evaluates the descriptor and arrives at a boolean result of true or false.
For example, if the descriptor is a String descriptor, then the macro runtime looks in the application screen at the row and column that the descriptor specifies, and compares the string at that location with the string that the descriptor specifies. If the two strings match, then the macro runtime assigns a value of true to the String descriptor. If the two strings do not match then the macro assigns a value of false to the String descriptor.
Usually a macro screen contains more than one descriptor.
However, if a macro screen contains only one descriptor (and assuming that the descriptor does not have the Inverse Descriptor option set to true) then if the single descriptor is true the entire description is true, and the macro runtime recognizes the macro screen as a match for the application screen. In contrast, if the single descriptor is false, then the entire description is false, and the macro screen is not recognized.
If you have more than one descriptor in a <description> element, then you must use either the default combining method described in this section or the uselogic attribute described in The uselogic attribute.
The default combining method is appropriate for only two scenarios:
You should not use the default method for any other scenario, unless you thoroughly understand how the default combining method works.
The default combining method uses:
Every descriptor has an Inverse Descriptor option that is set to false (the default) or true. You can see the Inverse Descriptor option as a listbox below and to the right of the Number of Fields input field in Figure 20. The macro language uses the invertmatch attribute of the descriptor element to store this option.
By default this option is false, so that it has no effect on the evaluation of the descriptor.
If this setting is true, then the macro runtime inverts the boolean result that it obtains from evaluating the descriptor, changing true to false or false to true.
For example, if the macro runtime determines that a String descriptor is true (the string in the descriptor matches the screen in the application window), but the String descriptor has the Inverse Descriptor option set to true, then the macro runtime changes the String descriptor's result from true to false.
Every descriptor has an Optional option that is set to either false (the default) or true. You can see this option as a listbox below the Number of Fields input field in Figure 20. The macro language uses the optional attribute of the descriptor element to store this option
The Optional option states how a individual descriptor's result is to be treated when the macro runtime uses the default combining rule to combine the boolean results of the descriptors. By default this option is set to false, signifying that the descriptor's result is required rather than optional.
As stated earlier, the default combining rule is appropriate for only two scenarios:
If you want the description as a whole to be true only if ALL the descriptors are true, then set the Optional setting of all the descriptors in the description to false (the default setting).
In contrast, if you want the description as a whole to be true if AT LEAST ONE of the descriptors is true, then set the Optional setting of all of the descriptors in the description to true.
You should not use the default combining rule in any other scenario where you have multiple descriptors in one macro screen, unless you understand the rule and its implications thoroughly. For more information see The default combining rule for multiple descriptors in one macro screen.
Also, you should not set the Optional settings of multiple descriptors in one macro screen differently (some true, some false) unless you understand the rule and its implications thoroughly.
The uselogic attribute of the <description> element allows you to define more complex logical relations among multiple descriptors than are available with the default combining method described in the previous section.
If you use the uselogic attribute, then the macro runtime ignores the Inverse Descriptor settings and the Optional settings in the individual descriptors.
You have to add the uselogic attribute to the <description> element manually using the the Code Editor. The Macro Editor does not provide a control for this.
The value of the uselogic attribute is a simplified logical expression whose terms are 1-based indexes of the descriptors that follow. Figure 23 shows an example of a <description> element that contains a uselogic attribute (some of the attributes of the <string> element are omitted for clarity):
<description uselogic="(1 and 2) or (!1 and 3)" />
<oia status="NOTINHIBITED" optional="false" invertmatch="false"/>
<string value="'Foreground' row="5" col="8"/>
<cursor row="18" col="19" optional="false" invertmatch="false"/>
</description>In the figure above the value of the uselogic attribute is:
(1 and 2) or (!1 and 3)This logical expression is not a regular logical expression (as described in Conditional and logical operators and expressions) but rather a simplified style of logical expression used only in the uselogic attribute. The rules for this style of logical expression are:
| Operator: | Meaning: |
|---|---|
| and | Logical AND |
| or | Logical OR (inclusive) |
| ! | Logical NOT (inversion) |
In the example in Figure 23 the macro runtime will determine that the description as a whole is true if:
Remember that if you use the uselogic attribute, then the macro runtime ignores the Inverse Descriptor settings and the Optional settings in the individual descriptors.
Each type of descriptor is stored as an individual XML element situated within the <description> element of one macro screen.
You do not have to understand all the types of descriptors at first. Instead you should begin by becoming familiar with just two types:
These types of descriptors are sufficient to reliably describe many and perhaps even most application screens. However, if these types are not sufficient, then you should turn for help to one of the other types of descriptors.
Table 12 lists all the types of descriptors and shows the number of descriptors of each type that are allowed to exist in one macro screen (more specifically, in one <description> element belonging to one <screen> element):
| Type of descriptor: | Number of this type of descriptor allowed per macro screen: |
|---|---|
| Field Counts and OIA | 1 (required) |
| String descriptor | 0 or more |
| Cursor descriptor | 0 or 1 |
| Attribute descriptor | 0 or more |
| Condition descriptor | 0 or more |
The following subsections describe each type of descriptor in detail.
The Field Counts and OIA descriptor is required and must be unique. That is, every Description tab (<description> element) must contain one and only one Field Counts and OIA descriptor.
This fact should not cause you any trouble in practice, for the following reasons:
For user friendliness and for certain design reasons that are not discussed here, the Macro Editor presents the Field Counts and OIA descriptor as one descriptor (see Figure 20). However, in fact each of the three parts of the Field Counts and OIA descriptor on the Description tab of the Macro Editor corresponds to a separate and independent descriptor in the underlying XML macro language. Specifically:
Table 13 lists these three types of descriptors and shows how many of each can occur within a <description> element:
| Type of descriptor: | Number of this type of descriptor allowed per macro screen (that is, per <description> element): |
|---|---|
| <oia> | 1 (required) |
| <numfields> | 1 (optional) |
| <numinputfields> | 1 (optional) |
As the table above shows, only one of each type of these descriptors can occur in a <description> element. The <oia> descriptor is required, but the <numfields> descriptor and the <numinputfields> descriptor are optional. The Macro Editor enforces these rules.
You can reinforce these ideas in your mind by looking at a Field Counts and OIA descriptor first as it appears on the Description tab of the Macro Editor and then in the Code Editor. Figure 20 shows a Field Counts and OIA descriptor on the Description tab of the Macro Editor. The settings of the three parts of the Field Counts and OIA descriptor are set as follows:
Number of Fields:  80
Number of Input fields:  3
Wait for OIA to Become Uninhibited:  true
But if you look at the corresponding <description> element with the Code Editor, you see the following:
<description>
   <oia status="NOTINHIBITED" optional="false" invertmatch="false" />
   <numfields number="80" optional="false" invertmatch="false" />
   <numinputfields number="3" optional="false" invertmatch="false" />
</description>
The XML code fragment above shows that the <description> element contains three separate and independent descriptors, each corresponding to one of the three parts of the Field Counts and OIA descriptor.
Now suppose if you will that you change the Field Counts and OIA descriptor settings to be as follows:
Number of Fields:  (blank)
Number of Input fields:  (blank)
Wait for OIA to Become Uninhibited:  true
Setting the first two fields to blank tells the Macro Editor that these items are not to be included in the script. If you look again at the corresponding <description> element with Code Editor you now see:
<description>
   <oia status="NOTINHIBITED" optional="false" invertmatch="false" />
</description>
The XML code fragment above shows that the <description> element now contains only one descriptor, an <oia> descriptor corresponding to the Wait for OIA to Become Uninhibited setting in the Field Counts and OIA descriptor.
During screen recognition, when the macro runtime evaluates individual descriptors and combines the boolean results, the macro runtime treats the <oia> descriptor, the <numfields> descriptor (if it is present), and the <numinputfields> descriptor (if it is present) each as a separate and independent descriptor, one like any other descriptor.
For more information about evaluating multiple descriptors see Evaluation of descriptors
Table 14 shows:
| Setting on the Description tab: | Value of the status attribute in the <oia> element: | Meaning: |
|---|---|---|
| true | NOTINHIBITED | If the input inhibited indicator in the session window is cleared (that is, input is not inhibited) then the macro runtime evaluates the descriptor as true. Otherwise the macro runtime evaluates the descriptor as false. |
| false | DONTCARE | The macro runtime always evaluates the descriptor as true. |
| <Expression> | 'NOTINHIBITED', 'DONTCARE', or any expression that evaluates to one of these strings. | The macro runtime evaluates the expression and then interprets the resulting string. |
In almost all scenarios you can accept the default setting for this descriptor, which is true (on the Description tab) and NOTINHIBITED (in the macro language). Then, during screen recognition:
These are the results that you would want and expect. You typically do not want the macro runtime to recognize the macro screen and immediately start processing its actions while the input inhibited indicator is still set. An important timing issue is involved here, which you should read about separately (see Screen completion). But no matter how you resolve that issue, you should almost always leave this descriptor at the default setting, which is true.
However, if you have a scenario in which you want the macro runtime to ignore the input inhibited condition, then set this descriptor to false on the Description tab (the equivalent setting in the macro language is DONTCARE).
Use the Host ID field to specify the session to which you want this descriptor to refer:
If the referenced session is active, then you can use any automatic editing feature with the referenced session (see Using automatic editing features with other sessions).
The Number of Fields descriptor specifies a particular number of 3270 (or 5250) fields. You can use an integer in the Number of Fields input field, or any entity that evaluates to an integer (such as a variable, an arithmetic expression, or a call to an external Java method).
During screen recognition the macro runtime:
If the two numbers are equal then the macro runtime evaluates this descriptor as true. Otherwise the macro runtime evaluates this descriptor as false.
When the macro runtime counts the fields in the session window it counts all types of 3270 (or 5250) fields, including input fields.
If you do not want to use this descriptor then set the Number of Fields input field to blank.
Use the Host ID field to specify the session to which you want this descriptor to refer:
If the referenced session is active, then you can use any automatic editing feature with the referenced session (see Using automatic editing features with other sessions).
The Number of Input Fields descriptor is very similar to the Number of Fields descriptor described in the previous section. The difference is that the Number of Input Fields descriptor specifies a number of 3270 (or 5250) input fields, whereas the Number of Fields descriptor specifies a number of fields of all types, including input fields.
You can use an integer in the Number of Input Fields field, or any entity that evaluates to an integer (such as a variable, an arithmetic expression, or a call to an external Java method).
During screen recognition the macro runtime:
If the two numbers are equal then the macro runtime evaluates this descriptor as true. Otherwise the macro runtime evaluates this descriptor as false.
If you do not want to use this descriptor then set the Number of Input Fields field to blank.
Use the Host ID field to specify the session to which you want this descriptor to refer:
If the referenced session is active, then you can use any automatic editing feature with the referenced session (see Using automatic editing features with other sessions).
When you are editing a Field Counts and OIA descriptor and you want to set the Number of Fields field and the Number of Input Fields field to the correct values, you can use the Current button beside each input field to count the fields in the application screen for you.
To use this feature follow these steps:
The String descriptor specifies the following information:
The macro runtime searches inside the entire rectangular area of text for the string you specify. If the macro runtime finds the string inside the rectangular area of text, then it evaluates the string descriptor as true. If not, then it evaluates the string descriptor as false.
You define the rectangular area of text by specifying the row and column coordinates of opposite corners. The default values for these coordinates are (1,1) and (-1,-1), indicating the entire text area of the session window (for the significance of negative values such as -1,-1, see Significance of a negative value for a row or column). You can use an integer or any entity that evaluates to an integer (such as a variable, an arithmetic expression, or a call to an external Java method).
The rectangular area can be just large enough to contain the string, or much larger than the string. For example, suppose that the application screen that you want to match to the macro screen has the string 'Terminal and user parameters' in the rectangular area (6,20), (6,37). This rectangular area is exactly large enough to contain the string. If the application screen always has this string at this location, then you might specify the exact rectangular area.
However, suppose that the application screen that you want to match to the macro screen has the same string, 'Terminal and user parameters', located somewhere on it, but that you cannot predict which row of the application screen will contain the string. In this case you could specify the rectangular area (1,1), (-1,-1), indicating that the macro runtime should search every row of the application screen for the identifying string.
For the string value you can use a string or any entity that evaluates to a string (such as a variable, an expression, or a call to an external Java method). The string must be in the form required by the macro format that you have chosen, either basic or advanced (see Error in specifying a string).
During screen recognition the macro runtime:
If the the macro runtime finds the string within the rectangular block of text then the macro runtime evaluates this descriptor as true. Otherwise the macro runtime evaluates this descriptor as false.
If the Wrap option is set to false (the default setting), then the macro runtime searches each row of the rectangular area separately. This method works well when the entire string is contained within one row. For example, if the string is Utility Selection Panel and the rectangular area is (1,1), (24,80), then the macro runtime searches for the string as follows:
In contrast, if the Wrap option is set to true then the macro runtime searches for the string as follows:
If the string you are searching for can wrap from one line to the next of the session window, then you should set the Wrap option to true. Do not confuse this option with the Unwrap attribute of the Extract action, which is based on fields rather than blocks of text (see Unwrap Text option).
The following description provides an example in which the Wrap option is set to true.
Figure 25 shows rows 14 through 18 of an application screen:
 6  Hardcopy    Initiate hardcopy output
 7  Transfer    Download ISPF Client/Server or Transfer data set
 8  Outlist     Display, delete, or print held job output
 9  Commands    Create/change an application command table
 *  Reserved    This option reserved for future expansion
In the rows above, the first character of each row is a blank space. For example, in row 14, the the first two characters are ' 6', that is, a blank space followed by the numeral 6. Suppose that you want to set up a String descriptor that checks for the following rectangular block of text on this application screen:
Hardcopy
Transfer
Outlist
Commands
Reserved
The steps in setting up the String descriptor for this multi-row block are as follows:
'HardcopyTransferOutlist CommandReserved'Notice that in step 3 above the five rows are concatenated as a single string, without any filler characters added (such as a newline or space at the end). However, the string does contain a blank space after 'Outlist' because that blank space does fall within the boundaries of the rectangle.
If you use an Extract action to read text from the screen into a string variable (see Extract action (<extract> element)) then in a subsequent screen you can use the string variable in the String input field of a String descriptor.
For example, in ScreenA you might read a company name from the session window into a string variable named $strTmp$, using an Extract action. Then in ScreenB you could use $strTmp$ as the string to be searched for in a String descriptor.
You can do this when extracting multiple lines of text if you have the Wrap option set to true.
When you create a new String descriptor the Macro Editor places the string '*' into the String input field as an initial, default value. Just erase this initial string and fill in the string that you want. The asterisk (*) does not mean anything or have any function. The initial string could say 'Default string value' and have the same effect.
When you are editing a String descriptor and you want to specify the correct text rectangle and text string, you can use the marking rectangle to set these values. To use this feature follow these steps:
When you click Ctrl-v the Macro Editor does the following:
However, if you captured more than one row of text (as in the example in How the macro runtime searches the rectangular area (Wrap option)), then the paste operation inserts an extra space after each row of text except the last. Edit the String field to remove these extra spaces. In the example in How the macro runtime searches the rectangular area (Wrap option), the String field contains the following string before editing:
'Hardcopy Transfer Outlist Command Reserved'Notice that the string is too long (by 4 characters) to fit in the rectangle of the specified size (5 rows, 8 columns), and that an extra blank space has been inserted after each row. You should edit the string to the following value:
'HardcopyTransferOutlist CommandReserved'The Macro Editor does not prevent you from creating more than one String descriptor in the same <description> element. You should use as many String descriptors as you need in order to create a reliable description.
You can even define two different strings for the same rectangular block of text in the same <description> element. You might do this if the application screen corresponding to your macro screen displays different strings in the same location at different times. However, if you do define two different strings for the same rectangular block of text, you should be careful to indicate that both of the strings are not required (both are optional).
Use the Host ID field to specify the session to which you want this descriptor to refer:
If the referenced session is active, then you can use any automatic editing feature with the referenced session (see Using automatic editing features with other sessions).
The Cursor descriptor specifies a row and column location on the application screen, such as row 10 and column 50. For either the row value or the column value you can use an integer or any entity that evaluates to an integer (such as a variable, an arithmetic expression, or a call to an external Java method).
During screen recognition the macro runtime:
If the two locations are the same then the macro runtime evaluates this descriptor as true. Otherwise the macro runtime evaluates this descriptor as false.
When you are editing a Cursor descriptor and you want to specify the correct row and column values, you can use the Current button. The Current button is situated immediately to the right of the Row and Column fields in the Cursor descriptor window.
To use this feature follow these steps:
When you click Current the Macro Editor does the following:
Use the Host ID field to specify the session to which you want this descriptor to refer:
If the referenced session is active, then you can use any automatic editing feature with the referenced session (see Using automatic editing features with other sessions).
The attribute descriptor specifies a 3270 or 5250 attribute and a row and column location on the application window.
During screen recognition the macro runtime compares the specified attribute (such as 0x3) to the actual attribute at the row and column specified. If the attributes are the same, then the macro runtime evaluates the descriptor as true. Otherwise the macro runtime evaluates the descriptor as false.
This descriptor can be useful when you are trying to differentiate between two application screens that are very similar except for their attributes.
Before you specify an attribute, use the Data Plane listbox to select the data plane in which the attribute that you are looking for occurs. If you select <Expression> then you must specify an expression (such as a variable named $strDataPlane$) that resolves at runtime to one of the data plane strings in the listbox (FIELD_PLANE, COLOR_PLANE, or EXFIELD_PLANE).
Use the Row and Column input fields to specify the Row and Column location on the application screen of the attribute that you are looking for.
You can use any one of three methods to specify an attribute value:
Use the Host ID field to specify the session to which you want this descriptor to refer:
If the referenced session is active, then you can use any automatic editing feature with the referenced session (see Using automatic editing features with other sessions).
The Condition descriptor specifies a conditional expression that the macro runtime evaluates during screen recognition, such as $intNumVisits$ == 0. For more information on conditional expressions see Conditional and logical operators and expressions.
During screen recognition the macro runtime:
If the conditional expression evaluates to true then the macro runtime evaluates this descriptor as true. Otherwise the macro runtime evaluates this descriptor as false.
The Condition descriptor increases the flexibility and power of screen recognition by allowing the macro runtime to determine the next macro screen to be processed based on the value of one or more variables or on the result of a call to a Java method.
The Custom descriptor allows you to call custom description code.
To use a Custom descriptor you need the separate Host Access Toolkit product.
To create a Custom descriptor you must use the Code Editor to add an <customreco> element to the <description> element of the macro screen. For more information on this element see <customreco> element.
The final type of entry that can occur in the Descriptor listbox is the Variable update entry, which is not a descriptor at all, but rather an action that the macro language allows to occur inside a <description> element.
The Variable update action in a <description> element performs the very same type of operation that it performs in an <actions> element, which is to store a specified value into a specified variable.
For information about creating a Variable update action see Variable update action (<varupdate> element).
You should be aware of how the macro runtime processes one or more Variable update actions when they occur in a <description> element:
As you might remember, the macro runtime can go through the screen recognition process a number of times before matching a macro screen to an application screen (see Re-doing the evaluation). Therefore, if a <description> element contains one or more Variable update actions, then the macro runtime will perform the Variable update actions each time that it evaluates the <description> element.
For example, suppose that a macro is being played back, that the screen name ScreenB is on the list of valid next screens, and that ScreenB contains a <description> element like the one shown in Figure 26:
<description>
   <oia status="NOTINHIBITED" optional="false" invertmatch="false" />
   <varupdate name="$boolUpdate$" value="true" />
   <attrib value="0x4" row="1" col="1" plane="COLOR_PLANE" optional="false"
               invertmatch="false" />
</description>
Each time that the macro runtime tries to match ScreenB to the current application screen:
If you want the macro runtime to perform a Variable update action in a <description> element in some other sequence than first, you can change the order of execution by using the <description> element's uselogic attribute instead of the default combining rule (see The uselogic attribute).
When a Variable update action is used in a uselogic attribute:
Here is a list of all the actions, grouped according to function.
As you may remember from How the macro runtime processes a macro screen, when the macro runtime has selected a new current macro screen, the macro runtime immediately begins to perform the actions in the <actions> element of that macro screen.
After the macro runtime has performed all the actions, it immediately goes on to the next step of determining the next macro screen to be processed.
Within a single macro screen, the macro runtime performs the actions in the order in which they occur in the <actions> element. This is the same order in which you haved ordered the actions in the Action listbox.
You are not required to create any actions for a macro screen. If there is no <actions> element or if the <actions> element is empty, then the macro runtime goes straight to the next section of macro screen processing, which is selecting the next macro screen to be processed.
In specifying the parameters of an action, remember that, in general, any context that accepts an immediate value of a particular standard data type also accepts any entity of the same data type. For example, if an input field accepts a string value, then it also accepts an expression that evaluates to a string, a value that converts to a string, a string variable, or a call to an imported method that returns a string (see Equivalents).
However, there are a few fields in which you cannot use variables (see Using the value that the variable holds).
The Actions tab on the Screens tab of the Macro Editor allows you to create and edit actions. When you create an action in the Actions tab, the Macro Editor inserts the new action into the <actions> element of the currently selected screen. Figure 27 shows a sample Actions tab:

In the figure above, the Screens tab of the Macro Editor is selected. The name of the currently selected screen, Screen1, is displayed in the Screen Name field at the top of the Screens tab. Below the Screen Name field are the General, Description, and Actions subtabs. The Actions tab is selected.
As you look at the Actions tab in the figure above, you can see that, like the Description tab, it has an upper area and a lower area.
The upper area contains controls that operate on a single action element considered as a whole. In particular, the Action listbox situated in the upper left corner of the Actions tab contains the name of the currently selected action. In the figure above, there is no currently selected action, because no action has been created yet.
The lower area of the Actions tab displays the contents of the currently selected action, if any. If the currently selected descriptor is an Input action, then the lower area of the Actions tab presents the contents appropriate to that type of action. If the user creates or selects another type of action, such as an Extract action, then the lower area presents the contents appropriate to an Extract action.
Looking again at the Actions listbox in Figure 27, you should notice that it does not yet contain any actions. The selections, which are all enclosed in angle brackets and all begin with the word new, are for creating new actions. As you can see in Figure 27, the displayable part of the Actions listbox is not tall enough to show the whole list at once. Here is the entire list:
<new input action>
<new extract action>
<new prompt action>
<new message action>
<new pause action>
<new xfer action>
<new comm wait action>
<new trace action>
<new mouse click action>
<new box select action>
<new run program>
<new variable update action>
<new play macro action>
<new perform action>
<new conditional action>
<new print start action>
<new print extract action>
<new print end action>
<new sql query action>
<new file upload action>
For example, if you clicked <new input action>, the Macro object would create a new Input action and place it at the top of the list. The lower area of the Actions tab would allow you to fill out the various fields that belong to an Input action (such as the input key sequence). The new Input item would be in the selected area of the Actions listbox, and the list part of the listbox would then look like this:
Input action1(0,0)
<new input action>
<new extract action>
<new prompt action>
<new message action>
<new pause action>
<new xfer action>
<new comm wait action>
<new trace action>
<new mouse click action>
<new box select action>
<new run program>
<new variable update action>
<new play macro action>
<new perform action>
<new conditional action>
<new print start action>
<new print extract action>
<new print end action>
<new sql query action>
<new file upload action>
When the macro runtime processes this macro screen, it performs the actions in the same order in which they are listed in the Actions listbox. To change the order of the actual actions, click the Change Order button to the right of the Actions listbox.
The Box selection action draws a marking rectangle on the session window, simulating the action in which an actual user clicks on the session window, presses mouse button 1, and drags the mouse to create a marking rectangle.
In the lower area of the Actions tab, specify the row and column locations of the corners of the marking rectangle that you want to create or edit. Or, if the Box selection action is the currently selected action in the Actions listbox, you can click and drag the mouse over the session window to create the marking rectangle that you want to create. When you have completed the marking rectangle on the session window, the Macro Editor writes the row and column value of the corners of the marking rectangle into the appropriate Row and Column input fields of the Box selection action.
You can type a negative number (such as -1) into the Row (Bottom Corner) input field and into the Column (Bottom Corner) input field to specify a relative offset from the last row and last column of the session window. For example, if the session window is 24 by 80 and you specify corners of (1, 1) and (-4, -10), then the macro runtime draws a marking rectangle with the coordinates (1, 1) and (21, 71) (see Significance of a negative value for a row or column).
If you draw a marking rectangle and then click the session window anywhere outside the boundaries of the marking rectangle, the session window erases the marking rectangle. However, when the macro runtime is playing a macro, a Mouse click action does not erase an existing marking rectangle.
To erase a marking rectangle in a macro you have two choices:
Use the Host ID field to specify the session in which you want this action to be performed:
If the referenced session is active, then you can use any automatic editing feature with the referenced session (see Using automatic editing features with other sessions).
The Comm wait action waits until the communication status of the session changes to some state that you have specified in the action. For example, you might create a Comm wait action to wait until the session was completely connected.
When the macro runtime starts to perform a Comm wait action, it looks at the communication status specified in the Comm wait action and compares it to the actual communication status of the session. If the two statuses match, then the macro runtime concludes that the Comm wait action is completed, and the macro runtime goes on to perform the next action.
However, if the two statuses do not match, then the macro runtime does no further processing, but just waits for the communication status that is specified in the Comm wait action to actually occur in the session.
You can specify in the Comm wait action a timeout value in milliseconds that causes the macro runtime to end the Comm wait action when the timeout value has expired. That is, the macro runtime terminates the action when the timeout value has expired, even if the communication status that the macro runtime has been looking for has not been reached.
After a Comm wait action, you probably want to use some other action, such as an Extract action, to check some characteristic of the application screen that indicates to you whether the session has actually reached the communication status that you wanted, or whether the Comm wait action ended because of a timeout.
As the session connects or disconnects, the communication status typically moves quickly through some states (such as pending active, then active, then ready) until it reaches a particular state at which it remains stable for some time (such as workstation id ready). In most situations you want to specify that persistent, ending state in the Comm wait action. See the next section for a list of persistent states.
(If instead you specified some transitional state such as pending active, then the session might pass through that state and go on to the next state before the macro runtime gets a chance to perform your Comm wait action. Therefore when the macro runtime does perform your Comm wait action it waits interminably for some state that has already occurred.)
You can specify any of the states listed in the Connection Status listbox. Table 15 lists the name and significance of each state:
| Communication state: | Significance: |
|---|---|
| Connection Initiated | Initial state. Start Communications issued. |
| Connection Pending Active | Request socket connect. |
| Connection Active | Socket connected. Connection with host. |
| Connection Ready | Telnet negotiation has begun. |
| Connection Device Name Ready | Device name negotiated. |
| Connection Workstation ID Ready | Workstation ID negotiated. |
| Connection Pending Inactive | Stop Communications issued. |
| Connection Inactive | Socket closed. No connection with host. |
The stable states (that is, the ones that usually persist for more than a few seconds) are:
If you select <Expression> in the Connection Status listbox, then you must specify an expression that resolves to one of the keywords that the macro runtime expects to find in the value attribute of the <commwait> element (see <commwait> element). For example, you might specify a variable named $strCommState$) that resolves to CONNECTION_READY.
Use the Host ID field to specify the session in which you want this action to be performed:
If the referenced session is active, then you can use any automatic editing feature with the referenced session (see Using automatic editing features with other sessions).
<commwait value="CONNECTION_READY" timeout="10000" />The Conditional action contains the following items:
The Conditional action provides the functions of an if-statement or of an if-else statement.
You should specify in the Condition field the conditional expression that you want the macro runtime to evaluate. The conditional expression can contain logical operators and conditional operators and can contain terms that include arithmetic expressions, immediate values, variables, and calls to Java methods (see Conditional and logical operators and expressions).
Use the Condition is True tab to specify the actions that you want to be performed if the condition evaluates to true.
The Condition is True tab contains controls that are almost identical to the controls for the Actions tab. Specifically:
Use these controls on the Condition is True tab to create and edit the actions that you want the macro runtime to perform if the condition is true.
For example, you might set the Condition field to the name of a variable, such as $boolResult$, into which a previous operation has stored its result. If the value of $boolResult$ is true, you might want to a perform a Message action that displays a status message to the user. Therefore, in the Condition is True tab you would create a Message action that contains the status message that you want to display.
During macro playback the macro would evaluate the condition, $boolResult$. If the value is true then the macro runtime would perform the Message action that you had defined in the Condition is True tab. If the value is false then the macro runtime would skip over the Message action and over all the other actions (if any) that you had defined in the Condition is True tab.
Use the Condition is False tab to specify the actions that you want to be performed if the condition evaluates to false.
Like the Condition is True tab, the Condition is False tab contains controls that are almost identical to the controls for the Actions tab. Use these controls on the Condition is False tab to create and edit the actions that you want the macro runtime to perform if the condition is false.
The Macro Editor does not allow you to create a Condition action inside the Condition is True tab or inside the Condition is False tab. Therefore you cannot have the equivalent of an if-statement nested inside another if-statement, or of an if-statement nested inside an else-statement. The Code Editor enforces the same rules.
The following code fragment prompts the user for input. If the input string is the string true, the code fragment displays a message window with the message "You typed TRUE". If the input string is any other string, the code fragment displays a message window with the message "You typed FALSE". This example uses the following actions: Prompt action, Condition action, and Message action.
You can copy this code fragment from this document into the system clipboard, and then from the system clipboard into the Code Editor. Because this code is a fragment, you must copy it into a macro screen in an existing macro script. You must also create a string variable named $strData$. To create the variable, add the follow lines after the <HAScript> begin tag and before the first <screen> element:
<vars>
   <create name="$strData$" type="string" value="" />
</vars>
After you save the script in the Macro Editor, you can edit it either with the Macro Editor or with the Code Editor.
You should notice the following facts about this example:
<actions>
   <prompt name="’Type true or false’" description="" row="0" col="0"
               len="80" default="" clearfield="false" encrypted="false"
               movecursor="true" xlatehostkeys="true" assigntovar="$strData$"
               varupdateonly="true" />
   <if condition="$strData$" >
       <message title="" value="’You typed TRUE’" />
   </if>
   <else>
       <message title="" value="’You typed FALSE’" />
   </else>
</actions>The Extract action captures text from the session window and stores the text into a variable. This action is very useful and is the primary method that the Macro object provides for reading application data (short of using programming APIs from the toolkit).
If you have the IBM Host Access Toolkit product, then you can use the Extract action to read data from any of the available data planes. For more information see Using the Toolkit to capture data from any data plane.
The most common use of the Extract action is to capture text that is being displayed in the session window. This operation does not require the IBM Host Access Toolkit.
Here is an overview of the steps to follow. Each step is described in more detail in the following subsections.
If you want to capture a rectangular block of text, then set the Continuous Extract option to false (this is the default value). For more information, see Capturing a rectangular area of the session window.
In contrast, if you want to capture a continuous sequence of text that wraps from line to line, then set the Continuous Extract option to true. For more information, see Capturing a sequence of text from the session window .
To specify the area of the session window that you want to capture, you can either use the marking rectangle to gather the row and column coordinates, or else you can type the row and column coordinates of the text area into the Row and Column fields on the Extract action window.
Whichever method you use, the macro runtime interprets the values differently depending on whether the Continuous Extract option is set to false or true (see Set the Continuous Extract option).
If you are using the marking rectangle (see Using the marking rectangle) then the macro runtime writes the row and column coordinates of the upper left corner of the marking rectangle into the first pair of Row and Column values (labeled Top Corner on the Extract action window) and the row and column coordinates of the lower right corner into the second pair of Row and Column values (labeled Bottom Corner).
If you enter the Row and Column values yourself, then type the first set of row and column coordinates into the first pair of Row and Column values (labeled Top Corner on the Extract action window) and type the second set of coordinates into the second pair of Row and Column values (labeled Bottom Corner). You can use the text cursor on the session window as an aid to determine the coordinates that you want (see Using the session window's text cursor).
In the Row (Bottom Corner) input field you can enter -1 to signify the last row of the data area on the session window. This feature is helpful if your users work with session windows of different heights (such as 25, 43, 50) and you want to capture data down to the last row. Similarly for the Column (Bottom Corner) input field you can enter -1 to signify the last column of the data on the session window (see Significance of a negative value for a row or column).
You must specify an extraction name, such as 'Extract1'. However, you can not use this name for any purpose unless you are using the IBM Host Access Toolkit product.
In the Data Plane listbox click TEXT_PLANE. This is the default.
Set the checkbox labeled Assign Text Plane to a Variable and enter the name of the variable into which you want the text to be stored. You have to use this method to store the captured text unless you are using the IBM Host Access Toolkit product.
The text is returned as a string. In most cases you probably want to store the string in a string variable, so that some other action in your macro can process the string.
However, if you specify a variable of some other standard data type (boolean, integer, double) then the macro runtime converts the string to the format of the variable, if possible. For example, if the text on the screen is 1024 and the variable is an integer variable then the macro runtime converts the string 1024 to the integer 1024 and store the value in the integer variable. If the format is not valid for converting the string to the data type of the variable then the macro runtime terminates the macro with a run-time error. For more information about data conversion see Automatic data type conversion.
Text captured from the TEXT_PLANE does not contain any nulls (0x00) or other undisplayable characters. Any character cell on the display screen that appears to contain a blank space character is captured as a blank space character.
When the Continuous Extract option is false (this is the default value), the macro runtime treats the two pairs of Row and Column values as the upper left and lower right corners (inclusive) of a rectangular block of text. The rectangular block can be as small as one character or as large as the entire application window.
The macro runtime:
As an example, suppose that the first 40 characters of rows 16, 17, and 18 of the session window are as follows:
.8..Outlist.....Display, delete, or prin
.9..Commands....Create/change an applica
.10.Reserved....This option reserved for
and suppose that the macro runtime is about to perform an Extract action with the following settings:
Because the Continuous Extract option is false, the macro runtime treats the row and column pairs as marking a rectangular block of text, with the upper left corner at row 16 and column 5 and the lower right corner at row 18 and column 12.
The macro runtime initializes the result string to an empty string. Then the macro runtime reads the rectangular block of text one row at a time ('Outlist.', 'Commands', 'Reserved'), concatenating each row to the result string. Finally the macro runtime stores the entire result string into the result variable $strTmp$. The variable $strTmp$ now contains the following string:
'Outlist.CommandsReserved'When the Continuous Extract option is true, the macro runtime treats the two pairs of Row and Column values as the beginning and ending positions (inclusive) of a continuous sequence of text that wraps from line to line if necessary to get from the beginning position to the ending position. The sequence of text can be as small as one character or as large as the entire application window.
The macro runtime:
For example, suppose that rows 21 and 22 of the session window contain the following text (each row is 80 characters):
........Enter / on the data set list command field for the command prompt pop-up
or ISPF line command............................................................
and suppose that the macro runtime is about to perform an Extract action with the following settings:
Because the Continuous Extract option is true, the macro runtime treats the row and column pairs as marking the beginning and end of a sequence of text, with the beginning position at (21, 9) and the ending at (22, 20).
The macro runtime initializes the result string to an empty string. Then the macro runtime reads the sequence of text from beginning to end, wrapping around from the last character of row 21 to the first character of row 22. Finally the macro runtime stores the entire result string into the result variable $strTmp$. The variable $strTmp$ now contains the following string of 92 characters (the following text is hyphenated to fit on the page of this document, but actually represents one string without a hyphen):
'Enter / on the data set list command field for the com-
mand prompt pop-up or ISPF line command'
In contrast, if the Continuous Extract option is set to false in this example, $strTmp$ would contain a string of 24 characters, 'Enter / on tline command'.
This option was originally intended to be used with the IBM Host Access Toolkit product and only when the Continuous Extract option was set to false. However, you can also use it without the toolkit, and you can use it with the Continuous Extract option set either to false or true.
When you set Unwrap Text to true, the macro runtime uses not only the row and column pairs in the Extract window but also the field boundaries in the session window in determining the data to collect. The macro runtime returns an array of strings (if you are using the toolkit) or a single string of concatenated strings (if you are not using the the toolkit).
Do not confuse the Unwrap Text option with the Wrap option of the String descriptor, which is based on a rectangular block of text rather than fields (see How the macro runtime searches the rectangular area (Wrap option)).
When Continuous Extract is false, the row and column pairs represent the corners of a rectangular block of text. When you set Unwrap Text to true, the macro runtime reads each row of the rectangular block of text and processes each field in the row as follows:
The intent of the Unwrap Text option is to capture the entire contents of a field as one string even if the field wraps from one line to the next.
For example, suppose that the session window is 80 characters wide and that rows 9, 10, 11, and 12 of the session window are as follows:
...............................................Compress or print data set.......
..............................................................Reset statistics..
..............................................................Catalog or display
information of an entire data set...............................................
Suppose also that the following text areas in the lines above are fields:
Compress or print data set
Reset statistics
Catalog or display information of an entire data set
Finally, suppose that:
If you are using the IBM Host Access toolkit the macro runtime returns the following array of strings as the return value of the toolkit method: 'Reset statistics', 'Catalog or display information of an entire data set'. The macro runtime:
If you are not using the toolkit, the macro runtime concatenates the individual strings and stores them as a single string into the variable that you specified in the Extract window. In this example the macro runtime stores the string 'Reset statisticsCatalog or display information of an entire data set' into the variable.
When Continuous Extract is true, the row and column pairs represent the beginning and ending locations of a continuous sequence of text that wraps from line to line if necessary. When you then set Unwrap Text to true, the macro runtime processes the continuous sequence of text as follows:
You can use the Java APIs from the IBM Host Access Toolkit product to access data from any data plane, including the TEXT_PLANE.
The data planes, together with the type of data associated with each plane, are:
To access the extracted data using the Toolkit, you need to implement the MacroRuntimeListener class and register yourself with the Macro bean. For every Extract action, the Macro bean fires data to you in a MacroExtractEvent by calling your macroExtractEvent() method. Use the get methods of the MacroExtractEvent to access the data.
Use the Host ID field to specify the session in which you want this action to be performed:
If the referenced session is active, then you can use any automatic editing feature with the referenced session (see Using automatic editing features with other sessions).
The FileUpload action is a powerful and useful action that allows you to create, append data to, replace, or update a table in a host database. This action is a companion to the SQLQuery action, which allows you to send an SQL statement to a host database (see SQLQuery action (<sqlquery> element)).
You can use the FileUpload action in any type of Host On-Demand session that supports macros (3270 Display, 5250 Display, VT Display, or CICS Gateway).
The database server to which you connect can be on a different host than the host running your emulator session.
In the Database URL field, type the database URL of the database server that provides access to the database. The format of the database URL depends on the type of Java Database Connectivity (JDBC) driver that you use to access the database (for more information on JDBC drivers see Driver Identifier and Driver Class). Table 16 shows the format of the database URL for the JDBC driver included with Host On-Demand.
| Driver provided with Host On-Demand: | Format for database URL: | Examples: |
|---|---|---|
| AS/400 Toolbox for Java | jdbc:as400://[host] |
|
Notice that in the actual database URL (such as jdbc:as400://myISeries) you should not include the square brackets shown in the format.
The remote server can be located on a host other than the host to which the Host On-Demand emulator session is connected. For example, a FileUpload action can specify an iSeries host, even though the same FileUpload action is part of a macro that is running in a 3270 Display session connected to a zSeries host.
If you are using a JDBC driver other than the driver provided with Host On-Demand, consult the documentation provided by the driver vendor for the proper format for the database URL.
The JDBC driver that the FileUpload action uses to access the database is a Java client package on the Host On-Demand client workstation that communicates with a server program on a remote host. This server program on the remote host provides access to the database.
The Host On-Demand client already includes a JDBC driver from the AS/400 Toolbox for Java. This driver is automatically downloaded as part of the emulator client. This driver allows a client to access DB2/400 data on a properly configured iSeries or AS/400.
If you need a different JDBC driver, contact the administrator of the remote database server to obtain the driver. You must take some action to deploy the driver to your Host On-Demand client workstations.
In the Driver Identifier listbox of the FileUpload action window in the Macro Editor, select the driver provided with Host On-Demand, or select Other if you plan to use another driver.
The Driver Class field contains the fully qualified Java class name of the driver. If you select the driver provided with Host On-Demand, then the Macro Editor displays the class name for you in the Driver Class field (com.ibm.as400.access.AS400JDBCDRIVER) and does not allow you to modify the class name. In contrast, if you select Other in the Driver Identifier listbox, then you must type the fully qualified class name of the driver into the Driver Class field. If you do not know the fully qualified class name, contact the provider of the driver. When you type in the name, remember that case is significant (for example, com is different from COM).
If you want to add a driver to the list of available drivers in the Driver Identifier listbox (instead of having each time to select Other and type in the class name), then you can register the driver with Host On-Demand (see Registering a JDBC driver in the online help).
If the database connection requires a user id and a password, then type the user id into the User ID field and the password into the Password field.
Host On-Demand encrypts the key sequence that you type into the Password field. This encryption works exactly like the encryption used when the Password checkbox is selected in an Input action (see Password). Remember:
In addition to the connectivity information required for a file upload (Database URL, Driver Identifier, Driver Class, User ID, and Password, all described in the previous sections), you also need to provide information about the particular file upload operation. This information includes:
Also, for two types of file upload, you have to specify additional information: a Field Description Table for a create operation and Key Columns for an update operation. Table 17 summarizes this information:
| Type of file upload: | Requires name of host table: | Requires name of source file: | Requires other information: |
|---|---|---|---|
| Create | yes | yes | Field Description Table |
| Replace | yes | yes | (none) |
| Append | yes | yes | (none) |
| Update | yes | yes | Key Columns |
In the File Name field, type the path of the local file containing the data that you want to add to the table in the host database. (The file path is a string, so type the string using the format appropriate for your macro format, either basic or advanced). Or, click Browse to browse for the file. NOTE: You must specify a complete file path and file name in this field, including the drive letter if any (for example, c:\Documents and Settings\User1\input.txt).
In the File Type listbox, click the type of the file. This listbox lists the same database file types that are supported in the Database On-Demand client.
In the Table Name field, type the name of the table in the host database that you want to update (such as hodtest). Include a schema name in addition to a table name if the host database has schemas (hod.hodtest).
To create a new table, expand the Upload Type listbox and click create.
In the Field Description Table field, type the name of the schema and table in the host database (such as hod.hodmodel) from which the database server is to read the column (field) names and column widths for the new table . This table should contain the same number of columns as the table you want to create, and should contain the same column names and column widths as you want to use in the new table.
The file that you specify in the File Name field should likewise contain the same number of columns and column widths as the table that you want to create.
When the macro runtime performs the create operation, the database server creates the new table using the data from the specified file and using the column names and widths from the specified Field Description Table.
To replace the contents of an existing table, expand the Upload Type listbox and click replace.
The file that you specify in the File Name field should contain the same number of columns and column widths as the table whose contents you want to replace.
When the macro runtime performs the replace operation, the database server replaces the contents of the specified table using the data from the specified file and using the column names and widths already defined in the existing table. For example, table hodtest has 8 columns and 300 rows of data before the replace operation, but can contain 8 columns and 250 rows (all with brand-new data) after the replace operation.
To append rows to the end of an existing table, expand the Upload Type listbox and click append.
The file that you specify in the File Name field should contain the same number of columns and column widths as the table that you want to append to.
When the macro runtime performs the append operation, the database server appends the rows of data from the specified file to the end of the specified table. For example, table hodtest has 8 columns and 300 rows of data before the append operation, and can contain 8 columns and 320 rows of data (300 original rows plus 20 appended rows) after the append operation.
To selectively update a part of an existing table, expand the Upload Type listbox and click update.
In the Key Columns field, type the name or names of the column or columns that you want to update.
The file that you specify in the File Name field should contain the same number of columns of data as the number of names in the Key Columns field. For example, if you type three column names into the Key Columns field, the table should contain three columns of data.
When the macro runtime performs the update operation, the database server replaces the specified columns of data with the data from the specified file. For example, if table hodtest has 8 rows and 250 columns, you can update the first, second, and seventh columns of the table.
In the Deployment Wizard, you can specify which macro components for database access are preloaded by the Host On-Demand client. See Preload Options (Features1) in the online help.
The Input action sends a sequence of keystrokes to the session window. The sequence can include keys that display a character (such as a, b, c, #, &, and so on) and also action keys (such as [enterreset], [copy], [paste], and others).
This action simulates keyboard input from an actual user.
Use the Row and Column fields to specify the row and column location in the session window at which you want the input sequence to begin. For example, if you specify row 23 and column 17 in the Input action, and you specify Hello world as the String value of the Input action, then (assuming that the location you have specified lies within an input field) the macro runtime types the key sequence Hello world on the session window starting at row 23 and column 17.
If you specify a row or column location of 0, then the macro runtime types the key sequence beginning at the actual row and column location of the text cursor on the session window when the Input action is performed. You should not specify a row or column of 0 unless the context is one in which the location of the text cursor does not matter (for example, with a [copy] action key) or unless you can predict where the text cursor will be located (for example, if a Mouse click action has just moved the text cursor to a specific location, or if the application has positioned the text cursor as part of displaying the application screen).
During macro playback, the session window reacts to a key input error in the same way as it would react if an actual user had typed the key.
For example, if an Input action sends a key that displays a character (such as a, b, c, #, & and so on) to the session when the text cursor is not located in a 3270 or 5250 input field, then the session responds by inhibiting the key input and displaying an error symbol in the Operator Information Area, just as it would with a keystroke typed by an actual user.
The String field is an input field in which you specify the key sequence that you want the action to perform.
To specify a key that causes a character to be displayed (such as a, b, c, #, &, and so on), type the key itself.
To specify a key from the Actions Keys listbox, scroll the list to the key you want (such as [backspace]) and click Insert Action Key. The name of the key enclosed by square brackets appears at the next input position in the String field. Please notice that the keys in the Action Keys listbox are not listed alphabetically throughout. You might have to keep scrolling down the list to find the key you want.
Another way to specify an action key is just to type the name itself into the String input field, surrounded by square brackets (for example, [backspace]).
The following copy/paste keys occur in the Action Keys list for a 3270 Display Session:
[copy]                  [mark right]
[copyappend]            [mark up]
[cut]                   [paste]
[mark down]             [pastenext]
[mark left]             [unmark]
For other keys see Mnemonic keywords for the Input action.
The Translate Host Action Keys field indicates whether the macro runtime is to interpret action key names (such as [copy], [enterreset], [tab], and so on) in the input sequence as action keys or as literal sequences of characters. The default is true (interpret the action key names as action keys).
For example, suppose that the input key sequence is '[up][up]Hello world' and that the text cursor is at row 4, column 10. If the Translate Host Actions Keys value is true, then in performing this input sequence the macro runtime moves the text cursor up two rows and then types Hello world beginning at row 2, column 10. In contrast, if the Translate Host Actions Keys value is false, then the macro runtime types [up][up]Hello World beginning at row 4, column 10.
When the Translate Host Action Keys field is set to true (the default), then the Macro Editor also sets the Move Cursor to End of Input listbox to true and disables it. Even though the listbox is disabled, its value is still set to true.
If you set the Translate Host Action Keys listbox to false, then the Move Cursor to End of Input listbox is enabled and you can set it to false, true, or an expression that is evaluated at runtime.
When the value of this listbox is true (the default), then the macro runtime moves the text cursor in the same way that it would be moved if an actual user were entering keyboard input. For example, if the key is a text character, such as 'a', then the macro runtime types the character on the session window and then moves the text cursor to the first character position after the 'a'. Similarly, if the key is [tab], then the macro runtime moves the text cursor to the next tab location.
In contrast, if the value of the Move Cursor to End of Input listbox is false, then the macro runtime does not move the text cursor at all. The text cursor remains in the same position as it occupied before the macro runtime performed the Input action.
You can use the Password checkbox to encrypt the input key sequence contained in the String field. When you encrypt the contents of the String field, Host On-Demand stores only the encrypted version of the input key sequence into the macro script (in the <input> element) and does not retain the plain text (unencrypted) version of the input key sequence.
For example, Figure 32 shows an <input> element with an unencrypted input key sequence ('myPassword'):
input value="’myPassword’" row="20" col="16" movecursor="true"
          xlatehostkeys="true" encrypted="false" />
In contrast, Figure 33 shows the same <input> element with the input key sequence encrypted (I7xae6rSVlVFF6qzhWRfKw==). Notice that in this example the encrypted attribute of the <input> element is set to true:
input value="I7xae6rSVlVFF6qzhWRfKw==" row="20" col="16"
          movecursor="true" xlatehostkeys="true" encrypted="true" />
In the Macro Editor, an encrypted input key sequence is displayed with asterisks (for example, the encrypted version of 'myPassword' is displayed in the String field as ************************ rather than as I7xae6rSVlVFF6qzhWRfKw==).
Encryption allows you to include confidential data, such as a password, in an Input action without exposing the confidential data to casual view. An unauthorized person cannot discover the confidential data by viewing the macro script with a text editor, with the Macro Editor, or with the Code Editor.
After you encrypt the input key sequence, Host On-Demand does not allow you or anyone else to use the Macro Editor or the Code Editor to decrypt it. Host On-Demand does not decrypt an encrypted input key sequence of an Input action until the macro runtime processes the Input action during macro playback. When the macro runtime processes the Input action, the macro runtime decrypts the encrypted input key sequence and types the unencrypted version into the session window beginning at the specified row and column location.
Typically in a 3270 or a 5250 environment, for a confidential input key sequence such as a password, the host application creates a non-display input field as the destination of the input key sequence, so that blanks or asterisks (*) are displayed instead of the plain text.
However, a security exposure still exists if the macro script is exposed to more than casual view. A clever foe who gains access to a copy of the macro script can discover the original unencrypted input key sequence by editing the Row and Column fields of the Input action so that during macro playback the macro runtime types the decrypted input key sequence into a normal displayable field.
For greater security, you can use a Prompt action instead of an Input action. With a Prompt action, the input key sequence is not stored in the macro script, not even in encrypted form. Instead, during macro playback, when the macro runtime processes the Prompt action, the macro runtime pops up a window with an input field and a message prompting the end user to type an input key sequence. When the end user types the input key sequence and clicks OK, the macro runtime removes the popup window and directs the input key sequence into the session window at the specified row and column location.
Using an Input action does have this advantage, that the macro script runs automatically during macro playback without the end user having to intervene. However, if the confidential data changes (for example, if a password expires and a new and different password is required) then the Input action must be updated with the new input key sequence.
During macro recording, for 3270 Display and 5250 Display sessions only, the Record Password option controls how Host On-Demand records an input key sequence typed into a 3270 or 5250 non-display field.
If Record Password is enabled (the default), then Host On-Demand automatically records such an input key sequence as an Input action with an encrypted input key sequence. If Record Password is disabled, then Host On-Demand records such an input key sequence as a Prompt action. For more information see Record password.
If the input key sequence was automatically encrypted during macro recording, then when you look at the Input action in the Macro Editor, the Password checkbox is selected (checked) and the String field contains some number of asterisks (such as ******) representing the encrypted input key sequence.
In contrast, if the input key sequence was not automatically encrypted during macro recording (perhaps because the session was not a 3270 or 5250 display session, or perhaps because the input field was not a non-display input field) then the Password checkbox is cleared (not checked) and the String field contains some unencrypted input key sequence.
If the input key sequence was not automatically encrypted during macro recording, you can encrypt it in the Macro Editor. Follow these steps to encrypt the input key sequence. Before you start, clear (uncheck) the Password checkbox if it is not already cleared.
If you want to create an encrypted input key sequence, but you do not want the input key sequence to be displayed in unencrypted form as you type it into the String field, use the following method:
After the input key sequence is encrypted, you may decide that you do not want it to be encrypted or that you want to revise it.
If the input key sequence is encrypted and you decide that you do not want it to be encrypted, then follow these steps:
If the input key sequence is encrypted and you decide that you want to revise it, follow these steps:
Do not try to revise an encrypted input key sequence by typing over or inserting characters into the string of asterisks in the String field (*******)! If you do, then you corrupt the encrypted input key sequence with your unencrypted revisions. Then the Macro Editor, believing that you have typed in an unencrypted string, re-encrypts the corrupted sequence. The result is that during macro playback, when the macro runtime processes the Input action, the decrypted sequence is not the input key sequence that you expected. (Also, if you are using the advanced macro format and you do not enclose the corrupted input key sequence with single quotes, the Macro Editor generates an error message).
The Code Editor follows the same rules for encrypting an input key sequence as the Macro Editor.
The Code Editor always allows you to do either of the following actions:
You can also, while using the Code Editor, change the value of the encrypted attribute (which activates or deactivates encryption) from true to false, or false to true.
However, if you want to use the Code Editor to modify the value of the value attribute (which contains the encrypted or unencrypted input key sequence), and the encrypted attribute is set to true, then completely delete the encrypted input key sequence (so that it reads value=""), then type in the new input key sequence that you want encrypted.
Do not try to revise an encrypted input key sequence by typing over or inserting characters into an encrypted input key sequence in the value attribute! If you do, then you corrupt the encrypted input key sequence with your unencrypted revisions.
Although you can type a variable name (such as $var1$) into the String field in the Macro Editor (or into the value part of the value attribute in the Code Editor) and encrypt the name of the variable (using the same steps that you would use to encrypt a normal input key sequence) this normally is not a useful thing to do. The reason is that when you encrypt a variable name only the characters making up the variable name are encrypted. The contents of the variable itself are not encrypted.
During macro playback, the macro runtime decrypts the encrypted text to get the plain text (such as $var1$), sees that the plain text is a variable name, and then evaluates the variable in the usual way.
Use the Host ID field to specify the session in which you want this action to be performed:
If the referenced session is active, then you can use any automatic editing feature with the referenced session (see Using automatic editing features with other sessions).
The Message action displays a popup window that includes a title, a message, and an OK button. The macro runtime does not terminate the action until the user clicks OK.
You can use this message in many scenarios, such as the following:
You should specify in the Message Title input field the caption that you want to be displayed in the caption bar of the message window.
You should specify in the Message Text input field the text that you want to be displayed inside the message window.
Because both input fields expect a string as the input value, you can specify any entity that evaluates to a string (see Equivalents). If you use an arithmetic expression then the expression itself can contain immediate values, variables, arithmetic expressions, and calls to Java methods (see Arithmetic operators and expressions).
You can also use the data type conversion rules (see Automatic data type conversion) and the string concatenation operator (see String concatenation operator (+)). For example, if you want to display the value of an integer variable named $intResult$, then you can specify in the Message Text input field the following string:
'The result is ' + $intResult$ + '.'If the value of $intResult$ is 204, then the macro runtime displays in the message box the following text:
The result is 204.The Mouse click action simulates a user mouse click on the session window. As with a real mouse click, the text cursor jumps to the row and column position where the mouse icon was pointing when the click occurred.
In the lower area of the Actions window, specify the row and column location on the session window where you want the mouse click to occur. Or, you can click on the session window itself, and the Macro Editor updates the values in the Row and Column fields to reflect the new location of the text cursor.
Use the Host ID field to specify the session in which you want this action to be performed:
If the referenced session is active, then you can use any automatic editing feature with the referenced session (see Using automatic editing features with other sessions).
The following example shows how to mark a block of text in the session window, copy it to the system clipboard, and paste it back into the session window at a new location. This example uses the following action elements: Box selection action, Input action, Mouse click action, and Pause action.
You can copy the text of this macro script from this document into the system clipboard, and then from the system clipboard into the Code Editor (see Copy and paste a script from this guide into the Code Editor). After you save this script in the Macro Editor, you can edit it either with the Macro Editor or with the Code Editor.
You should notice the following facts about this example:
<HAScript name="COPY PASTE" description=" " timeout="60000" pausetime="300"
            promptall="true" author="" creationdate="" supressclearevents="false"
            usevars="false" >

   <screen name="Screen1" entryscreen="true" exitscreen="true"
            transient="false">
      <description>
         <oia status="NOTINHIBITED" optional="false" invertmatch="false" />
      </description>
      <actions>
         <boxselection type="SELECT" srow="18" scol="19"
                 erow="18" ecol="51" />
         <pause value="500" />
         <input value="[copy]" row="0" col="0" movecursor="true"
                 xlatehostkeys="true" encrypted="false" />
         <mouseclick row="4" col="15" />
         <input value="[paste]" row="0" col="0" movecursor="true"
                 xlatehostkeys="true" encrypted="false" />
      </actions>
      <nextscreens timeout="0" >
      </nextscreens>
   </screen>

</HAScript>The Pause action waits for a specified number of milliseconds and then terminates.
More specifically, the macro runtime finds the <pause> element, reads the duration value, and waits for the specified number of milliseconds. Then the macro runtime goes on to perform the next item.
Uses for this action are:
You should type the number of milliseconds in the Duration input field. The default is 10000 milliseconds (10 seconds).
The Perform action invokes a method belonging to a Java class that you have imported (see Creating an imported type for a Java class).
You can invoke a method in many other contexts besides the Perform action. However, the Perform action is useful in certain scenarios, for example, when you want to invoke a method that does not return a value.
Some of the contexts, other than the Perform action, in which you can invoke a method are as follows:
In general, outside the Perform action, you can invoke a method in any context in which the value returned by the method is valid.
Type the method call into the Action to Perform field. You must enclose a method call in dollar signs ($), just as you would a variable (see Syntax of a method call). The macro runtime invokes the method. See also How the macro runtime searches for a called method.
The following examples show how to invoke a method using the Perform action. You should notice the following facts about these examples:
   <actions>
      <!-- Example 1 -->
      <perform value="$importedVar.update( 5, 'Application', $str$)$" />

      <!-- Example 2 -->
      <perform value="$MyClass.myInit('all')$" />

      <!-- Example 3 -->
      <perform value="$fip.close()$" />

      <!-- Example 4 -->
      <perform value="$zis.createZipEntry( $name$ )$" />

      <!-- Example 5 -->
      <perform value="$ht.clear()$" />
</actions>The PlayMacro action launches another macro.
When the macro runtime performs a PlayMacro action, it terminates the current macro (the one in which the PlayMacro action occurs) and begins to process the specified macro screen of the target macro. This process is called chaining. The calling macro is said to "chain to" the target macro. There is no return to the calling macro.
You must specify in the PlayMacro action the name of the target macro and, optionally, the name of the macro screen in the target macro that you want the macro runtime to process first.
You can have the macro runtime transfer all of the variables with their contents from the calling macro to the target macro.
Outside of a Condition element:
Inside a Condition element:
You can have as many Condition elements in the macro as you like, with each Condition element containing one PlayMacro action in its Condition is True branch and one PlayMacro action in its Condition is False branch.
The Macro Editor and the Code Editor enforce these rules.
Use the Macro Name field to specify the name of the target macro. If you are chaining macros in a Server Library, you must specify the name of the macro file rather than the name of the macro. Remember that macro names are case-sensitive! For example, mymacro1 is a different name than myMacro, myMACRO, MyMacro, and so on.
You cannot call a macro that resides in a different location than the calling macro. Specifically:
Use the Start Screen Name listbox to select the macro screen in the target macro that you want the macro runtime to process first:
You can have the macro runtime transfer to the target macro all the variables that belong to the calling macro, including the contents of those variables, by setting the Variable Transfer listbox to Transfer (the default is No Transfer).
This transferring of variables and their contents allows you to use variables to pass parameters from the calling macro to the target macro.
After the target macro gets control, it can read from and write to the transferred variables in the same way that it reads from and writes to variables that it has declared itself.
For example, if MacroA currently has two integer variables named StartRow and StartCol, with values of 12 and 2, and then MacroA launches MacroB with a PlayMacro action, then MacroB starts out having variables StartRow and StartCol with values of 12 and 2.
Even if the transferred variable belongs to an imported type and contains a Java object, the target macro can still refer to the transferred variable and call methods on the Java object, or can write some other object into that transferred variable.
The target macro must have selected the advanced macro format (see Choosing a macro format).
Please notice the following restriction on all types of transferred variables:
If the target macro creates a variable with the same name and type as a transferred variable, then the macro runtime uses the created variable rather than the transferred variable.
In the target macro, if you want to use a transferred variable that belongs to an imported type, then you do not need to import that same type in the target macro. Examples of operations where you do not need to import the type are as follows:
However, in the target macro, if you want to use the name of an imported type, then you must import that type. Examples of operations where you must import the type:
The following example shows a PlayMacro action:
<actions>
   <playmacro name="TargetMacro" startscreen="*DEFAULT*"
            transfervars="Transfer" />
</actions> The Print actions allow you to print text from the session window of a 3270 Display session. You can print the entire application screen, or you can print a rectangular area of text from the application screen. You can use the same printer setup options and most of the same page setup options that are available for a 3270 Printer session.
You can use the Print actions only with a 3270 Display session.
The Print actions do not create a host print session. Rather, the Print actions print data that is displayed in the 3270 Display session window (screen print).
The Print actions are:
The Print Start action instantiates a print bean object for the current macro and sets the Printer Setup options and the Page Setup options for the bean. The Print Extract action sends text to the print bean. The Print End action terminates the print bean.
Although the Macro Editor presents Print Start, Print Extract, and Print End as separate types of action, in fact the Macro object stores all three using the <print> element.
The Print Start action instantiates a print bean object for the current macro using the Printer Setup options and the Page Setup options that you specify.
Before performing a Print Start action, the macro runtime checks to see if a print bean already exists for the current macro. If so, then the macro runtime terminates the existing print bean and then performs the Print Start action to instantiate a new print bean.
Click Printer Setup to set the printer setup options for the new print bean. You can control the same printer setup options as are available for a 3270 Printer session, including Printer destination (Windows Printer, Other Printer, or File), Printer Definition Tables, and Adobe PDF output for the File destination.
Click Page Setup to set the page setup options for the new print bean. You can control the same page setup options that are available for a 3270 Printer session and that also are appropriate for the 3270 Display datastream (LU2), including Font, treatment of nulls (0x00), and Printer-Font Code Page.
The Printer Setup options and the Page Setup options that you specify for a print bean for the current macro do not affect the printer setup options and page setup options for:
However, if your print destination is a Windows printer, and you use the Microsoft Windows Print Setup dialog to make configuration changes to that Windows printer, such as an orientation of Landscape rather than Portrait, then those particular configuration changes affect any Host On-Demand printing activity that uses that Windows printer, including:
If you want to verify that the Print Start action is successful, then click Assign Return Code to a Variable and select a variable to hold the return code from the Print Start action.
The Print Extract action copies the text from a rectangular area of the 3270 Display session window that you specify and prints the text using the current print bean.
Before performing a Print Extract action, the macro runtime checks to see if a print bean has been started for the current macro. If not, then the macro runtime performs a Print Start action with the default printer setup options and the default page setup options, and then performs the Print Extract action.
To specify the area of the session window that you want to print, you can either use the marking rectangle to gather the row and column coordinates, or else you can type the row and column coordinates of the text area into the Row and Column fields on the Extract action window.
If you are using the marking rectangle (see Using the marking rectangle) then the macro runtime writes the row and column coordinates of the upper left corner of the marking rectangle into the first pair of Row and Column values (labeled Top Corner on the Extract action window) and the row and column coordinates of the lower right corner into the second pair of Row and Column values (labeled Bottom Corner).
If you enter the Row and Column values yourself, then type the first set of row and column coordinates into the first pair of Row and Column values (labeled Top Corner on the Extract action window) and type the second set of coordinates into the second pair of Row and Column values (labeled Bottom Corner). You can use the text cursor on the session window as an aid to determine the coordinates that you want (see Using the session window's text cursor).
In the Row (Bottom Corner) input field you can enter -1 to signify the last row of the data area on the session window. This feature is helpful if your users work with session windows of different heights (such as 25, 43, 50) and you want to capture data down to the last row. Similarly for the Column (Bottom Corner) input field you can enter -1 to signify the last column of the data on the session window (see Significance of a negative value for a row or column).
If you want to verify that the Print Extract action is successful, then click Assign Return Code to a Variable and select a variable to hold the return code from the Print Extract action.
Use the Host ID field to specify the session in which you want this action to be performed:
If the referenced session is active, then you can use any automatic editing feature with the referenced session (see Using automatic editing features with other sessions).
The Print End action terminates the current print bean if one exists. If a current print bean does not exist then the action has no effect.
If you want to verify that the Print End action is successful, then click Assign Return Code to a Variable and select a variable to hold the return code from the Print End action.
The Prompt action provides a powerful way to send immediate user keyboard input into the 3270 or 5250 application or into a variable.
The Prompt action displays on top of the session window a prompt window that contains a message, an input field, and three buttons (OK, Cancel, Help). After the user types text into the input field and clicks OK, the Prompt action uses the input in one or both of the following ways:
A typical use of this action, but by no means the only use, is to permit the user to provide a password. Many scenarios require that a macro log on to a host or start an application that requires a password for access. Because a password is sensitive data and also typically changes from time to time, you probably do not want to code the password as an immediate value into the macro.
With the Prompt action, you can display a message that prompts the user for a password and that lets the user type the password into the input field. After the user clicks OK, the macro runtime types the input into the session window at the row and column location that you specify. The input sequence can include action keys such as [enterreset], so that if the user types MyPassword[enterreset] the macro runtime not only can type the password into the password field but also can type the key that completes the logon or access action. (Or, you can put the action key into an Input action that immediately follows the Prompt action.)
You should type the prompt text (such as 'Please type your password:') into the Prompt Name field, not into the Prompt Text field. (The Prompt Text field is an optional field than you can use to store a note containing details about the particular Prompt action.)
The macro runtime displays a prompt window with the following characteristics:
In the Default Response field, which is optional, you can type the text of a default response that you want to appear in the input field of the prompt window when the prompt window is displayed. If the user does not type any keyboard input into the input field of the prompt window, but rather just clicks OK to indicate that input is complete, then the macro runtime processes the default response that is contained in the input field.
For example, if the user normally uses ApplicationA but sometimes uses ApplicationB, you could type ApplicationA into the Default Response field. When the macro runtime performs the Prompt action, the prompt window appears with the text ApplicationA already displayed in the input field. The user either can click OK (in which case the macro processes ApplicationA as the contents of the input field) or else can type ApplicationB into the input field and then click OK (in which case the macro processes ApplicationB as the contents of the input field).
If you select true in the Password Response listbox (the default is false) then when the user types each key into the input field of the prompt window, the macro runtime displays an asterisk (*) instead of the character associated with the key.
For example, with the Password Response listbox set to true (or resolving to true at runtime) then if the user types 'Romeo' the macro runtime displays ***** in the input field.
If you select true in the Require Response listbox (the default is false) then:
Thus, setting Require Response to true has the effects of reminding the end user (by displaying (required) to the right of the input field) that a response is required before proceeding, and of requiring the end user to enter text in the input field before clicking OK (by disabling OK until the input field contains text). However, if the Prompt action contains a Default Response, then OK is enabled and the default response is displayed in the input field.
If you select false in the Require Response listbox then:
Thus, setting Require Response to false has the effect of allowing the user to continue processing the macro by clicking OK, even if the input field of the prompt is blank.
If the promptall attribute of the <HAScript> element (or of the <actions> element) is set to true, and you have several prompt actions in the macro (or in the macro screen) with Require Response set to true, then at the start of macro playback (or at the start of the playback of the macro screen), when the macro runtime displays all the prompt input fields in a single prompt window, the macro runtime does not enable the OK button in the prompt window until all required input fields contain text (see The promptall attributes ).
The value in the Response Length field specifies not the size of the input field, but the number of characters that the macro runtime allows the user to type into the input field.
For example, if you set the Response Length field to 10, then the macro runtime allows the user to type only 10 characters into the input field.
Both you (in the Default Response input field) and the user (in the input field of the Prompt window) can use action keys (such as [enterreset], [copy], and so on) as you would in the String field of an Input action (see Input string).
The Translate Host Action Keys listbox and its effect are exactly like the Translate Host Action Keys listbox in the Input action (see Translate Host Action Keys). If you set this listbox to true, which is the default value, then the macro runtime interprets an action key string (such as [copy]) as an action key rather than as a literal string.
Use the Row and Column fields to specify the row and column position on the session window at which you want the macro runtime to start typing the input sequence. To have the macro runtime start typing the input sequence at the current position of the text cursor, you can set either or both of the Row and Column fields to 0. As with the Input action, the row and column position must lie within a 3270 or 5250 input field at runtime, or else the session window responds by inhibiting the input and displaying an error symbol in the Operator Information Area, just as it responds to keyboard input from an actual user.
You can have the macro runtime clear the contents of the input field before typing begins, by setting the Clear Host Field listbox to true.
The Move Cursor to End of Input field has the same function and effects as the button of the same name in the Input action (see Move Cursor to End of Input).
You can have the macro runtime not display the input sequence in the input field by setting the Don't Write to Screen listbox to true. This field is enabled only when the Assign to a Variable checkbox is selected.
You can have macro runtime store the input sequence into a variable by checking the Assign to a Variable checkbox.
Create a new variable by clicking the <New Variable> entry in the listbox. In the popup window for specifying a new variable, you can specify the name of a variable that the current macro inherits from another macro, or you can specify the name of a new variable that you want to create in the current macro. If you want to create a new variable in the current macro, select the Create variable in this macro checkbox and select the type of the new variable.
The macro runtime stores the input sequence as a string, and consequently you could specify a string variable as the variable to receive the input. However, if the variable is of some other type than string, then the macro runtime tries to convert the input to the data type of the target variable according to the usual rules (see Automatic data type conversion).
You can have the macro runtime combine the popup windows from all <prompt> elements into one large prompt window and display this large prompt window at the beginning of the macro playback, by setting the promptall attribute of the <HAScript> element to true (see <HAScript> element).
The promptall attribute in the <actions> element works similarly (see <actions> element).
Use the Host ID field to specify the session in which you want this action to be performed:
If the referenced session is active, then you can use any automatic editing feature with the referenced session (see Using automatic editing features with other sessions).
The Run program action launches a native application and optionally waits for it to terminate. You can provide input parameters for the application and store the return code in a variable.
You can launch any application that can be run by the system runtime.
The Run program action has many uses, such as the following:
You should specify in the Program input field the complete path and name of the file that launches the native application, for example:
'c:\\Program Files\\MyApp\\bin\\myapp.exe'You should notice in the example above that a single backslash character (\)is represented by two backslash characters (\\). The reason is that in the advanced macro format the backslash is a special character and therefore must be represented by a backslash + the character itself (see In the advanced macro format, rules for representation of strings, etc.).
You should specify in the Parameters field any parameters that should be passed to the native application.
If you want the macro runtime to wait until the native application has terminated, set the Wait for Program listbox to true. The default is false (the macro runtime does not wait).
You can capture the status code returned by the native application in a variable by selecting the Assign Exit Code to Variable checkbox and specifying the name of a variable.
The following example launches a native application, waits for it to terminate, and then displays the return code from the application in a message window. This example uses the following action elements: Run program action, Message action.
You can copy the text of this macro script from this document into the system clipboard, and then from the system clipboard into the Code Editor (see Copy and paste a script from this guide into the Code Editor). After you save this script in the Macro Editor, you can edit it either with the Macro Editor or with the Code Editor.
You should notice the following facts about this example:
<HAScript name="g1" description=" " timeout="60000" pausetime="300"
            promptall="true" author="" creationdate="" supressclearevents="false"
            usevars="true" ignorepauseforenhancedtn="false"
            delayifnotenhancedtn="0">
   <vars>
      <create name="$intReturn$" type="integer" value="0" />
   </vars>
   <screen name="Screen1" entryscreen="true" exitscreen="true" transient="false">
      <description>
         <oia status="NOTINHIBITED" optional="false" invertmatch="false" />
      </description>
      <actions>
         <runprogram exe=
                  "%ProgramFiles%\Windows NT\Accessories\wordpad.exe"
                  param="’c:\\tm\\new_file.doc’" wait="true"
                  assignexitvalue="$intReturn$" />
         <message title="" value="’Return value is ’+$intReturn$" />
      </actions>
      <nextscreens timeout="0" >
      </nextscreens>
   </screen>
</HAScript>The SQLQuery action is a very useful and powerful action that allows you to send an SQL statement to a host database, retrieve any data resulting from the SQL statement, and then either write the data into a global variable, write the data into a file, or display the data. (A companion action, FileUpload, allows you to send a File Upload command to a host database. See FileUpload action (<fileupload> element).)
You can use the SQLQuery action in any type of Host On-Demand session that supports macros (3270 Display, 5250 Display, VT Display, or CICS Gateway).
The database server to which you connect can be on a different host than the host running your emulator session.
You can create an SQL statement manually, compose and test an SQL statement using the SQL Wizard, or import an SQL statement either from the current session or from a library of SQL statements.
The SQLQuery action supports only SQL statements of type Select. It does not support SQL statements of type Insert, Update, or Delete.
The SQLQuery action window has two main sections: a statement section and a result section.
The statement section occupies the upper area of the window and includes the following fields: Database URL, Driver Identifier, Driver Class, User ID, Password, and Statement. You can modify the information in this section in three ways:
You can also edit any of the fields at any time by typing into the field.
The result section occupies the lower area of the window and includes the remaining fields: Output Result To, File Name, Show in Web browser, File Type, Hold on output dialog, Overwrite, and Append.
You can use the SQL Wizard to create an SQL statement and test it. The graphical user interface of the SQL Wizard makes it much easier to create an SQL statement, compared to typing in the entire text of the SQL statement into the Statement field of the Macro Editor. Also, in the SQL Wizard you can run an SQL statement that you are working on and view the results.
Click Import Query to import an SQL statement. You can import an SQL statement either from the current session or from a personal library on the client workstation.
To save an SQL statement so that someone can later import it, start the SQL Wizard, create or open an SQL statement, run the SQL statement, go to the Results tab, and then click Save SQL. Use the Saved statements dialog to save the SQL statement to the current session or to a personal library.
When you import an SQL statement, the Macro Editor writes the contents of the imported SQL statement into the fields of the statement section. The Macro Editor also automatically formats the new information correctly for the underlying macro type (see The basic macro format versus the advanced macro format). Any already existing information in the fields of the statement section is overwritten.
Instead of creating an SQL statement with the SQL Wizard or importing an SQL statement, you can type the information directly into the fields of the statement section. You can also type into any of the fields after you have created or imported an SQL statement.
In the Database URL field, type the database URL of the database server that provides access to the database. The format of the database URL depends on the type of Java Database Connectivity (JDBC) driver that you use to access the database (for more information on drivers see Driver Identifier and Driver Class). Table 18 shows the format of the database URL for the driver included with Host On-Demand.
| Driver provided with Host On-Demand: | Format for database URL: | Examples: |
|---|---|---|
| AS/400 Toolbox for Java | jdbc:as400://[host] |
|
Notice that in the actual database URL (such as jdbc:as400://myISeries) you should not include the square brackets shown in the format.
The remote server can be located on a host other than the host to which the Host On-Demand emulator session is connected. For example, a SQLQuery action can specify an iSeries host, even though the same SQLQuery action is part of a macro that is running in a 3270 Display session connected to a zSeries host.
If you are using a JDBC driver other than the driver provided with Host On-Demand, consult the documentation provided by the driver vendor for the proper format for the database URL.
The JDBC driver that the SLQQuery action uses to access the database is a Java client package on the Host On-Demand client workstation that communicates with a server program on a remote host. This server program on the remote host provides access to the database.
The Host On-Demand client already includes a JDBC driver from the AS/400 Toolbox for Java. This driver is automatically downloaded as part of the emulator client. This driver allows a client to access DB2/400 data on a properly configured iSeries or AS/400.
If you need a different JDBC driver, contact the administrator of the remote database server to obtain the driver. You must take some action to deploy the driver to your Host On-Demand client workstations.
In the Driver Identifier listbox of the SQLQuery action window in the Macro Editor, select the driver provided with Host On-Demand, or select Other if you plan to use another driver.
The Driver Class field contains the fully qualified Java class name of the driver. If you select the driver provided with Host On-Demand, then the Macro Editor displays the class name for you in the Driver Class field (com.ibm.as400.access.AS400JDBCDRIVER) and does not allow you to modify the class name. In contrast, if you select Other in the Driver Identifier listbox, then you must type the fully qualified class name of the driver into the Driver Class field. If you do not know the fully qualified class name, contact the provider of the driver. When you type in the name, remember that case is significant (for example, com is different from COM).
If you want to add a driver to the list of available drivers in the Driver Identifier listbox (instead of having each time to select Other and type in the class name), then you can register the driver with Host On-Demand (see Registering a JDBC driver in the online help).
If the database connection requires a user id and a password, then type the user id into the User ID field and the password into the Password field.
Host On-Demand encrypts the key sequence that you type into the Password field. This encryption works exactly like the encryption used when the Password checkbox is selected in an Input action (see Password). Remember:
Type or paste an SQL statement into the Statement field. If the Statement field already contains an SQL statement, you can edit it (even if the SQL statement was imported or was created using the SQL Wizard).
The Macro Editor does not check the format of the SQL statement for validity. If the format is invalid, a run-time error occurs when the macro runtime processes the SQLQuery action.
If you are unfamiliar with SQL statements, it is a very good idea to build the statement and test it in a Database On-Demand session, and then copy and paste the statement into the Statement field. Then you can be sure that the syntax and content of your SQL statement are correct.
You can spread the SQL statement over several lines (as it appears on the Review tab of a Database On-Demand session) or write it all on one line. Figure 38 and Figure 39 show the same SQL statement written over several lines and written as one line. Either way is correct.
SELECT
   *
FROM
   HODTEST.EX01
WHERE
   (
      ( HODTESET.EX01.DESCRIPT is not null )
)SELECT * FROM HODTEST.EX01 WHERE((HODTESET.EX01.DESCRIPT is not null))Remember that if you are using the advanced macro format you must enclose the SQL statement in single quotes and follow the rules for special characters (see The basic macro format versus the advanced macro format). Below, Figure 40 and Figure 41 show the same SQL statement written for the basic macro format and for the advanced macro format:
select * from hodtest.ex01 where
((hodtest.ex01.descript='Edit Products'))'select * from hodtest.ex01 where
((hodtest.ex01.descript=\'Edit Products\'))'You can use either upper case or lower case for reserved words (such as select) and database names and fields (such as hodtest.ex01.descript), but you must use exact case for matching strings (such as 'Edit Products'). Thus the two SQL statements in Figure 42 are equivalent:
select * from hodtest.ex01 where
      ((hodtest.ex01.descript='Edit Products'))
SELECT * FROM HODTEST.EX01 WHERE
((HODTEST.EX01.DESCRIPT='Edit Products'))The fields in the result section control how the SQLQuery action uses the data resulting from the SQL statement. You can write the data into a global variable, write the data into a file, or display it.
The default destination for the data resulting from an SQLQuery action is the global variable $HMLSQLUtil$. The Host On-Demand runtime always updates this variable with the results of a successful SQLQuery action, even when you specify a destination of File or Display in the Output Result To listbox. For example, when you specify a destination of File, then Host On-Demand:
Consequently, you can both write the data to a file (or display it) and also use the data in the macro, without having to make the same database query twice.
To store data only into $HMLSQLUtil$, expand the Output Result To listbox and click $HMLSQLUtil$.
To use the data stored in $HMLSQLUtil$ in a subsequent macro action, you must invoke methods from the Host On-Demand Macro Utility library (HML library) associated with $HMLSQLUtil$. See $HMLSQLUtil$.
To write the data to a file, expand the Output Result To listbox and click File.
Type the file path into the File Name listbox. (The file path is a string, so type the string using the format appropriate for your macro format, either basic or advanced). Or, click Browse to browse for the file. NOTE: You must specify a complete file path and file name in this field, including the drive letter if any (for example, c:\Documents and Settings\User1\output.txt).
In the File Type listbox, click the type of file in which you want to store the data. This listbox lists the same database file types that are available in the Database On-Demand client.
Click Overwrite to overwrite the contents of an existing file, or click Append to append the data to an existing file. If the file does not exist, then either Overwrite or Append creates the new file.
If you select the Show in Web browser checkbox, Host On-Demand first writes the data into the file and closes the file, and then displays the file in the default browser. The browser must have the plug-in (for example, an Excel plug-in) for the file type (such as Microsoft Excel BIFF3 or BIFF4). For some browsers, you must configure the security settings of the browser to allow a Java applet or application to launch an instance of the browser to display a local file (see Configuring a browser to display a local file in the online help).
To display the data, expand the Output Result To listbox and click Display. This option causes the macro runtime to display the data inside a Query Results dialog.
The Hold on output dialog checkbox controls whether the macro runtime immediately goes on to process the next macro action after displaying the Query Results dialog:
In either case, the Query Results dialog remains open until the end user closes it (by clicking either Close or else Close and Continue).
Table 19 shows for each of the buttons its name, its function, and the setting of the Hold on output dialog checkbox that causes it to appear:
| Button name: | Function: | Setting of the Hold on output dialog checkbox: |
|---|---|---|
| Save Results |
|
Selected or cleared |
| Close |
|
Cleared |
| Continue |
|
Selected |
| Close & Continue |
|
Selected |
In the Deployment Wizard, you can specify which macro components for database access are preloaded by the Host On-Demand client. See Preload Options (Features1) in the online help.
The Trace action sends a trace message to a trace destination that you specify, such as the Java console.
Use the Trace Handler listbox to specify the trace destination to which you want the trace message sent:
Use the Trace Text input field to specify the string that you want to send to the trace destination.
The following example shows how to send trace messages to the Java console. This example uses the following action elements: Trace and Variable update.
You can copy the text of this macro script from this document into the system clipboard, and then from the system clipboard into the Code Editor (see Copy and paste a script from this guide into the Code Editor). After you save this script in the Macro Editor, you can edit it either with the Macro Editor or with the Code Editor.
You should notice the following facts about this example:
<HAScript name="TRACE" description=" " timeout="60000" pausetime="300"
            promptall="true" author="" creationdate="" supressclearevents="false"
             usevars="true" ignorepauseforenhancedtn="false"
             delayifnotenhancedtn="0">
   <vars>
      <create name="$strData$" type="string" value="’Original value’" />
   </vars>
   <screen name="Screen1" entryscreen="true" exitscreen="false" transient="false">
      <description>
          <oia status="NOTINHIBITED" optional="false" invertmatch="false" />
      </description>
      <actions>
         <trace type="SYSOUT" value="’The value is ’+$strData$"  />
         <varupdate name="$strData$" value="’Updated value’" />
         <trace type="SYSOUT" value="’The value is ’+$strData$"  />
      </actions>
      <nextscreens timeout="0" >
      </nextscreens>
  </screen>
This script causes the macro runtime to send the following data to the Java console:
The value is +{$strData$ = Original value}
The value is +{$strData$ = Updated value}
In the trace output above you should notice that instead of just displaying the value of $strData$, the Debug action displays both the variable's name and its value inside curly braces {}.
To take advantage of the User trace event setting, you need the separate Host Access Toolkit product. You should implement the MacroRuntimeListener interface. The macro runtime sends an event to MacroRuntimeListeners for the following types of occurrences:
The <varupdate> element stores a value into a variable. You must specify:
During macro playback the macro runtime performs the Variable update action by storing the specified value into the specified variable.
You can also use the Variable update action in a <description> element (see Processing a Variable update action in a description).
The value can be an arithmetic expression and can contain variables and calls to imported methods. If the value is an expression, then during macro playback the macro runtime evaluates the expression and stores the resulting value into the specified variable.
The Variable update action works like an assignment statement in a programming language. In a Java program you could write assignment statements such as:
boolVisitedThisScreen = true;
intVisitCount = intVisitCount + 1;
dblLength = 32.4;
strAddress ="123 Hampton Court";
With the Variable update action you type the left side of the equation (the variable) into the Name field on the Variable Update window and type the right side of the equation (the value) into the Value field on the same window. To create the equivalents of the Java assignment statements above, you would write:
| In the Name input field: | In the Value input field: |
|---|---|
| $boolVisitedThisScreen$ | true |
| $intVisitCount$ | $intVisitCount$+1 |
| $dblLength$ | 32.4 |
| $strAddress$ | '123 Hampton Court' |
The value that you provide must belong to the correct data type for the context or be convertible to that type (see Automatic data type conversion).
The great usefulness of the Variable update action is due to the facts that:
For more information on expressions see Data types, operators, and expressions.
Using a Variable update action to update a field variable is a convenient way of reading the contents of a 3270 or 5250 field in the session window and storing the field's contents as a string into a variable.
A field variable is a type of string variable. A field variable contains a string, just as a string variable does, and you can use a field variable in any context in which a string variable is valid. However, a field variable differs from a string variable in the way in which a string is stored into the field variable. The string that a field variable contains is always a string that the macro runtime has read from a 3270 or 5250 field in the current session window.
When you use the Variable update action to update a string variable, you specify the following information in the Variable update window:
When the macro runtime performs the Variable update action, the macro runtime:
You can then use the field variable in any context in which a string is valid. For example, you can concatenate the field variable with another string, as in the following:
'The field\'s contents are'+ $fldPrintOption$As an example, suppose that the session window contains a 3270 or 5250 field with the following characteristics:
You set up a Variable update action with the following values:
When the macro runtime performs this Variable update action, the macro runtime reads the entire contents of the field and stores the contents as a string into $fldData$. The field variable $fldData$ now contains the string 'Print VTOC information'.
When you are using a field variable in a Variable update action, you can specify a location string that contains two locations. Use this feature if you want to read only part of the contents of a field.
Type the first and second locations into the Value field with a colon (:) between them. For example, if the first location is 5,14 and the second location is 5,17, then you would type '5,14:5,17'.
When you specify two locations:
As an example, suppose that the session window contains a 3270 or 5250 field with the following characteristics:
and suppose that you set up a Variable update action with the following values:
When the macro runtime performs this Variable update action, the macro runtime reads the string 'VTOC' from the field (beginning at the position specified by the first location string and continuing until the position specified by the second location string) and stores the string 'VTOC' into $fldData$.
If the second location lies beyond the end of the field, the macro runtime reads the string beginning at the first location and continuing until the end of the field. The macro runtime then stores this string into the field variable.
The Xfer action (pronounced "transfer action" or "file transfer action") transfers a file from the workstation to the host or from the host to the workstation.
In the Tranfer Direction listbox you must specify whether you want the file to go from the workstation to the host (Send) or from the host to the workstation (Receive). If you select Expression, then you must specify an expression (for example, a variable named $strDirection$) that at runtime resolves to either Send or Receive.
Table 21 shows the values that you should use in the Host-File Name field and the Local-File Name field:
| Transfer Direction: | Host-File Name field: | Local-File Name field: |
|---|---|---|
| Send | The name that you want assigned to the file when it reaches the host. For example, in a 3270 Display session, 'trace1 txt a' | The name of the file that you want to send to the host. For example, 'e:\\tm\\trace1.txt'. |
| Receive | The name of the file that you want to receive at the workstation. For example, 'january archive a' | The name that you want assigned to the file after it reaches the client. For example, 'd:\\MyData\\january.arc' |
Remember that if you are using the advanced macro format the backslash \ is a special character that must be written '\\'(see In the advanced macro format, rules for representation of strings, etc.).
In the Clear Before Transfer field, in most cases you should use true for 3270 Display sessions and false for 5250 Display sessions.
You should set the Timeout field to the number of milliseconds that you want the macro runtime to wait before terminating the transfer. The default is 10000 milliseconds (10 seconds). This Timeout field saves the user from the situation in which the macro hangs because it is trying to transfer a file over a session that has suddenly been disconnected. You might need to use a greater value for very long files or if your connection is slow.
You should use the Options field for any additional parameters that your host requires. These parameters are different for each type of host system. If the host is an iSeries, you should add the following parameters to the Options field:
USERID(myuserid) PASSWORD(mypassword)You should use the Local Code-page field to select the code page (mapping table) that you want the macro runtime to use in translating characters from the workstation's character set to the host's character set and vice versa. You should select the same code-page number (such as 437) that is specified in the session configuration.
There are additional parameters for BIDI sessions (Arabic or Hebrew) that you can set with the Code Editor (Attributes ).
Use the Host ID field to specify the session in which you want this action to be performed:
If the referenced session is active, then you can use any automatic editing feature with the referenced session (see Using automatic editing features with other sessions).
The following example shows an Xfer action:
<actions>
   <filexfer direction="send" pcfile="'c:\\myfile.txt'" hostfile="'myfile text A0'"
            clear="true" timeout="10000" pccodepage="437"  />
</actions> As you may remember from How the macro runtime processes a macro screen, the macro runtime typically finds the names of macro screens that are candidates for becoming the next macro screen to be processed by looking in the <nextscreens> element of the current macro screen. That is, the macro screen contains within itself a list of the macro screens that can validly be processed next. (Entry screens and transient screens are exceptions, see Entry screens, exit screens, and transient screens.)
In the Macro Editor, the Links tab provides the user interface for storing the names of candidate macro screens into the <nextscreens> element of a macro screen. Figure 45 show a sample Links tab:
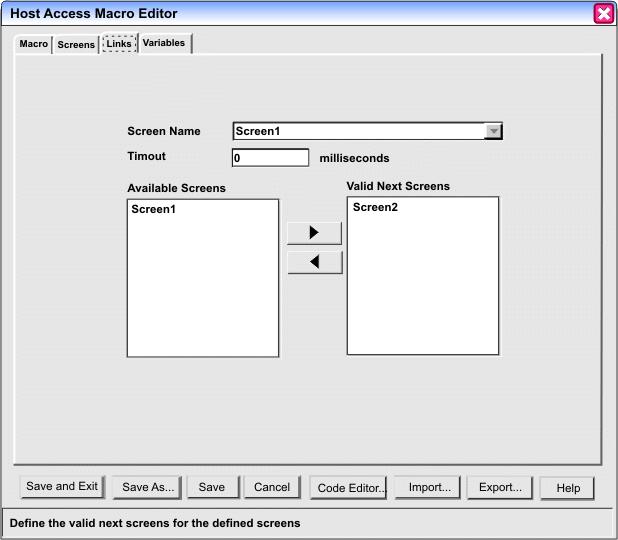
In the figure above, the Screen Name listbox at the top of the tab contains a list of all the macro screens in the entire macro. The currently selected macro screen is Screen1. On the right, the Valid Next Screens listbox contains a list of candidate macro screens for Screen1 (Do not confuse this listbox, which contains the names in the <nextscreens> element of Screen1, with the list of valid next screens that the macro runtime uses when a macro is played back). On the left, the Available Screens listbox contains a list of the names of all other macro screens .
Although the figure above shows only one screen in the Available Screens list, that is because this figure is from a macro with only two macro screens in it, Screen1 and Screen2. Instead, imagine a macro of twenty screens, and suppose that you want to add macro screens to the <nextscreens> list of a new macro screen, ScreenR. You would follow these steps:
When you are done, ScreenR, the currently selected macro screen, has the names of three macro screens in its list of valid next screens.
In the Code Editor, you would see the names of the valid next macro screens, ScreenS, ScreenG, ScreenY, stored inside ScreenR as shown in Figure 46:
<screen name="ScreenR" entryscreen="true" exitscreen="false" transient="false">
   <description>
      ...
   </description>
   <actions>
      ...
   </actions>
   <nextscreens>
      <nextscreen name="ScreenS"/>
      <nextscreen name="ScreenG"/>
      <nextscreen name="ScreenY"/>
   </nextscreens>
</screen>
The figure above shows the <screen> element for ScreenR, with the name attribute set to "ScreenR". Inside are the three primary structural elements of a <screen> element: the <description> element, the <actions> element, and the <nextscreens> element. The contents of the <description> element and the <actions> element are not shown but are indicated with an ellipsis (...). The <nextscreens> element contains three <nextscreen> elements, and each <nextscreen> element contains the name of one of the valid next screens: ScreenS, ScreenG, and ScreenY.
For more information about runtime processing see How the macro runtime processes a macro screen.
You can use the entry screen, exit screen, and transient screen settings to mark macro screens that you want the macro runtime to treat in a special way. In the Macro Editor, you make these settings on the General tab of the Screens tab. At the top of the tab, under the Screen Name field, are listboxes for Entry Screen, Exit Screen, and Transient Screen. For each of these listboxes, you must specify a boolean value (the default is false) or an expression that evaluates to a boolean value.
In the Code Editor, these settings appear as attributes of the <screen> element. In Figure 46, above, you can see these three attributes in the <screen> element for ScreenR: entryscreen, exitscreen, and transient.
Set Entry Screen to true if you want the macro screen to be considered as one of the first macro screens to be processed when the macro is played back. You might have only one macro screen that you mark as a entry screen, or you might have several.
When the macro playback begins, the macro runtime searches through the macro script and finds all the macro screens that are designated as entry screens. Then the macro runtime adds the names of these entry macro screens to the runtime list of valid next screens. Finally the macro runtime tries in the usual way to match one of the screens on the list to the current session window.
When the macro runtime has matched one of the entry macro screens to the session window, that macro screen becomes the first macro screen to be processed. Before performing the actions in the first macro screen, the macro runtime removes the names of the entry macro screens from the runtime list of valid next screens.
One of the situations in which you might have several entry screens in the same macro is when a host application begins with a series of application screens one after another, such as application screen A, followed by application screen B, followed by application screen C. For instance, screen A might be a logon screen, screen B a screen that starts several supporting processes, and screen C the first actual screen of the application.
In this situation, you might want the user to be able to run the macro whether the user was at application screen A, B, or C.
If you mark a screen as an entry screen, it can still participate in the macro as a normal screen and be listed in the <nextscreens> lists of other macro screens.
For example, you might have a host application that has a central application screen with a set of menu selections, so that each time you make a menu selection the application goes through several application screens of processing and then returns to the original central application screen.
In this situation, suppose that macro ScreenA is the macro screen corresponding to the central application screen. Therefore:
Setting Exit Screen to true for a macro screen causes the macro runtime to terminate the macro after it has performed the actions for that macro screen. That is, after the macro runtime performs the actions, and before going on to screen recognition, the macro runtime looks to see if the current macro screen has the exit screen indicator set to true. If so, then the macro runtime terminates the macro. (The macro runtime ignores the <nextscreens> element of an exit screen.)
Therefore you would set Exit Screen to true for a macro screen if you wanted the macro screen to be a termination point for the macro.
You can have any number of exit screens for a macro. Here are some examples of situations in which there could be several exit screens.
A transient macro screen is used to process an application screen that has the following characteristics:
An example of such an application screen is an error screen that the application displays when the user enters invalid data. This error screen appears at unpredictable times (whenever the user enters invalid data) and as a macro developer the only action that you want to take for this error screen is to clear it and to get the macro back on track.
When the macro runtime prepares to play back a macro, at the point where the macro runtime adds the names of entry screens to the runtime list of valid next screens, the macro runtime also adds the names of all macro screens marked as transient screens (if any) to the end of the list.
The names of these transient screens remain on the runtime list of valid next screens throughout the entire macro playback. Whenever the macro runtime adds the names of new candidate macro screens (from the <nextscreens> element of the current macro screen) to the list, the macro runtime adds these new candidate names ahead of the names of the transient screens, so that the names of the transient screens are always at the end of the list.
Whenever the macro runtime performs screen recognition, it evaluates the macro screens of all the names on the list in the usual way. If the macro runtime does not find a match to the application screen among the candidate macro screens whose names are on the list, then the macro runtime goes on down the list trying to match one of the transient macro screens named on the list to the application screen.
If the macro runtime matches one of the transient macro screens to the current application screen, then the macro runtime does not remove any names from the list. Instead, the macro runtime performs the actions in the transient macro screen (which should clear the unexpected application screen) and then goes back to the screen recognition process that it was pursuing when the unexpected application screen occurred.
Suppose that the macro runtime is doing screen recognition and that it has the names of three macro screens on the list of valid next screens: ScreenB and ScreenD, which are the names of candidate screens, and ScreenR, which is the name of a transient screen. The macro runtime performs the following steps:
This section discusses the scenario in which the macro runtime cannot advance because it cannot match a screen on the list of valid next screens to the current application screen. There are two fields that let you set a timeout value that terminates the macro if screen recognition does not succeed before the timeout expires:
As you know, after the macro runtime has performed all the actions in the <actions> element of a macro screen, then the macro runtime attempts to match one of the screens on the list of valid next screens to the new application screen (see How the macro runtime processes a macro screen).
Sometimes, unforeseen circumstances make it impossible for the macro runtime to match any of the macro screens on the list of valid next screens to the application screen. For example, a user might type an input sequence that takes him to an application screen unforeseen by the macro developer. Or, a systems programmer might have changed the application screen so that it no longer matches the description in the <description> element of the corresponding macro screen.
When such a scenario occurs, the result is that the macro appears to hang while the macro runtime continually and unsuccessfully attempts to find a match.
The Timeout Between Screens checkbox and input field are located on the Macro tab and specify a timeout value for screen recognition. By default, if the checkbox is enabled, this value applies to each and every macro screen in the macro. However, you can change the value for a particular macro screen by using the Timeout field on the Links tab (see the next section).
Whenever the macro runtime starts to perform screen recognition, it checks to determine whether the Timeout Between Screens value is set for the entire macro and whether a Timeout value is set for the macro screen. If a timeout value is set, then the macro runtime sets a timer to the number of milliseconds specified by the timeout value. If the timer expires before the macro runtime has completed screen recognition, then the macro runtime terminates the macro and displays a message such as the following:
Macro timed out: (Macro=ispf_ex2, Screen=screen_address_type)Please notice that this message displays the name of the macro and the name of the screen that was being processed when the timeout occurred. For example, if the screen specified in this message is ScreenA, then the macro runtime had already performed all the actions in ScreenA and was trying to match a macro screen in the Valid Next Screens list for ScreenA to the application screen.
To use the Timeout Between Screens field, select the checkbox and type a value for the number of milliseconds to wait before terminating the macro. By default the checkbox is checked and the timeout value is set to 60000 milliseconds (60 seconds).
The Timeout input field on the Links tab specifies a timeout value for screen recognition for a particular macro screen. If this value is non-0, then the macro runtime uses this value as a timeout value (in milliseconds) for screen recognition for this macro screen, instead of using the value set in the Timeout Between Screens field on the Macro tab.
If the timer expires before the macro runtime has completed screen recognition, then the macro runtime displays the message in Figure 47.
The recognition limit is not an attribute in the begin tag of the <screen> element but rather a separate element (the <recolimit> element) that optionally can occur inside a <screen> element, on the same level as the <description>, <actions>, and <nextscreens> elements.
The Set Recognition Limit checkbox and the Screens Before Error input field are located on the General tab of the Screens tab (see Figure 15). By default the Set Recognition limit checkbox is cleared and the input field is disabled. If you select the checkbox, then the Macro Editor sets the default value of the Screens Before Error input field to 100. You can set the value to a larger or smaller quantity.
The recognition limit allows you to take some sort of action if the macro runtime processes a particular macro screen too many times. If the macro runtime does process the same macro screen a large number of times (such as 100), then the reason is probably that an error has occurred in the macro and that the macro is stuck in an endless loop.
When the recognition limit is reached, the macro runtime either terminates the macro with an error message (this is the default action) or starts processing another macro screen that you specify.
You should notice that the recognition limit applies to one particular screen and that by default it is absent. You can specify a recognition limit for any macro screen, and you can specify the same or a different recognition limit value for each macro screen in which you include it.
The macro runtime keeps a recognition count for every macro screen that includes a <recolimit> element. When macro playback begins the recognition count is 0 for all macro screens.
Suppose that a macro includes a macro screen named ScreenB and that ScreenB contains a <recolimit> element with a recognition limit of 100. Each time the macro runtime recognizes ScreenB (that is, each time the macro runtime selects ScreenB as the next macro screen to be processed), the macro runtime performs the following steps:
The default action when the recognition limit is reached is that the macro runtime displays an error message such as the following and then terminates the macro:
Recolimit reached, but goto screen not provided, macro terminating.If you want the macro runtime, as a recognition limit action, to go to another macro screen, then you must use the Code Editor to add a goto attribute to the <recolimit> element and specify the name of the target macro screen as the value of the attribute (see <recolimit> element).
If you use the goto attribute, the macro runtime does not terminate the macro but instead starts processing the macro screen specified in the attribute.
You can use the target macro screen for any purpose. Some possible uses are:
This chapter describes several timing issues involved in processing actions and the resources available for dealing with these issues.
This section discusses the scenario in which an action does not perform as expected because a previous action has side effects that have not completed.
There are two settings that let you add a pause after actions during runtime:
Because the macro runtime executes actions much more quickly than a human user does, unforeseen problems can occur during macro playback that cause an action not to perform as expected, because of a dependency on a previous action.
One example is a keystroke that causes the application screen to change. If a subsequent action expects the application screen to have already changed, but in fact the application screen is still in the process of being updated, then the subsequent action can fail.
Timing-dependent errors between actions can occur in other situations, if the macro runtime performs each action immediately after the preceding action.
The Pause Between Actions field on the Macro tab specifies a time period for the macro runtime to wait:
Originally the Pause Between Actions was implemented as a pause after every type of action, not just after Input and Prompt actions. It is now implemented as follows:
By default the Pause Between Actions checkbox is enabled and the timeout value is set to 300 milliseconds. Therefore by default the macro runtime:
Notice that Pause Between Actions affects every macro screen. Therefore this one setting allows you avoid timing errors throughout the macro, without having to change each macro screen that might have a problem.
If you want a longer or shorter "pause between actions" for a particular macro screen, or if you have only a few macro screens in which a "pause between actions" is important, then you can use the Set Pause Time setting on the General tab of the Screens tab.
By default this checkbox is disabled.
If you enable this setting for a macro screen, then the macro runtime uses the specified number of milliseconds for the "pause between actions" for this particular macro screen.
For example, if for ScreenA you select the Set Pause Time checkbox and set the value to 500 milliseconds, then the macro runtime waits 250 milliseconds after each Input action and Prompt action in ScreenA except the last one, and waits 500 milliseconds after the last action in ScreenA..
When the macro runtime processes a macro screen with Set Pause Time enabled, it ignores the setting of the Pause Between Actions option on the macro tab, and uses only the value in the Set Pause Time setting.
If you need an additional pause after one particular action in a macro screen, you can add a Pause action after the action. The wait that you specify in the Pause action is in addition to any wait that occurs because of a Pause Between Actions or a Set Pause Time.
Suppose that you have a macro screen, ScreenB, with the following bug: the macro runtime starts processing the actions in ScreenB before the host has completely finished displaying the new application screen. Although this timing peculiarity might not pose a problem for you in most situations, suppose that in this instance the first action in ScreenB is an Extract action that causes the macro runtime to read data from rows 15 and 16 of the application screen. Unfortunately the macro runtime performs this action before the host has had time to write all the new data into rows 15-16.
Analyzing this problem, you verify that:
In short, as a result of this timing problem the macro runtime has read rows 15 and 16 of the new application screen before the host could finish update them.
The reason for this problem is that the unenhanced TN3270 protocol does not include a way for a host to inform a client that the host application screen is complete. (TN3270 implements a screen-oriented protocol, 3270 Data Stream, over a character-oriented connection, Telnet). Therefore, the host cannot send several blocks of data to the client and then say, "OK, the application screen is now complete - you can let the user enter data now." Instead, each block arrives without any indication about whether it is the last block for this application screen. From the client's point of view, something like the following events occur:
This process continues until the host has completely displayed a new host application data screen. The client still waits, not knowing that the host application screen is complete. (For more information, see How the macro runtime processes a macro screen).
This process does not present problems for a human operator, for various reasons that are not important here.
However, this process does present problems for the macro runtime during screen recognition. Recall that during screen recognition the macro runtime tries to match the application screen to one of the valid next macro screens every time the screen is updated and every time an OIA event occurs (see Re-doing the evaluation). Therefore the macro runtime might find a match before the screen is completely updated. For example, a String descriptor might state that recognition occurs if row 3 of the application screen contains the characters "ISPF Primary Option Menu". When the host has updated row 3 to contain these characters, then the macro runtime determines that a match has occurred, regardless of whether the host has finished updating the remainder of the application screen.
There are three approaches to solving this problem:
The following subsections describe these solutions.
This approach works sometimes but can be awkward and unreliable. You add enough descriptors to the description part of ScreenB so that the macro runtime will not recognize the ScreenB until the critical portion of the application screen has been updated.
Inserting a delay is the best solution if the session is an ordinary TN3270 session or if the session is a TN3270E session without contention-resolution. That is, after the Input action (in ScreenA in our example) that causes the host to send a new application screen, insert a pause of several hundred milliseconds or longer. This delay allows enough time for the host to update the application screen before the macro runtime starts processing the actions in the next macro screen (ScreenB).
In this scenario there are several ways to insert a pause after the Input action:
If your macro has to run both on ordinary TN3270 sessions and also on TN3270E sessions with contention-resolution enabled, the XML macro language has several attributes that can help you. See Attributes that deal with screen completion.
TN3270E (Enhanced) is an enhanced form of the TN3270 protocol that allows users to specify an LU or LU pool to which the session will connect and that also supports the Network Virtual Terminal (NVT) protocol for connecting to servers in ASCII mode (for example, in order to log on to a firewall).
Contention-resolution mode is an optional feature of TN3270E, supported by some but not all TN3270E servers, that solves the client's problem of not knowing when the host has finished updating the application screen. If the client is running a TN3270E session and is connected to a server that supports contention-resolution, then the macro runtime does not recognize a new macro screen until the host has finished updating the application screen.
In Host On-Demand you can set a 3270 Display session to use TN3270E rather than TN3270 by clicking the appropriate radio button on the Connection configuration window of the 3270 Display session configuration panel.
Normally Host On-Demand automatically communicates in contention-resolution mode with a TN3270E server, if the server supports it. However, you can disable contention-resolution mode with an HTML parameter (see NegotiateCResolution in the online help).
Host On-Demand has three element attributes that address problems that the macro developer encounters when trying to support a single version of a macro to run on both the following environments:
You will have to add these attributes using the Code Editor.
The ignorepauseforenhancedtn parameter of the <HAScript> element, when set to true, causes the macro runtime to skip Pause actions (<pause> elements) during macro playback if the session is running in a contention-resolution environment. You can use this attribute if you developed a macro to run in a non-contention-resolution environment (you inserted Pause actions) and you now want the macro to also run in a contention-resolution environment without unnecessary delays (you want the Pause actions to be ignored).
With this attribute set to true, the macro runtime processes Pause actions (waits the specified number of milliseconds) in a non-contention-resolution environment but ignores Pause actions in a contention-resolution environment.
Notice, however, that setting this attribute to true causes the macro runtime to skip all Pause actions (<pause> elements) in the macro, not just the pauses that have been inserted in order to time for the application screen to be updated. The next subsection addresses this secondary problem.
The ignorepauseoverride parameter of the <pause> element, when set to true in a particular <pause> element, causes the macro runtime to process that <pause> element (wait for the specified number of milliseconds) even if the ignorepauseforenhancedtn attribute is set to true in the <HAScript> element.
Set this attribute to true in a <pause> element if you want the <pause> element always to be performed, not skipped, even in a contention-resolution environment with the ignorepauseforenhancedtn attribute set to true in the <HAScript> element.
The delayifnotenhancedtn parameter of the <HAScript> element, when set to a non-zero value, causes the macro runtime to automatically pause the specified number of milliseconds whenever the macro runtime receives a notification that the OIA (Operator Information Area) has changed.
You can use this attribute if you developed a macro in a contention-resolution environment (you did not need to insert Pause actions) but you now want the macro to run also in a non-contention-resolution environment (some macro screens might need a Pause action to allow time for the application screen to be completed).
With this attribute set to true, then when the macro is run in a non-contention-resolution environment the macro runtime inserts a pause for the specified number of milliseconds each time it receives a notification that the OIA has changed. For example, if you specify a pause of 200 milliseconds then the macro runtime waits for 200 milliseconds every time the OIA changes.
The cumlative effect of the macro runtime pausing briefly after each notification of a change to the OIA is that the application screen is completed before the macro runtime begins processing the actions of the new macro screen. The macro runtime inserts these extra pauses only when it detects that the session is running in a non-contention-resolution environment.
A limitation of this attribute is that the macro runtime adds these extra pauses during every screen, not just during screens in which screen update is a problem. However, the additional time spent waiting is small. And more importantly, this attribute lets you quickly adapt the macro to a non-contention resolution environment, without having to test individual screens and insert a pause action in each screen with a screen update problem.
Variables help you to add programming intelligence to macros. With a variable you can store a value, save a result, keep a count, save a text string, remember an outcome, or do any number of other programming essentials.
You can create a variable that belongs to any of the standard data types (string, integer, double, boolean, and field).
You can also create a variable that belongs to an imported type representing a Java class. You can then create an instance of the class and call a method on the instance. This capability opens the door to the abundant variety of functionality available through Java class libraries, including libraries in the Java Runtime Environment (JRE) libraries, libraries in the Host Access Toolkit product, classes or libraries that you yourself implement, or Java classes and libraries from other sources.
Using variables requires that you use the advanced macro format for your macro (see Choosing a macro format). Therefore, if you want to add variables to a macro that is in the basic macro format, you must decide whether to convert the macro to the advanced macro format. If you have an old macro in the basic macro format that many users rely on and that works perfectly, you might want to leave the macro as it is.
However, remember that all recorded macros are recorded in the basic macro format. So, if you have recently recorded a macro and are beginning to develop it further, then you might simply not have gotten around to switching to the advanced macro format.
The Macro Editor addresses both these situations by popping up a window with the following message when you start to define a variable in a macro that is still in the basic macro format:
You are attempting to use an advanced macro feature. If you choose to continue,
your macro will automatically be converted to advanced macro format. Would you
like to continue?
Click Yes if you are building a macro in which you plan to use variables, or No if you have a macro in the basic macro format that you do not want to convert.
The scope of every variable is global with respect to the macro in which the variable is created. That is, every variable in a macro is accessible from any macro screen in the macro. All that an action or a descriptor in a macro screen has to do to access the variable is just to use the variable name.
For example, suppose that you have a variable named $intPartsComplete$ that you initialize to 0. You might use the variable in the following ways as the macro proceeds:
In the example above, actions in several different macro screens are able to read from or write to the variable $intPartsComplete$.
Because a variable belongs to the entire macro, and not to any one screen, it seems appropriate that there is a separate high-level tab for Variables. The Variables tab allows you to:
To create a variable belonging to a standard data type, use the Variables tab in the Macro Editor. Figure 49 shows a sample Variables tab:

In the figure above, the Variables tab of the Macro Editor is selected. The name of the currently selected variable, $strUserName$, is displayed in the Variables listbox. Three other fields contain information that the macro runtime needs to create this variable: the Name input field, the Type listbox, and the Initial Value input field.
The Variables listbox contains the names of all the variables that have been created for this macro. It allows you to select a variable to edit or to remove, and it also contains a <new variable> entry for creating new variables.
Notice that the entry of the currently selected variable is contained in parentheses after another string:
Variable1($strUserName$)The string Variable1 is a setting that shows how many variables you have created. It is not saved in the macro script. The real name of the variable is $strUserName$, and you should use this name alone throughout the macro wherever you use the variable.
You have probably noticed that the variable name $strUserName$ is enclosed in dollar signs ($). This is a requirement. You must enclose the variable name in dollar signs ($) wherever you use it in the macro.
The Name input field displays the name of the currently selected variable, $strUserName$. You can change the name of the variable by typing over the old name. Mostly you should use this field only for assigning a name to a newly created variable. Although you can come back later at any time and change the name of this variable (for example to $strUserFirstName$), remember that you might have already used the variable's old name elsewhere in the macro, in some action or descriptor. If you change the name here in the Variables tab, then you must also go back to every place in the macro where you have you used the variable and change the old variable name to the new variable name.
You can choose any variable name you like, although there are a few restrictions on the characters you can choose (see Variable names and type names). You do not have to choose names that begin with an abbreviated form of the data type (such as the str in the string variable $strUserName$), as this book does.
The Type listbox lists the available types for variables and lets you select the type that you want to use for a new variable. The standard types are string, integer, double, boolean, and field. Also, whenever you import a Java class, such as java.util.Hashtable, as an imported type, the Type listbox picks up this imported type and adds it to the list of available types, as shown in Figure 50:
string
integer
double
boolean
field
java.util.Hashtable
You should use this listbox for assigning a type to a newly created variable. You can come back later and change the variable's type to another type, but, as with variable names, remember that you might have already used the variable throughout the macro in contexts that require the type that you initially selected. If so, you must go to each of those places and make sure that the context in which you are using the variable is appropriate for its new type.
The Initial Value input field allows you to specify an initial value for the variable. The Macro Editor provides the following default values, depending on the type:
| Type of variable: | Default initial value: |
|---|---|
| string | No string |
| integer | 0 |
| double | 0.0 |
| boolean | false |
| field | (No initial value) |
| (any imported type) | null |
To specify a new initial value just type over the default value.
The Remove button removes the currently selected variable.
The Import button and the Import popup window are discussed in Creating an imported type for a Java class.
To create a new variable in the Macro Editor, first click the <new variable> entry at the end of the Variable listbox. The Macro Editor creates a new variable and assigns to it some initial characteristics that you should modify to fit your needs. The initial values are:
Now you should set the values that you want for the new variable. For example, if you are creating an integer variable that is for counting screens and that should have an initial value of 1, then you might set the initial values as follows:
Besides the Variables tab, the Macro Editor provides access, in several convenient locations, to a popup window for creating new variables. For example, in the Variable update action, the Name listbox contains not only all the names of variables that you have already created but also a <New Variable> entry. Click this entry to bring up the popup window for creating a new variable. Variables created using this popup window are equivalent to variables created in the Variables tab.
In the Code Editor, you create a new variable using a <create> element. There is a containing element called <vars> that contains all the variables in the macro script, and there is a <create> element for each variable. Figure 51 shows a <vars> element that contains five <create> elements:
<vars>
   <create name="$strAccountName$" type="string" value="" />
   <create name="$intAmount$" type="integer" value="0" />
   <create name="$dblDistance$" type="double" value="0.0" />
   <create name="$boolSignedUp$" type="boolean" value="false" />
   <create name="$fldFunction$" type="field" />
</vars>
In the figure above the <vars> element creates one variable from each of the standard data types (string, integer, double, boolean, and field). You should notice that the attributes of each <create> element match the fields on the Variables tab: the name attribute contains the variable name, the type attribute contains the type, and the value field contains the initial value.
You must put all variable creations (<create> elements) inside the <vars> element. The <vars> element itself must appear after the <import> element, if any (see the next section), and before the first macro screen (<screen> element).
The way that a Host On-Demand macro imports a Java class is through an imported type. That is, you must first create an imported type and associate it with a particular Java class. You have to do this only once per Java class per macro. Follow these steps to create an imported type:
To create a variable belonging to this imported type, create the variable in the normal way, but select the imported type as the type of the variable. Follow these steps to create a variable of the imported type:
Notice that the constructors are enclosed in dollar signs ($). You must use dollar signs around every call to a Java method, just as you must use dollar signs around the name of a variable. (The reason is that the enclosing dollar signs tell the macro runtime that it needs to evaluate the item.)
Going back to the Import popup window, the Imported Types listbox allows you to create new types and to edit or delete the types that you have already created. To create a new type, click the <new imported type> entry at the end of the list. To edit a type, select the type in the Imported Types listbox and modify the values in the Class and Short Name input fields. To remove a type, select the type and click Remove.
When you specify a short name, you can use any name, with certain restrictions (see Variable names and type names).
In the Code Editor, you create an imported type using a <type> element. There is a containing element called <import> that contains all the imported types in the macro script, and there is a <type> element for each imported type. Figure 52 shows an <import> element that declares an imported type, followed by a <vars> element that creates and initializes a variable belonging to the imported type:
<import>
   <type class="java.util.Hashtable" name="Hashtable" />
</import>

<vars>
   <create name=$ht$ type="Hashtable" value="$new Hashtable(40)$" />
 </vars>
In the figure above the <import> element contains one <type> element, which has a class attribute (containing the fully qualified class name, java.util.Hashtable) and a name attribute (containing the short name, Hashtable). The <vars> element contains one <create> element, which as usual specifies a name ($ht$), a type (Hashtable), and an initial value (which here is not null but rather is a call to a constructor that returns an instance of the class, $new Hashtable(40)$).
If you are using the Code Editor, you must put all imported types (<type> elements) inside the <import> element. The <import> element itself must appear inside the <HAScript> element (see <HAScript> element) and before the <vars> element.
During macro playback, when the macro runtime processes a call to a Java method, the macro runtime searches all the available Java library files and class files for the class to which the method belongs, until it finds the class.
Deploying a Java library or class consists of placing the library file or class file containing the class in a location where the macro runtime can find it during macro playback.
You do not have to deploy the following types of Java classes:
All other Java classes containing methods invoked by a macro script must be deployed by you to a location where the macro runtime can find them. Depending on the environment, you can deploy the Java classes as class files or as libraries containing Java classes.
For more information on deploying Java libraries and classes, see "Deploying customer-supplied Java archives and classes" in Planning, Installing, and Configuring Host On-Demand.
The rules for variable names are as follows:
The rules for type names are as follows:
The PlayMacro action, in which one macro "chains to" another macro (a call without return), allows you to transfer all the variables and their values belonging to the calling macro to the target macro. The target macro has access both to its own variables and to the transferred variables (see PlayMacro action (<playmacro> element)).
A field variable is a type of string variable. It holds a string, just as a string variable does, and you can use it in any context in which a string variable is valid.
However, a field variable differs from a string variable in the way in which a string is stored into the field variable. The string that a field variable contains is always a string that the macro runtime reads from a 3270 or 5250 field in the current session window. To get the macro runtime to read this string from the 3270 or 5250 field, you have to create a Variable update action that specifies:
When the macro runtime performs the Variable update action it takes the following steps:
For more information, see Variable update action with a field variable.
The macro runtime assigns initial values to variables at the start of the macro playback, before processing any macro screen.
A variable that belongs to a standard type (string, integer, double, boolean) can be used in much the same way as an immediate value of the same type (such as 'Elm Street', 10, 4.6e-2, true):
However, you cannot use a variable in certain contexts. In the Macro Editor, you cannot use a variable in the following contexts:
In the Code Editor, you cannot use a variable in the following contexts:
You can write a value into a variable belonging to a standard type in the following ways:
You cannot assign one of the following values to a variable of standard type:
If you write a Java object into a variable of standard type, then the macro runtime calls the toString() method of the imported type and then attempts to assign the resulting string to the variable.
You can use the value contained in a variable belonging to an imported type in the following ways:
You cannot assign the following types of data to a variable of imported type:
If your macro attempts to assign one of these invalid types of values to a variable of imported type, then the Macro runtime generates a runtime error and halts the macro
You can write a value into a variable of imported type in the following ways:
You can assign the following types of values to a variable belonging to an imported type:
<create name=$ht$ type="Hashtable" value="" />In any conditional expression (for example, in the Condition field of a conditional action) in which you are comparing two variables of the same imported type, you should implement a comparison method (such as equals()) in the underlying class rather than using the variables themselves. For example,
$htUserData.equals($htPortData$)$If instead, you compare the variables themselves (for example $htUserData$ == $htPortData$), then:
This will probably not yield the outcome that you expect from comparing the two variables.
In everyday language, a parameter list is a set of values that direct a program in its work and that an end user specifies when he or she launches the program. For example, if copy is the name of a program that copies a file from the current directory to another directory, then the following command line invocation:
copy MyFile.txt c:\tempinvokes the copy program by name (copy) and specifies a parameter list (MyFile.txt c:\temp) that includes the name of the file to be copied (MyFile.txt) and the destination directory (c:\temp).
Host On-Demand has a macro feature that works similarly to passing a parameter list to a program when the program is invoked. Before launching a macro, or at the same time as launching a macro, an end user can specify a list of name-value pairs, each pair consisting of a variable defined inside the macro and an initial value that the macro runtime should assign to the variable.
For example, if the macro FileDownload downloads a file from a remote host to the local workstation, and this macro contains the variables strRemoteFile and strLocalFile, then the end user can specify the following parameter list:
strRemoteFile="NewData.123", strLocalFile="MyData.123"When the end user plays the macro, the macro runtime initializes each of the variables named in the parameter list to the value specified in the parameter list. The macro then downloads the file NewData.123 from the remote host and renames the downloaded file to MyData.123.
Of course, for the above scenario to work, the macro writer must have coded the macro so that it looks in the variables strRemoteFile and strLocalFile for the required information.
In general, the macro writer is responsible for:
Also, as a part of good programming practice, the macro writer should consider the following actions:
For more information see Considerations for the macro writer.
The end user is responsible for:
However, the system administrator can handle the task of specifying the parameter list by pre-defining a parameter list, either:
For more information see Specifying the parameter list.
Every variable in a macro has an initial value, whether or not the variable is used in a parameter list. The initial value may be either a default initial value (see Table 22) or an initial value assigned by the macro writer.
A parameter list exists outside the macro to which it pertains. It is not stored in the macro itself, but rather is passed to the macro runtime when macro playback begins.
When the macro runtime prepares to play a macro, the macro runtime first initializes each variable in the macro to the initial value defined in the macro itself for that variable.
The macro runtime then looks for a parameter list. If a parameter list is provided, then the macro runtime processes each name-value pair in the parameter list, re-initializing each named variable to the value specified in the list.
The macro runtime then continues with macro playback in the usual way.
Table 23 shows the locations in the Host On-Demand user interface where you can specify a parameter list for a macro:
| Area of the user interface: | How to navigate to the input field that contains the parameter list: | Does Host On-Demand save the parameter list? |
|---|---|---|
|
Session configuration |
Start Options window
|
Yes. The input list is saved as part of the session configuration. |
|
Main toolbar Please notice: The main toolbar can be saved as a toolbar object and then imported into other session configurations. |
Edit > Preferences > Toolbar > Add Button
|
Yes. The parameter list is saved as part of the main toolbar. |
|
Play macro dialog |
Actions > Play Macro
|
No. The parameter list is temporarily saved in the Parameters input field until another selection is made in either:
|
|
Available macros dialog |
Select a macro icon on the Macro Manager toolbar
|
No. The parameter list is temporarily saved in the Parameters input field until another selection is made in either:
|
|
Customize popup keypad dialog |
Edit > Preferences > Popup Keypad > Customize in the main window, or Edit > Customize in the popup keypad window |
Yes. The parameter list is saved as part of the popup keypad. |
However, you cannot specify a parameter list when you play the currently selected macro using the Play Macro icon in the Macro Manager toolbar. Instead, specify a parameter list in the Available macros dialog (as shown in row 4 of the table above) and then play the currently selected macro.
In the table above, notice that Host On-Demand saves the parameter list only for the locations specified in the first two rows of the table (in the Auto-Start section of the session configuration, and in a customized button added to the main toolbar).
Also, notice that Host On-Demand saves the parameter list outside the macro (as a part of the session configuration or as a part of the main toolbar) rather than as a part of the macro itself.
When you specify a parameter list (for example, in the Parameters input field of the Macro window of the Add Button dialog, as shown in row 2 of Table 23) you must specify it in the following format:
name1="value1", name2="value2", name3="value3", ...For example,
strRemoteFile="NewData.123", strLocalFile="MyData.123"Here are the format rules:
The parameter list is a series of name-value pairs. You can specify any number of pairs, so long as each pair refers to a variable that is defined in the macro.
Use either a blank space (' '), a comma (','), or both (", ") to separate one name-value pair from the next.
In the name-value pair, specify the variable name, followed by an equals sign ('='), followed by the value enclosed in double quotes (""). For example,
strLocalFile="MyData.123"Spell the variable name exactly as it is spelled in the macro. Letter case is significant! For example, strLocalFile is different from strLocalfile.
You can specify the variable name with or without the enclosing dollar signs ($). Right: $strLocalFile$. Also right: strLocalFile.
The variable must be a primitive variable, that is, a variable belonging to a standard type (integer, double, string, or boolean). You cannot specify a variable belonging to an imported type (that is, based on an imported Java class).
An equals sign is required between the variable name and the value.
The variable value must be enclosed in double quotes ("").
The value must be a simple value, not an expression.
If the value belongs to a different standard data type than the variable, then Host On-Demand automatically attempts to convert the value to the correct data type in the usual way (see Automatic data type conversion).
Rules for string variables:
Rules for doubles, integers, and booleans:
Examples of each primitive variable type:
intLineCount="24", dblLength="1441.25", strName="John Smith", boolComplete="true"Host On-Demand does not check the parameter list for errors until the end user plays the macro. When the end user plays the macro, if Host On-Demand finds an error in the parameter list, then Host On-Demand:
Host On-Demand checks for three types of error situations:
In this type of error the parameter list includes a variable name that does not exist in the macro or that is spelled incorrectly (for example, strLocalfile instead of strLocalFile).
Actions that you can take to avoid this type of problem are as follows:
In this type of error the parameter list contains a syntax error (for example, the value is not enclosed in double quotes).
Actions that you can take to avoid this type of problem are as follows:
Figure 53 gives examples of syntax errors and describes how Host On-Demand processes the errors:
strRemoteFile="NewData.123 intLength="14622"
Host On-Demand:
1) Sets the variable strRemoteFile to "NewData.123 intLength=".
2) Tries to process 14622" but cannot
   (Host On-Demand is  looking for a variable name
   but instead finds an integer followed by a double quote).
3) Terminates the macro playback and generates an error message.

strRemoteFile="NewData.123"98 strLocalFile="MyData.123"
Host On-Demand:
1) Sets the variable strRemoteFile to "NewData.123".
2) Tries to process 98 but cannot
   (Host On-Demand is looking for a variable name but finds an integer).
3) Terminates the macro playback and generates an error message.

strRemoteFile=NewData.123 strLocalFile=MyData.123
Host On-Demand:
1) Does not find a double quote after the first equals sign (=).
2) Terminates the macro playback and generates an error message.An example of a problem in a parameter list that causes a run-time error is the following:
intLength="abc"In the example above the variable intLength is of type integer. Host On-Demand tries to convert the string abc to a decimal integer and fails.
When a run-time error occurs, Host On-Demand:
In the above example of a run-time error, Host On-Demand displays an error dialog box containing a message such as the following: A type mismatch occurred while updating variable $intLength$.
The Host Access Toolkit (included on the Host On-Demand CD-ROM) provides two Java methods for managing parameter lists:
Returns, for each primitive variable in the macro, the variable name and the initial value to which the macro sets the variable. Use this method to get a list of the all variables in the macro that you could include in a parameter list.
Specifies an input parameter list for the macro, consisting of a variable name and a value for each parameter.
For more information see the documentation included with the Host Access Toolkit.
When you code a macro to use a parameter list, remember that:
As a general principle, remember that the end user must be able specify the parameter list correctly, without syntax errors or other errors. To help end users, consider the following actions:
A parameter list initializes variables only in the macro that the end user launches with the parameter list. A parameter list does not initialize variables of the same name that occur in a subsequent macro that the original macro chains to. (For more information on chained-to macros see PlayMacro action (<playmacro> element).)
For example, consider the following situation:
In this situation, when Host On-Demand prepares to play the chained-to macro, Host On-Demand doesnot initialize the variable strRemoteFile in the chained-to macro to NewData.123. Instead, as usual, Host On-Demand initializes the variable in the chained-to macro is whatever initial value is specified in the chained-to macro (either a default initial value or an initial value specified by the macro writer).
Do not confuse the above situation with the transferring of variables that can occur when one macro chains to another. If macro A chains to macro B, macro A can pass all its variables and their current values to B (see Transferring variables). Use this feature to pass values from the calling macro to the chained-to macro.
You can call a method in any context in which the value returned by the method is valid. For example, in an Input action you can set the Row value to the integer value returned by a method, such as:
$importedVar.calculateRow()$Also, you can use the Perform action to call a method when you do not need the return variable of the method or when the method has no return value (void) (see Perform action (<perform> element)).
To call a method belonging to an imported class, use the same syntax that you would use in Java. However, in addition, you must also enclose a method call in dollar signs ($), just as you would a variable. Examples:
$new FileInputStream('myFileName')$
$fis.read()$
An immediate string value (such as 'Elm Street', or 'myFileName' in the first example above) passed as a parameter to a method must be enclosed in single quotes, as usual (see In the advanced macro format, rules for representation of strings, etc.).
When you add a method call (such as $prp.get('Group Name')$) to a macro script, the Macro Editor does not verify that a called method or constructor exists in the class to which the variable belongs. That check is done by the macro runtime when the call occurs.
The method must be a public method of the underlying Java class.
When the macro runtime searches in the Java class for a method to match the method that you have called, the macro runtime maps macro data types (boolean, integer, string, field, double, imported type) to Java data types as shown in Table 24:
| If the method parameter belongs to this macro data type: | Then the macro runtime looks for a Java method with a parameter of this Java data type: |
|---|---|
| boolean | boolean |
| integer | int |
| string | String |
| field | String |
| double | double |
| imported type | underlying class of the imported type |
The macro runtime searches for a called method as follows:
The Host On-Demand Macro Utility Libraries (HML libraries) are utility libraries that are packaged with the Host On-Demand client code. You can invoke a method from one of these libraries without:
In fact, you are not allowed to import a class contained in an HML Java library, or to create a variable belonging to an HML class, or to create an instance of an HML object.
The reason is that the macro runtime, during the initializing that goes on when macro playback is started:
The following table shows for each HML variable the variable name and the types of methods in the underlying class.
| HML variable: | Description of methods: |
|---|---|
| $HMLFormatUtil$ | Methods for formatting strings. |
| $HMLPSUtil$ | Methods that access the presentation space of the session window. |
| $HMLSessionUtil$ | Methods that return session values. |
| $HMLSQLUtil$ | Methods that return information about the results of the most recent SQLQuery action. |
| $HMLSystemUtil$ | Methods that return information about applet, Java properties and OS environments. |
To invoke a method belonging to an HML library, specify the variable name, method name, and input parameters in the usual way:
$HMLFormatUtil.numberToString(1.44)$
$HMLPSUtil.getCursorPos()$
$HMLSessionUtil.getHost()$To prevent confusion between normal variables and HML variables, variable names beginning with HML are reserved. If you try to create a variable beginning with HML, Host On-Demand generates an error message.
The methods invoked with $HMLFormatUtil$ are formatting methods. Table 26 summarizes these methods:
| METHOD SUMMARY: $HMLFormatUtil$ | |
|---|---|
| String |
|
| int or double |
|
A locale is a set of formatting conventions associated with a particular national language and geographic area. For example, depending on the locale with which a client workstation is configured, a decimal value such as 1111.22 can be represented with any of the following strings:
'1111.22'
'1,111.22'
'1111,22'
As another example, a negative number such as -78 can be represented as:
'-78'
'78-'
The methods numberToString() and stringToNumber() perform conversions between a number (that is, a variable or immediate value of type integer or type double, such as 1111.22) and its representation in the current locale (a string, such as '1111.22', '1,111.22', or '1111,22').
public String numberToString(Object obj)This method converts a number (integer or double) to a string formatted according to the currently configured locale. The input parameter can be of type integer or of type double.
This method replaces the standalone method $FormatNumberToString()$, which is deprecated.
<input value="$HMLFormatUtil.numberToString(1111.44)$"
          row="20" col="16" movecursor="true"
xlatehostkeys="true" encrypted="false" />public int stringToNumber(String str)
public double stringToNumber(String str)This method converts a numeric string formatted according to the currently configured locale to a number. The number returned is either of type integer or of type double, depending on the input string.
This method replaces the standalone method $FormatStringToNumber()$, which is deprecated.
<message title="’stringToNumber()’" value="’1111.33’" />
<extract name="'Extract'" planetype="TEXT_PLANE"
         srow="1" scol="1"
         erow="1" ecol="10" unwrap="false"
         assigntovar="$value$" />
<if condition="$HMLFormatUtil.stringToNumber($value$)$ < 0 "
   ...
</if>The methods invoked with $HMLPSUtil$ affect the presentation space of the session window or return information about the presentation space of the session window. Table 27 summarizes these methods:
| METHOD SUMMARY: $HMLPSUtil$ | |
|---|---|
| int |
|
| int |
|
| void |
|
| int |
|
| int |
|
| int |
|
| int |
|
| int |
|
| int |
|
| String |
|
| int |
|
The presentation space is a data structure that contains an element for each row and column position in the session window (but not including the last row of the session window, which is used for the Operator Information Area). The size of the presentation space depends on the size of the session window. For example, if the session window has 80 rows and 25 columns, then the size of the presentation space is 80 * 24 = 1920.
The position of the elements in the presentation space corresponds serially to the row and column positions in the session window, reading from left to right, top to bottom. For example, if the session window has 80 rows and 25 columns, then:
     Row of    Column of  Corresponds to
     Session   Session    element at this
     Window:   Window:    position in PS:
         1          1             1
         1          2             2
         1          3             3
      ...
         1         80            80
         2          1            81
         2          2            82
         2          3            83
      ...
        24         79          1919
        24         80          1920
Host On-Demand uses the presentation space to store the characters that are to be displayed in the session window. Each element in the presentation space is used to store one character (and information about that character, such as intensity). For example, if the string Message appears at row 1 and column 1 of the session window, then:
     Row of    Column of  Corresponds    Character
     Session   Session    to element     stored in
     Window:   Window:    at this pos-   this element:
                          ition in PS:
         1          1          1          M
         1          2          2          e
         1          3          3          s
         1          4          4          s
         1          5          5          a
         1          6          6          g
         1          7          7          e
Although you normally will not need to use them, Table 28 show the formulas for calculating various values. The meanings of the symbols used in these formulas is as follows:
| Value: | Formula for calculating: |
|---|---|
| Size of the PS |
|
| row |
|
| col |
|
| pos |
|
public int convertPosToCol(int pos)This method returns the column number associated with the specified position in the presentation space.
<message title="’Example of convertPosToCol()’"
          value="’Cursor is at column ’+
$HMLPSUtil.convertPosToCol($HMLPSUtil.getCursorPos()$)$" />public int convertPosToRow(int pos)This method returns the row number associated with the specified position in the presentation space.
<message title="'Example of convertPosToRow()'"
          value="'Cursor is at row '+
$HMLPSUtil.convertPosToRow($HMLPSUtil.getCursorPos()$)$" />public void enableRoundTrip(boolean flag)This method is for bidirectional languages only (Arabic and Hebrew). Assume that A, B, and C are bidirectional characters. Normally, when a string contains a series of bidirectional characters followed by a series of numerals (for example, ABC 123), and the entire string is stored, the Host On-Demand client exchanges the positions of the bidirectional characters and the numerals. For example, normally, if you read the string ABC 123 from the presentation space and store the string into a variable, and then subsequently write the value of the variable back into the presentation space, the Host On-Demand client writes 123 ABC back into the presentation space.
To turn off this technique of forced reversal, call enableRoundTrip() with a value of true. To restore this technique of forced reversal, call enableRoundTrip() with a value of false.
<perform value="$HMLPSUtil.enableRoundTrip(true)$" />public int getCursorCol()This method returns the column location of the text cursor in the presentation space.
<input value="$HMLSessionUtil.getHost()$"
          row="$HMLPSUtil.getCursorRow()$"
          col="$HMLPSUtil.getCursorCol()$+2"
          movecursor="true" xlatehostkeys="true"
encrypted="false" />public int getCursorPos()This method returns the position of the text cursor in the presentation space.
<message title="’Example of getCursorPos()’"
          value="’Cursor is at row ’+
          $HMLPSUtil.convertPosToRow($HMLPSUtil.getCursorPos()$)$+
          ’ and column ’+
$HMLPSUtil.convertPosToCol($HMLPSUtil.getCursorPos()$)$" />public int getCursorRow()This method returns the row location of the text cursor in the presentation space.
<input value="$HMLSessionUtil.getHost()$"
          row="$HMLPSUtil.getCursorRow()$"
          col="$HMLPSUtil.getCursorCol()$+2"
          movecursor="true" xlatehostkeys="true"
encrypted="false" />public int getSize()This method returns the size of the presentation space, that is, the number of character positions in the presentation space. For example, if the session window has 25 rows and 80 columns, then the size of the presentation space is 24 * 80 = 1920.
<message title="’Example of getSize()’"
value="’Size of PS is ’+$HMLPSUtil.getSize()$" />public int getSizeCols()This method returns the number of columns in the presentation space. The presentation space has the same number of columns as the session window. For example, if the session window has 25 rows and 80 columns, then the number of columns in the presentation space is 80.
<message title="’Example of getSizeRows and getSizeCols()’"
          value="’The PS has ’+$HMLPSUtil.getSizeRows()$+
          ’ rows and ’+
$HMLPSUtil.getSizeCols()$+’ columns’" />public int getSizeRows()This method returns the number of rows in the presentation space. The presentation space has one row less than the session window (because the last line of the session window, which contains the Operator Information Area, is not included in the presentation space). For example, if the session window has 25 rows and 80 columns, then the number of rows in the presentation space is 24.
<message title="’Example of getSizeRows and getSizeCols()’"
          value="’The PS has ’+$HMLPSUtil.getSizeRows()$+
          ’ rows and ’+
$HMLPSUtil.getSizeCols()$+’ columns’" />public String getString(int pos, int len)This method returns the text string beginning at the specified position in the presentation space and continuing for the specified number of characters.
<message title="’Text of row 18:’"
          value="’Text:’+$HMLPSUtil.getString(
                    $HMLPSUtil.getSizeCols()$*17+1,
$HMLPSUtil.getSizeCols()$)$" />public int searchString(int pos, int len)This method returns the position in the presentation space of the specified string. This method returns 0 if the string is not found in the presentation space.
<varupdate name="$int$" value="$HMLPSUtil.searchString('IBM')$" />
<message title="'Searching for IBM'"
          value="'IBM is found at position '+$int$+
          ' that is row='+
          $HMLPSUtil.convertPosToRow($int$)$+
          ', column='+
$HMLPSUtil.convertPosToCol($int$)$" />The methods invoked with $HMLSessionUtil$ return values associated with the session. Table 29 summarizes these methods:
| METHOD SUMMARY: $HMLSessionUtil$ | |
|---|---|
| String |
|
| String |
|
| String |
|
public String getHost()This method returns the host name or the host address that you typed into the Destination Address field of the Connection section of the session configuration (such as myhost.myloc.mycompany.com or 9.27.63.45).
<message title="’Host name or address’" value="$HMLSessionUtil.getHost()$" />public String getLabel()This method returns the session name that you typed into the Session Name field of the Connection section of the session configuration (a name such as 3270 Display or 5250 Display).
<message title="’Session name’" value="$HMLSessionUtil.getLabel()$" />public String getName()This method returns the identifying name that the host assigns to the session (such as A , B, or C). When you start a session, the host assigns a name to the session to distinguish it from other instances of the same session that might be started.
<message title="’Session instance identifier’" value="$HMLSessionUtil.getName()$" />The methods invoked on $HMLSQLUtil$ return information about the results of the most recent SQLQuery action. Table 30 summarizes these methods:
| METHOD SUMMARY: $HMLSessionUtil$ | |
|---|---|
| int |
|
| String |
|
| String |
|
| int |
|
The results of the SQLQuery action are stored as a two-dimensional array that is one column wider and one row taller than the size of the block of data returned. Row 0 is used to store the names of the columns (the field names from the database), and Column 0 is used to store a zero-based index (see Table 31 below). The entry at Row 0, Column 0 contains an empty string. The remainder of the array contains the actual data. All values are strings.
Table 31 shows as an example the results of a query, a 3 x 5 block of data, stored in a 4 x 6 array:
| (empty string) | TOPICID | EXMPLID | DESCRIPT |
| 0 | 4 | 18 | Create a toolbar with custom buttons. |
| 1 | 9 | 54 | Attach tables at startup. |
| 2 | 11 | 74 | Edit Products. |
| 3 | 11 | 75 | Enter or Edit Products |
| 4 | 11 | 76 | Find Customers |
In the table above, the entry at Row 0, Column 0 contains an empty string. The remainder of Row 0 contains the field names from the database (TOPICID, EXMPLID, DESCRIPT). The remainder of Column 0 contains index numbers for the rows (0, 1, 2, 3, 4). The actual data is contained in the remainder of the array. All values are strings.
public int getColumnSize()This method returns the actual number of columns of data in the array, including the added Column 0. For example, for the array in Table 31 this method returns 4.
<message title="’Column size’" value="$HMLSessionUtil.getColumnSize()$" />public int getDataByIndex(int row, int column)This method returns the entry at the specified row and column index. The following list shows the values returned for the data shown in Table 31:
<message title="’Row 3, Column 3’" value="$HMLSessionUtil.getDataByIndex(3,3)$" />public int getDataByName(int row, String fieldName)This method returns the entry at the specified row and field name. The following list shows the values returned for the data shown in Table 31:
<message title="’Row 3, Field DESCRIPT’"
value="$HMLSessionUtil.getDataByName(3,'DESCRIPT')$" />public int getRowSize()This method returns the actual number of rows of data in the array, including the added Row 0. For example, for the array in Table 31 this method returns 6.
<message title="’Column size’" value="$HMLSessionUtil.getRowSize()$" />The methods invoked with $HMLSystemUtil$ allow you to obtain information about applet, Java properties and OS environments.
Table 32 summarizes these methods:
| METHOD SUMMARY: $HMLSystemUtil$ | |
|---|---|
| String |
|
| String |
|
| String |
|
public String getHTMLParameter(String name)This method accepts the HTML Parameter name and returns its value.
If a non-existing parameter name is given, the method returns an empty string.
$HMLSystemUtil.getHTMLParameter('some_param_name')$public String getenv(String name)This method accepts the Operating System environment variable name and returns its value.
If a non-existing variable name is given, the method returns an empty string.
$HMLSystemUtil.getenv('Temp')$public String getSystemProperty(String name)This method accepts the Java System Property name and returns its value.
If a non-existing variable name is given, the method returns an empty string.
$HMLSystemUtil.getSystemProperty('java.home')$If you are using case-sensitive operating systems, the names specified as a parameter for these methods will be case-sensitive.
$FormatNumberToString()$ is deprecated in favor of $HMLFormatUtil.numberToString()$. The former has the same input parameters and return type as the latter (see numberToString()).
$FormatStringToNumber()$ is deprecated in favor of $HMLFormatUtil.stringToNumber()$. The former has the same input parameters and return type as the latter (see stringToNumber()).
This chapter describes other security options.
By default the Record Password option is enabled. You can disable Record Password in one of the following ways:
The Record Password option controls how Host On-Demand records an input key sequence that the end user types into a 3270 or 5250 non-display input field during macro recording. A non-display input field is a 3270 or 5250 field that does not display characters when you type into it. Typically a non-display input field is used for entering confidential information such as a password.
Notice that the Record Password option:
When Record Password is enabled (this is the default setting) and the end user types characters into a 3270 or 5250 non-display input field during macro recording, Host On-Demand records the input key sequence as an Input action and encrypts the input key sequence in the Input action using the Password option of the Input action.
For example, suppose that Record Password is enabled, that you are recording a macro, and that you type a logon password (such as "MyPassword") into a 3270 or 5250 non-display input field. Host On-Demand creates an Input action, encrypts the logon password, stores the encrypted password into the Input action, and writes the Input action into the macro script being recorded.
Encrypting the input key sequence in the Input action provides a degree of security, because a casual unauthorized person cannot discover the input key sequence by editing or viewing the recorded macro script. Host On-Demand does not decrypt an encrypted input key sequence in an Input action until Host On-Demand processes the Input action during macro playback. However, a clever foe who gains access to the macro script can still discover the input key sequence by editing the Input action to direct the input key sequence into a normal displayable field during macro playback (see Password).
The advantage of having the input key sequence recorded in an Input action is that during macro playback the macro runs automatically without the user having to intervene. However, if a required input sequence changes (for example, if a password expires and a different password must be used) then the Input action must be updated with the new input key sequence.
When Record Password is disabled, and the end user types an input key sequence into a 3270 or 5250 non-display input field during macro recording, Host On-Demand discards the input key sequence and creates a Prompt action in the recorded macro script instead of an Input action. The Prompt action contains information about the length of the input key sequence and the row and column location on the screen where the input key sequence is to be directed, but does not contain the input key sequence itself. Consequently, an unauthorized person viewing, editing, or even running the macro script cannot discover the input key sequence.
During macro playback, when Host On-Demand processes the Prompt action, it pops up a prompting window containing an input field and a message indicating that the end user should type some input. (The default message is Password, but after macro recording is complete you can edit the Prompt action to specify a different message.) When the end user types an input key sequence into the input field of the prompting window and clicks OK, then Host On-Demand closes the prompting window and types the same input key sequence into the 3270 or 5250 non-display field in the session window at the specified row and column location.
Thus, disabling Record Password provides greater security than enabling it, because when Record Password is disabled the input key sequence is not stored in the macro script, not even in encrypted form. Instead, the end user provides the input key sequence during macro playback, when Host On-Demand processes the Prompt action.
When Host On-Demand creates the Prompt action during macro recording, it turns on the Password Response option in the Prompt action. This option causes Host On-Demand, during macro playback, to use asterisks (*) to display the characters that appear in the input field of the prompting window when the user types the input key sequence (see Password Response).
This chapter describes other advanced features.
Starting with Host On-Demand Version 9.0, a macro can interact with display emulation sessions other than the display emulation session that launched the macro.
This feature makes it easier and quicker for you to pass data between different host applications, or to pass data from two or more host applications to a single workstation application. For example:
Before this feature was available, you could do tasks similar to these, but not as easily nor with as much automation. You needed a separate macro for each host session, you had to manually launch each macro, and you had to manually synchronize the macros, waiting for one macro to complete a work product before you launched a macro that depended on that work product.
A macro that interacts with more than one session can be stored in any of the locations that an ordinary macro can be stored.
A macro that interacts with more than one session is launched by a single session, just as an ordinary macro is launched. However, all the sessions that the macro interacts with must be active (connected) before the macro is launched (see Run-time requirements).
The various sessions that the macro interacts with can be of different types (3270 Display, 5250 Display, VT Display, or CICS Gateway) or all of the same type, and can be connected to different hosts or to the same host.
There is no limit to how many active sessions a single macro can interact with, so long as:
A Host ID field has been added to the macro descriptors and macro actions that support this feature. The value in the Host ID field identifies the active session to which the descriptor or action applies (see Specifying a Host ID).
During macro playback, when the macro runtime prepares to evaluate a descriptor or to perform an action, the macro runtime looks in the Host ID field of the descriptor or the action. If the Host ID field is missing, or blank, then the macro runtime applies the descriptor or the action to the original session, the session that launched the macro (for example, a 3270 Display session). But if the Host ID field is specified and non-blank, then the macro runtime:
The following descriptors support this feature:
That is, you can use any of these descriptors to refer to an active display emulation session other than the original session that launched the macro. The remaining descriptors (Condition, Custom) and the Variable update action do not refer to a particular session window and therefore do not support this feature. With the first three descriptors in the list above, there is a limitation with how many descriptors are displayed in the Macro Editor (see Referring to different sessions in the same macro screen).
The following macro actions support this feature:
You can apply any of these actions to an active display emulation session other than the original session that launched the macro. The remaining actions (Conditional, File Upload, and so on) do not act upon a particular session window and therefore do not support this feature.
When you build a macro screen that refers to a session other than the original session that launches the macro, there are at least two techniques that you can use.
The first technique is to make each macro screen refer to one and only one active session. That is, all the descriptors and all the actions within any one macro screen should refer to the same active session. This technique allows you great flexibility and makes it simple to write, debug, and maintain your macro screens.
For example, the first 10 macro screens of your macro could interact with the original session, the next 8 macro screens could interact with a second session, and the final 4 macro screens could interact with the original session again.
The Macro object uses this first technique in storing recorded material when you record a macro that interacts with more than one active session. Whenever you switch from one active session to another, the Macro object completes and stores the current macro screen and then creates a new macro screen to hold the descriptors and actions for the first application screen of the newly selected session (see One recorded macro screen refers to one session window).
Therefore, when you record a macro that refers to more than one session, the Macro object builds the macro using the first technique.
The second technique is to allow a macro screen to refer to more than one active session. Either the descriptors refer to two or more active sessions, or the actions do, or both. If the descriptors refer to two or more active sessions, then the macro runtime evaluates each descriptor with reference to the session window of the specified session. If the actions refer to two or more active sessions, then the macro runtime executes each action against the session window of the specified session.
The second technique requires users to edit the macro, with either the Macro Editor or the Code Editor, to add references to more than one session within one macro screen (see Referring to different sessions in the same macro screen).
This second technique is more flexible than the first technique and in some situations can be necessary. However, this second technique usually makes it somewhat more complicated to write, debug, and maintain your macro screens.
For clarity, this section describes in more detail the processing of descriptors and actions for multiple sessions during macro playback.
When the macro runtime plays back a macro that refers to more than one session, the macro runtime processes descriptors exactly as it does with an ordinary macro. However, if a descriptor applies to an active session other than the original session that launched the macro, then the macro runtime evaluates the descriptor as true or false with respect to the session window of that active session. There are two main cases, which are described in the two following subsections.
Suppose that a macro was launched by a 3270 Display session, that the macro runtime has just finished processing a macro screen that refers to this 3270 Display session, and that the macro runtime is now trying to recognize the next macro screen to be processed. Suppose also that the macro runtime is examining as a candidate a macro screen named Screen26, and that Screen26 contains the following descriptors, each of which applies to the same active 5250 Display session:
Assuming that all three descriptors are required descriptors and that none is an inverse descriptor, then the macro runtime determines that Screen26 is the next macro screen to be processed, if each descriptor evaluates to true with respect to the session window of the 5250 Display session. For example, suppose that the values of the descriptors are 4, 53, and NOTINHIBITED. If the session window of the 5250 Display session contains 4 input fields, contains 53 fields of all types, and has the input inhibited indicator cleared, then the macro runtime determines that Screen26 is the next macro screen to be processed.
The above processing is exactly the same as the processing for an ordinary macro screen, except that all the descriptors apply to a session window other than the session window of the session that launched the macro.
Again, suppose that a macro was launched by a 3270 Display session, that the macro runtime has just finished processing a macro screen that refers to this 3270 Display session, and that the macro runtime is now trying to recognize the next macro screen to be processed. Suppose also that the macro runtime is examining as a candidate a macro screen named Screen32, and that Screen32 contains 6 descriptors:
Assuming that all the descriptors are required descriptors and that none is an inverse descriptor, then the macro runtime determines that Screen32 is the next macro screen to be processed if:
In this example the process of evaluating individual descriptors is exactly the same as in an ordinary macro, except that the macro runtime evaluates the descriptors with respect to two different active session windows.
After evaluating each descriptor as true or false with respect to a particular session window, the macro runtime then combines the boolean results of the individual descriptors in the usual way (see Evaluation of descriptors).
When the macro runtime plays back a macro that refers to more than one session, the macro runtime processes actions exactly as it does with an ordinary macro. However, if an action contains a Host ID that refers to an active session other than the original session that launched the macro, then the macro runtime executes the action with respect to the session window of that active session.
As with descriptors, a single macro screen can contain actions all of which apply to the same session, or actions that apply to two or more different sessions. For example, if a macro screen contains one Input action for the original session that launched the macro (such as a 3270 Display session) and a second Input action for another session (such as a 5250 Display session), then the macro runtime:
When an end user runs a macro that interacts with more than one session, the macro runtime has two requirements:
For the first requirement, whenever the end user launches a macro, the macro runtime, as part of the preparations for running the macro, scans the entire macro script for Host ID fields and compiles a list of sessions that the macro accesses. The macro runtime then verifies that each session in the list is started and connected. If one of the sessions is not started and connected, then the macro runtime displays an error message and terminates the macro playback.
The second requirement is just an extension of the ordinary requirement that the end user position the session that launches the macro at the application screen expected by the first macro screen of the macro. Just as the first macro screen of an ordinary macro expects to find the session window positioned at a particular application screen, so the first macro screen that interacts with a session other than the original session expects to find the session window of that session positioned at a particular application screen.
In the Macro Editor, a Host ID input field is displayed in the editing window of each descriptor or action that can refer to a session other than the original session that launches the macro (see the lists of descriptors and actions in Implementation). In the Code Editor, the hostid attribute is valid in the corresponding XML elements.
A Host ID consists of:
Examples: B:3270 Display, C:5250 Display.
IBM recommends that you specify, in the session properties of each session that a macro refers to other than the original session, a particular session ID (a letter between A and Z) for the session, rather than letting the Host On-Demand client assign the session ID automatically when the end user launches the session. To specify a particular session ID for a session:
If, instead, you let the Host On-Demand client assign the session ID automatically, then the session ID can be different (for example, C) than the session ID that you use in the macro script (such as B), and if so then the Host ID value is also different (C:3270 Display instead of B:3270 Display). Consequently, when the end user launches the macro, the macro runtime can terminate the macro playback with an error because the macro contains a reference (B:3270 Display) to a session that is not active and connected.
To change the session name component of the Host ID (for example, to change 3270 Display to SessionApp1:
In the Macro Editor, after you have typed a session reference into the Host ID field of the editing window of a descriptor, then if the session referred to by the Host ID is active, and if the descriptor has a Current button, then you can use the Current button to gather data automatically from the session window of the session that the Host ID refers to.
However, you cannot use the marking rectangle in the same way. That is, you cannot use the marking window to gather editing information from any session window except the session window belonging to the session from which you launched the Macro Editor.
This section describes issues involved in recording a macro that interacts with more than one session. Each of the following subsections deals with an issue.
As with an ordinary macro, the Macro object creates the macro script for the recorded macro in the selected location.
As you switch between different active sessions during the recording process, the Macro object continues to store the recorded information into the same location that you originally selected.
Whenever you switch from one active session to another active session during the recording process, the Macro object:
Thus the Macro object uses the first of the two techniques described earlier for building macro screens, the technique of making all the descriptors and all the actions within any one macro screen refer to the same active session (see Two techniques for building macro screens).
Start recording as usual, by clicking the Record macro icon on the Macro Manager toolbar. You should start recording in the same session from which you plan to launch the macro when it is completed.
To switch to another session, click the Append recording icon on the Macro Manager toolbar of the session from which you want to record. To switch back to the original session, click the Append recording icon on the Macro Manager toolbar of the original session.
To stop recording at any time, click the Stop recording icon on the Macro Manager toolbar of the same session from which you originally started the recording. For example, if you start recording from a 3270 Display session, and you later continue recording from two other active 3270 Display sessions, then you must stop recording by clicking the Stop recording icon on the original 3270 Display session.
Table 33 summarizes this information about starting, switching sessions, and stopping.
| Function: | The icon to click: | The session in which the icon is located: |
|---|---|---|
| Start recording | Start recording | The session from which you plan to run the completed macro. |
| Switch to any active session (including the original session) | Append recording | The session that you want to switch to. |
| Stop recording | Stop recording | The session from which you started recording. |
The currently selected session is either:
(In the second alternative, the currently selected session can be the original session, if you have switched to another session and then have switched back to the original session).
In the currently selected session, the Append recording icon is disabled, to indicate that the session is the current source of recorded material.
In the currently selected session, the following Macro Manager icons are active: Pause recording, Add a Prompt, Add a Smart Wait, and Add an Extraction. Use these icons as you would normally to pause recording or to add an element.
If the currently selected session is the original session in which you started recording:
In contrast, if the currently selected session is not the original session from which you started the recording:
Table 34 summarizes this information:
| Macro Manager icon in the currently selected session: | State: |
|---|---|
| Append recording | Disabled |
|
Enabled |
| Record |
|
| Stop |
|
If a session is not the currently selected session, and if it is also not the original session from which you started recording the macro, then all the icons on the Macro Manager toolbar are in their normal state and can be used normally.
For example, you can start recording a new macro by clicking the Record macro icon, even though you are currently recording another macro that you started in another session.
Very occasionally, you may want or need to record more than one macro at the same time. If so, then you must start each macro in a separate active session. (The Macro Manager enforces this rule by making the "Record a macro" icon active and not selectable when you click it, until you click Stop recording.) Each macro is recorded separately and individually, and the recordings do not interfere with one another.
However, suppose that the following situation occurs:
To switch to SessionC as the source of recorded material, click the Append recording icon in SessionC.
In this situation, the Macro object does not know whether you wish the recorded material from SessionC to be added to the macro that you started recording in SessionA or to the macro that you started recording in SessionB. Therefore, when you click the Append recording icon in SessionC, the Macro object immediately displays a window listing the sessions in which you have launched a recording (SessionA and SessionB) and asking you to select the session to which you want to add the recorded material from SessionC.
Also, while you are using SessionC to record information for SessionA, you cannot use SessionC to record information for SessionB.
When you want to use the second technique described earlier for building macro screens (see Two techniques for building macro screens), the technique of referring to more than one session in the descriptors or in the actions of the same macro screen, you must use the Macro Editor or the Code Editor to manually add the references to additional session or sessions.
For example, if you have recorded a macro screen that interacts with a 3270 Display session, and you want to add to that macro screen references to a 5250 Display session, then you must open the macro script with the Macro Editor or the Code Editor and then manually add the appropriate descriptors or actions to the 5250 Display session.
With the following three descriptors, there is a limitation in how many descriptors the Macro Editor can display in the editing window:
You might recall that these three descriptors are represented in the Macro Editor by a single descriptor, the Field Counts and OIA descriptor, and that in an ordinary macro only one Field Counts and OIA descriptor is allowed per macro screen (see Field Counts and OIA descriptor). Because of this state of affairs in ordinary macros, the Macro Editor is incapable of displaying multiple Field Counts and OIA descriptors, even if each one refers to a different session. Therefore, if your macro screen contains more than one Field Counts and OIA descriptor, the Macro Editor displays only the first one. However, you can see all the descriptors by viewing the macro screen with the Code Editor.
If you are using the Macro Editor, then use can use the Current button in descriptors to gather data from sessions other than the session from which the Macro Editor was launched (see Using automatic editing features with other sessions).
The Macro window of the Disable Functions does not have a separate option for enabling or disabling the recording of a macro that interacts with more than one session. Instead, this function is considered part of the Record Macro option.
Even though the Macro Editor window appears on top of the session window, you can still use the session window.
Drag the Macro Editor window to one side of the screen so that you can see the area on the session window that you want to work with. Then click on the session window to make it the current window. (The Macro Editor might still overlap part of the session window.)
There are several situations in which you can use the marking rectangle to mark an area of the session window, including:
To mark an area with the marking rectangle, follow these steps:
Some actions and descriptors require you to enter a pair of row and column coordinates. Some examples are:
To determine a row and column location on the session window using the text cursor:
In input fields that require a string, you must specify the string in the manner required by the format that you have selected for the macro, either the basic macro format or the advanced macro format (see Representation of strings and special characters, treatment of operator characters).
For example, if you have selected the advanced macro format, but you specify a string that is not surrounded with single quotes (such as Terminal parameters), then the Macro Editiro will display an error message like the following:
String -- Invalid expression -- Resetting to previous value.To avoid getting this error message, specify the string surrounded with single quotes (such as 'Terminal parameters').
In contrast, if you have selected the basic macro format, but you specify a string that is surrounded with single quotes, then you will not get an error message, but the Macro Editor will treat the single quotes as part of the string.
This section tells you how to copy a macro script from this document to the Code Editor. This text assumes that you are copying an entire macro script, beginning with <HAScript> and ending with </HAScript>. Follow these steps.
If you wish to edit this macro, then you can do so either with the Macro Editor or the Code Editor.
A Host On-Demand macro is stored in an XML script using the XML elements of the Host On-Demand macro language. This section describes some of the conventions of XML and gives examples from the Host On-Demand macro language:
<screen>   ...      </screen>
<Screen>   ...      </Screen>
<scrEen> ... </scrEen><HAScript> ... </HAScript>
<import> ... </import>
<vars> ... </vars>
<screen> ... </screen>
<oia ... />
<numfields ... /><oia status="NOTINHIBITED" optional="false" invertmatch="false"/>
<numfields number="80" optional="false" invertmatch="false"/>
<HAScript name="ispf_ex1" description="" timeout="60000" ... author="" ...>
   ...
</HAScript><description>
<oia status="NOTINHIBITED" optional="false" invertmatch="false">
<numfields number="80" optional="false" invertmatch="false"/>
</description>You can edit the XML text of a macro script directly with the Code Editor (see Code Editor).
You can cut and paste text between the Code Editor and the system clipboard. This is a very important feature, because it allows you to transfer text between the Code Editor and other XML editors or text editors.
Figure 80 lists the begin tags of all the XML elements in the Host On-Demand macro language. This list is not valid in terms of XML syntax and does not indicate where more than one element of the same type can occur. However, the indentation in this list does shows which XML elements occur inside other XML elements. For example, the first element in the list, the <HAScript> element, which is not indented at all, is the master element and contains all the other elements. The second element, the <import> element, occurs inside an <HAScript> element and contains a <type> element. And so on.
<HAScript>                 Encloses all the other elements in the script.
   <import>                Container for <type> elements.
      <type>               Declares an imported data type (Java class).
   <vars>                  Container for <create> elements.
      <create>             Creates and initializes a variable.
   <screen>                Screen element, contains info about one macro screen.
      <description>        Container for descriptors.
         <attrib>          Describes a particular field attribute.
         <cursor>          Describes the location of the cursor.
         <customreco>      Refers to a custom recognition element.
         <numfields>       Describes the number of fields in the screen.
         <numinputfields>  Describes the number of input fields in the screen.
         <string>          Describes a character string on the screen.
         <varupdate>       Assigns a value to a variable.
      <actions>            Container for actions.
         <boxselection>    Draws a selection box on the host application screen.
         <commwait>        Waits for the specified communication status to occur.
         <custom>          Calls a custom action.
         <extract>         Copies data from the host application screen.
         <else>            Allows you to insert an else-condition.
         <filexfer>        Uploads or downloads a file.
         <if>              Allows you to insert an if-condition.
         <input>           Sends keystrokes to the host application.
         <message>         Displays a message to the user.
         <mouseclick>      Simulates a mouse click.
         <pause>           Waits for the specified amount of time.
         <perform>         Calls a Java method that you provide.
         <playmacro>       Calls another macro.
         <prompt>          Prompts the user for information.
         <trace>           Writes out a trace record.
         <varupdate>       Assigns a value to a variable.
      <nextscreens>           Container for <nextscreen> elements.
         <nextscreen>         Contains the name of a valid next macro screen.
      <recolimit>             Takes action if recognition limit is reached.
The hierarchy of the elements and the corresponding structure of the macro script are discussed in numerous places in this document. In particular, see the following sections:
For descriptions of individual elements see Macro language elements.
You can insert a comment anywhere inside an <HAScript> element by using XML-style comment brackets <!-- --> around the text of your comment.
Comments are useful for:
When you save a macro script, the Code Editor re-formats your comments if necessary to make them conform to the following format:
No matter where you place a comment, the Code Editor will arrange it according to this scheme ( see Examples of comments).
The Code Editor will display an error message in the following situations:
Also, you cannot use comment brackets <!-- --> outside the <HAScript> element. If you do so then the Code Editor will discard those comment brackets and the surrounded text when it saves the script.
Here are some examples of the use of comment brackets <!-- --> to insert comments:
<!--
A multi-line comment that comments on
the following <screen> element
-->
<screen name="Screen1" entryscreen="true" exitscreen="false" transient="false">

<!-- A comment on the following <description> element -->
<description>
   <oia status="NOTINHIBITED" optional="false" invertmatch="false" />
</description>

<! A comment on the following <actions> element -->
<actions>
   <mouseclick row="4" col="16" />
   <input value="3[enter]" row="0" col="0" movecursor="true"
             xlatehostkeys="true" />
</actions>
<!--
BEGIN
An accidental comment that surrounds part of
a <nextscreens> element,  thereby corrupting
the macro script.
You will get an error when you try to save
this macro script
<nextscreens timeout="0" >
   <nextscreen name="Screen2" />
END of accidental comment
-->
</nextscreens>
</screen>
When you are debugging, you can use the <trace> element to send text and values to a trace output destination. In particular, if you include the name of a variable in the output, then the macro runtime will display both the name and the value of the variable in the output, enclosed in curly braces {}. Here is an example:
<vars>
<create name="$var1$" type="string" value="'original'" />
</vars>
.
.
<actions>
<trace type="SYSOUT" value="'Before update: '+$var1$" />
<varupdate name="$var1$" value="'updated'" />
<trace type="SYSOUT" value="'After update: '+$var1$" />
</actions>
The code shown in the figure above prints the following text to the Java console:
Before update: +{$var1$ = original}
After update: +{$var1$ = updated}
Notice that the <trace> action displays each variable in curly brackets {} that contain both the variable name and the contents of the variable.
The separate Host Access Toolkit product includes classes that allow you to dynamically create macro variables, perform macro actions, and run macros. This section contains an example of using the Host Access Toolkit product.
Figure 83 shows the first version of a macro that prompts for the user's ID and password, logs on to a host, and says Welcome! This version of the macro does not use the Host Access Toolkit:
<HAScript name="Logon" description="" timeout="60000" pausetime="300"
          promptall="true" author="" creationdate="" supressclearevents="false"
          usevars="true" >

  <screen name="Screen1" entryscreen="true" exitscreen="false" transient="false">

    <description>
      <oia status="NOTINHIBITED" optional="false" invertmatch="false" />
    </description>

    <actions>
      <prompt name="'UserID:'" description="" row="20" col="16" len="8"
              default="" clearfield="false" encrypted="false" movecursor="true"
              xlatehostkeys="true" assigntovar="" varupdateonly="false" />
      <input value="'[tab]'" row="0" col="0" movecursor="true"
              xlatehostkeys="true" encrypted="false" />
      <prompt name="'Password:'" description="" row="21" col="16" len="8"
              default="" clearfield="false" encrypted="true" movecursor="true"
              xlatehostkeys="true" assigntovar="" varupdateonly="false" />
      <input value="'[enter]'" row="0" col="0" movecursor="true"
              xlatehostkeys="true" encrypted="false" />
    </actions>
    <nextscreens timeout="0" >
      <nextscreen name="Screen2" />
    </nextscreens>
  </screen>

  <screen name="Screen2" entryscreen="false" exitscreen="true" transient="false">
    <description>
      <oia status="NOTINHIBITED" optional="false" invertmatch="false" />
      <numfields number="7" optional="false" invertmatch="false" />
      <numinputfields number="1" optional="false" invertmatch="false" />
    </description>
    <actions>
      <message title="" value="'Welcome!'" />
    </actions>
    <nextscreens timeout="0" >
    </nextscreens>
  </screen>

</HAScript>
Assume that you want to use this macro in a Host Access Beans program and that you want to store the user ID into a variable and save it for later use (for example, in the Welcome message). You can do this directly by modifying the macro, but one reason for writing a program for this is to avoid having to maintain many different macros for different situations. You could instead have a basic version of the macro and use a program to modify it depending on the situation. The following is an example of how you can do this in Java:
// Assume macro is an instantiated Macro with the appropriate listeners set up.
// (See the Javadoc for the Macro bean and the Macro variables demo program,
// MacroVariablesDemo.java, in the Host Access Toolkit samples directory
// for details.)
// Assume macroString is a String containing the previous macro script

macro.setMacro(macroString);
MacroScreens ms = macro.getParsedMacro();
ms.createVariableString("$userid$", null);   //creates a variable $userid$ with
                                             //initial value of ""
MacroScreen mscrn = ms.get(0);   //get the first screen
MacroActions mas = mscrn.getActions();   //get the actions from the first screen
MacroActionPrompt map = (MacroActionPrompt)mas.get(0);   //get the first prompt action
map.setAssignToVar("$userid$"); //assign the prompt response to the variable $userid$
MacroScreen mscrn2 = ms.get(1); //get the second screen
MacroActions mas2 = mscrn2.getActions(); //get the actions from the second screen
MacroActionMessage mam = (MacroActionMessage)mas2.get(0); //get the message action
mam.setMessage("'Welcome ' + $userid$ + '!'"); //change the message to now be a
                                               //personalized message using $userid$
macro.setParsedMacro(ms); //reset the macro with the updated MacroScreens
macro.play(); //play the macro with the changes for variables
Suppose that you now want to add a second message to the actions for Screen2. In this message, you want to display the time and date, which you extract from the screen. You would add the following lines before macro.setParsedMacro(ms):
//create a variable $datetimestamp$ with initial value ""
ms.createVariableString("$datetimestamp$", null);

//create new extract to get date and time from second row of screen
MacroActionExtract mae = new MacroActionExtract(2, 35, 2, 71, "'datetimeextract'");

//assign the date and time string to $datetimestamp$
mae.setAssignToVar("$datetimestamp$");

//add the extract after the first message
mas2.add(mae);

//create a new message to display the date and timestamp
MacroActionMessage mam2 = new MacroActionMessage(
   "'You have logged on at ' + $datetimestamp$", "'Date Time Stamp'");

//add the message after the extract
mas2.add(mam2);
Note that at the point when the attribute containing the variable(s) is associated with the MacroScreens, you must have already created the variable (through one of the createVariable() methods). For example, this code sequence would also be valid:
MacroActionExtract mae = new MacroActionExtract(2, 35, 2, 71, "'datetimeextract'");
mae.setAssignToVar("$datetimestamp$");
ms.createVariableString("$datetimestamp$", null);
mas2.add(mae);
MacroActionMessage mam2 = new MacroActionMessage("'You have logged on at ' +
   $datetimestamp$", "'Date Time Stamp'");
mas2.add(mam2);
The above sequence is valid because $datetimestamp$ is created before the MacroActionExtract is added to the MacroActions (which are already associated with the MacroScreens because they were pulled from the MacroScreens originally). If the createVariable() method was called at the end of the sequence above, you would have an invalid sequence because the variable $datetimestamp$ would not have been available at the time that the MacroActionExtract and MacroActionMessage were added to the MacroActions and associated with the MacroScreens.
The default value of the MacroScreens method isUseVars() is false. However, if you call one of the createVariable() methods on your MacroScreens, isUseVars() will return true automatically. If you don't create any variables, but want to have your attributes scanned for variables and arithmetic anyway (e.g. you might be writing a chained child macro that has no variables of its own but is anticipating some from the parent), you must call setUseVars(true) on your MacroScreens.
Attributes that can now take variables or expressions as arguments have setAttribute(String) and either getAttributeRaw() or isAttributeRaw() methods available. If you wanted to use an expression now to represent the row attribute for a MacroActionInput, you could call setRow("$rowvar$ + 1"). Subsequently calling getRow() would return the evaluated value of this expression (an integer), whereas calling getRowRaw() would return "$rowvar$ + 1." Note that if you do the following you will get a NumberFormatException:
MacroActionInput mai = new MacroActionInput();
mai.setRow("$rowvar$ + 1");
int row = mai.getRow();
This is because mai has not yet been associated with any MacroScreens with isUseVars() returning true. Therefore, "$rowvar$ + 1" is being treated as a string rather than a variable plus one. Note also that if you had call the setAttribute() methods to set up variables and expressions after the object containing these attributes have been associated with the MacroScreens, you will likely experience a savings in processing time as the attributes would otherwise need to be reparsed for variables/expressions at the point when they are added to the MacroScreens.
The VariableException class is available for catching exceptions such as illegal expressions (e.g., "45 *") or illegal arithmetic operands (e.g., "'3a' * 2").
A sample program that uses programmed macros, MacroVariablesDemo.java, can be found in the Host Access Toolkit samples directory.
In the macro language the value of every attribute must be enclosed in double quotes. For example, in the following <mouseclick> element the values of the row and col attributes are enclosed in double quotes:
<mouseclick row="4" col="51" />As you may remember, even if a macro is in the advanced format, not all input fields in the Macro Editor expect a string to be placed in single quotes ('') (see Representation of strings and special characters, treatment of operator characters). Specifically, the advanced format affects input fields only on the following tabs of the Macro Editor:
Similarly, in the macro language, when you provide a string value for an attribute that corresponds to one of these input fields that is affected by the advanced format, you must enter the string in the advanced format. For example, in the <message> element the strings for both attributes must be written enclosed in single quotes, if the macro is in the advanced format:
<message title="'Instructions'" value="'Check the java console'" />However, if an attribute does not correspond to one of the input fields affected by the advanced format, then you should not write the value enclosed in single quotes, even if the macro is in the advanced formt. For example, the name attribute of the <screen> element should never be enclosed in single quotes:
<screen name="Screen1" entryscreen="true" exitscreen="true" transient="false" >
   ...
</screen>
In the descriptions in this chapter of macro language elements, this book indicates such attributes (attributes that are unaffected by the advanced format) by not specifying a data type. For example, the description of the name attribute of the <screen> element is "Required" rather than as "Required string".
Most attributes require a particular type of data: boolean, integer, string, double, or imported. For these attributes, the same rules apply as in the Macro Editor:
The <actions> element, the <description> element, and <nextscreens> element are the three primary structural elements that occur inside the <screen> element (see Conceptual view of a macro screen).
The <actions> element contains elements called actions (such as simulating a keystroke, capturing data, and others) that the macro runtime performs during macro playback (see Macro actions).
The promptall attribute of the <HAScript> element performs the same function for all the <prompt> elements in one macro (see <HAScript> element).
<actions promptall="true">
   ...
</actions> The <attrib> element is a descriptor that states the row and column location and the value of a 3270 or 5250 attribute (see Attribute descriptor (<attrib> element)).
<attrib value="0x3" row="4" col="14" plane="COLOR_PLANE"
optional="false" invertmatch="false" /> The <boxselection> element draws a marking rectangle on the session window, simulating the action in which a user clicks on the session window, holds down mouse button 1, and drags the mouse to create a marking rectangle (see Box selection action (<boxselection> element)).
<boxselection srow="6" scol="16" erow="7" ecol="73" type="SELECT" /> The <comment> element inserts a text comment as a subelement within a <screen> element. Limitations are:
A more flexible method for inserting a comment is to use the XML-style comment brackets <!-- -->. See Inserting comments into a macro script.
None.
<screen name="Screen2" entryscreen="false" exitscreen="true"
               transient="false">
   <comment>This comment provides information about this macro screen.
   </comment>
   ...
</screen>The <commwait> action waits for the communication status of the session to change to some specified value (see Comm wait action (<commwait> element)). You must specify a timeout value.
<commwait value="CONNECTION_READY" timeout="10000" />The <condition> element specifies a conditional expression that the macro runtime evaluates during screen recognition. If the expression evaluates to true then the macro runtime evaluates the descriptor as true. If the expression evaluates to false then the macro runtime evaluates the descriptor as false (see Condition descriptor (<condition>) element).
For more information on conditional expressions see Conditional and logical operators and expressions.
<description>
   <! Check the value of a variable -->
   <condition value="$intPartsComplete$ == 4"
            optional="false" invertmatch="false" />

   <!-- Check the return value of a Java method -->
   <condition value="$htHashTable.size()$ != 0"$
            optional="false" invertmatch="false" />
</description>The <create> element creates and initializes a variable (see Creating a new variable).
The <create> element must occur inside a <vars> element.
<HAScript ... usevars="true" ... >
   <import>
      <type class="java.util.Properties" name="Properties" />
   </import>

   <vars>
      <create name="$prp$" type="Properties" value="$new Properties()$" />
      <create name="$strAccountName$" type="string" value="" />
      <create name="$intAmount$" type="integer" value="0" />
      <create name="$dblDistance$" type="double" value="0.0" />
      <create name="$boolSignedUp$" type="boolean" value="false" />
      <create name="$fldFunction$" type="field" />
   </vars>
   ...
</HAScript> The <cursor> element is a descriptor that states the row and column location of the text cursor on the session window (see Cursor descriptor (<cursor> element)).
<cursor row="4" col="14" optional="false" invertmatch="false" />The <custom> element allows you to invoke a custom Java program from inside the <actions> element of a macro screen. However, you must use the separate Host Access Toolkit product.
Here is an overview of the process:
<custom id="'MyProgram1'" args="'arg1 arg2 arg3'" /><custom id="'MyProgram1'" args="'arg1 arg2 arg3'" />
<custom id="'MyProgram2'" args="'arg1 arg2'" />This <customreco> element allows you to call out to custom description code. To use the <customreco> element you must have the separate Host Access Toolkit product.
The steps for creating a custom descriptor are as follows:
The macro runtime performs the <customreco> element after performing all the other descriptors.
<customreco id="'MyCustomDescriptor01'" optional="false" invertmatch="false" />The <actions> element, the <description> element, and the <nextscreens> element are the three primary structural elements that can occur inside the <screen> element (see Conceptual view of a macro screen).
The <description> element contains elements called descriptors, each of which states an identifying characteristic of an application screen (see Screen description and recognition). The macro runtime uses the descriptors to match the macro screen to an application screen.
<description uselogic="true">
   ...
</actions> The <else> element contains a sequence of macro actions and must occur immediately after an <if> element. The macro runtime evaluates the conditional expression in the <if> element. Then:
The Macro object uses the <if> element, and if necessary the <else> element, to store a Conditional action (see Conditional action (<if> element and <else> element)).
None.
<if condition="($var_int$ > 10)">
   ...
</if>
<else>
   ...
</else>This <extract> action captures data from the session window (see Extract action (<extract> element)).
For more information on the use of all these attributes see Extract action (<extract> element).
<extract name="'Get Data'" srow="1" scol="1" erow="11" ecol="11"
assignto="$strText$" />The <fileupload> element creates, replaces, appends data to, or updates a table in a host database (see FileUpload action (<fileupload> element)).
<fileupload url="'jdbc:as400://elcrtp06'"
   driver="'com.ibm.as400.access.AS400JDBCDriver'"
   userid="'myuser'"
   password="Ex0bRtrf73mPrwGrWMT+/g=="
   filename="e:\\tm\\db02.txt"
   filetype="4"
   table="'hod.hodtest01'"
uploadtype="append" /> The <filexfer> action transfers a file from the workstation to the host or from the host to the workstation (see Extract action (<extract> element)).
<filexfer direction="send" pcfile="'c:\\myfile.txt'"
            hostfile="'myfile text A0'"
clear="true" timeout="10000" pccodepage="437" /> The <HAScript> element is the master element of a macro script. It contains the other elements and specifies global information about the macro (see Conceptual view of a macro script).
True: Both the pausetime attribute in <HAScript> and the pause attribute in <screen> are ignored. No pause occurs after input/prompt actions or between screens. This is the default value.
False: The pausetime attribute in <HAScript> and the pause attribute in <screen> are not ignored.
Note that ignorepausetimeforenhancedtn has no effect when running in a non-contention-resolution environment. That is, even if ignorepausetimeforenhancedtn is true, the pausetime attribute in <HAScript> and the pause attribute in <screen> will not be ignored if running in a non-contention-resolution environment.
See the "Macro Programming Guide" for information on ignorepauseforenhancedtn and delayifnotenhancedtn, two other attributes that affect the way that macros are executed in a contention-resolution environment. To view or modify the value for ignorepausetimeforenhancedtn, use the Code Editor of the Macro Editor.
<HAScript name="ispf_ex2" description="ISPF Sample2" timeout="60000"
            pausetime="300" promptall="true" author="Owner"
            creationdate="Sun Jun 08 12:04:26 PDT 2003"
            supressclearevents="false" usevars="true"
            ignorepauseforenhancedtn="false"
            delayifnotenhancedtn="0">
   ...
</HAScript>The <if> element contains a conditional expression and a sequence of macro actions. The macro runtime evaluates the conditional expression in the <if> element. Then:
The Macro object uses the <if> element, and if necessary the <else> element, to store a Conditional action (see Conditional action (<if> element and <else> element)).
<vars>
   <create name="$condition1$" type="string"/>
   <create name="$condition2$" type="boolean" value="false"/>
   <create name="$condition3$" type="integer"/>
</vars>
<screen>
   <description>
        ...
   </description>
   <actions promptall="true">
      <extract name="Get condition 1" srow="2" scol="1" erow="2"
               ecol="80" assigntovar="$condition1$"/>
      <extract name="Get condition 2" srow="3" scol="1" erow="3"
               ecol="80" assigntovar="$condition2$"/>
      <extract name="Get condition 3" srow="4" scol="1" erow="4"
               ecol="80" assigntovar="$condition3$"/>

      <if condition=
               "(($condition1$ !='')&&
               ($condition2$)||($condition3$ < 100))">
           ...
      </if>
      <else>
           ...
      </else>
   </actions>
</screen>The <import> element, the <vars> element, and the <screen> element are the three primary structural elements that occur inside the <HAScript> element (see Conceptual view of a macro script).
The <import> element is optional. It contains <type> elements each of which declares an imported type based on a Java class (see Creating an imported type for a Java class).
The <import> element must occur after the <HAScript> begin tag and before the <vars> element.
None.
<HAScript .... >
   <import>
      <type class="java.util.Properties" name="Properties" />
   </import>

   <vars>
      <create name="$prp$" type="Properties" value="$new Properties()$" />
   </vars>
...
</HAScript>The <input> element sends a sequence of keystrokes to the session window. The sequence can include keys that display a character (such as a, b, c, #, &, and so on) and also action keys (such as [enterreset], [copy], [paste], and others) (see Input action (<input> element)).
<input value="'3[enter]'" row="4" column="14" movecursor="true"
xlatehostkeys="true" encrypted="false"/> The <message> element displays a popup window that includes a title, a message, and an OK button. The macro runtime waits until the user clicks OK before going on to the next action (see Message action (<message> element)).
<message title="'Ready'" value="'Ready to process. Click OK to proceed.'" />The <mouseclick> element simulates a mouse click on the session window by the user. As with a real mouse click, the text cursor jumps to the row and column position where the mouse icon was pointing when the click occurred (see Mouse click action (<mouseclick> element)).
<mouseclick row="20" col="16" /> The <nextscreen> element specifies the name of a <screen> element (macro screen) that the macro runtime should consider, among others, as a candidate to be the next macro screen to be processed (see Valid next screens).
The <nextscreen> element must occur within a <nextscreens> element.
   <!--
   The effect of the following <nextscreens> element and its contents
   is that when the macro runtime finishes performing the actions in
   the current screen, it adds ScreenS and ScreenG to the runtime list of
   valid next screens.
   -->
   <nextscreens>
      <nextscreen name="ScreenS">
      <nextscreen name="ScreenG">
</nextscreens> The <actions> element, the <description> element, and the <nextscreens> element are the three primary structural elements that occur inside the <screen> element (see Conceptual view of a macro screen).
The <nextscreens> element contains <nextscreen> elements, each of which states the name of a macro screen that can validly occur after the current macro screen (see Screen Recognition, Part 2).
   <!--
   The effect of the following <nextscreens> element and its contents
   is that when the macro runtime finishes performing the actions in
   the current screen, it will attempt to recognize ScreenS and ScreenG.
   -->
   <nextscreens>
      <nextscreen name="ScreenS">
      <nextscreen name="ScreenG">
</nextscreens> The <numfields> element is a descriptor that states the number of 3270 or 5250 fields of all types that exist in the session window (see Number of Fields descriptor (<numfields> element)).
<numfields number="10" optional="false" invertmatch="false" />The <numinputfields> element is a descriptor that states the number of 3270 or 5250 input fields that exist in the session window (see Number of Input Fields descriptor (<numinputfields> element)).
<numinputfields number="10" optional="false" invertmatch="false" /> The <oia> element is a descriptor that describes the state of the input inhibited indicator in the session window (see Wait for OIA to Become Uninhibited descriptor (<oia> element)).
The macro runtime evaluates the descriptor as true if the input inhibited indicator is cleared, or false if the input inhibited indicator is set.
The macro runtime always evaluates the descriptor as true.
The macro runtime evaluates the expression and then, depending on the result, evaluates the descriptor as usual.
<oia status="NOTINHIBITED" optional="false" invertmatch="false" />The <pause> element waits for the specified number of milliseconds (see Pause action (<pause> element)).
<pause timeout="5000"> The <perform> element invokes a method belonging to a Java class that you have imported (see Creating an imported type for a Java class).
You can invoke a method in many other contexts besides the <perform> element. However, the <perform> element is useful when you want to invoke a method that does not return a value (see Perform action (<perform> element)).
<!-- Call the update() method associated with the class to which
     importedVar belongs (such as mypackage.MyClass).
-->
<perform value="$importedVar.update( 5, 'Application', $str$)$" />The <playmacro> element terminates the current macro and launches another macro (see PlayMacro action (<playmacro> element)). This process is called chaining macros.
There are restrictions on where in the <actions> element you can place a <playmacro> element (see Adding a PlayMacro action).
If you are using the Host Access Toolkit then you need to perform the following actions:
<playmacro name="ispf_ex1.mac" startscreen="ScreenA"
transfervars="Transfer" />The <print> element provides printing functions. Three primary print actions (start, extract, and end) are specified through the action attribute (see Print actions (<print> element)).
The macro runtime instantiates a print bean object for the current macro using the Printer Setup options and Page Setup options that you specify (see Print Start).
Because of the great number of printer setup options and page setup options, and because changing one option might require several other options to be adjusted, you should not use the macro language to specify printer setup options and page setup options. Instead, use the Macro Editor to create a Print start action and use the Printer Setup and Page Setup windows to specify these options (see Printer Setup and Page Setup).
The macro runtime copies the text from a rectangular area of the session window that you specify and sends the text to the current print bean (see Print Extract).
The macro runtime terminates the print bean if one exists (see Print End).
<print action="start" assigntovar="$intReturnCode$" />
<print action="extract" srow="1" scol="1" erow="-1" ecol="-1"  />
<print action="end" />The <prompt> element displays a popup window prompting the user for input, waits for the user to click OK, and then sends the input to the session window (see Prompt action (<prompt> element)).
<prompt name="'ID'" row="1" col="1" len="8" description="'ID for Logon'"
        default="'guest'" clearfield="true" encrypted="true"
assigntovar="$userID$" varupdateonly="true" required="true"/> The <recolimit> element is an optional element that occurs within a <screen> element, at the same level as the <description>, <actions>, and <nextscreens> elements (see Recognition limit (General tab of the Screens tab)).
The <recolimit> element allows you to take action if the macro runtime processes the macro screen in which this element occurs more than some specified number of times.
<recolimit value="1" goto="RecoveryScreen1" />The <runprogram> element launches a native application and optionally waits for it to terminate. You can provide input parameters for the application and store the return code into a variable (see Run program action (<runprogram> element)).
<runprogram exe=
      "’%ProgramFiles%\Windows NT\Accessories\wordpad.exe’"
      param="’c:\\tm\\new_file.doc’" wait="true"
      assignexitvalue="$intReturn$" />
<message title="" value="’Return value is ’+
$intReturn$" />The <screen> element, the <import> element, and the <vars> element are the three primary structural elements that occur inside the <HAScript> element (see Conceptual view of a macro script).
Multiple screen elements can occur inside a macro. One <screen> element contains all the information for one macro screen (see The macro screen and its subcomponents).
The <screen> element contains three primary structural elements: the <actions> element, the <description> element, and <nextscreens> (see Conceptual view of a macro screen).
<screen name="ScreenB" entryscreen="false" exitscreen="false"
            transient="false">
   <description>
      ...
   </description>
   <actions>
      ...
   </actions>
   <nextscreens>
      ...
   </nextscreens>
</screen> The <sqlquery> element sends an SQL statement to a database, retrieves the data resulting from the SQL statement, if any, and then either stores the data into a global variable, writes the data into a file, or displays the data (see SQLQuery action (<sqlquery> element)).
mlprops="key1@@value1
@@key2@@value2@@key3@@value3"<sqlquery url="'jdbc:as400://elcrtp06'"
driver="'com.ibm.as400.access.AS400JDBCDriver'"
userid="'myuser'"
password="Ex0bRtrf73mPrwGrWMT+/g=="
statement="'SELECT * FROM HODTEST WHERE ((HODTEST.DESCRIPT is not null))'"
outputtype="1"
outfilename="'MyFile'"
outfiletype="4"
overwrite="true"
inbrowser="false" /> The <string> element is a descriptor that specifies a sequence of characters and a rectangular area of the session window in which the sequence occurs (see String descriptor (<string> element)).
The sequence of characters can occur anywhere in the rectangular block.
   <!-- The string must occur in one specific area of a single row  -->
   <string value="'Utility Selection Panel'" row="3" col="28"
               erow="3" ecol="51" casesense="false" wrap="false"
               optional="false" invertmatch="false" />

   <!-- The string can occur in any single row of the session area -->
   <string value="'Utility Selection Panel'" row="1" col="1"
               erow="-1" ecol="-1" casesense="false" wrap="false"
optional="false" invertmatch="false" /> The <trace> element sends a trace message to a trace destination that you specify, such as the Java console (see Trace action (<trace> element)).
<trace type="SYSOUT" value="’The value is ’+$strData$" />The <type> element declares an imported type (such as Properties) that represents a Java class (such as java.util.Properties). After you have declared the type, you can create variables based on the type, create an instance of the Java class, and call methods on the instance (see Creating an imported type for a Java class).
A type can also be used for directly calling static methods (no need to instantiate).
The <type> element must occur inside a <import> element.
   <import>
      <type class="java.util.Date" name="Date"/>
      <type class="java.io.FileInputStream"/>
      <type class="com.ibm.eNetwork.beans.HOD.HODBean" name="HODBean"/>
      <type class="myPackage.MyClass" name="MyClass"/>
</import> The <vars> element, the <import> element, and the <screen> element are the three primary structural elements that occur inside the <HAScript> element (see Conceptual view of a macro script).
The <vars> element is optional. It contains <create> elements, each of which declares and initializes a variable (see Creating a new variable). The <vars> element must occur after the <import> element and before the first <screen> element.
To use variables, you must set the usevars element in <HAScript> to true.
None.
<HAScript ... usevars="true" .... >
   <import>
      <type class="java.util.Properties" name="Properties" />
   </import>

   <vars>
      <create name="$prp$" type="Properties" value="$new Properties()$" />
      <create name="$strAccountName$" type="string" value="" />
      <create name="$intAmount$" type="integer" value="0" />
      <create name="$dblDistance$" type="double" value="0.0" />
      <create name="$boolSignedUp$" type="boolean" value="false" />
      <create name="$fldFunction$" type="field" />
   </vars>
   ...
</HAScript>The <varupdate> element causes the macro runtime to store a specified value into a specified variable. The value can be an immediate value, a variable, a call to a Java method, or an arithmetic expression that can contain any of these values. If the value is an expression, then during macro playback the macro runtime evaluates the expression and stores the resulting value into the specified variable (see Variable update action (<varupdate> element)).
You can also use the <varupdate> action in a <description> element (see Variable update action (<varupdate> element)).
For more information on variables see Variables and imported Java classes.
<type>
   <type class="mypackage.MyClass" name="MyClass" />
   <type class="java.util.Hashtable" name="Hashtable" />
   <type class="java.lang.Object" name="Object" />
</type>

<vars>
   ...
</vars>

<screen>
   <description>
   ...
   </description>
   <actions>
      <varupdate name="$var_boolean1$"  value="false" />
      <varupdate name="$var_int1$"      value="5" />
      <varupdate name="$var_double1$"   value="5" />
      <varupdate name="$var_string1$"   value="'oak tree'" />
      <varupdate name="$var_field1$"    value="4,5" />

      <!-- null keyword -->
      <varupdate name="$var_importedMC1$"  value="null" />
      <!--  Equivalent to null keyword for an imported type  -->
      <varupdate name="$var_importedMC2$"  value="" />

      <varupdate name="$var_importedMC4$"
                  value="$new MyClass( 'myparam1', 'myparam2' )$" />
      <varupdate name="$var_importedMC5$"
                  value="$var_importedMC4$" />
      <varupdate name="$var_importedMC6$"
                  value="$MyClass.createInstance( 'mystringparam1' )$" />
      <varupdate name="$var_boolean2$"
                  value="$var_importedMC4.isEmpty()$" />
      <varupdate name="$var_int2$"
                  value="$($var_importedMC4.getHashtable()$).size()$" />
      <varupdate name="$var_double2$"
                  value="$var_importedMC4.getMeters()$" />
      <varupdate name="$var_string2$"
                  value="$var_importedMC4.toString()" />
   </actions>
</screen>NOTE: This sample requires Microsoft Excel or IBM DB2.
This sample macro reads transaction records from the CICS transaction amnu, which is a very small sample database, and writes the records into an Excel spreadsheet or IBM DB2.
The files for this sample are stored in the following directory, where <install> stands for the Host On-Demand installation directory, and where xx stands for your language id (such as en):
<install>\HOD\xx\doc\macro\samples\amnuThe files in this sample are the following:
These are the macro files. The first one is for use with the Excel spreadsheet. The second is for use with DB2.
This is the Excel spreadsheet.
EditDB.java is a Java source file containing source code for the EditDB class. The macro uses the EditDB class to write to the spreadsheet or database. EditDB.class is compiled with Java 2 and stored in the EditDB.jar. EditDB.jar is a Java 2 JAR file.
You will need to grant certain permissions for the Host On-Demand applet in order to run this sample. You can alter the .java.policy file by using policytool or you can create a new policy file and specify this file in the plug-in Java Runtime Parameters(-Djava.security.policy=PolicyFileName).
Your new policy file should contain the following and should be located in your local home directory.
grant {
    permission java.lang.RuntimePermission
        "accessClassInPackage.sun.jdbc.odbc";
    permission java.util.PropertyPermission
       "file.encoding", "read";   };
If you want to change .java.policy (and not set the parameter above in your plug-in), launch the policytool executable in the bin directory of your Java plug-in install and set the permissions specified in the lines above.
USING AMNU:
The transaction amnu is a small sample database that is provided with CICS. To start amnu, follow these steps:
The amnu menu comes up in the upper left quadrant of the session window and displays operator instructions.
To see if there are any records in the database, follow these steps:
The amnu transaction displays the first 4 records. Follow the instructions on the screen to browse the database.
If the database is empty, you need to add records to it before you run the macro. To add records to the database, follow these steps:
You will be prompted to enter a record number. Enter a number of a transaction that you have entered or that you saw when you browsed through the database in step 5. Hit OK. The application screen will display the contents of the record corresponding to the number that you entered. You will be prompted again to ask if you would like to save the record on the screen to your database. The default response is "Y." Hit OK. You will again be prompted to Enter a transaction number. You could continue to enter as many record numbers as you like (and you will be notified if you enter an invalid number), but this time hit Q to quit. Hit OK to close the prompt, and OK again to dismiss the message "Good Bye!" The macro will end, and amnu.xls will open. You should see the contents of the record you just saved inside the spreadsheet.
Hopefully this sample will get you thinking about the powerful ways in which you can put macros to use for your business. Note that this sample can easily be modified, for example to write to a different kind of database (see below for directions on writing to DB2) or to read from the local database and write to the amnu database. Note that this sample was designed to be short and simple, not a lesson in best practices of Java or macro coding. For example, you may have noticed that we are connecting to and disconnecting from the local database every time we write a record out. This could be avoided by writing "connect" and "disconnect" macros that are linked to the amnu macro such that there is only one connect and one disconnect for each macro play.
If you look inside the Excel macro amnu.mac, you'll see that it is using the driver sun.jdbc.odbc.JdbcOdbcDriver to connect to the Excel spreadsheet. If this class is not in your classpath, the sample will not run properly. This class is included in the Sun Java 2 plug-ins but not in IBM plug-ins.
If you are using an IBM plug-in and do not have the sun.jdbc.odbc package in your classpath, you can instead run this sample with IBM DB2.
<create name="$database$" type="DB"
     value="$new DB('jdbc:db2://hostname:6789/AMNU',
'COM.ibm.db2.jdbc.net.DB2Driver')$" /><perform value="$database.setUserID('db2admin')$" />
<perform value="$database.setPassword('db2admin')$" />Note some differences in the two macros:
[CUSTRECS$]CUSTRECSHere is the rule:
This section contains the mnemonic keywords for the Input action and the type of session or essions in which the mnemonic is supported. Session support for a given mnemonic is denoted by an X, along with any special notes that apply to the function.
| Function: | Keyword: | 3270: | 5250: | VT: | CICS: |
|---|---|---|---|---|---|
| Attention | [attn] | x | x | x | |
| Alternate view | [altview] | x3 | x3 | x3 | |
| Backspace | [backspace] | x | x | x1 | x |
| Backtab | [backtab] | x | x | x | |
| Beginning of Field | [bof] | x | x | x | |
| Clear | [clear] | x | x | x1 | x |
| Cursor Down | [down] | x | x | x1 | x |
| Cursor Left | [left] | x | x | x1 | x |
| Cursor Right | [right] | x | x | x1 | x |
| Cursor Select | [cursel] | x | x | x1 | x |
| Cursor Up | [up] | x | x | x1 | x |
| Delete Character | [delete] | x | x | x1, 2 | x |
| Display SO/SI | [dspsosi] | x3 | x3 | x3 | |
| Dup Field | [dup] | x | x | x | |
| Enter | [enter] | x | x | x | x |
| End of Field | [eof] | x | x | x1, 2 | x |
| Erase EOF | [eraseeof] | x | x | x | |
| Erase Field | [erasefld] | x | x | x | |
| Erase Input | [erinp] | x | x | x | |
| Field Exit | [fldext] | x | |||
| Field Mark | [fieldmark] | x | x | ||
| Field Minus | [field-] | x | |||
| Field Plus | [field+] | x | |||
| F1 | [pf1] | x | x | x | x |
| F2 | [pf2] | x | x | x | x |
| F3 | [pf3] | x | x | x | x |
| F4 | [pf4] | x | x | x | x |
| F5 | [pf5] | x | x | x | x |
| F6 | [pf6] | x | x | x | x |
| F7 | [pf7] | x | x | x | x |
| F8 | [pf8] | x | x | x | x |
| F9 | [pf9] | x | x | x | x |
| F10 | [pf10] | x | x | x | x |
| F11 | [pf11] | x | x | x | x |
| F12 | [pf12] | x | x | x | x |
| F13 | [pf13] | x | x | x | x |
| F14 | [pf14] | x | x | x | x |
| F15 | [pf15] | x | x | x | x |
| F16 | [pf16] | x | x | x | x |
| F17 | [pf17] | x | x | x | x |
| F18 | [pf18] | x | x | x | x |
| F19 | [pf19] | x | x | x | x |
| F20 | [pf20] | x | x | x | x |
| F21 | [pf21] | x | x | x | |
| F22 | [pf22] | x | x | x | |
| F23 | [pf23] | x | x | x | |
| F24 | [pf24] | x | x | x | |
| Help | [help] | x | |||
| Home | [home] | x | x | x1, 2 | x |
| Insert | [insert] | x | x | x1, 2 | x |
| Keypad 0 | [keypad0] | x | |||
| Keypad 1 | [keypad1] | x | |||
| Keypad 2 | [keypad2] | x | |||
| Keypad 3 | [keypad3] | x | |||
| Keypad 4 | [keypad4] | x | |||
| Keypad 5 | [keypad5] | x | |||
| Keypad 6 | [keypad6] | x | |||
| Keypad 7 | [keypad7] | x | |||
| Keypad 8 | [keypad8] | x | |||
| Keypad 9 | [keypad9] | x | |||
| Keypad Dot | [keypad.] | x | |||
| Keypad Enter | [keypadenter] | x | |||
| Keypad Comma | [keypad,] | x | |||
| Keypad Minus | [keypad-] | x | |||
| New Line | [newline] | x | x | x | |
| PA1 | [pa1] | x | x | x | |
| PA2 | [pa2] | x | x | x | |
| PA3 | [pa3] | x | x | x | |
| Page Up | [pageup] | x | x | x1, 2 | x |
| Page Down | [pagedn] | x | x | x1, 2 | x |
| Reset | [reset] | x | x | x | x |
| System Request | [sysreq] | x | x | x | |
| Tab Field | [tab] | x | x | x1 | x |
| Test Request | [test] | x |
The following table shows the bidirectional keywords for the Input action.
| Function: | Keyword: | 3270: | 5250: | VT: | CICS: |
|---|---|---|---|---|---|
| Auto Push | [autopush] | x | x | ||
| Auto Reverse | [autorev] | x | x | ||
| Base | [base] | x | x | ||
| BIDI Layer | [bidilayer] | ||||
| Close | [close] | x | |||
| CSD | [csd] | x | x | ||
| End Push | [endpush] | x | x | ||
| Field Reverse | [fldrev] | x | x | x | |
| Field Shape | [fieldshape] | x | x | ||
| Final | [final] | x | x | ||
| Initial | [initial] | x | x | ||
| Isolated | [isolated] | x | x | ||
| Latin Layer | [latinlayer] | x | x | ||
| Middle | [middle] | x | x | ||
| Push | [push] | x | x | ||
| Screen Reverse | [screenrev] | x | x | x |
This information was developed for products and services offered in the U.S.A.
IBM may not offer the products, services, or features discussed in this document in other countries. Consult your local IBM representative for information on the products and services currently available in your area. Any reference to an IBM product, program, or service is not intended to state or imply that only that IBM product, program, or service may be used. Any functionally equivalent product, program, or service that does not infringe any IBM intellectual property right may be used instead. However, it is the user's responsibility to evaluate and verify the operation of any non-IBM product, program, or service.
IBM may have patents or pending patent applications covering subject matter described in this document. The furnishing of this document does not give you any license to these patents. You can send license inquiries, in writing, to:
Site Counsel
IBM Corporation
2455 South Road
Poughkeepsie, NY 12601-5400
U.S.A.
For license inquiries regarding double-byte (DBCS) information, contact the IBM Intellectual Property Department in your country or region or send inquiries, in writing, to:
IBM World Trade Asia Corporation
Licensing
2-31 Roppongi 3-chome, Minato-ku
Tokyo 106, Japan
The following paragraph does not apply to the United Kingdom or any other country or region where such provisions are inconsistent with local law: INTERNATIONAL BUSINESS MACHINES CORPORATION PROVIDES THIS PUBLICATION "AS IS" WITHOUT WARRANTY OF ANY KIND, EITHER EXPRESS OR IMPLIED, INCLUDING, BUT NOT LIMITED TO, THE IMPLIED WARRANTIES OF NON-INFRINGEMENT, MERCHANTABILITY OR FITNESS FOR A PARTICULAR PURPOSE. Some states do not allow disclaimer of express or implied warranties in certain transactions, therefore, this statement may not apply to you.
This information could include technical inaccuracies or typographical errors. Changes are periodically made to the information herein; these changes will be incorporated in new editions of the publication. IBM may make improvements and/or changes in the product(s) and/or the program(s) described in this publication at any time without notice.
Any references in this information to non-IBM Web sites are provided for convenience only and do not in any manner serve as an endorsement of those Web sites. The materials at those Web sites are not part of the materials for this IBM product and use of those Web sites is at your own risk.
IBM may use or distribute any of the information you supply in any way it believes appropriate without incurring any obligation to you.
Licensees of this program who wish to have information about it for the purpose of enabling: (i) the exchange of information between independently created programs and other programs (including this one) and (ii) the mutual use of the information which has been exchanged, should contact:
IBM Corporation
Department T01
Building B062
P.O. Box 12195
Research Triangle Park, NC 27709-2195
U.S.A.
Such information may be available, subject to appropriate terms and conditions, including in some cases, payment of a fee.
The licensed program described in this document and all licensed material available for it are provided by IBM under terms of the IBM Customer Agreement, IBM International Program License Agreement or any equivalent agreement between us.
Such information may be available, subject to appropriate terms and conditions, including in some cases, payment of a fee. The licensed program described in this document and all licensed material available for it are provided by IBM under terms of the IBM Customer Agreement, IBM International Program License Agreement or any equivalent agreement between us.
Information concerning non-IBM products was obtained from the suppliers of those products, their published announcements or other publicly available sources. IBM has not tested those products and cannot confirm the accuracy of performance, compatibility or any other claims related to non-IBM products. Questions on the capabilities of non-IBM products should be addressed to the suppliers of those products.
If you are viewing this information softcopy, the photographs and color illustrations may not appear.
The following terms are trademarks of International Business Machines Corporation in the United States, other countries, or both: IBM
Java and all Java-based trademarks and logos are trademarks or registered trademarks of Oracle Corporation in the United States and other countries.
Microsoft, Windows, and the Windows logo are registered trademarks of Microsoft Corporation.
Other company, product, and service names may be trademarks or service marks of others.