Configuring on a clustered environment
After creating your database, you can configure Decision Server and Decision Center in clusters, to achieve high availability and scalability.
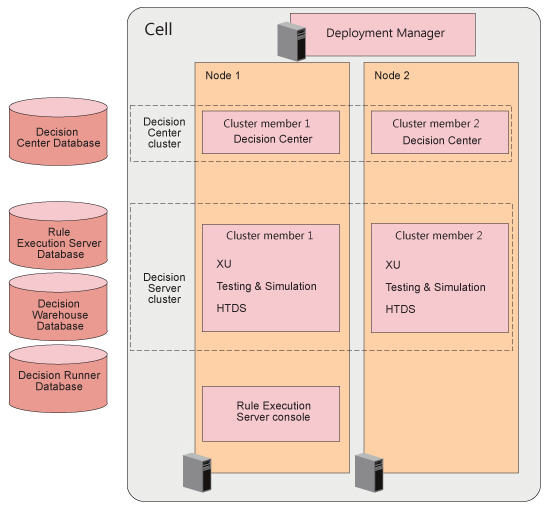
Some examples in this section are based on a simple cluster made up of two members. The Deployment Manager resides on one machine, a different machine (Node01) hosts the first cluster member (and the Rule Execution Server console), and another machine (Node02) hosts the second cluster member. Notice, in the following diagram, that when you create both a Decision Server and Decision Center cluster, a given node can host the equivalent cluster member for each module. Consult Recommended topology and assess your own needs:
- Step 1: Create a WebSphere® Application Server Deployment Manager profile
- Step 2: Augment the Deployment Manager profile with Decision Server or Decision Center
- Step 3: Create a node for each cluster member
- Step 4: Set the cluster configuration properties
- Step 5: Create the clusters
If you have many cluster members, you need a load balancing system, such as IBM® HTTP server.
Before you start
Create the dedicated databases for Decision Server and Decision Center. See Mandatory: Creating the databases.
managesdk -listAvailable
managesdk.bat -setCommandDefault -sdkname 1.8_64
managesdk.bat -setNewProfileDefault -sdkname 1.8_64If you are using version 9 of WebSphere Application Server, the JDK is set to version 8 by default, so you do not need to run the managesdk commands.
Step 1: Create a Deployment Manager profile
The WebSphere Application Server Deployment Manager provides a single administrative point. Create a Deployment Manager profile as follows. From <WAS_InstallDir>\AppServer\:
.\bin\manageprofiles.bat -create
 -templatePath .\profileTemplates\management
-enableAdminSecurity true -adminUserName wasadmin -adminPassword wasadmin- -templatePath
- Use <WAS_InstallDir>\AppServer\profileTemplates\management, which is the location of the Deployment Manager template.
- -enableAdminSecurity
- Set this parameter to true to enable WebSphere Application Server administrative security. Decision Server and Decision Center will not work correctly without administrative security. Also provide -adminUserName and -adminPassword.
This command creates a Deployment Manager profile under profiles\Dmgr01 unless you provide a different profile name. For more information, see WebSphere Application Server WAS Knowledge Center: Creating management profiles with deployment managers.
Step 2: Augment the Deployment Manager profile
You augment the Deployment Manager profile with Decision Server or Decision Center so that each cluster member that you create afterwards contains the same configuration.
- On Windows, replace with -Xms2048M -Xmx4096M in your set
PERFJAVAOPTION command in wsadmin.bat and
launchWsadminListener.bat:
set PERFJAVAOPTION=-Xms256m -Xmx256m -Xquickstart - On Linux:
- Change PERF_JVM_OPTIONS in wsadmin.sh. Based on your platform, change "-Xms256M" to "-Xmx4096M".
Change PERF_JVM_OPTIONS in launchWsadminListener.sh. Based on your platform, change "-Xms256M" to "-Xmx4096M".
- Increase operating system "open files limit" with the command ulimit -n 8192.
- For Decision Server: .\bin\manageprofiles.bat -augment -profileName Dmgr01 -templatePath .\profileTemplates\odm\decisionserver\management -odmHome <ODM_InstallDir>
- For Decision Center: .\bin\manageprofiles.bat -augment -profileName Dmgr01 -templatePath .\profileTemplates\odm\decisioncenter\management -odmHome <ODM_InstallDir>
Log files corresponding to the augment command are available in <WAS_InstallDir>\AppServer\logs\manageprofiles\Dmgr01\odm
The augment commands have the following effects:
| Decision Server | Decision Center |
|---|---|
|
|
Step 3: Create a node for each cluster member
A cluster is made up of members that are normally on different machines (nodes). For each cluster member that you intend to create, create a node and federate this node to the Deployment Manager. You do this on each machine that hosts a cluster member. You create the node with the WebSphere Application Server profile of type managed, and then federate the node with the command:
addNode.bat <dmgrhost> <dmgrport> -username wasadmin -password wasadminwhere <dmgrhost> is the location of the machine that hosts the Deployment Manager and <dmgrport> is the port (usually 8879).
- Start the Deployment Manager from an Administrator command line.
From <WAS_InstallDir>\AppServer\:
.\profiles\Dmgr01\bin\startServer.bat dmgr - Create the first node and federate it to the Deployment Manager.
On the machine that will host the first node, in <WAS_InstallDir>\AppServer\:
- Set the managesdk options described at the beginning of this section (you do this for each machine).
- Create the profile:
.\bin\manageprofiles.bat -create
 -templatePath .\profileTemplates\managed
 -profileName ODMMachine01
 -nodeName ODMNode01
Federate the node to the Deployment Manager. From <WAS_InstallDir>\AppServer\profiles\ODMMachine01\:
.\bin\addNode.bat dmgr.ibm.com 8879 -username wasadmin -password wasadmin
- Repeat for each machine. For example, on the second machine, with a profile name ODMMachine02 and a node name ODMNode02.
Before moving to the next step, it is good working practice to verify that the nodes have been federated. In the WebSphere Integrated Solutions Console for the Deployment Manager, open .
Step 4: Set the cluster configuration properties
- For Decision Server: ODMDecisionServerCluster.properties
- For Decision Center: ODMDecisionCenterCluster.properties
| Property | Value | Example |
|---|---|---|
| cluster.name | The name of the cluster. | cluster.name=DecisionServerCluster or cluster.name=DecisionCenterCluster |
| virtualhost.name | The target virtual host where the applications will be installed. | virtualhost.name=default_host |
| res.console.server.name | The name of the server for the Rule Execution Server console. Required only for the Decision Server script. | res.console.server.name=RulesMgrSrv |
| cluster.member.nodes | A comma-separated list of the federated nodes to include in the cluster. | cluster.member.nodes=ODMNode01,ODMNode02 |
| res.console.node | The name of the node that hosts the Rule Execution Server console. Required only for the Decision Server script. | res.console.node=ODMNode01 |
| cluster.servers.maxHeapSize | The max heap size. | cluster.servers.maxHeapSize=8192 |
| cluster.servers.initialHeapSize | The initial heap size. | cluster.servers.initialHeapSize=1096 |
| cluster.servers.jvm.args | The jvm args. | |
| database.type | The type of database manager. Valid values are:
|
database.type=DB2 |
| database.jdbcDriverPath | The fully-qualified location and name of the JDBC driver file. Separate the files with a semi-colon (;) if there are more than one. |
C:/drivers/db2cc.jar;C:/drivers/db2cc_license_cu.jar. |
| database.name | The name of the database. | Typically, resdb and dcdb. |
| database.hostname | The database server host name or IP address. | localhost if on your local machine. |
| database.port | The database TCP/IP service port or listener port. | database.port=50000 for DB2 |
| database.user | The user ID to access the database. | |
| database.password | The password for the user ID to access the database. |
cluster.name=DecisionServerCluster
virtualhost.name=default_host
res.console.server.name=RulesMgrSrv
cluster.member.nodes=ODMNode01,ODMNode02
res.console.node=ODMNode01
cluster.servers.maxHeapSize=8192
cluster.servers.initialHeapSize=1096
cluster.servers.jvm.args=-Xgcpolicy:gencon -Xgcthreads6
database.type=DB2
database.jdbcDriverPath=C:/drivers/db2cc.jar;C:/db2cc_license_cu.jar.
database.name=resdb
database.hostname=dbhost.ibm.com
database.port=50000
database.user=res
database.password=res
Step 5: Create the clusters
- For Decision Server:
.\bin\createODMDecisionServerCluster.bat -clusterPropertiesFile .\bin\odm\ODMDecisionServerCluster.properties -adminUsername wasadmin -adminPassword wasadmin - For Decision
Center:
.\bin\createODMDecisionCenterCluster.bat
 -clusterPropertiesFile .\bin\odm\ODMDecisionCenterCluster.properties
 -adminUsername wasadmin -adminPassword wasadmin
Log files corresponding to the cluster creation are in <WAS_InstallDir>\AppServer\profiles\Dmgr01\logs\odm
The script performs the following actions:
| Action | Manual equivalent |
|---|---|
| Installs the JDBC provider and the data source on each node. | Setting up a data source and connection pool |
| Configures security and maps users to roles. | Activating security access |
| Deploys the MBean descriptors. | Deploying the Rule Execution Server MBean descriptors |
| Deploys the execution unit (XU) on each node. | Deploying the XU RAR |
| Deploys the Rule Execution Server console. | Deploying the Rule Execution Server management EAR |
| Deploys the testing and simulation archive. | Deploying the testing and simulation archive |
| Deploys the hosted transparent decision services. | Deploying the hosted transparent decision service EAR |
For Decision Center:
| Action | Manual equivalent |
|---|---|
| Installs the JDBC provider and the data source on each node. | Configuring database connectivity |
Configures security access. Typically, you use the default users to complete the configuration and other IT tasks. To give access to other users on the basic registry or configure an LDAP repository, see the manual equivalent section. |
Configuring access to Decision Center |
| Installs the Decision Center application. | Deploying the Decision Center EAR file |
.\bin\createODMDecisionServerCluster.bat -uninstall
 -clusterPropertiesFile .\bin\odm\ODMDecisionServerCluster.properties
 -targetNodeName ODMNode01
-adminUsername wasadmin -adminPassword wasadmin- Completing the configuration of Rule Execution Server
- Completing the configuration of Decision CenterNote: You also need to set UTF8 encoding override as described in Deploying the Decision Center EAR file.
Troubleshooting
Log files corresponding to the cluster creation are in <WAS_InstallDir>\AppServer\profiles\Dmgr01\logs\odm. Individual log files corresponding to the different steps of the script let you see where problems occurred.