Updating your production environment from V8.9.0 online
You update an installed version of Decision Server Insights V8.9.0 online by running an Installation Manager update on all of the server hosts in your production topology one by one.
Before you begin
Specify the repository locations for Decision Server Insights V8.9.1 in the Installation Manager preferences.
About this task
In a production environment that must be updated online, client applications and event senders cannot be subjected to a process or period of transition. Every interaction that is started must complete. Therefore, you update individual servers in the topology one at a time. If you do have issues when you update your servers, you can revert the process. Restore your database if you have one and restart your system.
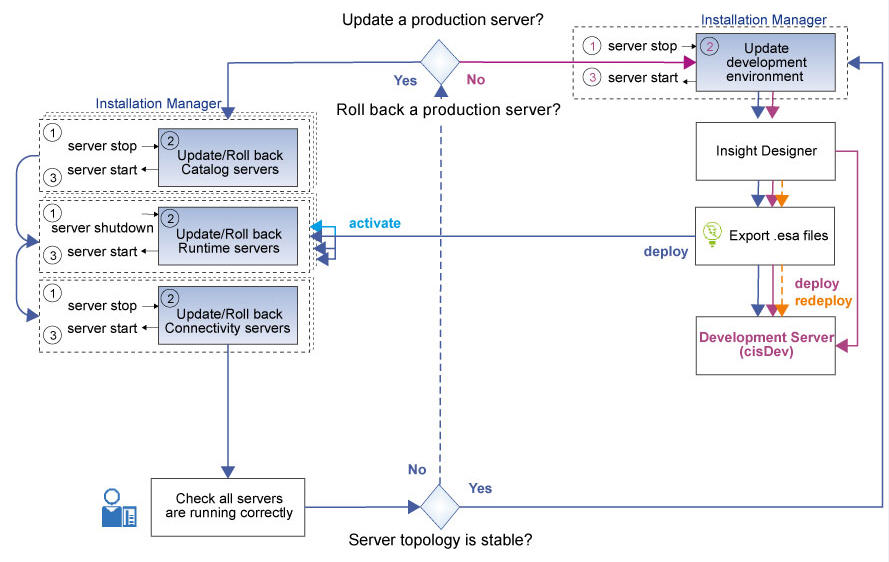
The following diagram shows the high-level steps that you must take to update Decision Server Insights V8.9.0 to V8.9.1. Typically, the steps are done in the following order:
- Update the production server hosts. When this step is complete, the solutions that ran in the previous version are now running in the new runtime.
- Update the development environment.
- Migrate all of the solutions that show errors due to the update. This step converts solutions to make them compatible with the new release. It is not required for all updates.
- When a solution needs to be modified, you can edit and deploy a new version to the updated servers. The previous version of the solution remains active until you deploy the new solution on all of the runtime servers and activate it. Use solutionManager deploy enableOnly=true and the solutionManager activate commands to tell Insight Server to switch to the new version.
Procedure
What to do next
- Update Decision Server Insights in your development environment, and follow the steps in Migrating solutions.
- Deploy the migrated version of your solutions to the runtime servers.
- The SQL description of the database in V8.9.1 that persists the data for
Decision Server
Insights includes BATCHID
indexes. To take advantage of the indexes during a startup, add the indexes to your persistence
database.
The BATCHID indexes are included in the .sql files under <InstallDir>/runtime/ia/persistence/sql.
-- DDL Statements CREATE INDEX "ENTITIES_IDX" ON "ENTITIES" ("BATCHID"); CREATE INDEX "OUTBOUNDEVENTS_IDX" ON "OUTBOUNDEVENTS" ("BATCHID"); CREATE INDEX "INBOUNDEVENTS_IDX" ON "INBOUNDEVENTS" ("BATCHID"); CREATE INDEX "JOBRESULTS_IDX" ON "JOBRESULTS" ("BATCHID"); CREATE INDEX "JOBHISTORY_IDX" ON "JOBHISTORY" ("BATCHID"); CREATE INDEX "RULESETS_IDX" ON "RULESETS" ("BATCHID"); CREATE INDEX "DELAYEDEVENTS_IDX" ON "DELAYEDEVENTS" ("BATCHID"); CREATE INDEX "EVENTSTORE_IDX4" ON "EVENTSTORE" ("BATCHID"); - If you persist your data in an Oracle database, upgrade the JDBC driver for Oracle to
ojdbc8.jar to benefit from better handling of database timeouts. The file is
specified in the server configuration file (server.xml) of each runtime
server.
<dataSource jndiName="jdbc/oracle_datasource">
   <connectionManager maxPoolSize="120"/>
   <jdbcDriver>
      <library>
         <fileset dir="/opt/oracle/java" includes="ojdbc8.jar" />
      </library>
   </jdbcDriver>
   ...
</dataSource>