Task 5: Testing and deploying
You prepare and run a test suite, and then deploy a RuleApp from your decision model service to the execution environment.
About this task
Now that your decision model service is complete, you create a test suite to do regression testing, and then deploy the service as a RuleApp to the execution environment.
Step 1: Generating the scenario file
The first step to creating a test suite is to generate an empty scenario file. Scenarios represent real or fictitious use cases that you use to validate the behavior of your rules. Each scenario contains all the information that is needed to run your rules properly.
About this task
Procedure
- Open the Tests tab.
-
Click the Generate Scenario File button
 .
.
- Name your scenario file salutation.
- In the tests to include, select Salutation.
- Click Download, and save the file to a location on your computer.
Step 2: Entering the scenarios and expected results
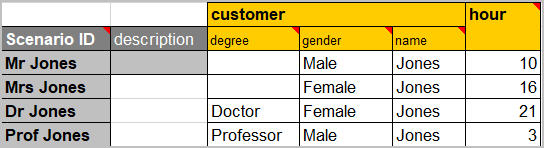
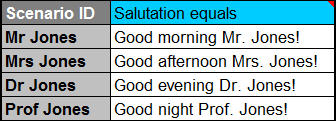
You create scenarios of representative cases for the client application. Each row in the first spreadsheet represents a scenario. Its columns indicate where to put the data for the scenarios. In the second spreadsheet, you enter the expected results of each scenario.
Procedure
- Open the scenario file on your computer.
-
Enable editing if required, and enter the following data in the
Scenarios tab:
- At the bottom of the spreadsheet, click the Expected Results tab to open it.
-
Enter the following expected results for the scenarios:
- Save and close the file.
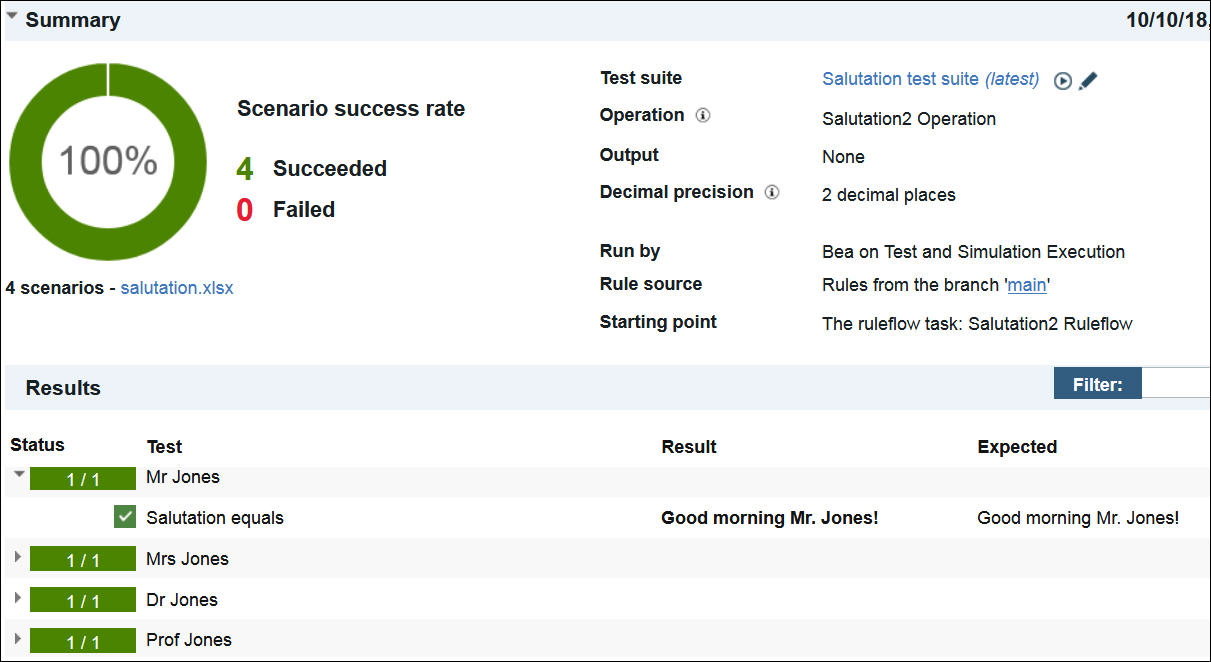
Step 3: Creating and running the test suite
You run the test suite to compare your expected results with the actual results.
Procedure
-
On the Tests tab, click the Add button
 to create a new test suite.
-
When the status of the test is complete, click the report name.
You see that the scenarios ran successfully. The expected results that you entered are the same as the returned results.
Step 4: Deploying the decision model service
The decision operation defines the rules to deploy, and the input and output parameters. Because a decision model service acts as one entity, there is only one decision operation available, which includes all the rules of the decision model. This decision operation is created automatically and updated every time you save.
About this task
A deployment configuration contains all the information required to deploy a RuleApp from your decision model service, including the target server and the decision operation. For convenience, a deployment configuration is created the first time you save your decision model service, and for security, only users with configuration manager rights can view it.
The RuleApp contains the ruleset developed in the decision model service. The execution environment runs the ruleset for the client application (see Deployment configurations).
Procedure
-
Log out of the Business console, and then log back by using Paul as the user name and
password.
This user has configuration manager rights.
- On the Library tab, click the Salutation2 decision service, and then click main on the Branches tab.
- Click the Deployments tab.
- Click on Salutation2 Deployment.
Look at the different subtabs to understand what is contained in the deployment configuration.
- On the Operations subtab, hover over Salutation2 Operation to see its contents.
- On the Groups subtab, you can grant rights to user groups so that they can deploy using this deployment configuration. For example, to give Bea the right to deploy, you edit the deployment configuration and add UserGroup.
- In the top banner, click Deploy.
- Select Decision Service Execution as the target server, and then click Deploy.
- Click OK to close the status report message.
- When the status is complete, click the report link to show
the results of the deployment. The report shows that the deployment was successful.
- Click Close, and then log out.
Results
Operational Decision Manager provides the execution environment to which you deployed a RuleApp from your decision model service. To learn about this environment, see Tutorial: Managing RuleApps.