Getting started with the MQTT client for Java on Android
You can install an MQTT client sample Java app for Android that exchanges messages with an MQTT server. The app uses a client library from the MQTT SDK from IBM®. You can either build the app yourself, or download a pre-built sample app.
Before you begin
- For supported and reference MQTT client platforms, see System requirements for IBM Mobile Messaging and M2M Client Pack.
- If there is a firewall between your client and the server, check that it does not block MQTT traffic.
- The MQTT client sample app works on Ice Cream Sandwich (Android 4.0) and up. This version of Android also gives a crisper display resolution on tablets.
About this task
The MQTT client sample Java app for Android is
called mqttExerciser
. This app uses a
client library from the MQTT SDK, and exchanges
messages with an MQTT server.
You can either build the sample app yourself then export it from Eclipse as mqttExerciser.apk, or use the pre-built sample app that is available as file mqttExerciser.apk in the sdkroot\SDK\clients\android\samples\apks folder of the Mobile Messaging and M2M Client Pack. If you choose to build the app yourself, the development environment that you build is tailored to include mobile messaging into apps for Android. This should help you when you begin to include mobile messaging in your own apps.
Procedure
- Optional: Build the mqttExerciser sample app for Android.
Configure the Eclipse and Android tools, and import and build the mqttExerciser project from the MQTT SDK.
Note: If you do not want to do this right now, you can use the pre-built sample app that is available as file mqttExerciser.apk in the sdkroot\SDK\clients\android\samples\apks folder of the MQTT SDK.- Import the sample mqttExerciser app
project into Eclipse,
and fix errors.
- Import the sample app project from the MQTT SDK, in the
path sdkroot\SDK\clients\android\samples\mqttExerciser.
The Problems view lists many build errors. You resolve the build errors in the next few steps.
- Copy the org.eclipse.paho.client.mqttv3.jar library
into the libs folder in the Android project.
 For example, on Windows, this is under
the sdkroot\SDK\clients\java folder. A File
Operation window is displayed. Accept the Copy
files selection then click OK.
For example, on Windows, this is under
the sdkroot\SDK\clients\java folder. A File
Operation window is displayed. Accept the Copy
files selection then click OK. - Right-click the project folder, com.ibm.msg.android; click . Read and accept the license terms, then click Install.
- Right-click the project folder, com.ibm.msg.android; click .
- If the workspace still has about 84 errors, referring to overriding
a super class method, the compiler compliance level is probably set
to 1.5 or lower. Android SDK
version 16 expects the compiler compliance level to be no greater
than 1.5. To fix the remaining errors, complete the following steps:
- Check and (if necessary) update your Android SDK and the corresponding Eclipse plugins to Android SDK version 17.
- Right-click the com.ibm.msg.android project folder, then select . Check the Compiler compliance level, set it to at least 1.6, then rebuild the workspace.
- Import the sample app project from the MQTT SDK, in the
path sdkroot\SDK\clients\android\samples\mqttExerciser.
The project builds, with some warnings, and no errors.
- Import the sample mqttExerciser app
project into Eclipse,
and fix errors.
- Use the mqttExerciser sample app for Android to connect,
subscribe, and publish to a topic.
- Open the MQTT client sample Java app for Android.
This window is open in your Android device:

- Connect to an MQTT server.
- Click the + sign to open
a new MQTT connection.
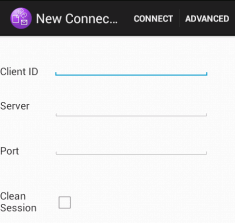
- Enter any unique identifier into the client ID field. Be patient, the keystrokes can be slow.
- Enter into the Server field
the IP address of your MQTT server.
This is the server that you chose in the first main step. The IP address must not be
127.0.0.1 - Enter the port number of the MQTT connection.
The default port number for a normal MQTT connection is
1883.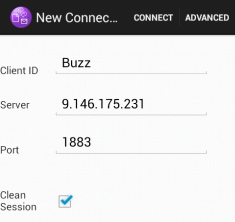
- Click Connect.If the connection is successful, you see a
Connecting
message followed by this window:
- Click the + sign to open
a new MQTT connection.
- Subscribe to a topic.
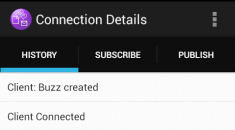
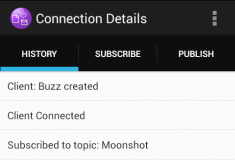
- Click the Connected message.The Connection Details window opens with the history listed:
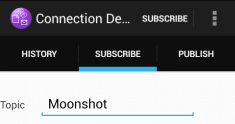
- Click the Subscribe tab, and enter a topic
string.
- Click the Subscribe action.
A
Subscribed
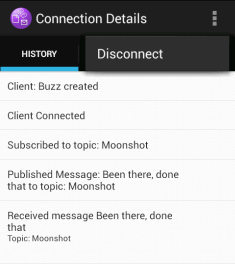
message appears for a short time. - Click the History tab.The history now includes the subscription:
- Click the Connected message.
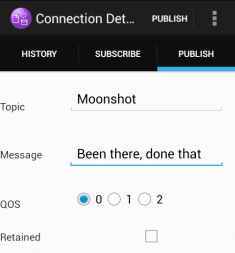
- Now publish to the same topic.
- Click the Publish tab, and enter the same
topic string as you did for subscribing. Enter a message.
- Click the Publish action. Two messages are displayed for a short time,
Published
followed bySubscribed
. The publication is displayed in the status area (pull the separator bar down to open the status window).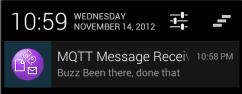
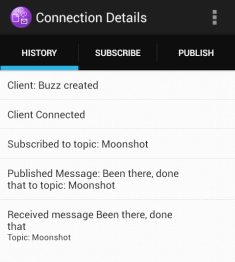
- Click the History tab to view the full
history.
- Click the Publish tab, and enter the same
topic string as you did for subscribing. Enter a message.
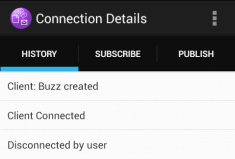
- Disconnect the client instance.
- Click the menu icon in the action bar.

The MQTT client sample Java app for Android adds a Disconnect button to the MQTT Connection Details window.
- Click Disconnect.The connected status changes to disconnected:
- Click the menu icon in the action bar.
- Click Back to return to the list
of MQTT client sample Java app sessions.
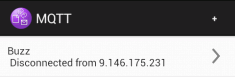
- Click the plus sign to start a new MQTT client sample Java app session.
- Click the disconnected client to reconnect it.
- Click Back to return to the launchpad.
- Open the MQTT client sample Java app for Android.
What to do next
If you built the sample app yourself, you are ready to start developing your own Android apps that call MQTT libraries to exchange messages. You can model your Android apps on the classes in mqttExerciser. To study the sample, generate the Javadoc for the classes in com.ibm.msg.android and com.ibm.msg.android.service in the mqttExerciser project.