Configure Secure Sockets Layer (SSL) and Transport Layer Security (TLS) on the IBM Spectrum Protect™ server, backup-archive client, and storage agent to
ensure that data is encrypted during communication. You can use a signed certificate from a
third-party Certificate Authority (CA) to verify an SSL communication request between the server,
client, and storage agent.
Before you begin
To use SSL to secure communications between the Operations Center and the hub server, see Securing communications between the Operations Center and the hub server.
Before you set up the server certificate on the client, follow these steps:
- Open a command window and change the directory to your IBM
Spectrum Protect client directory, for example:
cd
"C:\Program Files\Tivoli\TSM\baclient"
- Append the GSKit binary path and library path to the PATH
environment variable, for example:
set PATH=x:\Program Files\Common Files\Tivoli\tsm\api64\gsk8\bin\;
 x:\Program Files\Common Files\Tivoli\tsm\api64\gsk8\lib64;%PATH%
where
x: is the system drive where IBM
Spectrum Protect is installed.
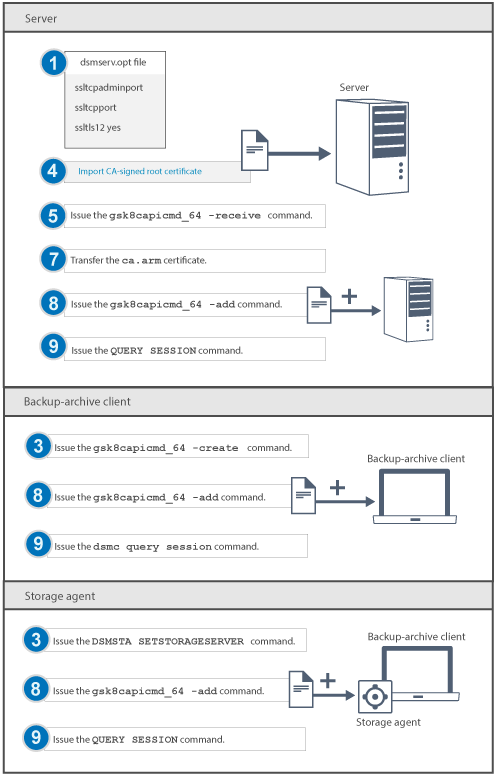
The following figure shows the step number to complete the task.
Requirements: - Enter commands on one line. In the following steps, commands are displayed here on multiple
lines to make it easier to read. Ensure that you enter a space after each command.
- If your client operating system is 32-bit, replace the gsk8capicmd_64 command
with gsk8capicmd in all GSKit commands.
About this task
Each IBM
Spectrum Protect server, client, or storage agent
that enables SSL must use a trusted self-signed certificate or obtain a unique certificate that is
signed by a CA. You can use your own certificates or purchase certificates from a CA. Either
certificate can be installed and added to the key database on the IBM
Spectrum Protect server, client, or storage agent. If you use a root
certificate from a CA, you must install it on each key database for the client, server, and storage
agent that initiates SSL communication. The certificate is verified by the SSL client or server that
requests or initiates the SSL communication.
Restriction: Some Certificate Authorities use certificates in a format that is not
recognized by IBM
Spectrum Protect. You might need to contact
your CA to convert the certificate to a format that you can use with IBM
Spectrum Protect.
TLS 1.2 is a more secure communication protocol than previous TLS
protocol levels. To enable TLS 1.2, you must configure the source server and the target server or
storage agent to use TLS 1.2.
Procedure
- Specify the TCP/IP port on which the server waits for client communications that are enabled
for SSL or TLS. Update the dsmserv.opt file in the server instance directory by
specifying the SSLTCPADMINPORT or SSLTCPPORT option, or
both:
- Specify the SSLTCPADMINPORT option to specify the port address on which the
server TCP/IP communication driver waits for requests.
- Specify the SSLTCPPORT option to specify the SSL port address.
Tip: The SSLTLS12 YES server option is automatically set in the
server options file to specify TLS 1.2.
- Restart the server. If you change any default values for the server, you must restart the
server.
- Create the key database file:
- Server: Start the server. This action creates the server key
database file, cert.kdb, which is stored in the server instance directory. To
enable TLS 1.2 as the communication protocol, the following changes occur when a key database file
is created:
- The default label is automatically set as "TSM Server SelfSigned SHA Key".
- The SSLHIDELEGACY and SSLDISABLELEGACYTLS server options are
updated to YES in the server options file.
If a password exists for the server database, it is reused for the key database,
cert.kdb. After you create the database, the key database access password is
generated and stored.
- Client: Use the following command in the bin directory on the client to
create the key database,
dsmcert.kdb:
gsk8capicmd_64 -keydb -create -populate
-db dsmcert.kdb -pw password -stash
- Storage agent: Issue the DSMSTA SETSTORAGESERVER command to initialize
the storage agent and add communication information to the device configuration file and the storage
agent options file
dsmsta.opt:

LDR_CNTRL=TEXTPSIZE=64K@DATAPSIZE=64K@STACKPSIZE=64K@SHMPSIZE=64K
dsmsta setstorageserver myname=storage_agent_name
mypa=sta_password
myhla=ip_address
servername=server_name
serverpa=server_password
hla=ip_address
lla=ssl_port
STAKEYDBPW=password
ssl=yes


dsmsta setstorageserver
myname=storage_agent_name
mypa=sta_password
myhla=ip_address
servername=server_name
serverpa=server_password
hla=ip_address
lla=ssl_port
STAKEYDBPW=password
ssl=yes
- Import a unique certificate that is signed by a CA for each server that enables SSL or
TLS. Use the following command from the IBM
Spectrum Protect server as the instance user from the instance directory:
gsk8capicmd_64 -cert -add -db "cert.kdb" -stashed
-label "My CA" -format ascii -file myca.cer
- To receive the signed certificate and make it the default for communicating with clients, issue
the following command:
gsk8capicmd_64 -cert -receive -db cert.kdb
-pw password -stash -file cert_signed.arm -default_cert yes
In
the preceding example, the server key database file name is cert.kdb.
- Restart the server.
- Transfer the root certificate (ca.arm) to the client directory.
- Add the root certificate to the key database by using the gsk8capicmd_64 -cert
-add command.
- Server and storage agent:
gsk8capicmd_64 -cert -add -db cert.kdb
-pw password -label "CA_name"
-file ca.arm -format ascii
Tip: The key database for the server is stored in the server directory. The key database for
the storage agent is stored in the storage agent directory.
- Client:
gsk8capicmd_64 -cert -add -db dsmcert.kdb
-pw password -label "CA_name"
-file ca.arm -format ascii
Tip: For this example, the client key database name is
dsmcert.kdb.
- To verify successful SSL or TLS communication, issue the following command:
- Server and storage agent: query session
- Client: dsmc query session


