Environment properties, bindings, and tasks
Use Environments to define groups of variables or tags that can be used in both tests and in transport definitions. A single suite of tests can be reused in all cases when environments are used to modify runtime parameters that are appropriate to the current stage.
When a new project is created, a default environment named after the computer hostname is created. This environment can be renamed or a new environment can be created for the project, if required.
The default values for all tags (variables) are stored under Default Properties. When a tag is created here, that tag inherits its value from Default Properties.
Environment properties
Environment Properties define all of the available tags in the project.
- To create a tag, click New.
- To edit an existing tag, select it and click Edit.
- To remove the current value of a tag, select it and click Clear.
- To remove a tag, select it and click Delete. Note: To refer to tag values anywhere else in IBM® Rational Integration Tester, it is necessary to enter the tag name with two percent signs on either side of it. For example, to refer to the tag WEBSERVER_HOST, it must be typed as %%WEBSERVER_HOST%%.Note: Tags are in blue text when used (for example, %%name%%). Invalid tag names are underlined (for example, %%badname%%). Any field that accepts tags allows input by right-clicking and choosing the Insert Tag option as shown.

Tag names can contain the slash character (/), meaning that you can logically organize them into folder-like structures. In the previous example, the HTTP_Host and HTTP_Port tags would actually be named HTTP/HTTP_Host and HTTP/HTTP_Port.
Environment bindings
Environment Bindings define the connection between the logical and physical components in the project.
Creating an environment
- A new environment can be created as follows:
- Click the small arrow next to the Environment icon
in the main toolbar, then select the Create New Environment option.

- Click the Create New Environment icon
 in
the Environment Editor.
in
the Environment Editor. - Select the Project > Create New Environment menu option.
- Click the small arrow next to the Environment icon
in the main toolbar, then select the Create New Environment option.
- When prompted, enter a name for the new Environment. Once you do, the Environment is opened for viewing and editing (see Editing environments.)
Editing environments
Immediately after you create an environment, it is opened for editing. Otherwise, you can edit an existing environment as follows:
- Open the Environment Editor in one of the following ways:
- Click the Environment icon
 in the main toolbar
 - Click the small arrow next to the Environment icon
in the main toolbar and select the Edit Environments option.
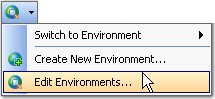
- Select the Project > Edit Environments menu option.
- Click the Environment icon
- In the Environment Editor, select the wanted environment from the list on the left side of the editor. The contents of each environment are organized as Properties, Bindings, and Documentation.