subscribe iconSubscribe to this information

xSeries 346

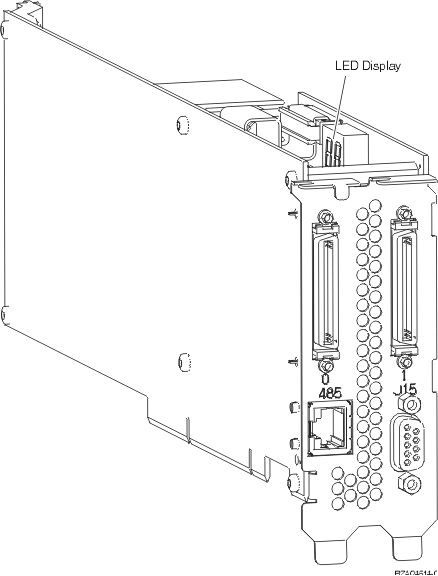
Learn how to install a card number 2689 machine type 1519 model 200 IXA card into an xSeries® 346 server.

The IXA card can be installed with the IBM® eServer™ i5 or eServer p5 server system power on or the system power off.
Note: On iSeries® systems the IXA adapter can only be installed with the iSeries server power off.

To install the card, complete the following steps. You might need to refer to your xSeries server information for some of the steps.

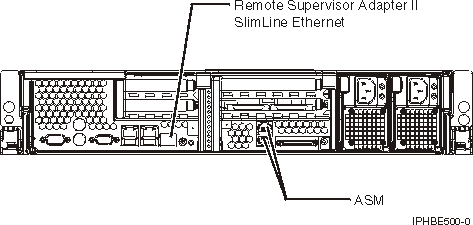
A Remote Supervisor Adapter II SlimLine option (P/N 73P9341) must be installed in this xSeries server before installing the Integrated xSeries Adapter (IXA) card. Some xSeries 346 models come with the Remote Supervisor Adapter II SlimLine option already installed. Refer to the Remote Supervisor Adapter II SlimLine option documentation for information on installing a Remote Supervisor Adapter II SlimLine option.

  1. The xSeries server's BIOS, Baseboard Management Controller firmware, and Remote Supervisor Adapter II SlimLine option firmware must be updated to the latest level after the Remote Supervisor Adapter II SlimLine option has been installed in the xSeries server. For more information, go to Update the xSeries server firmware.
  2. If you want to install with the i5 or p5 server system power off, see Stop the system or logical partition for instructions on stopping the system. Then return to this step.
  3. Ensure that the xSeries server power is off.
  4. Unplug the xSeries server power cord from the electrical outlet.
    Note: This system might be equipped with a second power supply. Before continuing with this procedure, ensure that all power sources to the system have been completely disconnected.
  5. Refer to the xSeries information to install the card in card position 4, located in the PCI riser card cage.
    Note: Both card positions in the PCI riser card cage are used by the card, so you might need to move an existing card to install the Integrated xSeries Adapter (IXA) card in the correct position. Also, you will need to remove the blue card extender from the IXA card prior to installing it.
  6. After the card is installed, return to these instructions.
  7. Install the HSL strain relief bracket (P/N 97P5742) onto the rear of the xSeries server by orienting the bracket with the indented center support down, then inserting the tabs on the bracket into the matching slots above and below the IXA card's HSL connectors (labelled 0 and 1) as installed in the xSeries server. These slots are in the rear of the xSeries server, not on the IXA card itself. Then slide the bracket to the left to lock it in place.
  8. Connect the SPCN Connection Block (P/N 04N2652) to the IXA card J15 position. Connect the cable to the SPCN network of your system. Ensure that the cable is routed to maintain a recommended minimum 6–inch separation from any alternating current (ac) power cord.
    J15 label
  9. Connect RS-485 shielded cable (P/N 21P4162) to the IXA card 485 label.
  10. Connect the other end of the RS-485 shielded cable to the upper of two ASM ports on the rear of the xSeries server
  11. Connect the terminator plug, P/N 59P2951, to the unused ASM port on the rear of the xSeries server.
    ASM Interconnect Module
  12. Connect any high-speed link (HSL) cables that you ordered to the card 0 and 1 label. For more information, refer to High-speed link (HSL) information in the IBM Systems Hardware Information Center.
  13. Plug the xSeries server into an electrical outlet.
  14. Go to Expansion units in the Installing hardware topic to complete setup for the xSeries server. Then return to this step.
  15. If the eServer i5 or eServer p5 server system power is off, or on System i® servers start the system. For instructions on starting the system, see Start the system or logical partition. Then return to this step.
    Important: Do not turn on the xSeries server using the xSeries power switch. Do not turn on the xSeries server using hardware service manager.
  16. Wait for the system to detect that the IXA card is installed and to turn on the xSeries server.
    Note: Power-on might take several minutes because the IXA card's SPCN firmware might require automatic update to complete.
  17. Verify that the IXA card is functional. For instructions, see Verify the installed part and select the appropriate procedure. Then return to this step.
  18. To complete the installation, go to Windows® environment on iSeries in the iSeries Information Center.

Send feedback | Rate this page

Last updated: Fri, Oct 30, 2009