Example 1: Configuring the Output step
In the Output step, create mappings that define how to map source items in one data structure to target items in another data structure.
About this task
In this assembly, you use the Output step to map a hierarchical data structure to a relational data structure.
Procedure
- Click the Output step in the Assembly Outline to open the
step. The step displays the Output window of the Configuration tab.
In the Output window, the output table describes the data structure
that is the output of the assembly. The following figure shows the
relevant columns of the output table for this assembly:
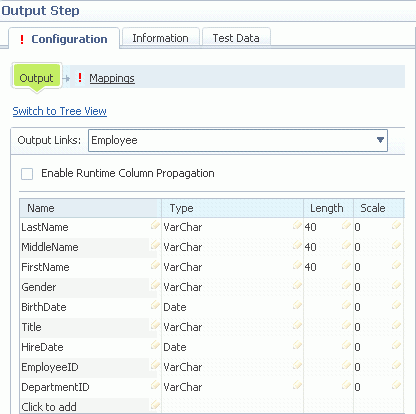
The default view in the Output window is the Links view. The Links view looks similar to the table that displays on the Columns tab in the Hierarchical Data stage editor. The output structure for Employee link is shown. Notice that the columns that you defined in the Hierarchical Data stage editor display in the output table. In the Links view, you can modify the columns that you already defined. Any changes that you make to the columns are propagated to the column definitions in the Hierarchical Data stage properties.
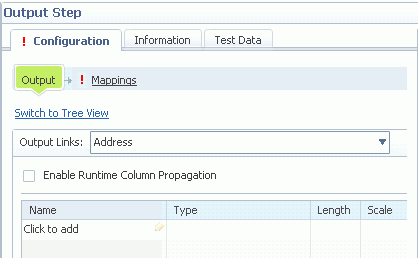
- From the Output Links drop-down
list, select Address. The following figure shows that the output table
does not display any columns because when you created the job, you
did not define any columns for the Address link. The lack of columns
is not an error. However, if no columns are defined on the link, you
cannot map any source items in the hierarchical data structure to
this link. Because this job is designed to produce a file that contains
address data, you need to create the address columns. But instead
of returning to the job and manually creating columns, you can automatically
create them from the Mappings tab of the Output
step.
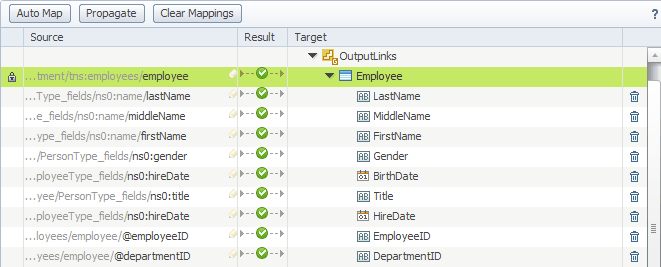
- Click the Mappings tab. The following
figure shows the mapping table. In this table, each item in the output
structure is represented by a row in the table. You map target items
to source items. For this job, the target structure is two links,
Address and Employee, and the columns that are defined on those links.
In the Target column, the Employee link is represented as a list item.
Under the Employee list item, each column displays as a content item.

- Select the Employee list item from the Target column. In
the Source column, click and choose employee from the drop-down list.
Click Auto Map.
Automatic mapping is context-sensitive, it creates a mapping for the selected item and all of its descendent items. Each source item that is automatically mapped is determined based on similar name and data type.
The following figure shows the result of Auto Map for the Employee list item. The target Employee list item and all of its child items are automatically mapped to source items. If the Employee list item had a descendent list that contained content items, the descendent list and all of its content items would also be automatically mapped.
- Next you need to map the Address list item from the Target
column. In the Source column, click and choose Address from the drop-down
list and click Propagate.
Propagate automatically creates one column for each item that is a descendent of the Address item in the source structure and automatically maps those items to the respective items in the source column. When you use the Propagate button to create items, the items are automatically mapped.
The following figure shows the result: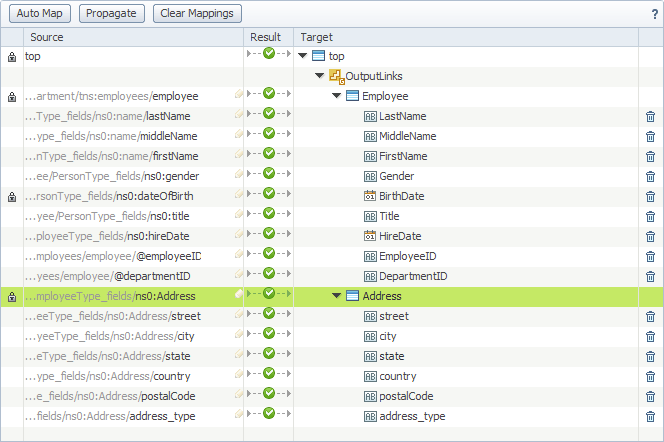
- Next you must map a source item to the new target item,
EmployeeID. Click and open the Mappings window.
You will see that the EmployeeID is added to the Address list in the
Target column. Manually map the EmployeeID in the source column to
the EmployeeID in the Address list of target column. In the Source
column, click and choose employeeID from the drop-down list.
If you do not see the items in the drop-down list, click More to find the required item.
The following figure shows the result of mapping: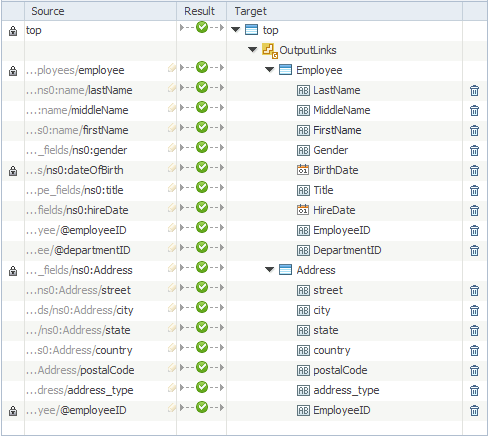
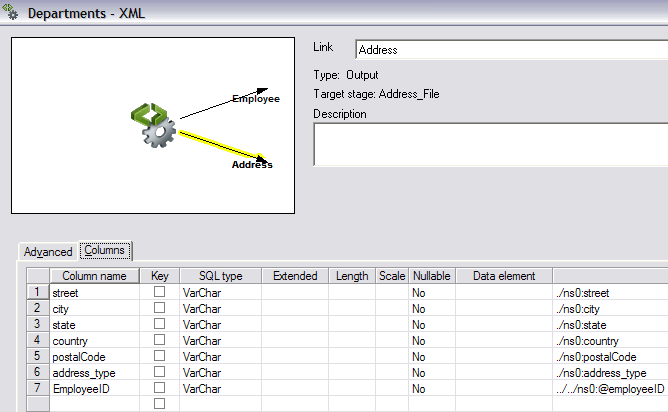
- Click OK to save your work and return to the Hierarchical
Data stage editor. Click the Address link in the preview window, and
then click the Columns tab to see that the
EmployeeID column that you just created has been propagated back to
the job. The following figure displays the preview window.