Installing Rhapsody Model Manager on individual computers
These are the steps required to install Rhapsody Model Manager on end-user computers.
Note: Before carrying out these steps, verify that your system administrator has installed the
necessary server components as described in Installing server components for Rhapsody Model Manager and created a project area
as described in Create a Rhapsody Model Manager project area using the Engineering Workflow Management client.
- Install the EWM Eclipse client:
- Download the compressed file for version 7.0.2 from jazz.net.
- Extract the contents of the file.
- Install IBM
Engineering Systems Design Rhapsody. The
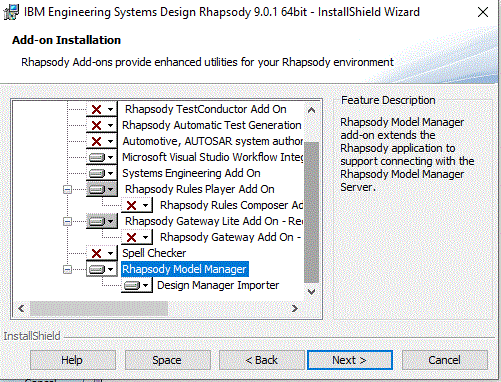
installation wizard includes a list of add-ons that can be installed. Make sure that the list of
add-ons you have selected includes the Rhapsody Model
Manager
add-on.

- Install the Rhapsody
plug-ins for integration with Engineering Workflow Management:
- Open Engineering Workflow Management and select .
- On the Available Software page, click Add.
- On the Add Repository page, click Local to display the directories on your computer.
- Navigate to the EWMIntegration folder in your Rhapsody installation directory. You will see two folders - EWMEclipseClient32bitPlugins and EWMEclipseClient64bitPlugins. Select the folder that matches your version of the EWM client, and click OK.
- Add a name for the local repository and click OK to close the Add Repository page.
- On the Available Software page, expand Engineering Rhapsody Tools.
- Select the Engineering Rhapsody integration for Engineering Workflow Management plug-in, and then click Next.
- On the Install Details page, click Next.
- On the Review License page, accept the terms of the license agreement, and then click Finish.
- When the installation completes, restart Engineering Workflow Management.
Note: If Rhapsody does not seem to be communicating with the integration plugin for Engineering Workflow Management even though you installed the plugins, try the steps listed in Troubleshooting the integration with Engineering Workflow Management. - Configure EWM to use
Rhapsody DiffMerge for comparisons:
- In EWM, select from the main menu.
- In the filter field at the top of the panel, type Compare, and then select Jazz Source Control > External Compare Tools.
- In the Use an External Compare Tool for Compare section, select For all files that match the specified file pattern, and use the following list for the file pattern: *.cfgx, *.clbx, *.clsx, *.cmpx, *.ctdx, *.dpdx, *.filx, *.folx, *.mscx, *.mttx, *.mtxx, *.omdx, *.pldx, *.rplx, *.rpyx, *.sbsx, *.stdx, *.tblx, *.tbtx, *.tmdx, *.ucdx
- In the Use an External Compare Tool for Auto-Resolve section, select For all files that match the specified file pattern, and use the following list for the file pattern: *.cfgx, *.clbx, *.clsx, *.cmpx, *.ctdx, *.dpdx, *.filx, *.folx, *.mscx, *.mttx, *.mtxx, *.omdx, *.pldx, *.rplx, *.rpyx, *.sbsx, *.stdx, *.tblx, *.tbtx, *.tmdx, *.ucdx
- In the 2-way Compare section, in the Location of Executable field, click Browse.
- Browse to the root directory of your Rhapsody installation, for example, C:\IBM\Rhapsody, select the DiffMerge.exe file, and click Open.
- In the 2-Way Compare section, in the Local Compare Arguments field, enter the following text (include the quotation marks): "${file1Path}" "${file2Path}" -AliasLeft "${file1Title}" -AliasRight "${file2Title}"
- In the 2-Way Compare section, in the Remote Compare Arguments field, enter the following text (include the quotation marks): "${file1Path}" "${file2Path}" -AliasLeft "${file1Title}" -AliasRight "${file2Title}"
- In the 3-Way Conflict Compare section, fill in the Location of Executable field by pasting in the full path for DiffMerge.exe (same path that you used in the 2-way Compare section).
- In the 3-Way Conflict Compare section, in the Compare Arguments field, enter the following text (include the quotation marks): -xmerge "${file1Path}" "${file2Path}" -base "${ancestorFilePath}" -out "${mergeFilePath}" -AliasLeft "${file1Title}" -AliasRight "${file2Title}" -AliasBase "${ancestorFileTitle}"
- In the Auto-Resolve section, fill in the Location of Executable field by pasting in the full path for DiffMerge.exe (same path that you used in the 2-way Compare section).
- In the Auto-Resolve section, in the Auto-resolve Arguments field, enter the following text (include the quotation marks): -merge "${file1Path}" "${file2Path}" -base "${ancestorFilePath}" -out "${mergeFilePath}" -AliasLeft "${file1Title}" -AliasRight "${file2Title}"
- Click OK.
Note: The settings for the diff tool to use are stored in a user's workspace, so each user will have to configure their EWM client with these instructions.