Installing InfoSphere MDM into a clustered environment
Use this procedure to run a custom installation of InfoSphere® MDM into a clustered environment.
Before you begin
Make sure that you meet these prerequisites:
- You have defined unique names for each member in the cluster.
- You have completed all of the installation preparation tasks, including preparing your IBM® WebSphere® Application Server and database.
- You have installed IBM Installation Manager and added the necessary repositories.
- Your IBM WebSphere Application Server deployment manager and node are started.
- Your database is started.
- You have installed IBM Rational® Application Developer if you are installing InfoSphere MDM Workbench on a workstation.
- Optionally, you have installed the Installation Startup Kit, which includes scripts and other tools to help with your installation and configuration. If the Installation Startup Kit is not installed, then the installation application will display a warning.
- You must be running in Administrator mode for IBM Installation Manager to write to the Windows registry. Administrator mode is not used for IBM AIX®, Linux, or Solaris.
- On a Microsoft Windows 7 operating system, you must install MDM into a directory that is not virtualized.
- Open the WebSphere Application Server Integrated Solutions Console and go to .
- Under Server Infrastructure, expand Java and Process Management, then click Process definition.
- Under Additional Properties, click Java Virtual Machine.
- Set the Initial heap size to 512 MB and the Maximum heap size to 1024 MB.
- Click OK, save your changes, and synchronize your changes with the nodes.
About this task
Procedure
- Configure your InfoSphere MDM installation
details: Tip: Use your completed installation worksheets for guidance. As you move through each of these configuration panels, the screen displays a green checkmark or red x to indicate whether the panel has been completed successfully.
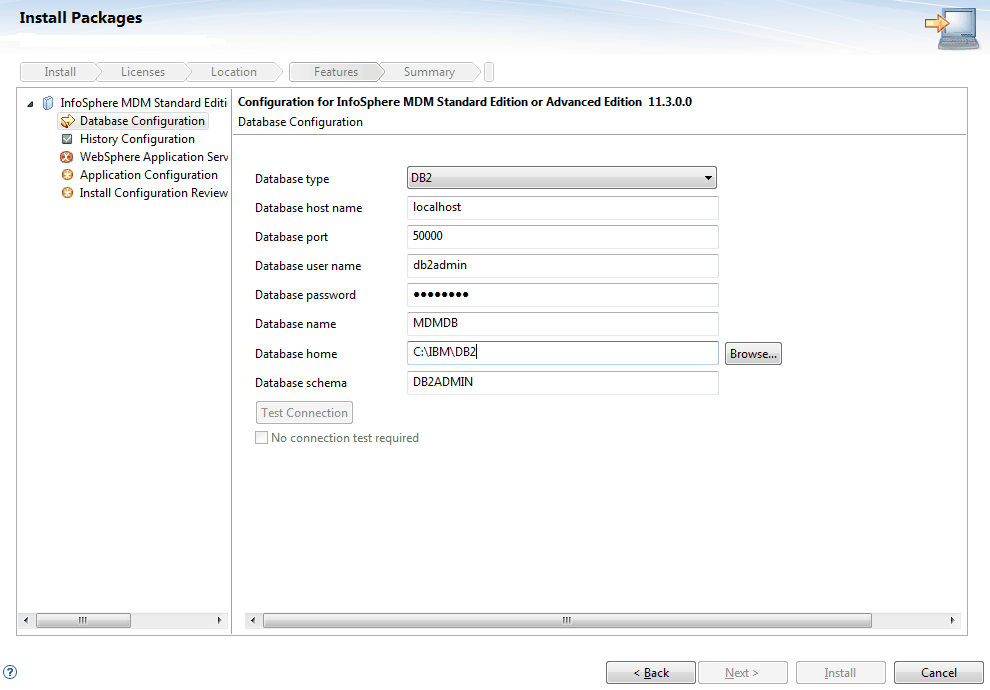
- On the Database Configuration panel:
- Enter the database details. If your database home value is valid, then the Test Connection button becomes active.
- Click Test Connection. The database must be accessible and running for the test to be successful.
- After a successful connection test, you can set up tablespaces. Select either Use existing tablespaces or Create new tablespaces. If you choose to create new tablespaces, then you must define the new names.
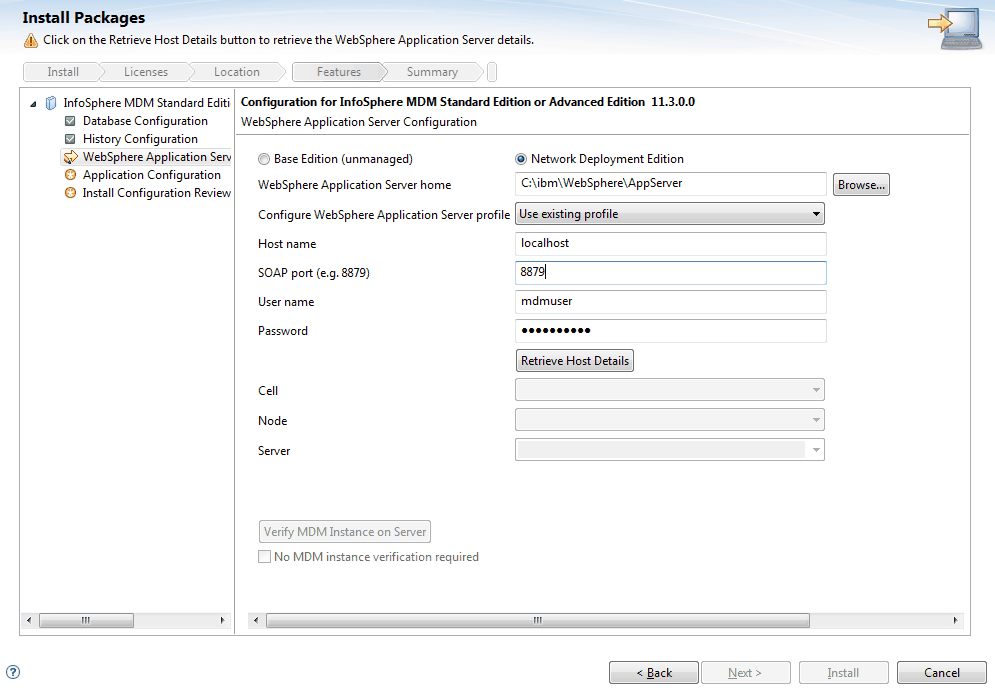
- On the WebSphere Application Server Configuration panel:
- Enter the information that you used to set up your application server.
- Select Retrieve Host Details to obtain your cell, node, and server information. Use each drop down list to select the retrieved cell, node, and server. If you need to provide a different value, you can type it in the field.
- Click Verify MDM Instance on Server.
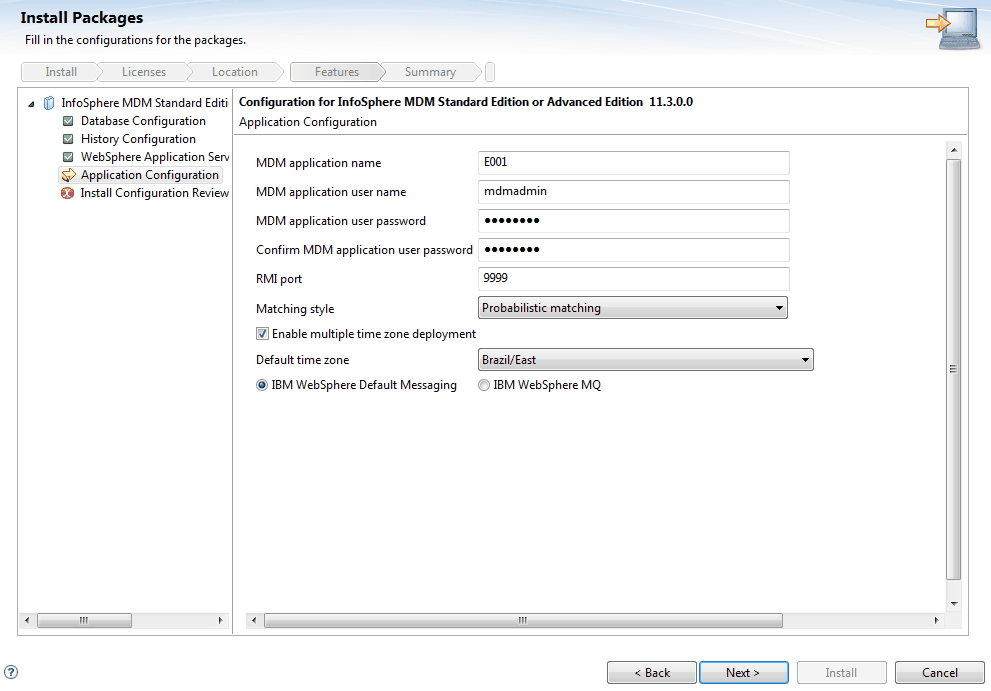
- On the Application Configuration panel:
- Provide the new application name, user password, and RMI port. The installation application will use these details to set up InfoSphere MDM.
- Select either Probabilistic matching or Deterministic matching for your matching style.
- If your application is running across different time zones or your data has time-sensitive values under different time zones, select Enable multiple time zone deployment and select a Default time zone.
- Select the messaging type to use for this installation.
If you select IBM WebSphere MQ, then you will be asked to provide the details of your WebSphere MQ instance.
Tip: If you installed WebSphere MQ on a different machine than the one where you are running IBM Installation Manager, make sure that you clear the Configure messaging server option to prevent the installer from creating a queue manager. Keep the option selected if you do want to create a queue manager.

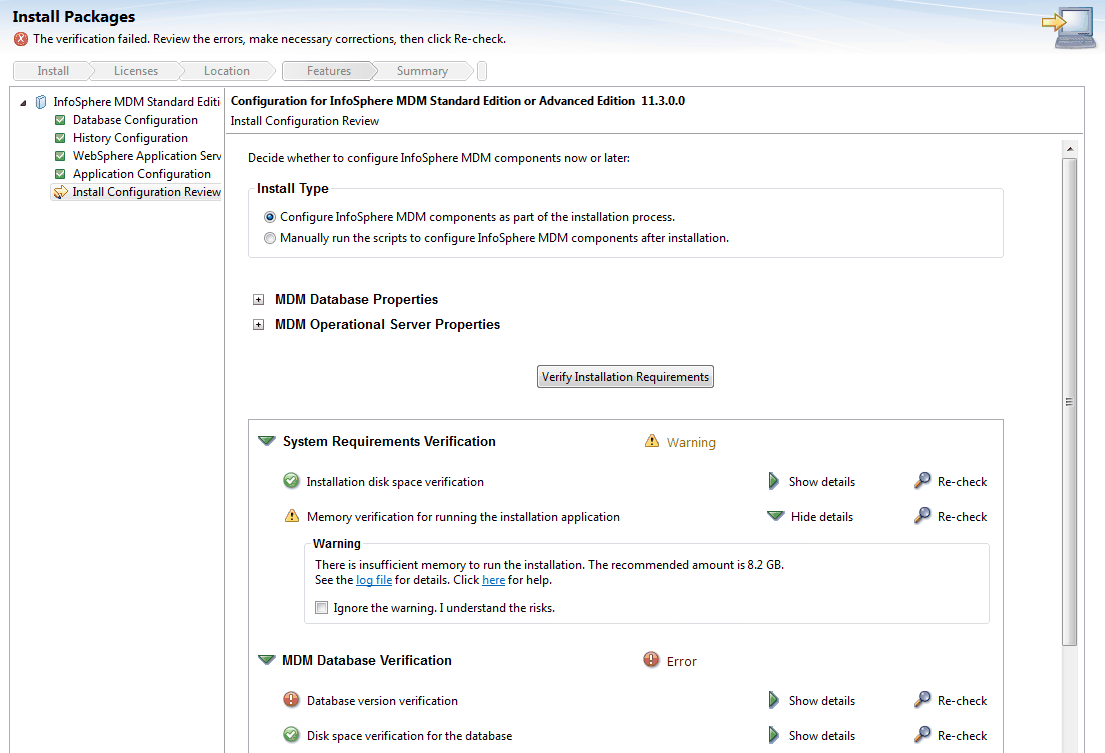
- On the Install Configuration Review panel:
- Select the install type. You can either choose to automatically configure the application components as part of the main installation process or run scripts after the main installation to configure them later.
- Expand the Properties headings to review the details that you have configured for this installation.
- Click Verify Installation Requirements to run a number of prerequisite checks. The checks will help you to confirm that your environment and configuration is sufficient to successfully complete the installation.
- Review the prerequisite validation test results. Click Show
details to see more information of for each test, and
follow the provided links to view the log file and help for each result.Tip: You can ignore warnings by clicking Show details, then selecting Ignore the warning. I understand the risks. Errors cannot be ignored.
- If necessary, take any corrective action to address any warnings or errors, then click Recheck Status.
- When the checks pass successfully, click Install.
The installation application will install InfoSphere MDM. Depending on your configuration, the installation process can take a significant amount of time. - On the Database Configuration panel:
Results
A success message on the final installer panel indicates that the verification tests were automatically run as part of the installation process. You can also view the log files to verify a successful installation. If the installation is not successful, view the log files and use the information in the troubleshooting topics to assist you.
What to do next
After installation, if you want to add or remove a feature (for example, add an application or another language translation), or modify any of your configuration settings, you can run IBM Installation Manager again and select Modify.