Working with the user interface
The PowerAI Vision user interface is made up of these basic parts: the navigation bar, the side bar, the action bar, the data area, and the notification center.
Interface areas
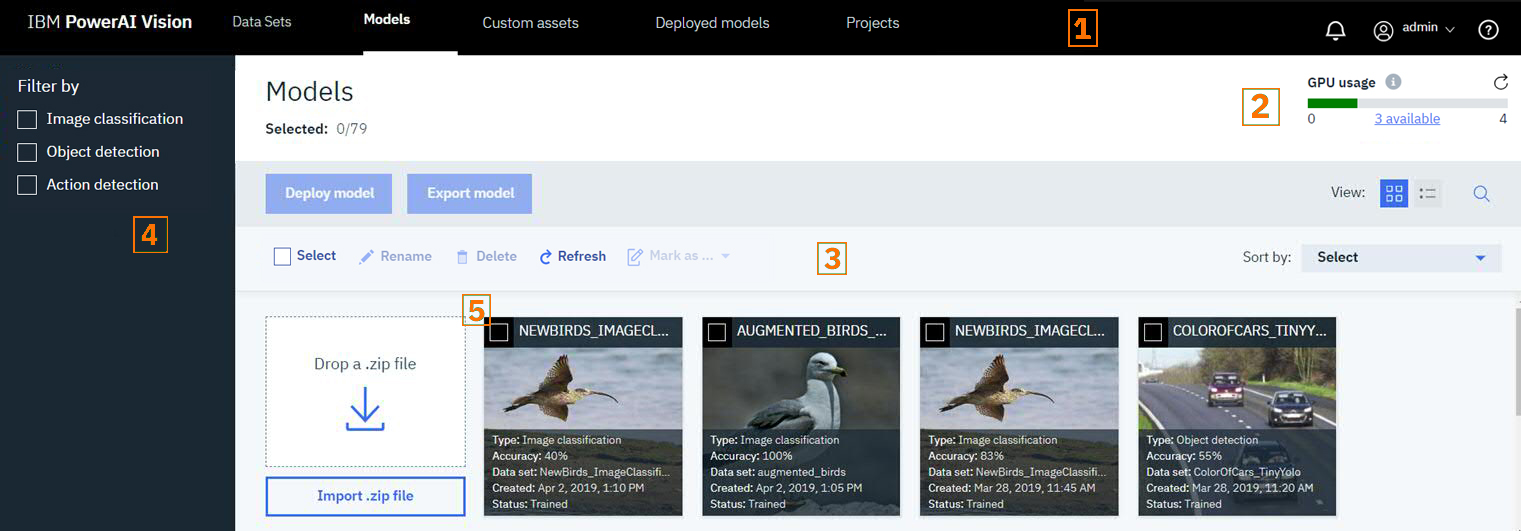
- 1: The navigation bar
- The navigation bar lets you access the notification area (the bell icon), work with your profile, or access the PowerAI Vision Knowledge Center (the question mark icon). If you click the arrow by your user name, you can log out, view your usage metrics, and can see the version number of the product.
- 2: The header bar
- The header bar on the Training, Models, Model details, and Deployed Models pages shows GPU usage
details in these categories:
- Training
- GPUs currently used for training jobs by PowerAI Vision.
- Deployed Models
- GPUs currently used for deployed models by PowerAI Vision.
- External
- External GPUs are those that are used for processes outside of PowerAI Vision. For IBM Cloud Private installations, all GPUs are listed as External.
Note: If the output shows "Unknown", then GPUs are in use, but not for PowerAI Vision training or deployment. This either indicates an issue with a GPU in use by a training or deploy job that failed unexpectedly, or there are other applications on the system using GPUs. This could lead to unexpected resource contention and application issues. - 3: The action bar
- This is where you find the actions that you can take on images, videos, data sets, and models in the current data area. The available actions differ depending on what type of object you are working with.
- 4: The side bar
- Data sets and models have a side bar with filtering options. Filtering helps you specify which
objects to include in the data area.
Navigating: If the side bar is long, for example, if you have a data set with a lot of different types of objects, you can scroll through the side bar content. To scroll, hover over the appropriate content and use your mouse roller or keyboard arrow keys. If the mouse pointer is right over the categories, for example, scrolling moves you through that list. If the mouse pointer is further to the right, on the edge of the side bar, scrolling moves you through all of the content on the side bar.
- 5: The data area
- This is where you find the objects that you can act on. It lists the objects of the selected
type, or displays the data included in the data set.
- Filtering
- With large data sets, you might need to filter the files that are shown in the data area. By default, your whole data set is shown.
- Filter by
- When you deselect a file type, those files are no longer shown in the data area. Therefore, if you only have Images selected, only images are shown in the data area.
- Categories / objects
- When you select categories, objects, or both, all files of the specified type that belong
to any of the selected categories, or contain the selected objects, are shown.
For example, assume you have a data set with two categories: Cats and Dogs. Also assume that you tagged these types of objects: Face, Collar, and Tail. Then if you select Images, the category Dogs, and the object Collar, you will see all images that are dogs or contain a collar. This will include images of cats if they have a collar as well as images of dogs with no collar.
- Using filtering and "Select all" with video data
- When you capture frames from a video, these frames always maintain a child /
parent relationship with the original video. That has some selection and filtering
implications.
- When using the filter on the side bar, if any video frame matches the filter criteria, both the frame and its parent video are selected and are shown in the data area.
- If you click the "Select" box in the action bar, everything in the data area is selected. Therefore, if there is a video shown in the data area, it, and all of its child frames, are selected. Any action performed in this situation applies to all selected images, the video, and all of its child frames.
Example
A user has captured 50 frames from a video file Cars Video. Fourteen frames of the 50 have no labels.- The user selects Unlabeled in the Objects filter in the sidebar. The 14 frames with no labels and their parent video, Cars Video, are shown in the data area.
- The user clicks Select in the action bar. The frames and the video are all selected.
- The user clicks Delete, intending to delete the unlabeled frames. However, because the video was selected, it, and the 36 labeled frames, are also deleted.
- Deleting items
- In general, to delete items, you select and delete the files. However, because video frames always maintain a child / parent relationship with the original video, when you select a video for deletion, the video and all of the frames are deleted. You can delete frames and leave the video, but you cannot delete the video and leave the frames.
- The notification area
- Click the bell icon in the navigation bar to access the notification area. This
allows you to view and work with messages. Click the arrow to return to your previous view.Figure 2. Notification area
