Example: Detecting objects in images
In this fictional scenario, you want to create a deep learning model to determine the make and model of a car caught by a traffic camera.
The image file used in this scenario is available for download here: Download car image.
Import images and create a data set
- Log in to PowerAI Vision.
- Click Data Sets in the navigation bar to open the Data Sets page. There are several ways to create a new data set. We will create a new, empty data set.
- From the Data set page, click the icon and name the data set Traffic camera.
- To add an image to the data set, click the Traffic image data set and click Import
file or drag the image to the + area. Important: You cannot navigate away from the PowerAI Vision page or refresh until the upload completes. You can navigate to different pages within PowerAI Vision during the upload.
Labeling objects in an image
The next step is to label objects in the images. For object detection, you must have at minimum five labels for each object. We will create "Black car" and "White car" objects and will label at least five images as black cars, and at least five as white cars.
- Select the images from your data set and click Label Objects.
- Create new object labels for the data set by clicking Add new by the Objects list. Enter Black car, click Add, then enter Black car, then click OK.
- Label the objects in the images:
- The first image is open in the data area, with thumbnails of all the selected image on the left side. Select the correct object label, for example, "Black car".
- Choose Box or Polygon from the bottom left, depending on the shape you want to draw around each object. Boxes are faster to label and train, but less accurate. Only Detectron models support polygons. However, if you use polygons to label your objects, then use this data set to train a model that does not support polygons, bounding boxes are defined and used. Draw the appropriate shape around the object.
- Select the thumbnail of the next image to open it. Add the appropriate labels, and continue through the rest of the images.
- Do not label part of an object. For example, do not label a car that is only partially in the image.
- If an image has more than one object, you must label all objects. For example, if you have cars and motorcycles defined as objects for the data set, and there is an image with both cars and motorcycles in it, you must label the cars and the motorcycles. Otherwise, you decrease the accuracy of the model.
- Label each individual object. Do not label groups of objects. For example, if two cars are right next to each other, you must draw a label around each car.
- Draw the shape as close to the objects as possible. Do not leave blank space around the objects.
- You can draw shapes around objects that touch or overlap. For example, if one object is behind another object, you can label them both. However, it is recommended that you only label objects if the majority of the object is visible.
- Use the zoom buttons (+ and -) on the bottom right side of the editing
panels to help draw more accurate shapes. Note: If you are zoomed in on an image and use the right arrow key to move all the way to the right edge, you might have to click the left arrow key several times to start panning in the other direction.
- Shapes cannot extend off the edge of the image.
- After defining a shape, you can copy and paste it elsewhere in the same image
or in a different image by using standard keyboard shortcuts. After you paste it, you can refine the
shape by moving, adding, or removing points in the outline.Note: To copy and paste a shape from one image to another, both images have to be available in the image carousel. From the data set, select all images that will share shapes, then click Label objects. All images will be listed in the image carousel in the left side of the Label objects window.
- Labeling with polygons
- To delete a point from an outline, ctrl+click (or cmd+click).
- To add a point to an outline, click the translucent white square between any two points on the outline.
- To move a point on the outline, click it and drag.
- After all objects are labeled in all of the image, click Done editing.
Training a model
With all the object labels that are identified in your data set, you can now train your deep learning model. To train a model, complete the following steps:
- From the Data set page, click Train.
- Fill out the fields on the Train Data set page, ensuring that you select Object Detection. We will choose Accuracy (faster R-CNN) for Model selection
- Click Train.
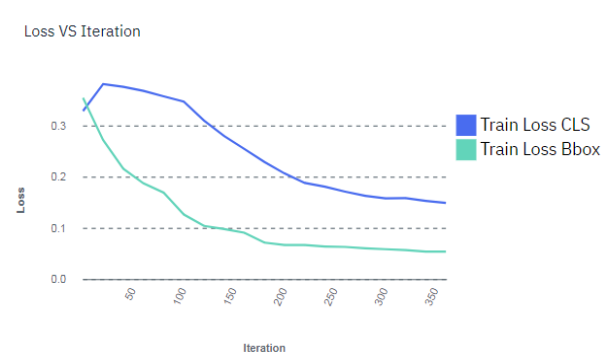
- (Optional - Only
supported when training for object detection.) Stop the training process by clicking .You can wait for the entire training model process complete, but you can optionally stop the training process when the lines in the training graph start to flatten out, as shown in the figure below. This is because improvements in quality of training might plateau over time. Therefore, the fastest way to deploy a model and refine the data set is to stop the process before quality stops improving.Note: Use early stop with caution when training segmented object detection models (such as with Detectron), because larger iteration counts and training times have been demonstrated to improve accuracy even when the graph indicates the accuracy is plateauing. The precision of the label is can still being improved even when the accuracy of identifying the object location stopped improving.Figure 1. Model training graph
 Important: If the training graph converges quickly and has 100% accuracy, the data set does not have enough information. The same is true if the accuracy of the training graph fails to rise or the errors in the graph do not decrease at the end of the training process. For example, a model with high accuracy might be able to discover all instances of different race cars, but might have trouble differentiating between specific race cars or those that have different colors. In this situation, add more images, video frames, or videos to the data set, label them, then try the training again.
Deploying a trained model
- Each Tiny YOLO V2, Detectron, or custom deployed model takes one GPU. The GPU group is listed as '-', which indicates that this model uses a full GPU and does not share the resource with any other deployed models.
- Multiple Faster R-CNN and GoogLeNet models are
deployed to a single GPU. PowerAI Vision uses packing to
deploy the models. That is, the model is deployed to the GPU that has the most models deployed on
it, if there is sufficient memory available on the GPU. The GPU group can be used to determine which
deployed models share a GPU resource. To free up a GPU, all deployed models in
a GPU group must be deleted (undeployed).
Note: PowerAI Vision leaves a 500MB buffer on the GPU.
- Click Models from the menu.
- Select the model you created in the previous section and click Deploy.
- Specify a name for the model, and click Deploy. The Deployed Models page is displayed, and the model is deployed when the status column displays Ready.
- Double-click the deployed model to get the API endpoint and test other videos or images against the model. For information about using the API see Vision Service API documentation.
Next steps
You can continue to refine the data set as much as you want. When you are satisfied with the data set, you can train the model again. This time when you train the model, you might want to train the model for a longer time to improve the overall accuracy of the model. The loss lines in the training model graph should converge to a stable flat line. The lower the loss lines are in the training graph the better. After the training completes, you can deploy the model again. You can double-click the deployed model to get the API endpoint and test other images or images against the model.