Example: Detecting actions in a video
In this fictional scenario, you want to create a deep learning model to determine when a cash register is being opened in a video.
Preparing videos for import
- Cut out long periods of background video without any actions.
- Transcode videos with FPS greater than 30 down to 30 FPS
- Crop the video so that actions should take up a large part of the frame.
Import videos and create a data set
- Log in to PowerAI Vision.
- Click Data Sets in the navigation bar to open the Data Sets page. There are several ways to create a new data set. We will create a new, empty data set.
- From the Data set page, click the icon and name the data set "Open cash register".
- To add a video to the data set, click the Open cash register data set and click
Import file or drag the video to the + area. We will
assume we have added the Cashier 1 - Cashier 5 videos.Important: You cannot navigate away from the PowerAI Vision page or refresh until the upload completes. You can navigate to different pages within PowerAI Vision during the upload.
Labeling actions in a video
The next step is to label actions in the videos. We will create the "Open" action and will label it in several videos.
- Each action label must be in the range of 5 - 1000 frames. The required length of time depends
on the video's FPS. For 30 FPS, each action label must be in the range of .166 - 33.367 seconds.
The label's duration is checked based on the frames per second and the selected start and end times. For example, if an action label is marked with a start time of 12.295 seconds and end time of 12.296 seconds for a 30 FPS video, you will get an error message like the following: "Label duration of '100' milliseconds does not meet required duration between '166.83333' milliseconds and '33366.668' milliseconds".
- At least 10 instances of each action tag in the data set are recommended.
- The longer the total labeled action time is, the better your results will be.
- If multiple types of actions are labeled in a data set, the total amount of
time for each action type should be similar. For example, if you tag 20 instances of the action
"jump" in a data set with a total time of 27 seconds, and you tag 10 instances of the action
"drive" in the data set with a total time of 53 seconds, the model will be biased toward the
"drive" action.
The total time for each action type is shown in the left pane in the Actions section.
Follow these steps to label actions. For more information, see Labeling actions:
- Open the "Open cash register" data set.
- Create the "Open" action tag in the data set by expanding Actions on the left and clicking Add action.
- Select the appropriate video and click Label actions. The existing tags are listed on the right.
- Find the start of an action by using the video control bar:
- Use the slider or play button to get near the part of the video you want.
- Set the playback rate (1x, .5x, and so on) to control how fast the video plays.
- Use the +1 and -1 buttons to move forward or backward one frame.
- Find the end of the action, then click + in End time.
- Select "Open" for the action name, then click Save action.
- Continue adding actions to videos until you are done.
Training the model
- From the Data set page, click Train.
- Fill out the fields on the Train Data set page, ensuring that you select Action detection. Leave the default values for all other options.
- Click Train.
- (Optional - Only
supported when training for object detection.) Stop the training process by clicking .You can wait for the entire training model process complete, but
you can optionally stop the training process when the lines in the training graph start to flatten
out, as shown in the figure below. This is because improvements in
quality of training might plateau over time. Therefore, the fastest way to deploy a model and refine
the data set is to stop the process before quality stops improving. Figure 1. Model training graph
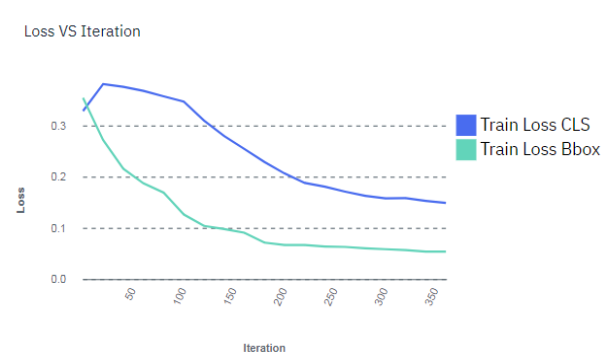 Important: If the training graph converges quickly and has 100% accuracy, the data set does not have enough information. The same is true if the accuracy of the training graph fails to rise or the errors in the graph do not decrease at the end of the training process. For example, a model with high accuracy might be able to discover all instances of different race cars, but might have trouble differentiating between specific race cars or those that have different colors. In this situation, add more images, video frames, or videos to the data set, label them, then try the training again.