Building Projects

About this task

A “build” is the process where IBM® AD Build Client reads project sources, places the results in the project repository, and generates the data that is needed to display the graphical representation of the applications’ internal and external program relationships.

The build process can be ran on individual programs in the project, on a batch of selected files and folders or globally on all the resources in the project. Generally, you make a global build, but if, for example, a single source file is changed, a build on that file alone would be appropriate. In that case, only the modified program is analyzed and the project repository is updated accordingly.

Procedure

  1. To build a project, follow the steps bellow.
    1. Select Build / Build Project to start the build process. A warning message alerts you to the fact that this operation erases the database. Click Yes to start the build process.
    2. As each file is processed, its name and accompanying notes and messages, including error notifications, are displayed in the Message pane
    3. On completion of the build, you can double-click any of these messages to open the corresponding source file at the appropriate line.
  2. To build a single program or a folder, follow these steps:
    1. In the Project pane, expand the project tree so that the required source program or folder is visible. Click the program icon or the folder to select it then right-click and select Build.
    2. The IBM AD Build Client Message window displays the file name and log messages that are created during the build process. Information about the file and its internal relationships is created and placed into the repository.
  3. To build a batch of selected files, follow these steps:
    1. In the Project pane, expand the project tree so that the required source programs and folders are visible. Click the programs and folders that you want to include in the build process then right-click and from the menu, select Build.
    2. Alternatively, for large batches of files you can create a *.txt file that contains the list of resource files that you want to build and then use the Build Imposed Selection option from the project node menu to load that file.
      This image shows a dialog box. You can specify a list of source files in the dialog box.
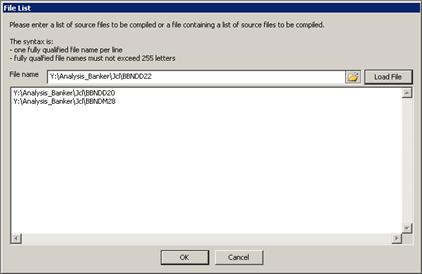
    3. Browse to the location of the *.txt file then click Load to load its contents. The *.txt file must contain the FULL PATH to each resource file on a separate line. Extra syntax indications for the *.txt file are also available. After the file is loaded, the resource files list is displayed. Click OK to start the build process. The Messages window displays the file names and log messages that are created during the build process. Information about the files and their relationships is created and placed into the repository.
  4. To update the project after several sources are changed:
    1. When several sources are changed, the easiest way to update the project repository is to use the Make option. Run Make by selecting Build / Make Project or by pressing F7. Make works in the following way: for each source, IBM AD Build Client compares the last modified date with the date on the disk and decides whether an update is necessary for the source. This step is called verification.
    2. A Build is ran only for the sources that are chosen in the verification step.
    3. A summary of the updated sources is displayed in the Message pane.
  5. To update files from mainframe library: to make sure that you have the current version of the resources that are brought to your project from mainframe use Update Modified Mainframe Members function from the project menu or select Update Modified Mainframe Members from Build menu.
  6. To build only the updated resources – Make: to make a build exclusively with the modified resources use Make option. Click Make from the toolbar, alternatively you can select Make from Build menu.
    Note: If you start a Build on a project where other users logged in, a warning message appears indicating which users are connected to the project. You need to confirm the operation.

    If another user activates a Build while you are logged in to a project a warning message appears urging you to close the project and wait for a notification that is sent to all users when the build process is completed. During the Build process, the project is locked and cannot be accessed by any user. After the Build is successfully completed, a notification is sent to all users logged in to the project.

    It is possible that the Make process might take a long time during which you cannot use the application. If you need to use the application, you can run the Make process in the background. To force the Make operation to run in the background, follow the steps:
    1. Click Start, select Run then type cmd followed by ENTER to open the command window.
    2. Go to the folder where your IBM AD Build Client is installed and locate IBMApplicationDiscoveryBuildClient.exe file. Drag the IBMApplicationDiscoveryBuildClient.exe file into the command window then enter /? and press ENTER. A window is displayed containing detailed instructions about how to make a specific process to run in the background. To make the Add files operation to run in the background, follow the displayed steps.