Netcool Network Management
Version 9.3
Quick Start Guide
This guide describes a quick and easy way to install the products in the solution.
Overview
IBM Netcool Network Management helps communication service providers, enterprise data centers, and networking staff to discover, visualize, detect, configure, activate, integrate and remediate your network. The single solution combines IBM Tivoli® Netcool/OMNIbus V8.1, IBM Tivoli Network Manager V4.2, and IBM Tivoli Netcool Configuration Manager V6.4.2.
This Quick Start Guide describes a single-server installation, where all products are installed on the same server. This type of installation is useful for a proof of concept or test environment. High-level instructions are provided here, with links to more detailed information.
Step 1: Access the software and documentation

Step 2: Evaluate the hardware and system configuration

Step 3: Review the installation architecture
The following diagram shows a simplified architecture of the products and components of Netcool Network Management.
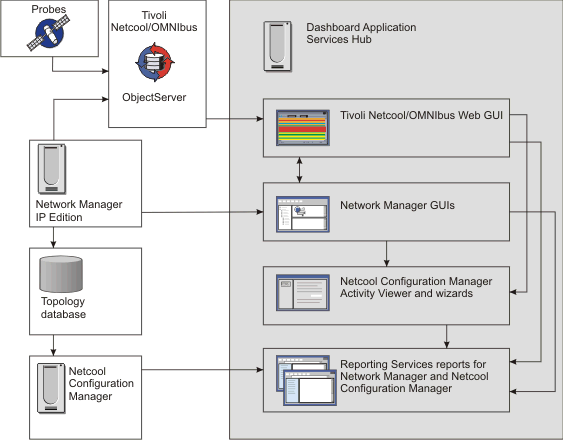
For more information about the architecture and data flow, see https://ibm.biz/Bd4xUS.
Step 4: Installing a database or database client

IBM DB2® V10.5 Enterprise Server Edition is included and is the default database in the Network Manager product. Other DB2 and Oracle databases are supported. For more information about the supported databases, see https://ibm.biz/Bd4xUK. For more information about installing and configuring the database to store network data, see https://ibm.biz/Bd4xUG.
Step 5: Installing the products on a server

To generate test events into Tivoli Netcool/OMNIbus, install the Simnet probe, which is included in the product. For more information, see https://ibm.biz/Bd4xUh.
Step 6: Configuring the integration

Step 7: Get started

More information

- Troubleshooting information for Network Manager V4.2: https://ibm.biz/Bd4xU6
- Troubleshooting information for Tivoli Netcool/OMNIbus V8.1: https://ibm.biz/Bd4xUU
- Troubleshooting information for Netcool Configuration Manager V6.4.2: https://ibm.biz/Bd4xU7
- IBM Fix Central, for fix packs: https://ibm.biz/BdRPiW
- IBM homepage for Netcool Network Management:https://ibm.biz/BdRPjc
- IBM Support Portal: https://ibm.biz/BdRPjd
- Service Management Connect on IBM DeveloperWorks: https://ibm.biz/BdRPjF