Configuring data collectors to communicate through a forward proxy
If your firewall rules do not allow transparent outbound HTTPS connections to external
hosts, you can configure data collectors to send traffic to a forward proxy. Edit the
APM_GW_PROXY_CONNECTION environment variable to configure data collectors to
communicate through the forward proxy.
Before you begin
To determine the IP address of the Cloud APM data center that your data collectors connect to, see Validating connectivity to the data center. Then, adjust your firewall rules to allow requests to be sent to those IP addresses from your forward proxy.
You can use the openssl command to check whether the computer system where your data collectors are installed has connectivity to the Cloud APM data center servers. You can also check whether your network supports the cipher suites that are used by Cloud APM. If the openssl command results indicate that the computer system cannot connect, you might need to set up a forward proxy. If the command results indicate that the Cloud APM server certificate could not be obtained, then work with your network team to determine why the required cipher suites are not supported. For the list of cipher suites that are used by Cloud APM, see Secure communication.
Run the openssl, as shown in the following
example:echo quit |
openssl s_client
-state -connect <domain-name>:443
-tls1_2
-cipher
ECDHE-ECDSA-AES128-GCM-SHA256:ECDHE-ECDSA-AES256-GCM-SHA384
where,
domain-name is the domain name for your Cloud
APM subscription.
To determine the domain name for your subscription, see Configuring agents to communicate through a forward proxy.
If the connection is successful, messages similar to the following example are
displayed:CONNECTED(00000003)
SSL_connect:before/connect initialization
SSL_connect:SSLv3 write client hello
A
SSL_connect:SSLv3 read server hello A
depth=2 C = US, O = IBM Service
Engage,
CN = ca_ec_384.ibmserviceengage.com
verify error:num=19:self
signed certificate in certificate chain
verify return:0
SSL_connect:SSLv3
read server certificate A
SSL_connect:SSLv3 read server key exchange A
SSL_connect:SSLv3 read server certificate request A
SSL_connect:SSLv3 read server done
A
SSL_connect:SSLv3 write client certificate A
SSL_connect:SSLv3 write
client key exchange A
SSL_connect:SSLv3 write change cipher spec A
SSL_connect:SSLv3 write finished A
SSL_connect:SSLv3 flush data
SSL_connect:SSLv3 read finished A
---
Certificate chain
0
s:/C=US/O=IBM Service Engage/OU=Application Performance
Management/CN=*.agents.na.apm.ibmserviceengage.com
i:/C=US/O=IBM Service
Engage/OU=Application Performance
Management/CN
=ca_ec_384.apm.ibmserviceengage.com
1 s:/C=US/O=IBM Service Engage/OU=Application
Performance
Management/CN=ca_ec_384.apm.ibmserviceengage.com
i:/C=US/O=IBM
Service Engage/CN=ca_ec_384.ibmserviceengage.com
2 s:/C=US/O=IBM Service
Engage/CN=ca_ec_384.ibmserviceengage.com
i:/C=US/O=IBM Service
Engage/CN=ca_ec_384.ibmserviceengage.com
---
Server
certificate
-----BEGIN CERTIFICATE-----
MIICkjCCAhegAwIBAgIIXlr284nLPaMwDAYIKoZIzj0EAwMFADCBhDELMAkGA1UE
BgwCVVMxGzAZBgNVBAoMEklCTSBTZXJ2aWNlIEVuZ2FnZTErMCkGA1UECwwiQXBw
bGljYXRpb24gUGVyZm9ybWFuY2UgTWFuYWdlbWVudDErMCkGA1UEAwwiY2FfZWNf
Mzg0LmFwbS5pYm1zZXJ2aWNlZW5nYWdlLmNvbTAeFw0xMzEyMDIxNjM2MDlaFw0y
MzEyMDExNjM2MDlaMIGGMQswCQYDVQQGDAJVUzEbMBkGA1UECgwSSUJNIFNlcnZp
Y2UgRW5nYWdlMSswKQYDVQQLDCJBcHBsaWNhdGlvbiBQZXJmb3JtYW5jZSBNYW5h
Z2VtZW50MS0wKwYDVQQDDCQqLmFnZW50cy5uYS5hcG0uaWJtc2VydmljZWVuZ2Fn
ZS5jb20wdjAQBgcqhkjOPQIBBgUrgQQAIgNiAAQmrGoCkAMoNAC3F6MIo1zR8fcO
mczYXtUux2bhlOibn3jQdxamhDR91nr2RBerGjMIITKNXd2MaOr3b6m8euk1BAL3
KsbN9lqvw94kXg0BTO1IHAcdsZQB+AuEVVhmDVGjUDBOMAwGA1UdEwEB/wQCMAAw
HwYDVR0jBBgwFoAU/zpE5TOnQ8LSuvbSWRfpbiGea08wHQYDVR0OBBYEFHL0At4O
GUdcOHVGg4Tfo4hl7LLGMAwGCCqGSM49BAMDBQADZwAwZAIwDWPHo5I04ZFVrkfk
St6gwH2UNF37jBscRN1lOE4SIwezZAqVs42BNMkWRjJBgiHzAjBm4m3zOjsXzNL8
+u8ALjQQCpBDT6dUHujzY5CRxG0xEHi5IXsXf4QwbctnjjvTeYA=
-----END
CERTIFICATE-----
subject=/C=US/O=IBM Service Engage/OU=Application
Performance
Management/CN=*.agents.na.apm.ibmserviceengage.com
issuer=/C=US/O=IBM Service Engage/OU=Application Performance
Management/CN=ca_ec_384.apm.ibmserviceengage.com
---
Acceptable client
certificate CA names
/C=US/O=IBM Service
Engage/CN=ca_ec_384.ibmserviceengage.com
/C=US/O=IBM Service Engage/OU=Application
Performance
Management/CN=ca_ec_384.apm.ibmserviceengage.com
/C=US/O=DigiCert Inc/OU=www.digicert.com/CN=DigiCert
Global Root CA/C=US/O=IBM Service
Engage/OU=Application Performance
Management/CN=*.agents.na.apm.ibmserviceengage.com
Server Temp Key: ECDH, prime256v1,
256 bits
---
SSL handshake has read 2659 bytes and written 261
bytes
---
New, TLSv1/SSLv3, Cipher is
ECDHE-ECDSA-AES128-GCM-SHA256
Server public key is 384 bit
Secure
Renegotiation IS supported
Compression: NONE
Expansion: NONE
SSL-Session:
Protocol : TLSv1.2
Cipher :
ECDHE-ECDSA-AES128-GCM-SHA256
Session-ID:
A18C31D0B45A1166357C917E1CFCD86A9FBEDB4A0EB768EF5390AC28C95CB7EF
Session-ID-ctx:
Master-Key:
252B8FE2731E51AC0B79A27C7BED33CA8B15AF4CFD015C98DBACA46EA01DC40B
9E6B56E62E0F332FF6B56266B5ADD7B0
Key-Arg : None
Krb5 Principal:
None
PSK identity: None
PSK identity hint: None
Start Time: 1510772474
Timeout : 7200 (sec)
Verify return code:
19 (self signed certificate in certificate chain)
---
DONE
SSL3 alert write:warning:close notify
If the computer system does not have connectivity to the Cloud
APM server, messages similar to the following example are
displayed:getaddrinfo: Name or service not
known
connect:errno=2
If the computer system cannot obtain the server certificate, because the cipher
suites are being blocked somewhere in the network, messages similar to the following example are
displayed:SSL_connect:failed
---
no peer certificate
available
---
No client certificate CA names sent
About this task
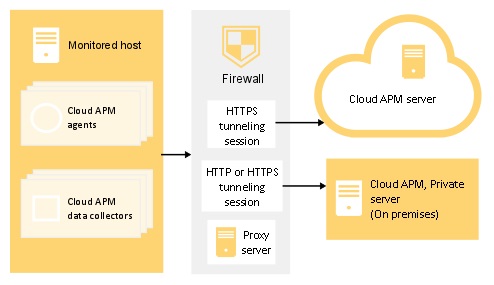
When a forward proxy is used, the data collector first opens a TCP connection with the proxy. The data collector sends a connection request and the target endpoint (Cloud APM server) URL to the forward proxy. Then, the forward proxy establishes a TCP connection with the target endpoint and sets up an HTTPS tunneling session between the data collector and the Cloud APM server.
Some data collectors support authenticating proxies, for example Node.js and Liberty data collectors. These data collectors support logging on to a forward proxy by using a configured proxy user ID and password.