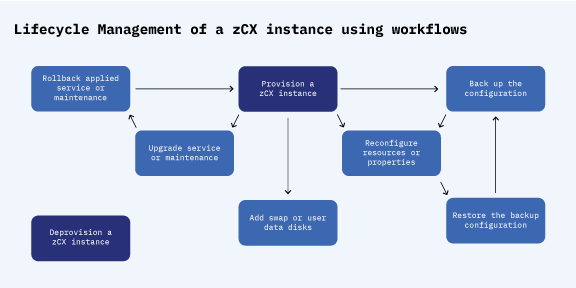
Running zCX Workflows
- Provisioning Workflow
- Backup Configuration Workflow
- Reconfiguration Workflow
- Restore Configuration Workflow
- Add Data Disks Workflow
- Upgrade Workflow
- Rollback Workflow
- Deprovisioning Workflow

Workflow variable input properties files
The workflow variables input properties file contains all the variables and corresponding values required to provision an IBM zCX instance. A sample input properties file of workflow variables is provided under ‘Properties Directory’ inside the installation directory.
A z/OS system administrator can copy the sample file in to a read/write directory and modify it with system-specific inputs. The system administrator should consult the z/OS storage administrator, z/OS security administrator, and the z/OS network administrator to provide the proper values.
The workflow variables input properties file is optional, as all the inputs can be added in the z/OSMF provisioning workflow directly. If the variables are manually added to the workflow, they can be saved to a specified directory as a workflow variables input properties file for subsequent use. Descriptions of the variables can be found in this document or by clicking the tool tips icons in z/OSMF.
How to use a zCX workflow
- Click Workflows in the left navigation panel.
- Click Actions, then Create Workflows.
- In the Create Workflows window, provide the path of the workflow you wish to run (the default locations of each workflow are in their respective sections of this chapter).
- Provide the path to the workflow variables input properties file, or manually input the values.
- Select the system that will provision the zCX instance.
- Click Next.
- Click Assign all steps to owner user ID at the bottom of the Create Workflow window to give the owner the authority to execute them.
- Click Finish.The workflow task UI panel will open, and all the steps will
be listed in the panel. Start with step 1 then continue through sequentially. To begin, click a
step, then click Actions and select Perform. After
step 1, all following steps can be automated by selecting the option to Automatically perform the
selected step, and all subsequent automated steps, according to their declared step dependencies,
until one of the following occurs:
- all workflow steps have been completed
- a non-automated, non-Complete step, is reached, or
- an error occurs.
Modify the JOB card
- Select Actions, then Customize JOB Statement.
- Highlight Modify the default JOB statement and select OK.
- Ensure that the MSGCLASS specified uses a SYSOUT class that is not quickly purged. Consult the JES system programmer to determine the proper SYSOUT class.
- Select OK to save the JOB card.