Figure 1 shows the System Register panel, which is displayed when you select System Register from the Options pull-down on the Workstation Agent panel. The main panel is divided into four parts.
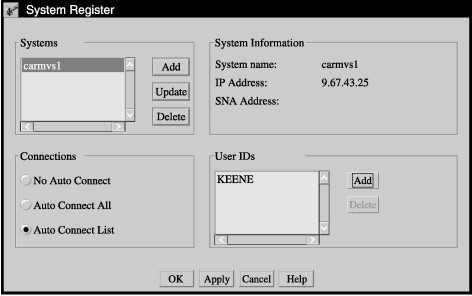
The Systems section of the panel is where you name the system you want to connect from. Click the Add pushbutton to add a new entry to the systems list. A pop-up dialog box like the one shown in Figure 2 appears.
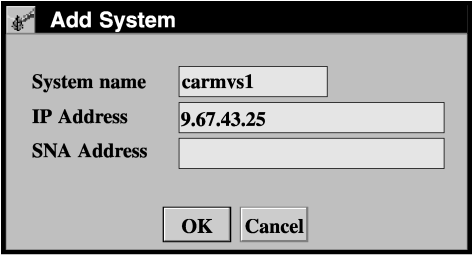
There are entry fields for the system name and an IP or SNA address. If you do not know the system address, you can get it from the WSA connection panel. Until you set up the system register to bypass that panel, it will show you the address of the system that you are connecting from. Simply make your client/server connection, and before accepting the connection, note the address of the system.
After filling in the appropriate information, click OK. After you finish your session with the System Register panel, this system will be available to the users you select without it being necessary for them to see the Workstation Agent connection panel.
You can update or delete system information in the same area of this panel. To update a system, first highlight it in the list by clicking on it. Then click the Update pushbutton. A Change System pop-up dialog box, similar to the Add System window, appears on your screen with the system name and its IP or SNA address already filled in. Modify the information, then click OK.
To delete a system from the System Register files, first highlight the desired system in the list by clicking on it. Then, click the Delete pushbutton. The system and any user IDs associated with it in the System Register files are deleted.
- No Auto Connect
- Selecting this choice means that no one connecting to the Workstation Agent can bypass the WSA connection panel for the specified system. In other words, everyone connecting to the WSA must use the connection panel to accept the connection from that system before continuing.
- Auto Connect All
- Everyone connecting to the WSA from the specified system will bypass the connection panel.
- Auto Connect List
- Selecting this choice activates the User IDs section of the System
Register panel. When you make this selection, you must enter the ID
of at least one user you want to be able to bypass the WSA connection
panel when connecting from the specified system. Enter user IDs by
clicking on the Add button in the User IDs
section of the panel. A pop-up dialog like the one shown here is displayed.
Figure 3. Add User Pop-up Dialog
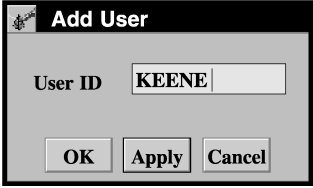
Enter the user ID of each user you want to automatically connect from the highlighted system. If you are entering only one user ID at this time, click OK to update the list and return to the System Register panel. If you are entering a list of IDs, click Apply after each entry, then click OK after the last one. As you enter IDs, they are added to the list appearing in this section of the System Register panel.
To delete IDs from the list, highlight the line in the list, then click on the Delete button located next to the list.
The System Information section of the System Register panel shows the name of the system highlighted in the Systems section of the panel, and its IP or SNA address. This is the system that you are currently working with on the System Register panel. You cannot change the information in the System Information section.
When you are finished working with the System Register panel, you can dismiss it by clicking the OK button at the bottom of the panel. During long sessions where you are making many entries, it is recommended that you occasionally click Apply to save your entries.