|
|
|
|
The following table lists features new to the IBM® Lotus Notes® 8.5.3 codestream, and tells you how to get started using those features.
This Lotus Notes Help topic introduces you to IBM Lotus Notes 8.5.3. To find and contribute information and videos about using Lotus Notes, see the Lotus Notes and Domino wiki at http://www.lotus.com/ldd/dominowiki.nsf.
Feature |
How do I use it? |
|---|---|
Search Mail by Sender or Subject |
Right-click in your Inbox and select or . 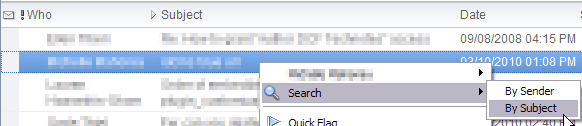 Note: This feature is limited to the Notes Standard client,
and to the following restrictions:
|
When sorting mail by Subject, Re: and Fw: prefixes are now ignored |
When you sort mail in a folder by Subject, Notes ignores prefixes such as Re: and Fw:, so that sorting is more accurate.  Note: This feature requires the 8.5.3 mail template, and
8.5.3 client, and an 8.5.3 server. If your mail file is local, you
only need the 8.5.3 client and mail template.
|
Display a slide-in summary for new email as it arrives |
You can now set a preference to see a slide-in summary alert for new email when it arrives. A small window slides into the bottom right corner of your screen with the new email preview, including the subject and sender for the first few new messages. The window remains open for a few seconds, and then fades if no action is taken. 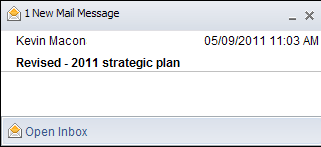 You can double-click a preview to open the message, or drag-and-drop the window to keep it open, so the preview will not fade. To set this preference, choose , click the plus (+) sign next to Mail, and then click Sending and Receiving. Select the option Display a popup alert when new mail arrives.  Note: This feature is limited to
the Notes Standard client only, and requires the 8.5.3 mail template,
and an 8.5.3 client (code runs only on client - there are no server
dependencies).
|
New typeahead preference |
You can choose to display an attribute such as "Job Title" for Contacts in your typeahead list.  To set this preference, click , click Contacts, and then choose an attribute to display. Note: This feature is limited to the Notes
Standard client only, and requires the 8.5.3 pernames.ntf template
and an 8.5.3 client.
|
Improved experience in mailfile copy of Contacts |
Users can perform actions in the mailfile copy of their Contacts just as they would for Contacts in their local address book, including preference settings. This feature requires the 8.5.3 mail template and an 8.x or newer client. |
New signature feature |
It is now easier to choose different signatures in different email messages. When creating a message, click the Signature button in the action bar above the message, then choose between your default signature, a new signature from a file on your computer, or no signature. 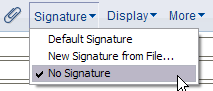 If you select New Signature from File, you can choose a TXT, HTML, JPG, BMP, or GIF file from your computer. If you have not specified a default signature in your preferences, that option will not appear. |
Change the color and style of Read and Unread mail |
You can change the color and boldness of Read and Unread messages in your Inbox. Click , and then click Fonts and Colors. Click the color to select a new color for Read or Unread messages; select or deselect Bold. |
Note: The below features require the
latest 8.5.3 mail template.
|
|
|---|---|
Feature |
How do I use it? |
Keep placeholder for original meeting time |
When proposing a new time for a meeting, you will see a new option Leave a placeholder for the original meeting on the calendar. 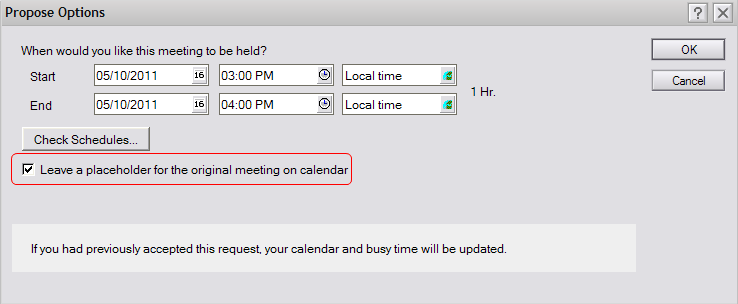 This option is decided on a per-meeting basis, and is turned on by default. To change this setting in your Calendar preferences click , select Calendar & To Do, open the Display tab, and then open the Views tab. Select or clear the checkbox for By default, leave a placeholder for countered meetings. 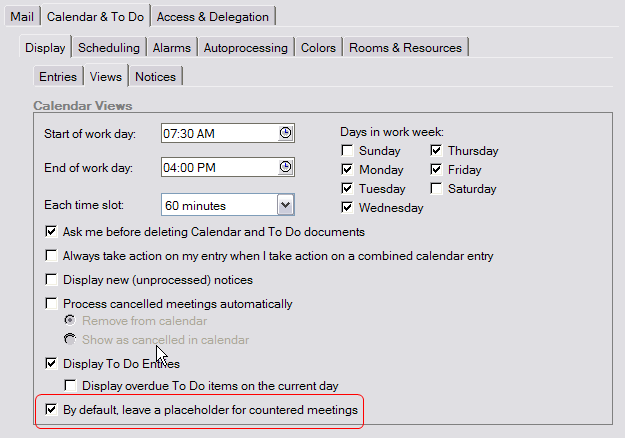 The proposed meeting will appear on your calendar in a different color (default is orange), and be prefaced with the word Countered:. If you open or hover over the countered entry, you will see the time that you proposed for the meeting. 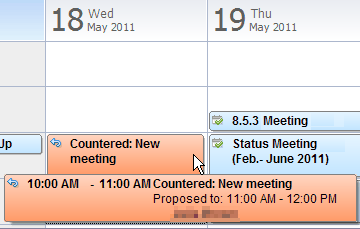 |
Update meeting invitees when people are added or removed |
When adding or removing attendees from an existing meeting, Notes can now send updates to the existing invitees, informing them of the change and updating the invitee list in their calendar invitation. If it is a repeating meeting, multiple updates may be sent. To enable this feature, click , select Calendar & To Do, open the Display tab, and then open the Notices tab. Select the checkbox for When I add or remove meeting invitees, update the other participants. 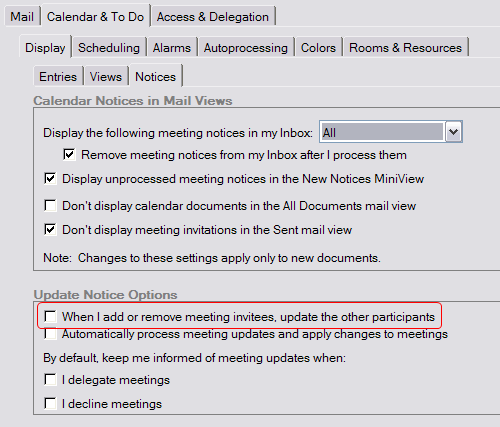 |
New preference to update meetings automatically |
Notes can now automatically apply updates to meetings that you have accepted as those updates arrive. To enable this feature, click , select Calendar & To Do, open the Display tab, and then open the Notices tab. Select the checkbox for Automatically process meeting updates and apply changes to meetings. 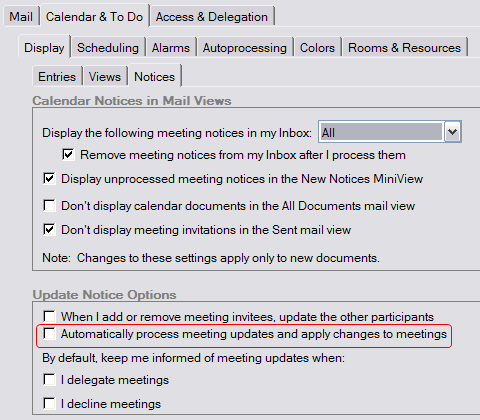 Note: You
may still receive update notices in your Inbox, depending on the preferences
set in the calendar Notices tab.
 If you open a notice that has already been processed, there will be text to indicate this, and the Update Calendar button will be renamed Re-apply update, to indicate that changes are already applied. |
Forward iCalendar subscriptions |
You can now email federated iCalendar subscriptions; simply right-click the calendar and choose Email To . . . 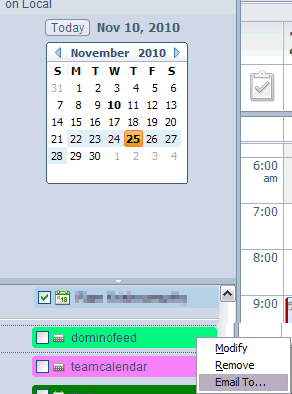 |
Duplicate calendar entries are merged automatically |
When you add other Notes calendars to your own calendar, duplicate entries are automatically merged into a single entry to avoid clutter. When you open a merged entry, you're asked which entry you'd like to open, since the entry appears in multiple calendars. If you always want to open your Notes calendar entry, so you won't be prompted every time, click , select Calendar & To Do, open the Display tab, and then open the Views tab. Select the Always take action on my entry when I take action on a combined calendar entry option. 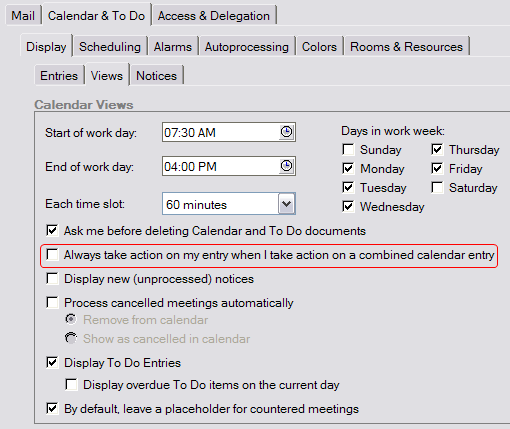 The action bar will also reflect the correct actions for the merged entry. |
Create or delete room or resource reservations from the web |
You can now create single or repeating room or resource reservations via the web. When you create a direct booking via a web browser, you will see a Repeat button, the same as in the Notes client. You can also delete a room or resource reservation from the web by selecting the Delete Reservation button. |
Feature |
How do I use it? |
|---|---|
Additional options for Recent Contacts |
There are new options available when you choose who is added to your Recent Contacts. To set this preference, click , click Contacts, and select an option for Choose how names are added to Recent Contacts. 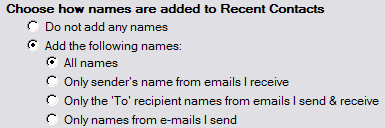 Note: This feature is limited to the Notes Standard client
only, and requires the 8.5.3 pernames.ntf template
and an 8.5.3 client.
|
Hide address in Recent Contacts (typeahead) |
When you address an email or meeting invitation, a list of names and addresses appears as you type; these are your Recent Contacts, which are chosen automatically, based on people with whom you have recently chatted, emailed, or had a meeting. If you see an address that you do not want to appear in the Recent Contacts list, you can hide it by selecting the contact in the Recent Contacts view, and clicking the Hide in Typeahead button.  Note: This feature is limited to the Notes
Standard client only, and requires the 8.5.3 pernames.ntf template
and an 8.5.3 client.
|
Feature |
How do I use it? |
|---|---|
Embedded Sametime version 8.5.1 installed with Notes |
The embedded version of Sametime installed with Notes has been upgraded from Sametime 8.0.2 to Sametime 8.5.1. For more about embedded Sametime 8.5.1, see What's new in Sametime 8.5.1? |
Embedded Symphony version 3 installed with Notes |
The embedded version of Symphony installed with Notes has been upgraded from Symphony 1.3 to Symphony 3.0. For more about Symphony 3.0, see What's new in IBM Lotus Symphony 3?. |
Feature |
How do I use it? |
|---|---|
Widget catalog as an XPages application |
The widget catalog is now an XPages application, with expanded view and search capabilities. For more details about administering this feature, see the Domino Administrator Help. As an end user, the following features are available to you in the XPages-based widget catalog; access to these features depends on the access level provided to you by your administrator.
|
Public widget provider APIs |
A set of public APIs are available that developers can use to create custom widget types for use with either supplied or custom applications. After deploying the plug-in containing the new widget type, the new widget types can then be disabled or enabled for users in the same way as the supplied widget types (using either Domino policy or a plugin_customization.inifile). Power users can then create widgets of these additional widget types and deploy them to end users. For details, see the Domino Administrator Help. |
Live text recognition in MIME emails |
Live Text strings are now recognized in MIME e-mails. This has been an anticipated enhancement for several releases, and is now available. |
Open a Web page widget in an external browser or named embedded browser |
When creating a Web page widget, you can specify
that the widget open in an external browser or a named embedded browser.
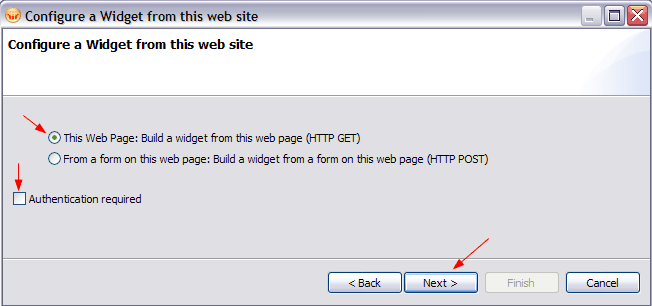 For the new browser specification options, the choices for Embedded browser are Default, XULRunner, and IE (Internet Explorer).  |
Open a Web page widget in a local Web container |
Underlying client architecture enables you to host a Web application in the local Web container, however by default and for security reasons, the local Web container port value changes every time you restart the client. Notes now lets you create a Web page widget from the current context (in this case, local Web container) based on a local Web application and then manage the widget's URL value in its XML file to resolve to the actual local Web container URL. This enables you to force a Web page widget to open in the local Web container, rather than referencing an old, invalid port. When you create a Web page widget that references the local Web container, the widget stores the port in its url= statement value. This is handled automatically when the Web page widget is created by the wizard. Without this, the Web container changes ports each time you restart the client causing the widget's URL to be invalid. |
New XPages widget type |
A new widget creation wizard is available for
creating a widget from an XPages application running in the Lotus
Notes client. The new wizard is available from the Configure
a Widget from the Current Context toolbar button.
Note: For
an XPages application running through a web browser, use a Web Page
widget rather than this new XPages widget type.
The first four
steps for creating the widget using the wizard are as follows; the
remaining user interaction is intuitive and similar to the other widget
types, as documented in Notes Help.
|
Feature |
How do I use it? |
|---|---|
Language tag enhancements |
A priority list for language tags, which contains the 5 most recently used languages, is now available in both the Text Properties infobox (), and in the toolbar (. 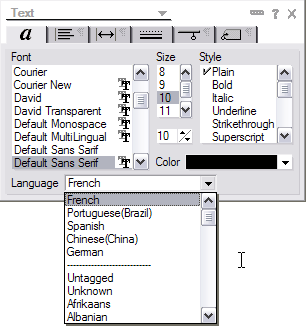 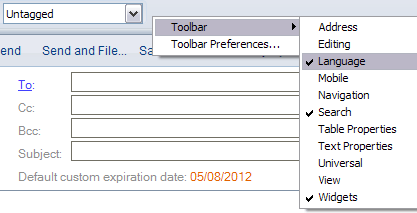 |
Lotus Notes single user to multi-user migration assistant tool |
You can now use a supplied tool to migrate a Notes single user install to a Notes multi-user install within any Notes 8.x release on a supported Windows platform, prior to upgrading to a new release. For details, see the Domino Administrator Help. |
Lotus Notes Install Cleanup Executable (NICE) tool |
Use the supplied Notes Install Cleanup Executable (NICE) tool to clean a failed installation, failed un-installation, or a failed upgrade. You can also use the tool to uninstall an existing version of Notes, and clean up extraneous files, prior to performing an upgrade installation. For details, see the Domino Administrator Help. |
Add or remove components from Notes install kit using UpdateSiteMgr |
The Notes install kit's trimUpdateSite and addToKit customization tools have been merged into a single UpdateSiteMgr tool. The addToKit and trimUpdateSite tools will no longer be supplied. For details, see the Domino Administrator Help. |
Notes installation and launch on Citrix XenApp 6 |
Initial installation and launch testing has been completed for Notes 8.5.3 with Citrix XenApp 6; XenApp 6 requires Windows 2008 R2. Installation instructions available for installing and configuring Notes with previous Citrix XenApp versions apply for installing XenApp 6. |
Integrated Windows Authentication (IWA) for Eclipse-based clients, including Lotus Notes, Symphony, and Sametime |
This code drop introduces Integrated Windows Authentication (IWA) for supplied and third-party Eclipse-based client applications, enabling SPNEGO authentication for integrated Notes application clients. This includes Notes and its embedded Eclipse-based features such as Widgets and Live Text, Feeds, Lotus Connections, and Composite Applications, as well as embedded Sametime and embedded Symphony. It also includes adjunct products that are based on Eclipse but not embedded within Notes, such as IBM WebSphere Portal with SiteMinder and stand-alone Lotus Connections 3.0 with SiteMinder. For details, see the Domino Administrator Help. |
TAM SiteMinder form-based authentication has changed |
TAM and SiteMinder form-based authentication type accounts used for single sign-on are now subject to additional checks. By default, the login form on the authentication server must be accessed using SSL, and the server must be contained in a list of trusted sites. The Accounts preference page has been enhanced to include the ability to change these settings. A preference page is also provided. The client Accounts user interface, including Accounts preferences and New Accounts dialogs have been changed, and a new Trusted Sites dialog has been added. New client plugin_customization.ini file settings have also been added. For details, see the Domino Administrator Help. |
Dojo upgraded to version 1.5.0 |
Notes and Domino 8.5.3 Dojo has been upgraded to version 1.5.0. |
New replication option |
A new replication option, Enable Purge Interval Replication Control, on the Space Savers tab, prevents older deletion stubs and document modifications from replicating to an application.  |