Adding a file system data source
When you added a data source for your project, you selected the file system type.
Before you begin
If you installed the Mediation Tool on a different system to the Analytics component, do the following:
- Set up an environment variable to mask the differences between the file system data source path on the server that hosts the Mediation Tool and the file system data source path on the server that hosts the Analytics component.
- Before you deploy the model that contains the environment variable, run the following command to
stop all the IBM® Streams
processes:
Ensure that the user's .bashrc includes this variable before you restart the Mediation Tool.$<PI_HOME>/bin/stop.sh -s - Copy CSV files that represent at least one full day of data to the server that hosts the Mediation Tool so you can preview the configuration before and during deployment.
The File Path parameter, which you set when you add a file system data source, supports the use of environment variables. If the server on which you are running the Mediation Tool is the same as the Analytics server, you do not need to create an environment variable.
One or more path environment variables can be used in the File Path element of a Predictive Insights data source for files extraction. Any environment variables that are entered into the File Path field are resolved against the environment of the operating system that hosts the UI or the Extractor instance.
If the Predictive Insights Mediation tool is running on Windows:
- Create an environment variable, such as, %MY_AGENT%.
- Set the environment variable to a valid local path, which points to the location of the files for extraction.
- Restart the Predictive Insights Mediation tool in order to make the new variable visible to the UI process.
If the Predictive Insights Mediation tool is running on Linux®:
- Create an environment variable, such as, $MY_AGENT.
- Set the environment variable to a valid local path, which points to the location of the files for extraction.
- Add the environment variable to the user's .bashrc file.
- Restart the Predictive Insights Mediation tool in order to make the new variable visible to the UI process.
For the Extractor, which can run only on Linux, as it must run on the same server as the Analytics component, the same applies: The $MY_AGENT variable must be properly exported to make it visible to the next running Extractor instance.
About this task
To create a file system data source configuration, you must enter details of that file system in the File System Details tab. Note the following when you update the File System Details tab:
.csv file format and the file content, see Rules for using CSV data sources- Set the File Path to the path that contains the file system data
source.Enter the path in Unix/Linux notation, that is, without drive letter and with forward slashes. Use Unix/Linux notation regardless of whether you are creating your configuration on a Windows server or a Linux server. It is assumed that the file system or a copy of that file system exists locally in the directory corresponding to that path. You can use an environment variable to make the File Path setting more portable.Note: For file-based data sources, you can create only one metric group per table within that data source. Creating multiple metric groups per table results in a deadlock situation. If you need to have multiple metric groups for a table, you must deliver the source file data to separate file system directories, and create one data source definition per directory.
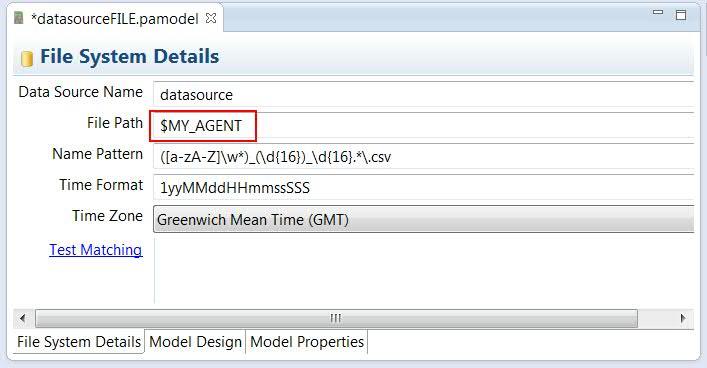
For both Windows and Linux, if you are referring to an environment variable in the File Path field, use Unix/Linux notation, for example,
$MY_AGENT. - Use the Name Pattern to enter a regular expression that filters the files
that are contained in the file path specified. The regular expression must have at least two
capturing groups, the second of which matches a timestamp or write time.
The default of
([a-zA-Z]\w*)__(\d{16})__(\d{16}).*\.csvhas three matching groups. The first matching group is expected to be the metric group name, the second is the start time, and the third is the end time; for example,Disk_1130421121500000_1130421123000000.csvNote: For more information about file patterns, see Example file naming patterns - Set the Time Format to a string that matches the format of the date and
time used in the CSV file names, for example,
1yyMMddHHmmssSSSThe formats allowable are defined by the
SimpleDateFormatJava™ class. For more information about theSimpleDateFormatJava class, see http://docs.oracle.com/javase/7/docs/api/java/text/SimpleDateFormat.html. - Use the Time Zone to specify which time zone the data source is from. You
must consider the time zone of the time stamps in both the source file names and the data:
- If the time stamps in the file names and data are for the same time zone, select that time zone.
- If the time stamps in the file names and data are for different time zones, the time stamps in either the file names or the data must include a timezone identifier. In the Time Zone field, select the time zone that is not identified in either the file names or the data time stamps. For example, if the time zone in the file names is EST but the time zone is not shown and the time zone in the data is CST and the time zone is shown, set the Time Zone field to EST.
- If the time zone in the file name and data are for different time zones and the time zone is shown in both time stamps, set the time zone to that shown in the file name time stamps.
All data extracted by Predictive Insights is loaded into the Predictive Insights database in UTC time. Therefore, if you can set the time zone of the source data, it is recommended that you set it to UTC for both the file names and data.
If the timezone the data is coming from applies DST, timestamps in both file names and data must include a time offset or timezone. If some of your file names and data timestamps already have timezone or time offset information, you can still set the timezone for the data source, but Predictive Insights gives priority to the time related information contained in the data.
Only one timezone is supported per model. If the CSV file names or the data within the files represent different time zones, the files for each different time zone must be in separate directories and you must create a separate model for each set of source files.
- Click Test Matching to confirm the file set that matches your expression.
Procedure
- Update the fields within the File System Details tab.
- Click .
- Check for any issues with your data source by opening the Problems tab.
As you need to complete further steps to make that data source valid, an error message is displayed within the Problems tab. The error message disappears when you complete the data source and model configuration.