Creating an Atom configuration file
You use the Atom configuration wizard in CICS Explorer® to create an Atom configuration file. This files is comprised of a number of XML elements, which provide metadata for the Atom feed. You enter the basic details to create the file using the New wizard and then add additional information using the editor.
Before you begin
About this task
When you create an Atom configuration file, you create a bundle project, then you use the Atom configuration wizard to enter the basic details for the Atom feed. The wizard creates the Atom configuration file that contains the XML elements associated with the details you enter.
The example Atom configuration file created in this task is based on the filea.xml sample Atom configuration file. When you install CICS Transaction Server, the sample Atom configuration file is installed in the directory /usr/lpp/cicsts/cicsts56/samples/web2.0/atom (where /usr/lpp/cicsts/cicsts56 is the default install directory for CICS files on z/OS UNIX).
Procedure
- Open the New Atom configuration wizard by using one of
the following methods:
- Click the down arrow on the New icon
 on the CICS Explorer toolbar
and click Other . Expand the CICS Resources folder and click Atom
Configuration File.
on the CICS Explorer toolbar
and click Other . Expand the CICS Resources folder and click Atom
Configuration File. - On the main menu bar, click . Expand the CICS Resources folder and click Atom Configuration File.
- Right-click the project in the Project Explorer view and click . Expand the CICS Resources folder and click Atom Configuration File.
- Click the down arrow on the New icon
- Complete the fields in the wizard. The following table
describes the fields in the Atom configuration wizard. Figure 1 shows the Atom
configuration wizard in CICS
Explorer with all fields completed based on the XML elements
in the filea.xml sample Atom configuration file
Table 1. Atom wizard fields Field Description Parent Folder The name of the project containing the Atom configuration file. You can overtype this field to change the project. File name The name of the Atom configuration file that you want to create. Service Type There are two service types: collection and feed. A collection supplies data that the web client can edit or delete. A feed supplies read-only data to the web client. Feed Title The title for the Atom feed that is displayed in the web client. CICS only supports plain text for titles. Entry Title The title for the Atom entry. CICS supports only plain text for titles. You must specify an entry title even if your CICS resource provides a title for Atom entries. Use a suitable default title that could apply to any of your Atom entries. Resource Type The type of resource that you want to use for your feed. Resource Name The name of the resource that you want to use for your feed. Default URI The partial URI for the Atom feed. You can omit the scheme and host components of the URI, and specify only the path component. The path must be unique to the Atom feed. XML Transform Name The name of an existing XMLTRANSFORM resource in the CICS region that points to the XML binding associated with the data source. Figure 1. The Atom configuration wizard in CICS Explorer with all fields completed based on the XML elements in the filea.xml sample Atom configuration file 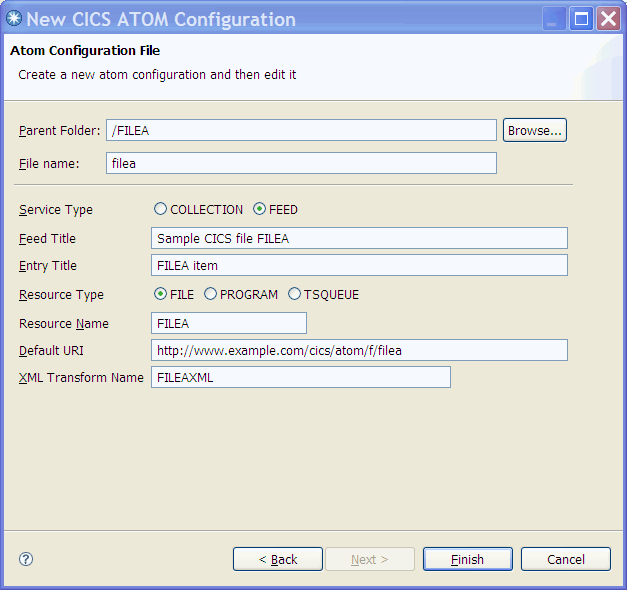
Results
The Atom configuration file is created. The attributes of this file are displayed in the Atom configuration editor.
What to do next
You can edit the Atom configuration file, or add additional XML elements to the file, by using the Atom configuration editor. The Atom configuration editor is a basic editor and, as such, not all XML elements can be edited or added using this editor; for more information see Editing an Atom configuration file. To add XML elements that are not supported by the Atom configuration editor, you must edit the Atom configuration file directly using an alternative XML editor.
If no further editing is required, you must deploy the bundle project containing the Atom configuration file to a CICS region.
When the bundle project is installed, CICS automatically generates the ATOMSERVICE and URIMAP resources for you. For more information about deploying a bundle project, see Deploying a CICS bundle project from CICS Explorer.