With CICS® TS APAR PH14856, you can use annotations
to enable a Java™ method to be invoked by a CICS application - CICS
creates the PROGRAM resource for you. The Spring Boot application runs in a Liberty JVM server, and
can be deployed within a JAR or WAR.
Before you begin
First, identify which Java class and method you want
to call. Then, adhering to site standards and CICS naming
rules, determine a suitable CICS program name. Make sure
that the Liberty JVM server is configured to enable linking to Spring Boot applications. For more
information, see Linking to a Java EE application from a CICS program.
Note: To avoid concurrency issues, JCICS
fields should be defined within the link-target method, or a subsequent prototype-scoped Bean, and
not on the linked-to component class.
Procedure
-
Add the
@CICSProgram annotation class to the classpath of your project.
- CICS Explorer® If you are using the
preinstalled IBM® CICS SDK for Java in CICS Explorer, the SDK includes the Liberty JVM
server libraries, which provide the
@CICSProgram annotation.
- GradleMaven If you're using your own build
toolchain, you need to declare dependence on the
com.ibm.cics.server.invocation.annotations artifact that's available on Maven
Central or use the com.ibm.cics.server.invocation.annotations.jar JAR file as
described in Developing applications using Maven or Gradle.
-
Create a class to contain the methods that CICS calls. Creating a class keeps the CICS-specific
code separate from the rest of your application.
-
Create a method for each CICS PROGRAM resource to be created.
-
Annotate each method with the
@CICSProgram annotation, giving it a parameter
of the PROGRAM name, such as @CICSProgram("CUSTGET").
CICS PROGRAM names:
- Must be 1 - 8 characters;
- Must match the pattern A-Z a-z 0-9 $ @ #.
Example of a simple class with a single method, annotated with the
@CICSProgram annotation:
@Component
public class CustomerLinkTarget
{
    @CICSProgram("CUSTGET")
    public void getCustomer()
    {
        // do work here
    }
}
Add targetType = TargetType.SPRINGBEAN if your class does not contain @Service,
@Repository, @Controller, or @Component annotations.
public class CustomerLinkTarget
{
    @CICSProgram(value ="CUSTGET", targetType = TargetType.SPRINGBEAN)
    public void getCustomer()
    {
        // do work here
    }
}
-
Enable annotation processing for the project.
- CICS Explorer If you are using CICS Explorer, either:
- Hover over a
@CICSProgram annotation with a warning underline and use the
quick-fix to enable annotation processing, or:
- Right-click the project and select Properties. Search for the
Annotation Processing page. Check both Enable project-specific
settings and Enable annotation processing.
- GradleMaven If you're using a build
toolchain such as Gradle or Maven, configure the Java compiler to use
com.ibm.cics.server.invocation as an annotation processor, as described in Developing applications using Maven or Gradle.
-
Validate the annotation is correctly specified.
- CICS Explorer If you are using CICS Explorer, validation happens automatically
to ensure that your annotation is correctly positioned and that the method that it annotates and the
containing class fulfills the following requirements.
- Maven If you're using
Maven in Eclipse, you can use the m2e-apt plugin to get the annotation processing
configured in Eclipse based on the dependencies specified in your pom.xml
file.
The annotation:
- Must be on a method.
- Must have a value attribute of a PROGRAM name.
The method:
- Must be concrete (not abstract).
- Must be public.
- Must have no arguments.
The class:
- Must be top level (not nested or anonymous).
- Must not have more than one method that is annotated with the same PROGRAM name.
-
Write the content of the annotated method. The content is likely to involve the following
stages:
-
Obtain containers from the channel.
-
Obtain input data from containers in a channel.
-
Use data-mapping code to convert the input data to Java objects.
-
Call the application business logic.
-
Use data mapping code to convert the resulting Java objects to output data.
-
Place the output data in containers in a channel.
Example of a class with a single method, annotated with the
@CICSProgram annotation, and code to take input data from a container and put
output data to a container:
@Component
public class CustomerLinkTarget
{
    @CICSProgram("CUSTGET")
    public void getCustomer()
    {
        Channel currentChannel = Task.getTask().getCurrentChannel();
        Container dataContainer = currentChannel.getContainer("DATA");

        // do work here

        Container resultContainer = currentChannel.createContainer("RESULT");
        byte[] results = null; // change this to be the result of the work
        resultContainer.put(results);
    }
}
- Ensure that the generated CICS proxy class is scanned for annotations by
Spring.
The CICS annotation processor generates a proxy class (a Spring bean) which needs
to be scanned for annotations by the Spring framework. If you use the @SpringBootApplication
annotation within the same package or a parent package, this happens automatically.
The
annotation processor generates the proxy class in a sub-package within the same package as the class
in which you annotate with @CICSProgram. CICS ExplorerYou can check these in the
Navigator view in CICS Explorer.
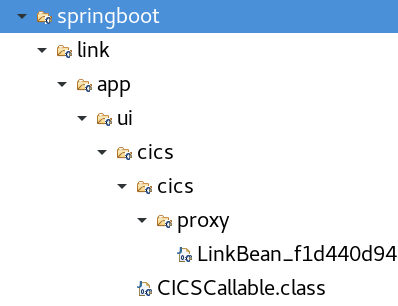
In this example, the class with the @CICSProgram annotation is in the package
springboot.link.app.ui.cics, and the annotation processor generates the proxy class
in springboot.link.app.ui.cics.cics.proxy
If you are not already using annotations, you must explicitly configure Spring to scan
for annotations:
- Add component scan to your Spring component class.
@ComponentScan(basePackages = "org.example.cics.proxy")
If you are using XML configuration, you can enable component scan
with:
<context:component-scan base-package="org.example.cics.proxy"/>
-
Build the application.
- CICS Explorer If you are in CICS Explorer, you can right-click the project and
select Export -> WAR file , or right-click a containing CICS Bundle Project and select Export Bundle to z/OS®
UNIX file system.
- If you are using the CICS build toolkit, the annotation
processor is invoked automatically.
- GradleMaven If you are building the Java code by using other tools, ensure that the dependency on the
CICS annotation and the annotation processor configuration are correctly specified by using the
artifacts on Maven Central. If you've done that in Steps 1 and 5, they are resolved automatically during build. Otherwise, you must
ensure the com.ibm.cics.server.invocation.annotations.jar JAR file (which
defines the
@CICSProgram annotation) is on the classpath of the Java compiler. Also, ensure that the
com.ibm.cics.server.invocation.jar JAR file (containing the annotation
processor) is on the classpath of the Java compiler, or is
otherwise specified in the -processorpath option. You can find both JAR files in
the
usshome /lib directory on z/OS
UNIX , where usshome is the value of the
USSHOME system initialization parameter.
- If the class is packaged in a library JAR inside the WEB-INF/lib directory
of a WAR file, export the generated metadata when you are building the JAR. CICS ExplorerIn CICS Explorer , you can do this by adding the library project to the deployment
assembly of the Dynamic Web Project. From the
properties dialog for the Dynamic Web Project, choose
the Deployment Assembly page, click the Add button, and select the library project.
-
Deploy the application.
Results
If the application is installed by a CICS bundle, PROGRAM resources are created as the CICS
bundle becomes ENABLED. If the application is installed directly from server.xml or
from a file by using an <application> element, PROGRAM resources are created
as the application is installed. You can now link to the Spring Boot application from another
CICS program by using:
EXEC CICS LINK PROGRAM("CUSTGET") CHANNEL()
 If you are not already using annotations, you must explicitly configure Spring to scan for annotations: