Standard Reports Configuration
Product: Workbench
- Relevant eLearning

- Configure Standard Reports
-
- In workbench, select .
- Shared Settings
- The Shared Settings tab contains settings that are shared across all
standard reports.
- Hired statuses section: Select the HR Status to be considered as the hired status across all standard reports. Multiple HR Statuses can be selected. Example: select Hired in the Available HR statuses column and select Add.
- Not interested statuses section: Select the HR Status to be considered as the disposition status across all standard reports. Multiple HR Statuses can be selected. Example: select Candidate Not Interested and Company Not Interested.
- Start date section: Select Select form field. Select the candidate form field to be used to indicate the start date for your organization’s new hires. Only Date fields from per req candidate forms show in this list. Example: Start Date from the Offer form.
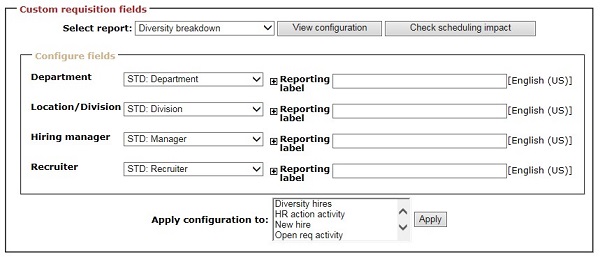
- Custom requisition fields section: This section allows you to pick up to
four req fields that users are able to choose from when filtering their standard reports. Filter
fields can vary between specific standard reports and you are able to update the reporting label in
the languages your organization has enabled for the BrassRing UI.
- Select the report name by using the pull-down menu. This refreshes the fields that are selected in the Configured fields section to display the fields chosen for the selected report. If needed, select different fields to be used as filters for that report.
- Select View configuration to view the req fields to be chosen as filters for each report.
- Instead of updating each standard report separately, use the Apply configuration to field to apply the filter fields to reports of your choosing.
- The default filter fields are:
- Department = Standard Department field.
- Location/Division = Standard Location or Division field.
- Hiring manager = Standard Manager field.
- Recruiter = Standard Recruiter field.
- Source Settings
- The Source settings tab allows your organization to determine what field
should be used to indicate candidate source in the standard reports.
- Select either Pull source from code type or Pull source from
form. Only one can be selected.
- If Pull source from code type is selected:
- Select the code type. Example: Source Code
- Select the instance. Example: Most Recent
- Note: Codes are stored in the Codes (Last Codes) section of the candidate’s Talent Record.
- If Pull source from form is selected:
- Select Select form field.
- Select the appropriate field that stores the candidate’s source from the req and candidate form fields. Only one can be selected.
- If Pull source from code type is selected:
- Select either Pull source from code type or Pull source from
form. Only one can be selected.
- Diversity Settings
- The Diversity settings tab allows you to determine what fields and options
indicate diverse groups for candidates in your organization. Only single per
candidate or single per candidate per req forms can be used in this configuration.
- Diversity hires section: This section is used to identify what a diverse
candidate or new hire means to your organization.
- Select Select form fields. Choose the fields that indicate a diverse candidate hire within your organization. Multiple fields can be selected. It is recommended that you consult with your legal team to determine which fields or options that should be used for this configuration. Example: Gender and Race or Ethnicity fields from the EEO Form. Selection field from the 503 Disability Self-ID form. Selection field from the VEVRAA Post-Offer form.
- Select each field separately from the Selected fields pull-down menu. Upon selecting each field, you can choose which field options indicate that the candidate is a diverse hire. Example: Women from the Gender field of the EEO Form. The Yes, I have a disability option from the 503 Disability Self-ID form.
- Select Candidate type instance of Current, Previous, or Original to determine which candidate type the Diversity report looks at for the calculation.
- Select the Candidate types that are represented in the graph.
- Diversity breakdown section: This section is used to map your req form field options and
candidate form field options for both the Diversity standard report and the Diversity visualization.
- Job category section:
- Select a requisition field in the Select question pull-down menu. Example: EEO1 Category
- Select List> for each category to map your req form field option to the designated job category option. Example: Exec/Sr Level Officials and Managers = Exec/Sr Level Officials and Managers option in the req form field. More than one field option can be mapped to each category configuration if wanted.
- Gender Section:
- Select Select form fields to choose which field to use in the mapping. Example: Gender field from the EEO Form.
- Select the field options that to designate as the Male and Female options for the gender configuration.
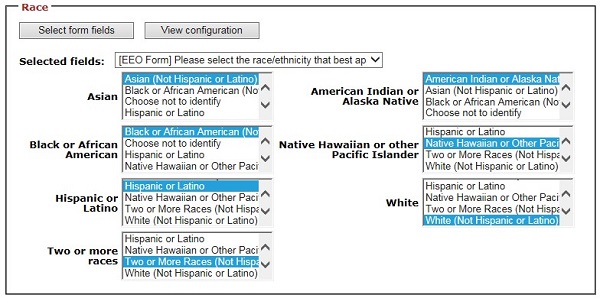
- Race section:
- Select Select form fields to choose which field to use in the mapping. Example: The Please select the race/ethnicity that best applies to you field from the EEO Form.
- Select the field options that to designate as the various race options for the race configuration.
- Job category section:
- Diversity hires section: This section is used to identify what a diverse
candidate or new hire means to your organization.
- Dashboard Settings
- The Dashboard settings tab allows you to edit settings for the standard
reports: Source Yield, Talent Pipeline, and Time to Fill.
- Source yield section:
- Displays the Source location or field that was selected in the Source settings tab. Select Select options to select up to five sources. Select View configuration to view the sources currently configured.
- Talent pipeline statuses section:
- Select the HR Statuses to include in the pipeline. A maximum of five statues can be selected. Statuses can also be ordered by using the Move Up or Move Down options. Example: Applied, Hiring Manager Review, First Interview, Offer Accepted, Hired.
- Time to fill goal section:
- Define your organization’s target Time to Fill goals by entering values into the Minimum days (#) and Maximum days (#) fields.
- Source yield section:
- Talent comparison settings
- The Talent Comparison tab allows you to configure the Talent Comparison
report. The Talent Comparison report is found in BrassRing by accessing a req folder, selecting 2 -
5 candidates, and selecting .
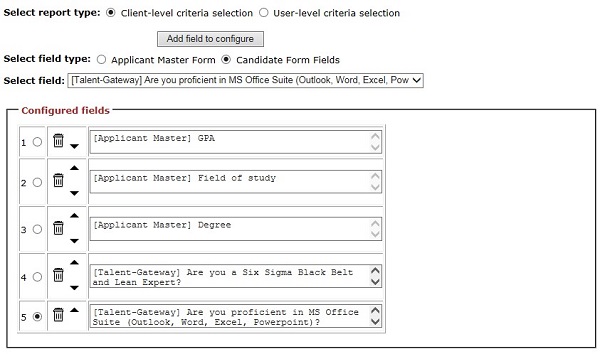
- From the Select report type field, select either the Client-level criteria selection or the User-level criteria selection option.
- If Client-level criteria selection is selected:
- Select Add field to configure.
- From the Select field type field, select either Applicant Master Form or Candidate Form Fields.
- The previous selection determines what fields show in the Select field pull-down menu. Choose the field to include in the comparison report.
- To add more fields to the configuration, repeat these steps. A maximum of 10 fields can be selected for the Talent Comparison Summary.
- If User-level criteria selection is selected:
- Select Select form fields.
- Select the appropriate fields to be included in the comparison.
- Email WatsonTalentTraining@us.ibm.com if you have a suggestion for improvement, or encounter an issue on this documentation. Include the product and page title in your email.