![[AIX Solaris HP-UX Linux Windows]](../images/ngdist.svg)
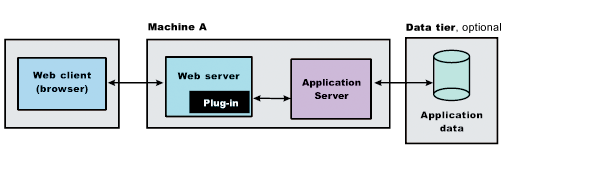
Configuring a web server and an application server profile on the same machine
WebSphere® Application Server provides web server plug-ins that you can configure to communicate with a particular brand of web server. Learn how to install the web server, its web server plug-in for WebSphere Application Server, and the application server on the same machine.
Before you begin
When multiple profiles exist, you can select the profile that
the Web Server Plug-ins Configuration Tool configures. See Plug-ins configuration for a description of the flow of logic that determines how to select
the profile to configure.
If the WebSphere Application Server product family supports a particular brand of web server, such as IBM® HTTP Server or Microsoft Internet Information Services (IIS), your WebSphere Application Server product provides a binary plug-in for the web server that you must install.
If the WebSphere Application Server product family does not provide a binary plug-in for a particular brand of web server, then the web server is not supported. The purpose of the binary plug-in is to provide the communication protocol between the web server and the application server.
Suppose that you create a new profile and you also want to use a
web server. You must install a new web server for the new profile, install the Web Server Plug-ins,
and use the Web Server Plug-ins Configuration Tool to configure both the web server and the
application server.
If the web server is not already installed, you can still install the Web Server Plug-ins for future use.
This procedure configures the application server profile that is the default profile on the machine. A one-to-one relationship exists between a web server and the application server.
However, a standalone application server profile and a managed profile can each have multiple web servers defined, each in a separate web server definition.
This topic describes how to create the following topology:
About this task
- For IBM HTTP Server, the following information:
![[Linux]](../images/nglinux.svg)
![[AIX]](../images/ngaix.svg)
![[HP-UX]](../images/nghpux.svg)
![[Solaris]](../images/ngsolaris.svg) System user ID and group to have write permission to IBM HTTP Server, the IBM
HTTP Server administrative server, and the web server plug-in configuration files
System user ID and group to have write permission to IBM HTTP Server, the IBM
HTTP Server administrative server, and the web server plug-in configuration files![[Windows]](../images/ngwin.svg) User ID and password if you choose to run the IBM HTTP Server administrative server as a Window service
User ID and password if you choose to run the IBM HTTP Server administrative server as a Window service
The Web Server Plug-ins Configuration Tool edits the configuration file or files for a web server by creating directives that point to the location of the binary plug-in module and the plug-in configuration file.
The name of the binary plug-in module varies per web server type. The plug-in configuration file is always the plugin-cfg.xml file.
The Web Server Plug-ins Configuration Tool creates a web server definition in the configuration of the application server unless one already exists.You can use the administrative console to manage the web server configuration. For example, when you install an application on the application server, you can also choose to install it on the web server definition. If so, the updated plugin-cfg.xml file shows that the new application is available. When the web server reads the updated plug-in configuration file, the web server becomes aware of the new application that it can serve to web clients.
If you choose not to install the new application on the web server definition, the application is not added to the plug-in configuration file. The web server is not aware of the application and cannot serve it to web clients.
Tip: As an alternative to using the Web Server Plug-ins Configuration Tool, you can use
the pct command-line tool with a response file to configure a web server. Read Configuring a web server plug-in using the pct tool for more information.Use this procedure to install the web server plug-in, configure the web server, and create a web server definition in the default application server profile.
Procedure
- Log on to the operating system.
If you are installing as a nonroot or non-administrative user, then there are certain limitations.
In addition, select a umask that allows the
owner to read/write to the files, and allows others to access them according to the prevailing
system policy. For root, a umask of 022 is recommended. For nonroot users, a umask of 002 or 022
could be used, depending on whether or not the users share the group. To verify the umask setting,
issue the following command:
To set the umask setting to 022, issue the following command:umaskumask 022When installing as an administrative user on a Windows operating system, a Windows service is automatically created to autostart the application server. The installer
user account must have the following advanced user rights:If you plan to run the application server as a Windows service, do not install from a user ID that contains spaces. A user
ID with spaces cannot be validated. Such a user ID is not allowed to continue the installation. To
work around this restriction, install with a user ID that does not contain spaces. - Click Browse to select the configuration file or files for your
web server, verify that the web server port is correct, and then click Next
when you are finished.
Select the file and not just the directory of the file. Some web servers have two configuration files and require you to browse for each file.
The following list shows configuration files for supported web servers:- apache_root/config/httpd.conf
- names.nsf and Notes.jar
The wizard prompts for the notes.jar file. The actual name is Notes.jar.
The Web Server Plug-ins Configuration Tool verifies that the files exist but the tool does not validate either file.
- IHS_root/conf/httpd.conf
- The Web Server Plug-ins Configuration Tool can determine the correct files to edit.
- obj.conf and magnus.conf
- If you are configuring an IBM HTTP web server
plug-in, perform the following actions.
- Specify the system user ID and group to have write permission
to IBM HTTP Server, the IBM HTTP Server administrative server, and the web server plug-in configuration
files.
Select Create a new unique system user ID and group using the credentials if necessary.
Restriction: The configuration might fail if you
specify a new user ID or group name that exceeds the platform limit, which is commonly 8 characters
and is sometimes configurable. - Optionally, set up the IBM HTTP Server
Administration Server to run as a Window service.
- Domino Web Server only: Set the
WAS_PLUGIN_CONFIG_FILE environment variable.
On platforms such as AIX® or Linux®, sourcing a script to the parent shell allows child processes to inherit the exported variables. On Windows systems, run the script as you would run any other command. Sourcing is automatic on Windows systems.
- Issue the appropriate command for the
plugins_root/bin/setupPluginCfg.sh script:
.
plugins_root/bin/setupPluginCfg.sh
(Notice the space between the period and the installation root directory.)source plugins_root/bin/setupPluginCfg.sh
The script is also in the lotus_root/notesdata directory on operating systems such as AIX or Linux.
Issue the appropriate command for the script before starting the Domino Web Server.
- Issue the appropriate command for the
plugins_root/bin/setupPluginCfg.sh script:
- Start the Snoop servlet to verify the ability of the web server to
retrieve an application from the application server.
Test your environment by starting your application server, your web server, and using the Snoop servlet with an IP address.
- Start the application server. Change directories to the profile_root/bin directory and run the startServer command:
- ./startServer.sh server1
- startServer server1
- Start the IBM HTTP Server or the web server that you are
using.Use a command window to change the directory to the IBM HTTP Server installed image, or to the installed image of your
web server. Issue the appropriate command to start the web server, such as these commands for IBM HTTP Server:To start the IBM HTTP Server from the command line:
Access the apache and apachectl
commands in the IBMHttpServer/bin directory.
- ./apachectl start
- apache
- Remote IBM HTTP Server only:
Verify that the automatic propagation function can work on a remote IBM HTTP Server by using the following steps. This procedure is
not necessary for local web servers.
Automatic propagation of the plug-in configuration file requires the IBM HTTP administrative server to be up and running. If you are managing an IBM HTTP Server using the WebSphere Application Server administrative console, the following error might display:
Could not connect to IHS Administration server error
Perform the following procedure to correct the error:
- Start the application server.
Results
The Web Server Plug-ins Configuration Tool creates a web server definition within the application server profile unless one already exists.
The Web Server Plug-ins Configuration Tool configures the web server to use the profile_root/plugin-cfg.xml file.
profile_root
   /config/cells/cell_name/nodes/
   web_server_name_node/servers/
   web_server_name/plugin-cfg.xml
What to do next
You can start a standalone application server and the web server immediately after configuring the plug-in for the local web server. Open the administrative console of the application server after you start the server and save the changed configuration.
See Selecting a web server topology diagram and roadmap for an overview of the installation procedure.
See Plug-ins configuration for information about the
location of the plug-in configuration file.
See Web server configuration for information about the files involved in configuring a web server.
See Editing web server configuration files for information about how the Web Server Plug-ins Configuration Tool configures supported web servers.
See Installing and configuring web server plug-ins for information about other installation scenarios for installing web server plug-ins.