Setting up for IBM Z Open Debug
Before you can connect to a z/OS® system and start debugging, configure for IBM Z® Open Debug.
Configuring the preferences
You can specify the connection details to the host and other preferences in or in the setting.json file.
| Field name in Settings | Property in settings.json | Description |
|---|---|---|
| Connection: Connection Name | zopendebug.connection.connectionName | The hostname of the remote z/OS system. |
| Connection: Connection Port | zopendebug.connection.connectionPort | The port of the Debug Profile Service on the remote z/OS system. For a secured connection, ensure that a secure port is specified. |
| Connection: Context Root | zopendebug.connection.contextRoot | The context root of the Debug Profile Service on the remote z/OS system. |
| Connection: Secured | zopendebug.connection.secured | Enable a secure connection. |
| Connection: User Name | zopendebug.connection.userName | The user ID to be used for connections to the remote z/OS server. |
| Profile View: Api Log | zopendebug.profileView.apiLog | Enable diagnostic logging of the Debug Profile Service. The log files are stored in the user's home directory. |
| Profile View: Show Welcome | zopendebug.profileView.showWelcome | Show the welcome page on the Z Open Debug Profiles view. |
Configuring launch.json
To configure launch.json for IBM Z Open Debug, see the supported attributes in Listing parked z/OS Debugger debug sessions on a z/OS host and Connecting to a parked z/OS Debugger debug session on a z/OS host.
Importing a self-signed certificate for Debug Profile Service
Z Open Debug uses the Debug Profile Service API
to manage debug profiles. This REST API is secured with a certificate. If the certificate is
self-signed, you need to install the certificate to the operating system to establish a secured
communication.
Note: This task is required if you are using Wazi Developer for Workspaces in the OpenShift® cloud environment.
Before you establish a secured connection, ensure that your system programmer created a
certificate for Debug Profile Service as described
in Enabling secure communication and you are connected to the remote z/OS system with a secured port specified and the secured connection enabled.
- Obtain the certificate directly from the systems programmer, or follow the steps below to obtain
the certificate with a browser:
- Open the Developer Tools window.
- In the Z Open Debug Profiles view of a VS Code client, select .
- In the OpenShift cloud environment, you can open the window directly. For example, if you are using Google Chrome, right-click and select Inspect from the menu.
- In the Z Open Debug Profiles view, perform any action.
- On the Network tab of the Developer Tools window,
click any dtcn/ in the Name column to copy the URL. The URL starts with
https://connection_name:port_number.
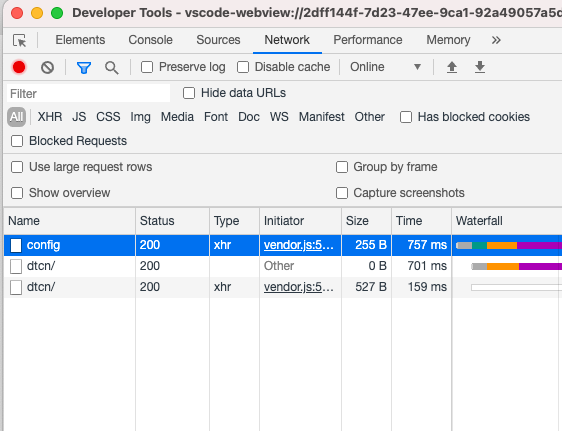
- Paste the copied URL in the address bar of a browser. A warning icon that indicates insecure connection is displayed in the address bar.
- Click the warning icon to download or export the certificate.Note: After you import the certificate into the certificate store of the operating system, the original name instead of the name you specified when you exported the certificate is displayed.
- Open the Developer Tools window.
- Import the self-signed certificate to your operating system.
You can import the certificate into Trusted Root Certification Authorities on Windows or Keychain Access on macOS directly, or use Google Chrome for any operating systems or Internet Explorer for Windows.
Google Chrome for Windows:- Select .
- In the Certificates window, open the Trusted Root Certification Authorities tab and select Import. The Certificate Import Wizard opens.
- In the Certificate Import Wizard, browse to select the certificate. You might need to choose All Files (*.*) to display all file types.
- Click Finish to complete importing the certificate.
- In the Certificates window, select Advanced to open the Advanced Options window and ensure that Client Authentication is selected.
Google Chrome for macOS:- Select .
- In Keychain Access, import the certificate.
- Double-click the imported certificate to set the fields to Always Trust.
Internet Explorer for Windows:- Select .
- On the Content tab of the Internet Options window, select Certificates to open the Certificates window.
- In the Certificates window, open the Trusted Root Certification Authorities tab and select Import. The Certificate Import Wizard opens.
- In the Certificate Import Wizard, browse to select the certificate. You might need to choose All Files (*.*) to display all file types.
- Click Finish to complete importing the certificate.
- In the Certificates window, select Advanced to open the Advanced Options window and ensure that Client Authentication is selected.