Testing with Jenkins
Introduction
To automate testing with Jenkins, you must configure two computers: A Jenkins master and a Jenkins slave. This master-slave configuration allows a single Jenkins installation on the master computer to host multiple slave environments for building and running tests. You must install the Jenkins plugin for Rational Functional Tester on the master computer, and install Rational Functional Tester itself on the slave, where you create the tests. For detailed information about the Jenkins master-slave relationship, see the Distributed Builds section on the Jenkins site.
Before you begin
- Install IBM® Installation Manager, which is required to install Rational Functional Tester.
- Install Rational Functional Tester.
- Verify that you have a Jenkins master computer where Jenkins and the Jenkins plugin for Rational Functional Tester are installed.
- Verify that you have a Jenkins slave computer where Rational Functional Tester is installed.
- Verify that you have a functional test residing within an Eclipse workspace where Rational Functional Tester is installed.
Installing the Rational Functional Tester Jenkins plugins on the Jenkins master computer
- Download the Rational Functional Tester Jenkins plugins from https://public.dhe.ibm.com/ibmdl/export/pub/software/rational/Jenkins_Plugins/ .
- From the Jenkins dashboard, install the Jenkins plugin for Rational Functional Tester.
- Configure Global Security to allow Random TCP Ports for Java™ Network Launch Protocol (JNLP) agents.
Job Configuration
- Create a Jenkins free-style software project. For details, see https://wiki.jenkins-ci.org/display/JENKINS/Building+a+software+project.
- From the Jenkins dashboard, click and click Run a Rational Functional Tester test.
- Provide details about the test run as described below.
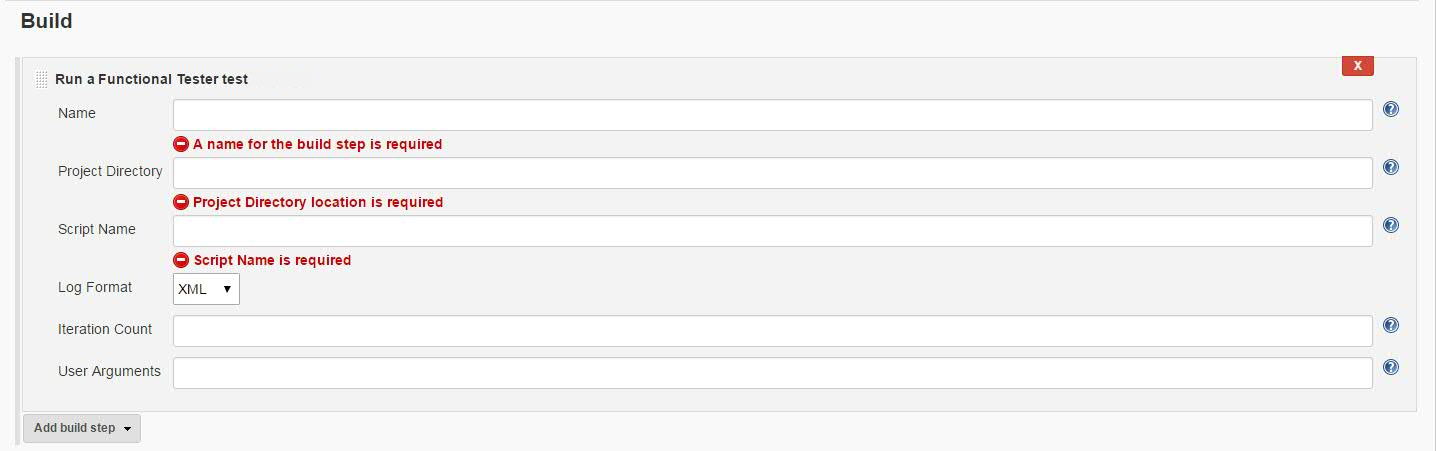
The following table explains each field.
Field Description Name Required. The name of the Rational Functional Tester test. Project Directory Required. The fully qualified path to the Rational Functional Tester project directory. Use '\\' or '/' as the file separator. Script Name Required. The name of the script to be run. Log Format Optional. The format of the script run logs. The options are: xml, html, text, and TPTP. Iteration Count Optional. The number of datapool iterations to be run. User Arguments Optional. Additional playback arguments, if any. - Click Save to save the build step configuration.
- To run multiple tests under the same job, click Add build step again and provide details for the next test.
Master/Slave Configuration
Master and slave configurations are supported by this plugin. See the Jenkins documentation on Distributed builds for more information.
While creating the job configuration, in addition to the steps above, provide the name of the slave node as the Label Expression in the Restrict where this project can be run field. This is the location where the products are installed and where tests can be run.
Running tests
After creating the Job (project), open the project and click Build Now. This action starts the test run on the slave computer.
Build result and logs
- After the build completes, click the build number and open the console for the project. Look for
Test Result to check the test execution status. Note: If you added multiple build steps to run multiple tests, you will find more than one Test Result.
- For product logs, log in to the slave machine and look in the Jenkins slave workspace/temp directory.