To migrate security settings from uDeploy® 4.8.5 or IBM® uDeploy 5.0
to IBM UrbanCode™ Deploy,
complete these steps.
Before you begin
Note: If you are upgrading from a
version before 4.8.5 and you want to upgrade your security settings, you must first upgrade to 4.8.5
or 5.0 before you start this task. If you are upgrading the server but not your security settings,
you must be at version 4.8.3 or higher.
About this task
Procedure
- Open the Object-Team Mapping pane.
This pane maps objects to the teams that manage security for those
objects. This pane shows only the objects that can have their own
security settings. The secure-able object types can be
seen in the following screen capture. To map objects, do these steps:
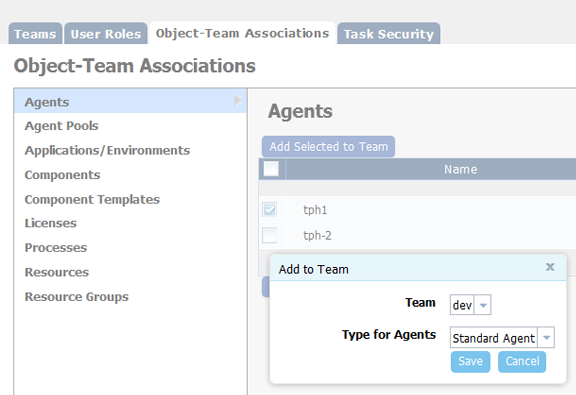
- Select the object type from the object-type list.
- Select all the objects to assign to the same team from the object list. The tph1 agent is selected in the accompanying figure. You can select multiple items by holding down the Shift key when you select an item. Use the filter boxes to limit long lists.
- Click Add Selected to Team.
- From the Add a Team dialog box, select the team to assign the selected objects to, and select the security type.
- Click Save.
Note: The Licenses type is not used and can be ignored. - By default, manual tasks are configured so that any user
can use them. To limit a task to a specific role, open the Task
Security pane, and associate the task with the role. Any application, component, or approval-type task that is used
in a process is available to use. To associate tasks with roles, do
these steps:
- Select the task type from the task-type list.
- Open the Configuration dialog box by clicking Configuration for the task to use.
- Select a value from the Who can approve this
task list. Roles can be restricted by environment
or application.
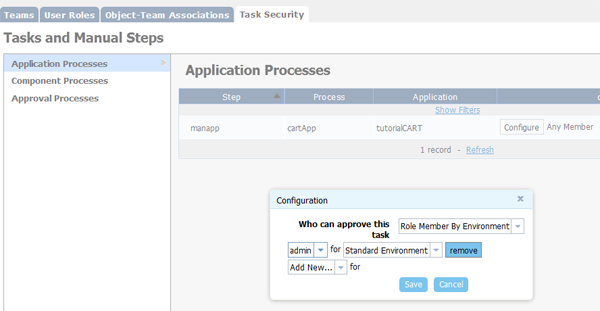
- Select the role and security type for the task. If you specify the admin role, for example, to use the object, a user must be assigned the admin role. Multiple roles can be selected.
- Save you work.