You might need to install the PDU horizontally, use the
instructions in this section to complete this task.
Tip: Removing the rack doors and side panels might
make installation easier.
Important: Use cage nuts
for rack cabinets with square holes, and use clip nuts for rack cabinets
with round holes. If your rack cabinet requires cage nuts, use a cage-nut-insertion
tool or a flat-blade screwdriver to install them..
To install the PDU+ in the rack,
complete the following steps
- Read the Rack safety notices.
- Align the vertical-mounting brackets to the front of the PDU+. Make
sure that you attach the brackets so that the power outlets face the
rear of the rack.
Figure 4. Aligning the vertical-mounting
brackets to the front of the PDU+.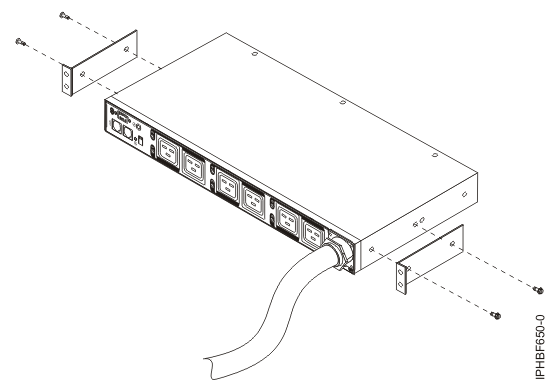
- Align the long mounting-brackets with the holes in the
rear of thePDU+ and
attach the brackets to the PDU+ with two M3
pan-head screws with captive lock washers per bracket. Use the screws
that come with the rack-mounting kit.
- Hold the PDU+ at
a slight angle and carefully insert it into the 1-U mounting space
in the rack cabinet. Pushing in slightly on both of the long mounting-brackets
helps clear the brackets from the rack flanges.
Figure 5. Aligning
the PDU+ with
the opening in the rack.
Attention: You must disconnect the
main input power before connecting or disconnecting the input power
cord from the PDU+.
- Secure the end of the PDU+ that has the
short mounting-brackets to the rack cabinet first. Make sure that
the short mounting-brackets are aligned with the outside of the rack
flanges. Attach the brackets to the rack flanges with two M6 screws
and two cage nuts or clip nuts per bracket. Use the cage nuts or clip
nuts and the screws that come with the rack-mounting kit.
- Secure the long mounting-brackets and the 1-U blank filler
panel to the rack cabinet by doing the following:
- Adjust the long mounting-brackets to fit the depth of the rack
cabinet.
- Make sure that the long mounting-brackets are aligned with the
inside of the rack flanges.
- Align the blank filler panel on the outside of the rack flanges.
- Attach the filler panel to the rack flanges and then to the long
mounting-bracket with one M6 screw per bracket.
- Tighten the M3 pan-head screws that secure the long mounting-brackets
to the PDU.
- Secure the end of the PDU+ that has the
short mounting-brackets to the rack cabinet first. Make sure that
the short mounting-brackets are aligned with the outside of the rack
flanges. Attach the brackets to the rack flanges with two M6 screws
and two cage nuts or clip nuts per bracket. Use the cage nuts or clip
nuts and the screws that come with the rack-mounting kit.
- If the PDU+ was
provided with a detached power cord, connect the power cord now. Align the connector on the power cord that was provided with
the PDU+ with
the connector on the front of the PDU+, turning as
necessary for key alignment. Then, turn the twist-lock on the connector
clockwise until it locks into place.
Figure 6. Aligning
the connector on the power cord with the PDU+.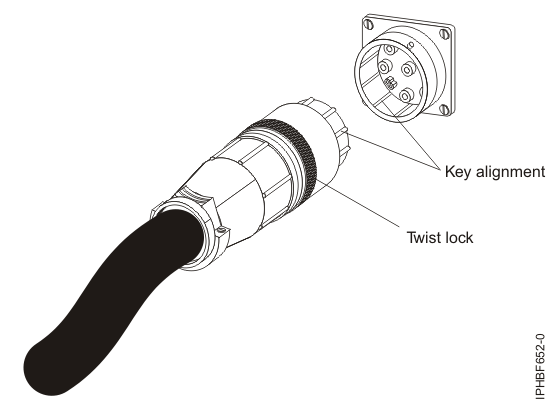
- Route the power cord from the PDU+ toward the
rack side braces. Then, route the power cord along a side
brace toward the back of the rack and secure the power cord with the
cable straps that are provided with the PDU+.
- Route the power cord toward a dedicated power source. Use the provided cable straps to secure the power cord along
the way. Use the openings in the rack, if the power cord must exit
the rack to connect to a power source.
Attention: To prevent
damage to a power device and other connected devices, always connect
the power device to an authorized power source for that device.
- Connect the power cord to a properly wired and grounded
dedicated power source. Then, you can connect servers or
rack PDUs in the rack to the power outlets on the PDU+.
- Route all of the other power cables neatly and secure the
power cables with cable straps.


