subscribe iconSubscribe to this information

Replace a SCSI disk drive

You might need to replace a Small Computer System Interface (SCSI) disk drive in a system or expansion unit. Use the procedure in this section to perform this task.

Remove the disk drive

  1. Log in as root user or use CE Login.

    For information on CE Login, go to General AIX diagnostic information.
  2. At the command line, type diag and press Enter.
  3. Press Enter to continue.
  4. On the Function Selection display, select Task Selection.
  5. On the Task Selection display, select Hot Plug Task.
  6. Select SCSI and SCSI RAID Hot Plug Manager.
  7. Select Identify a Device Attached to a SCSI Hot Swap Enclosure Device.
  8. Select the disk drive you want to replace and press Enter.
  9. Exit to the SCSI and SCSI RAID Hot Plug Manager display.
  10. On the SCSI and SCSI RAID Hot Plug Manager display, select Replace/Remove a Device Attached to a SCSI Hot Swap Enclosure Device. A list of all slots from which you can remove a disk drive is shown.
  11. Select the slot that contains the disk drive you want to remove. The disk drive slot enters the Remove state and power is removed from the slot. The concurrent maintenance light for the slot begins flashing rapidly.
  12. Unlock the disk drive. Unlock the disk drive handle by squeezing it and pulling it out toward you as shown in the following figures.
    Figure 1. Removing a disk drive from a model 51x or 710
    Graphic of removing a disk drive from the system unit.
    Video of removing a disk drive from the system unit.Video of removing a disk drive from the system unit.
    Figure 2. Removing a disk drive from a model 285, 52x, 55x, 9116-561, 570, 720, or 7311-D20
    Graphic of removing a disk drive from the system unit.
    Video of removing a disk drive from the system unit.Video of removing a disk drive from the system unit.
  13. Support the bottom of the disk drive as you slide it out of the system or expansion unit. Do not hold the disk drive by the handle.
    Note: The concurrent maintenance light for the slot turns off when you remove the disk drive.
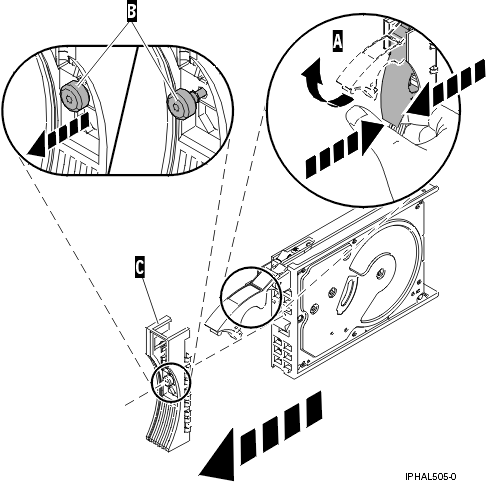
  14. Loosen and pull out on the thumbscrew B to release the bezel C from the disk drive.
    Figure 3. Removing a disk-drive bezel
    Graphic of removing a disk-drive bezel from the system unit.

Replace the disk drive

  1. Find the package that contains the new disk drive.
    Attention: Disk drives are fragile. Handle with care.
  2. Remove the disk drive from its protective package.
  3. Unlock the handle of the replacement disk drive by squeezing and pulling it out toward you. If the handle is not all the way out, the disk drive can not slide into the system.
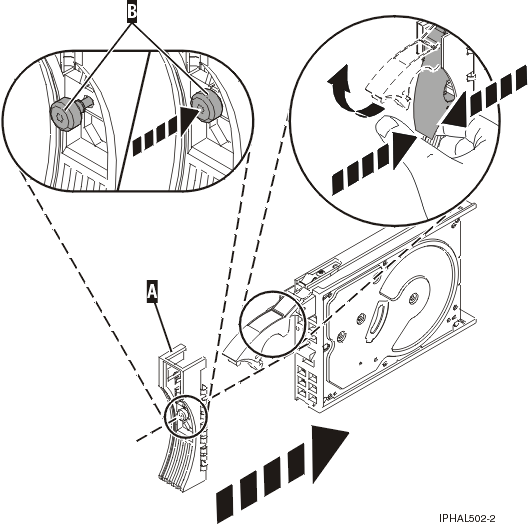
  4. Attach disk-drive bezel A to the replacement disk drive, as shown in the following figure.
    Figure 4. Attaching a disk-drive bezel
    Graphic of attaching a disk-drive bezel on a disk drive.
  5. Press in and then tighten thumbscrew B to secure bezel A to the disk drive.

    Video of attaching a disk-drive bezel to a disk drive.Video of attaching a disk-drive bezel to a disk drive.

  6. Install the disk drive as follows:
    1. Support the bottom of the disk drive as you align it with the guide rails in the system unit. Do not hold the disk drive by the handle.
    2. Slide the disk drive into the system until it stops.
      Note: It is important to ensure that when installing a disk drive, that the drive is fully seated and all the way into the system.
    3. Push the disk drive handle in until it locks, as shown in Figure 5 or Figure 6.
      Figure 5. Installing a disk drive in a model 51x or 710
      Graphic of installing a disk drive in the system unit.
      Video of installing a disk drive in the system unit.Video of installing a disk drive in the system unit.
      Figure 6. Installing a disk drive in a model a model 285, 52x, 55x, 9116-561, 570, 720, or 7311-D20
      Graphic of installing a disk drive in the system unit.
      Video of installing a disk drive in the system unit.Video of installing a disk drive in the system unit.
  7. Press Enter.
  8. Exit to the SCSI and SCSI RAID Hot-Plug Manager menu.
  9. Select Configure Added/Replaced Devices. Press Enter.
  10. Select the disk drive that you replaced and then press Enter.

    The disk drive is now configured.

  11. Exit to the Task Selection display.
  12. Select Log Repair Action.
  13. Select the disk drive that you replaced and then press Enter.
  14. Select Commit after you have made your selection and then press Enter.
  15. Exit to the command line.

Complete the procedure

  1. Replace the front cover. For instructions on replacing the cover, select the appropriate procedure from the following list:
  2. Install or close the system, expansion unit or rack front door. For instructions on installing the system unit door, see Install or replace the door on the model 285, 52x, 55x, or OpenPower 720.
  3. Verify that the disk drive is working. For instructions, see Verify an installed feature or replaced part on an AIX system or logical partition. If it is not possible to run online AIX diagnostics, for example if you replaced the root volume group (rootvg) disk drive, use standalone diagnostics as described in Verify an installed part using the eServer stand-alone diagnostics.
  4. To prepare the disk drive for use, go to Rebuild data on a replacement disk drive using AIX.

Send feedback | Rate this page

Last updated: Fri, Oct 30, 2009