Atualizando a configuração e os dados da tabela
Aprenda a atualizar a configuração da tabela e os dados após o envio do formulário. Nesta lição, você garante que o formulário funcione corretamente e se prepara para preencher os dados das APIs REST.
Procedimento
- Envie o formulário:
- Acesse a página Criar reserva, insira os dados e envie a reserva. Por exemplo:
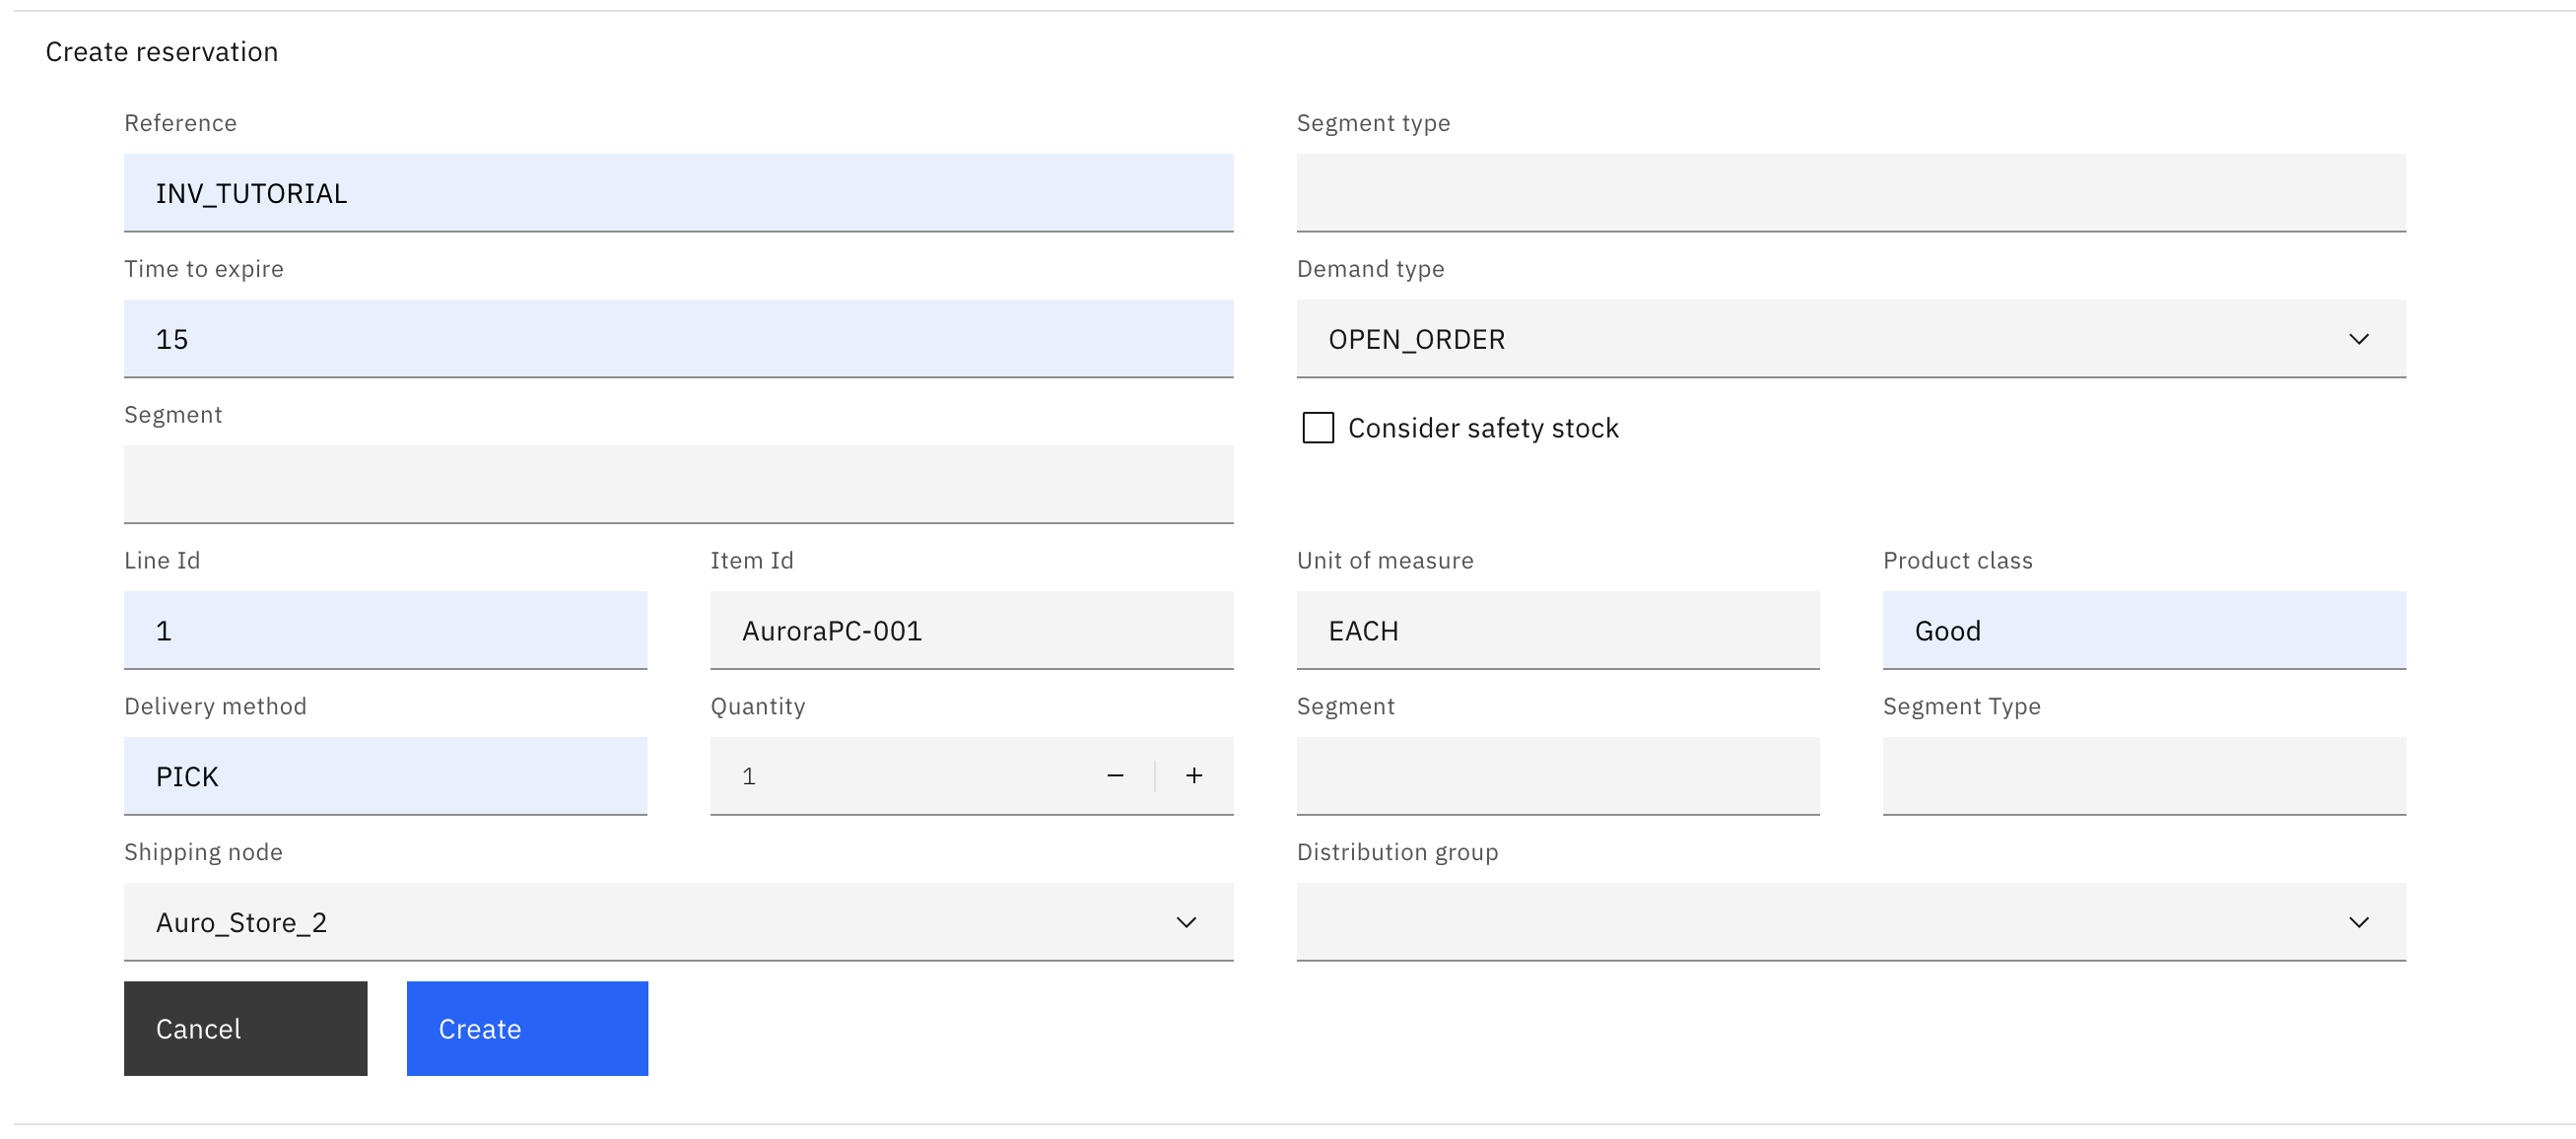
- Após enviar o formulário, você deverá ver a seguinte mensagem:

- Acesse a página Criar reserva, insira os dados e envie a reserva. Por exemplo:
- Em um terminal, vá para o diretório src-custom/app/features/create-reservation.
- Execute o seguinte comando para gerar uma tabela para os usuários visualizarem e atualizarem os valores das reservas.Este comando utiliza os scripts de geração de código IBM incluídos no kit de ferramentas do desenvolvedor.
ng g @buc/schematics:table-component \ --name create-reservation \ --extend ClientSidePaginationBaseTableComponent \ --path packages/inventory-search-results/src-custom/app/features/create-reservation \ --json-file-path packages/inventory-search-results/src-custom/assets/custom \ --translation-file-path packages/inventory-search-results/src-custom/assets/custom/i18n- --name <nome da tabela>,
- --path <caminho para onde deseja criar a tabela>
- --json-file-path <caminho para buc-table-config.json onde a configuração da tabela será adicionada>
- --translation-file-path <caminho para o arquivo JSON de tradução personalizada>
- --extend <nome da classe da tabela extensível>
ng g @buc/schematics:table-component --help - Após executar o script, novos arquivos são criados no local especificado e o ext-search-module.ts arquivo é atualizado com um novo componente, CreateReservationTableComponent.
- Como o componente personalizado que você gerou (
CreateReservationTableComponent) precisa usar utilitários e bibliotecas d IBM, mova o componente para o app-customization.impl.ts arquivo seguindo as etapas abaixo.- Edite o arquivo src-custom/app/features/ext-search.module.ts com as seguintes alterações.
- Exclua a instrução import {CreateReservationTableComponent}.
- Exclua CreateReservationTableComponent da matriz
declarations.
import { NgModule } from '@angular/core'; import { CommonModule } from '@angular/common'; @NgModule({ declarations: [ ], imports: [ CommonModule ] }) export class ExtSearchModule { } - Atualize o arquivo src-custom/app/app-customization.impl.ts com as seguintes alterações.
- Adicione a seguinte instrução de importação.
import { CreateReservationTableComponent } from './features/create-reservation/create-reservation-table/create-reservation-table.component'; - Adicione CreateReservationTableComponent à matriz de componentes.
static readonly components = [CreateReservationComponent, CreateReservationTableComponent];
- Adicione a seguinte instrução de importação.
- Edite o arquivo src-custom/app/features/ext-search.module.ts com as seguintes alterações.
- Abra o arquivo src-custom/app/features/create-reservation/create-reservation-table/create-reservation-table.component.ts e encontre o valor do seletor.Neste caso, o valor é buc-create-reservation-table. Você deve usar esse valor no HTML para exibir a tabela.
- Adicione o seguinte código ao arquivo src-custom/app/features/create-reservation/create-reservation.component.html após o comentário <!–Reservation table -->.
<buc-create-reservation-table [parentPage]="this"></buc-create-reservation-table> - Volte para o Order Hub de última geração e recarregue o quadro.Acesse a página Criar reserva para verificar se a mesa está sendo exibida.

- Observe que o cabeçalho inclui uma caixa de seleção. Para remover a caixa de seleção, execute as seguintes etapas.
- Abra o src-custom/app/features/create-reservation/create-reservation-table/create-reservation-table.component.html arquivo.
- Adicione o seguinte código ao final do elemento
<buc-table>.[showSelectionColumn]="false"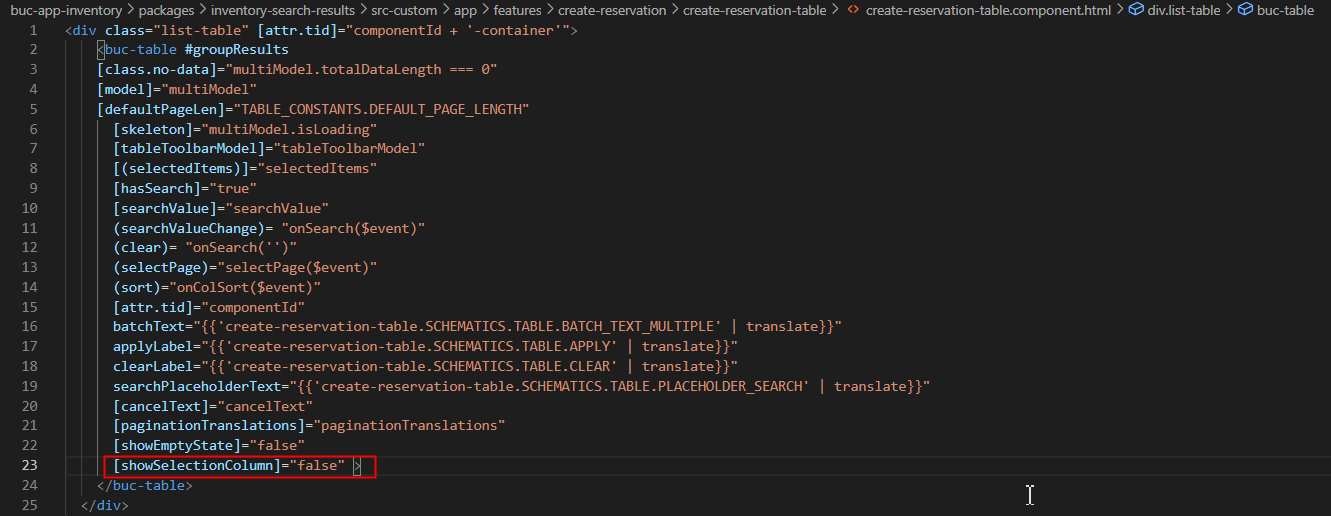
- Abra o arquivo packages/inventory-search-results/src-custom/assets/custom/buc-table-config.json.
- Substitua a matriz de cabeçalhos da tabela create-reservation-table pelo seguinte código para atualizar as cadeias de caracteres do cabeçalho da tabela.
Depois de substituir os cabeçalhos, certifique-se de que o código se parece com o seguinte trecho.{ "name": "Node id", "id": "nodeId", "sortKey": "nodeId", "dataBinding": "shipNode" }, { "name": "Available On hand", "id": "availableOnHand", "sortKey": "availableOnHand", "dataBinding": "reservedQuantity" }, { "name": "Reserved Total", "id": "totalReservedQty", "sortKey": "totalReservedQty", "dataBinding": "reservedQuantity" }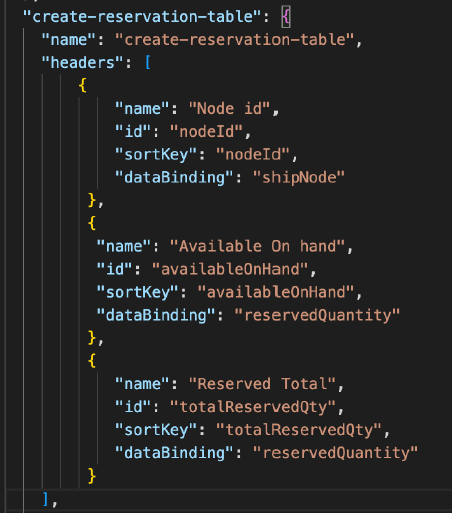
- Atualize a seção Cabeçalhos da tabela no create-reservation-table.component.ts arquivo.Observe que os IDs correspondem aos buc-table-config.json valores desta tabela.
/* Table Headers */ public readonly TABLE_HEADERS: any = { TH_NODE_ID: 'nodeId', TH_AVLBL_ON_HAND: 'availableOnHand', TH_TOTAL_RESRV: 'totalReservedQty' }; - Edite o arquivo src-custom/app/features/create-reservation/create-reservation-table/create-reservation-table.component.ts com as seguintes alterações.
- Para preencher a tabela com dados, você pode usar os parâmetros de consulta do buc-table-config.json e algumas variáveis que o Order Hub armazena no contexto.Adicione InventoryContextService e InventoryAvailabilityService como parâmetros do construtor.
private ctx: InventoryContextService, private invAvlSvc: InventoryAvailabilityService, private reservationService: CreateReservationService - Adicione o ID do locatário, a declaração de importação e o código:
- Adicione a seguinte variável à classe
CreateReservationTableComponent. Esta variável é usada na chamada da API.public tenantId; - Adicione o seguinte código ao método
ngOninit()para preencher o tenantId:this.tenantId = BucSvcAngularStaticAppInfoFacadeUtil.getInventoryTenantId(); - Adicione a instrução de importação correspondente:
import { BucSvcAngularStaticAppInfoFacadeUtil } from '@buc/svc-angular'; - Inclua o código a seguir:
getInventoryAvailabilityBreakup() {
	const searchCriteria = this.ctx.getSearchCriteria();
	const item = (this.reservationService.itemData?.itemId) ? [this.reservationService.itemData.itemId] : [''];
	const nodes = searchCriteria.filterCriteria.nodes;
	this.parentPage.nodesIds = nodes;
	const data = [];
	return this.invAvlSvc.getAvailabilityBreakupInventory(item, nodes,
		[], [searchCriteria.operators.uom.value],
		[searchCriteria.operators.pc.value], searchCriteria.filterCriteria,
		searchCriteria.operators.org.value, false, '').pipe(
		map((response: InventoryBreakupResponse) => {
			response.nodes.forEach(el => {
				const colD = {
					breakup: {},
					itemId: '',
					availableOnHand: '',
					nodeId: '',
					totalReservedQuantity: ''
				};
				colD.breakup = el.breakup;
				colD.availableOnHand = response.summary?.availToSell;
				colD.nodeId = el.nodeId;
				colD.totalReservedQuantity = el.breakup.totalReservedQuantity;
				data.push(colD);
			});
			return data;
		}),
		catchError(() => {
			this.multiModel.totalDataLength = 0;
			return [];
		})
	);
}
getReservation() {
	return this.reservationService.getReservation(this.tenantId,
		this.reservationService.reservationRef).pipe(
		catchError(() => {
			this.multiModel.totalDataLength = 0;
			return [];
		})
	);
}
- Adicione a seguinte variável à classe
- Prepare a tabela para obter os dados das APIs:
- Substitua o
fetchTableData()método pelo seguinte código para chamargetReservationegetInventoryAvailabilityBreakup:protected fetchTableData(): Observable < any[] > { const observables = []; observables.push(this.getReservation()); observables.push(this.getInventoryAvailabilityBreakup()); return forkJoin(observables).pipe(map((res) => { const reservationResp: any = res[0]; const nodebrkUp: any = res[1]; const rows = reservationResp.map((item: any) => ({ shipNode: item.shipNode, reservedQuantity: item.reservedQuantity, totalOnhandSupplyQuantity: nodebrkUp.map((data) => data.nodeId === item.shipNode ? data.breakup.totalOnhandSupplyQuantity[0] : '') })) return rows; })); } - Para exibir informações na tabela, você precisa usar a API
getAvailabilityBreakupInventoryexistente egetReservationa API doinventory-sharedpacote. Portanto, você precisa adicionar as seguintes instruções de importação:import { InventoryAvailabilityService, InventoryContextService } from '@buc/inventory-shared'; import { InventoryBreakupResponse } from '@buc/inventory-shared/lib/services/inventory-availability.service'; import { CreateReservationService } from "../services/create-reservation.service"; import { map, catchError } from 'rxjs/operators'; import { forkJoin } from 'rxjs';
- Substitua o
- Adicione um método de tratamento para mostrar notificações de sucesso ou erro. O Order Hub oferece serviços para exibir notificações.
- Adicione o
BucNotificationServicecomo parâmetro do construtor:private bucNotificationService: BucNotificationService - Adicione o
showNotificationmétodo:// notification showNotification(statusType, message) { const notification = new BucNotificationModel({ statusType, statusContent: message }); this.bucNotificationService.send([notification]); } - Adicione a instrução de importação correspondente:
import { BucNotificationModel, BucNotificationService} from '@buc/common-components';
- Adicione o
- Para preencher a tabela com dados, você pode usar os parâmetros de consulta do buc-table-config.json e algumas variáveis que o Order Hub armazena no contexto.
- Adicione um rodapé com as opções Cancelar e Criar.
- Abra o arquivo src-custom/app/features/create-reservation/create-reservation.component.html.
- Substitua o código existente
<div class="screen-footer">pelo seguinte código.<div class="screen-footer"> <!-- button row --> <div class="cds--row"> <div class="cds--col"> <buc-button [attr.tid]="'create-rule-cancel'" class="padding-right--1rem" [type]="'secondary'" (click)="onCancel()" [btnSize]="'normal'"> {{ 'custom.LABEL_CANCEL' | translate }} </buc-button> <buc-button id="saveBtn" [attr.tid]="'create-rule-save'" [type]="'primary'" [btnSize]="'normal'" (click)="onSave()"> {{ 'custom.LABEL_CREATE' | translate }} </buc-button> </div> </div> </div> - Atualize o arquivo src-custom/assets/custom/i18n/en.json com as strings de tradução para os rótulos Cancelar e Criar.
"custom": { "LABEL_CREATE_RESERVATION": "Create reservation", "SUCCESS_RESERVATION": "Reservation successful", "ERROR_RESERVATION": "Reservation failed:", "LABEL_CREATE": "Create", "LABEL_CANCEL": "Cancel" },
- Atualize o arquivo src-custom/app/features/create-reservation/create-reservation.component.ts para lidar com as ações Cancelar e Criar.
- Na classe CreateReservationComponent, declare uma nova variável booleana isCancelled.
public isCancelled: boolean; - No método construtor, adicione o parâmetro Router.
private router: Router - Adicione os seguintes métodos para lidar com as ações Cancelar e Criar.
onCancel() { this.isCancelled = true; this.router.navigate([Constants.RESULTS_ROUTE]); } onSave() {} - Adicione as seguintes instruções de importação.
import { ActivatedRoute, Router } from '@angular/router'; import { Constants } from '@buc/inventory-shared';
- Na classe CreateReservationComponent, declare uma nova variável booleana isCancelled.
- Crie um serviço para chamar a API Criar reserva em Sterling™ Intelligent PromisingInventory Visibility para preencher os dados de disponibilidade.
- Abra o arquivo src-custom/app/features/create-reservation/services/create-reservation-service.ts.Atualize o arquivo com o seguinte código para chamar a API Get Reservation (Obter reserva) do Sterling Intelligent PromisingInventory Visibility :
getReservation(tenantId, referenceId = 'REF2'): Observable < any > { if (tenantId === undefined || tenantId === null || tenantId === '') { return throwError(new Error('Missing required parameter: tenantId')); } let path = '/{tenant}/v1/reservations?reference={referenceId}'; path = path.replace('{tenant}', tenantId).replace('{referenceId}', referenceId); const url = this.domain + path; const obsToReturn$ = this.http.post(url, this.resourceDomain, null, this.options); return obsToReturn$; }
- Abra o arquivo src-custom/app/features/create-reservation/services/create-reservation-service.ts.
- Se você estiver inscrito no Global Inventory Visibility, abra o arquivo src-custom/app/features/create-reservation/create-reservation.component.ts e adicione o seguinte código.
- Adicione um método de tratamento para mostrar notificações de sucesso ou erro. O Order Hub oferece serviços para exibir notificações.
- Adicione o BucNotificationService como parâmetro do construtor.
private bucNotificationService: BucNotificationService - Adicione o método ` showNotification `.
// notification showNotification(statusType, message) { const notification = new BucNotificationModel({ statusType, statusContent: message }); this.bucNotificationService.send([notification]); } - Adicione a instrução de importação correspondente.
import { BucNotificationModel, BucNotificationService} from '@buc/common-components';
- Adicione o BucNotificationService como parâmetro do construtor.
- Modifique o método ` onSave( ` conforme necessário.
async onSave() {
    // Call GIV API here
        try {
      alert('Call GIV API here');
      this.showNotification('success', this.nlsMap['custom.SUCCESS_RESERVATION']);
      this.router.navigate([Constants.RESULTS_ROUTE]);
    } catch (error) {
      this.showNotification('error', this.nlsMap['custom.ERROR_RESERVATION'] + ' ' + error.error_message);
    }
  }
- Adicione um método de tratamento para mostrar notificações de sucesso ou erro. O Order Hub oferece serviços para exibir notificações.