System setup for the z/VM virtualization tests
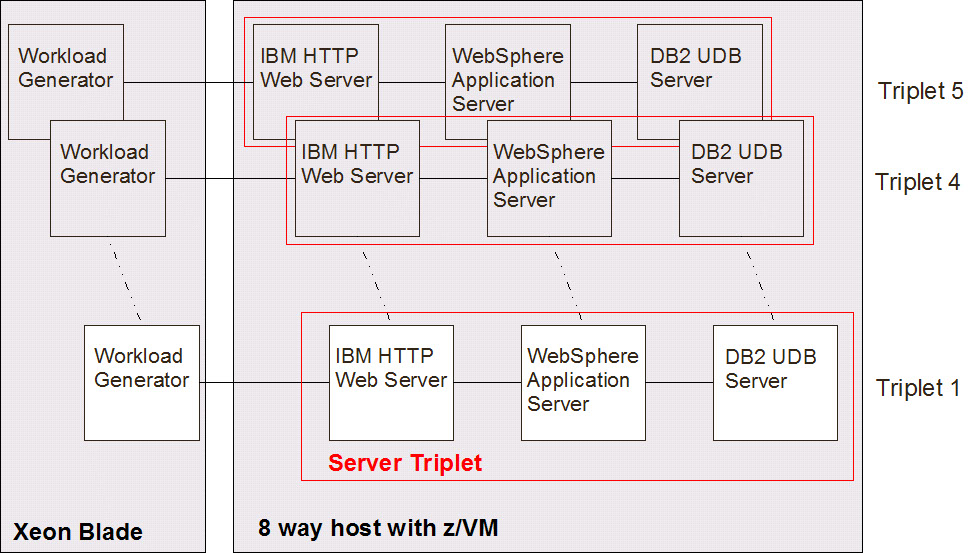
To emulate a customer-like environment we created a triplet using IBM HTTP Server, WebSphere Application Server, and a DB2 UDB Database. We also enabled WebSphere Application Server to use 1 GB of JVM heap, configured IBM HTTP Server to use certificates, modified the WebSphere Studio Workload Simulator configuration file and script, and enabled quick dispatch on z/VM.
WebSphere® environment
To emulate a customer-like environment, one WebSphere Application Server environment consisted of an IBM® HTTP Web server, the WebSphere Application Server, and a DB2® UDB database server. This environment is referred to as a triplet in this document. In our tests, the number of triplets was scaled from 1, 2, 4, to 5.
Enabling 31-bit WebSphere Application Server on System z™ to use 1 GB JVM
echo 268435456 >/proc/self/mapped_baselnwas3:/opt/IBM/WebSphere/AppServer/profiles/default/bin # cat startServer.sh
#!/bin/sh
echo 268435456 >/proc/self/mapped_base
WAS_USER_SCRIPT=/opt/IBM/WebSphere/AppServer/profiles/default/bin/setupCmdLine.sh
export WAS_USER_SCRIPT
/opt/IBM/WebSphere/AppServer/bin/startServer.sh "$@"Create a self-signed certificate
- export JAVA_HOME=/opt/IBMJava2-s390-142/jre/
- export PATH=/opt/IBMJava2-s390-142/jre/bin:$PATH
Configure IBM HTTP Server to use certificates
Enabling the use of gsk7ikm GUI (the 31-bit JRE is needed for this)
- export JAVA_HOME=/opt/IBMJava2-s390-142/jre/
- export PATH=/opt/IBMJava2-s390-142/jre/bin:$PATH
To make the above settings persistent over reboots, the above commands need to be added to the /etc/profile.
Create a key database and self-signed certificate. Configure IBM HTTP server.
We used the following steps to enable HTTPS on the IBM HTTP Server.
- Created a key database
- Created a self-signed certificate (using lnweb1:lnweb1 as the name)
- Placed the certificate under the /opt/IBMIHS/security directory (we had to create this directory)
Listen 443
<IfDefine SSL>
LoadModule ibm_ssl_module modules/mod_ibm_ssl.so
</IfDefine>
<IfDefine SSL>
     <VirtualHost 0.0.0.0:443>
     DocumentRoot /opt/IBMIHS/htdocs/en_US
     SSLEnable
     SSLClientAuth none
     SSLServerCert lnweb1:lnweb1
     Keyfile /opt/IBMIHS/security/key.kdb
     </VirtualHost>
</IfDefine>
Restarted the Web server normally with /opt/IBMIHS/bin/apachectl restart.
WebSphere Studio Workload Simulator Configuration file changes
- The number of simulated clients, which are executed by worker threads, was varied. Runs were made with 3, 4, 5, and 6 simulated clients. These clients were varied in order to reach optimal throughput and, at the same time, keep the overall processor utilization at around 90%. We found that four simulated clients achieved this.
- The time limit (length of our runs) was set to 20 minutes.
- The "element delay" (or "think time") was kept at 0.
- The "xml_interval" is the interval in minutes when WebSphere Studio Workload Simulator will take a snapshot of its output. This output can be customized. We paid attention to pages per second, transactions per second, and response time. Our xml_interval was set to five minutes.
A sample configuration file can be found in WebSphere Studio Workload Simulator sample configuration file.
WebSphere Studio Workload Simulator Script file changes
- Hostnames lnweb[1 thru 5] were added to each of the five sample scripts.
- For SSL, every occurrence of getpage and postpage were changed to getpage_ssl and postpage_ssl respectively.
A portion of the script, showing the changes we made, can be found in WebSphere Studio Workload Simulator sample script file.
Enabling quick dispatch (QUICKDSP)
When the quick dispatch option is assigned to a virtual machine, that virtual machine is added to the dispatch list immediately, whenever it has work to do, without waiting in the eligible list. We assigned it to all guests via the z/VM® user directory (see z/VM directory templates for Linux guests for details). For detailed information on quickdsp see:
http://www2.marist.edu/htbin/wlvtype?LINUX-VM.30359
Gather CPU values
The Performance Toolkit for z/VM was used to determine the CPU load.
The CPU utilization was normalized in a way that 100% CPU utilization means that eight CPUs are fully utilized.