Implementing UX (Polymer 3)
Get a basic idea of how to build a simple UX application. Sounds good?
UXis user experience. But for simplicity, I'll refer to the Maximo® Real Estate and Facilities UX framework as
UX.
Implementing UX (Polymer 3): Building a simple application in the UX framework
By Jay Manaloto
I. What are the key concepts?
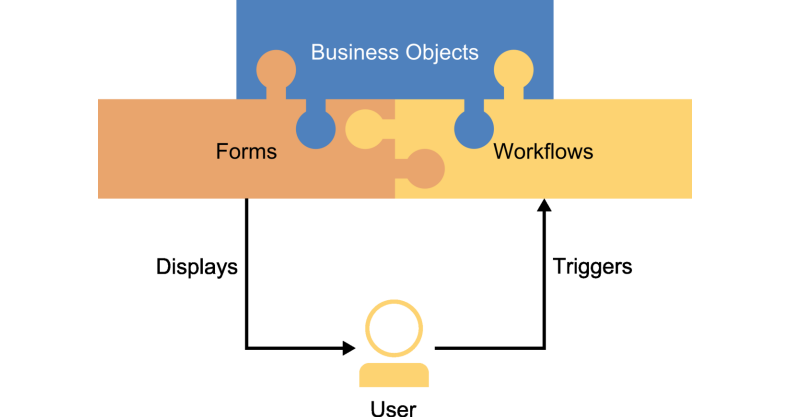
To refresh our memories, UX implements an MVC architecture
. Here's a basic diagram of the
typical MVC components and process flows.

II. What are the key challenges?
But if you remember, our classic framework doesn't fully apply the separation of
responsibilities.
. Components are too tightly coupled.
Here are a few examples:
- Records are bound to a single specific form.
- Form sections and fields are tied to BO sections and fields.
- Forms cannot be replaced without breaking workflows.
- The Modify Metadata task in the workflow is tied to a single form.
So, if we redraw the basic MVC diagram with this lack of separation, our Maximo Real Estate and Facilities framework might look like this. This is where UX comes in!
At the same time, let's be clear where UX doesn't come in.
Because there's no automatic or direct path from key classic concepts to new UX concepts, the
term upgrade
doesn't really apply. In the words of Ryan Koppelman, our (former) manager of
Maximo Real Estate and
Facilities platform development,
certain concepts do not align, and thus cannot be [directly] upgraded
. So instead, we'll take
each concept and compare their approaches.
a. Comparison of Approaches
| Concept | Classic | UX |
|---|---|---|
| Modify Metadata Task | Classic applications typically use workflows with Modify Metadata tasks to hide and show form tabs, sections, and fields, or to change the text or text color of a label. |
In UX, there is no concept of a Modify Metadata task. Instead, a variety of layout components, field elements, and action-button elements are available to render a dynamic view. |
| State Transition Actions | Classic applications typically use state transition actions that call workflows with Modify Metadata tasks to hide and show form tabs, sections, and fields, based on the state of a record. |
In UX, there is no concept of a Modify Metadata task. Again, a variety of layout components, field elements, and action-button elements are available to render a dynamic view. |
| Query Sections |
Classic applications typically use query sections to show a collection of records. Query sections can also trigger workflows with Modify Metadata tasks. |
In UX, query interactions rely on Query data sources, which can be pulled into table (grid) layout components. Again, there is no concept of a Modify Metadata task. |
| Query Actions |
Section actions and query sections with Find actions are found throughout our classic applications. Find queries also offer an option to add new records. |
In UX, there is no concept of section actions or a Find action for query sections. Instead, action-button elements are available to render actions as needed. Also, search interactions rely on Query data sources, which can be pulled into table (grid) layout components, list layout components, or search field elements. |
| Popup Forms |
Popup forms are found throughout our classic applications. Popup forms also display different elements or in different sizes, based on what is selected in the parent form. |
In UX, there is no concept of a popup form, which is designed for desktop screens not mobile displays. Instead, different data sources are pulled into their respective components or elements within the same view as needed. |
| Data Validation | Classic forms rely on Get Temp Record tasks and Modify Metadata tasks to show Attention messages. |
In UX, validation relies on in-memory business objects and modal dialogs. This validation approach is significantly different from the classic approach. |
| Mobile Design | Classic applications were designed for a full desktop experience, not for today's mobile experience with smaller screens and simplified interfaces. |
In UX, code that leverages built-in features of Google Polymer elements is “mobile responsive” out-of-the-box. This responsive-design approach is significantly different from the classic approach. |
As you can see, while the UX framework tackles the key challenges in decoupling our classic
framework into its separate MVC components, it also isn't meant to automatically upgrade
our
classic framework.
As observed by Casey Cantwell, our (former) lead QA engineer on the
Maximo Real Estate and
Facilities team, we have a unique opportunity to develop a framework for
next generation applications
. This innovative freedom is key. With this in mind, let's dig
deeper into the UX metadata concepts. Are you ready?
III. What are the new metadata concepts?
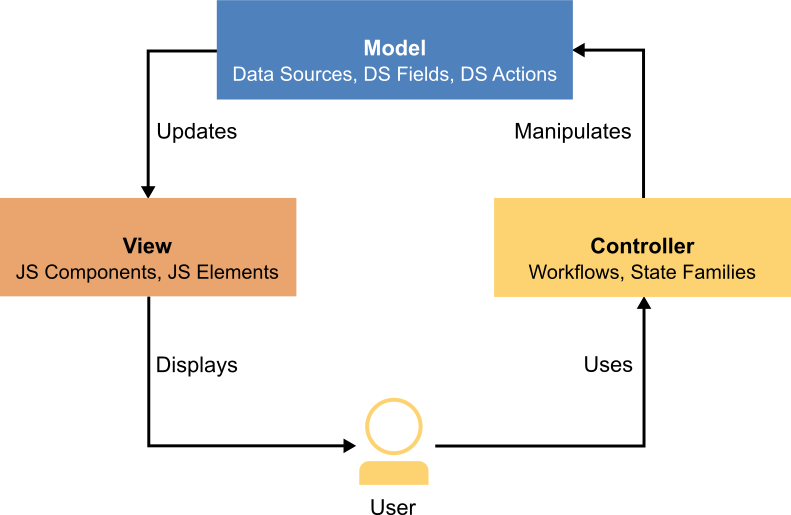
Building on a solid foundation, the UX framework introduces two new metadata concepts: (1) the
model to retrieve the data and trigger the business logic, and (2) the view to render
the interfaces or forms. The new renders will be bolt-on
views that can be quickly added or
removed, and will still use our existing application data and workflows.
Once again, if we redraw the basic MVC diagram with our new decoupled metadata approach, our UX framework might look something like this.
IV. Can we dig deeper into the UX model?
Of course! As I just mentioned, the model is used to retrieve the data and trigger the
business logic
. To be clear, this is where you can define your models in whatever way you
see fit to fulfill your business needs. First, you must define your models before you can develop
your views.
Each model can be made up of the following components:
- Data Sources
- Child Data Sources
- Related Data Sources
- Data Source Fields
- Data Source Actions
Before we look at some screenshots, here are some longer descriptions.
a. Component Descriptions
| Component | Description |
|---|---|
| Data Sources |
You can define data sources, child data sources, and related data sources to pull together all of the data needed for a model. A data source can be one of several types:
For more information, Application building for IBM Maximo Real Estate and Facilities. |
| Child Data Sources |
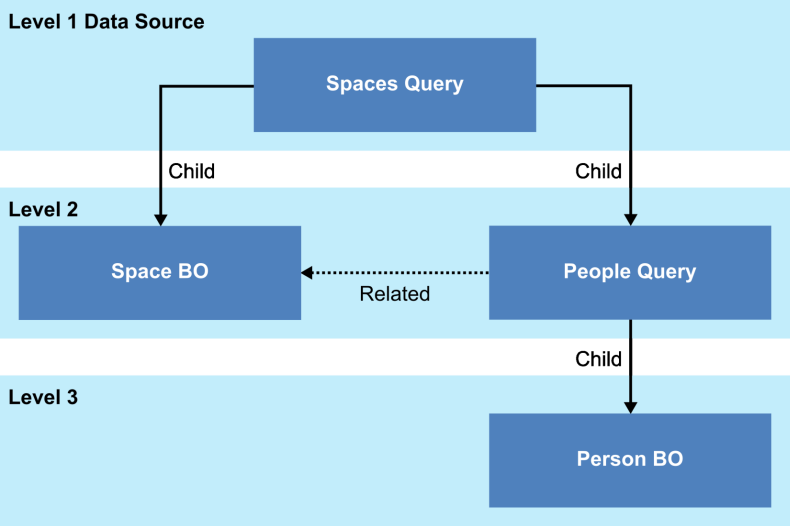
Child data sources are not required, but can also be powerful in shaping the user experience. They are identical to other data sources, but they operate as children at a lower level beneath their parent data source. In fact, you can add several levels to build a hierarchy of data sources. To illustrate, let's say that you defined Spaces Query as your first-level data source. Then you might define Space BO and People Query as second-level child data sources, where the Space BO would be a related (contextual) data source for People Query. Lastly, you might also define Person BO as a third-level child data source of People Query.
With this hierarchy, a user can (1) see a list of spaces, (2) drill into a single space and see people assigned to that space, and (3) drill into a single person record. In our classic framework, this scenario could only be achieved by using many workflows to set variables. In our UX framework, we can achieve this with zero workflows! |
| Related Data Sources |
Related (or contextual) data sources are not required either. But they can be just as powerful in filtering the results of one data source, based on the context of another data source. Imagine that! To illustrate, let's say that you defined Work Task as one data source. Then you might define Responsible Organization as another data source with the related data source of Work Task. You might also define Manager of Organization as yet another data source with the related data source of Responsible Organization.
|
| Data Source Fields |
Each data source must define at least one field. Each field corresponds to a field in the data source type. To illustrate, let's say that you defined a data source with a Business Object type. Then each field in your data source references a corresponding field in the business object. |
| Data Source Actions |
With data source actions, you define which business rules or workflow logic can be triggered by your data source. For convenience, your actions can also be grouped together into action groups. |
Here's a basic diagram of the data source hierarchy and its relationships.
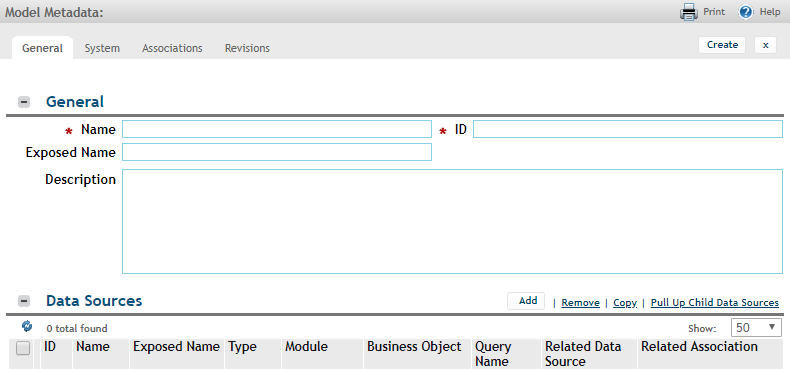
Next, here's an example of a blank model metadata form, where you define your model and add its data sources. In case you're wondering, while new UX applications will use MVC views, the UX metadata will use traditional forms until our UX framework matures. So stay tuned!
b. Model Metadata
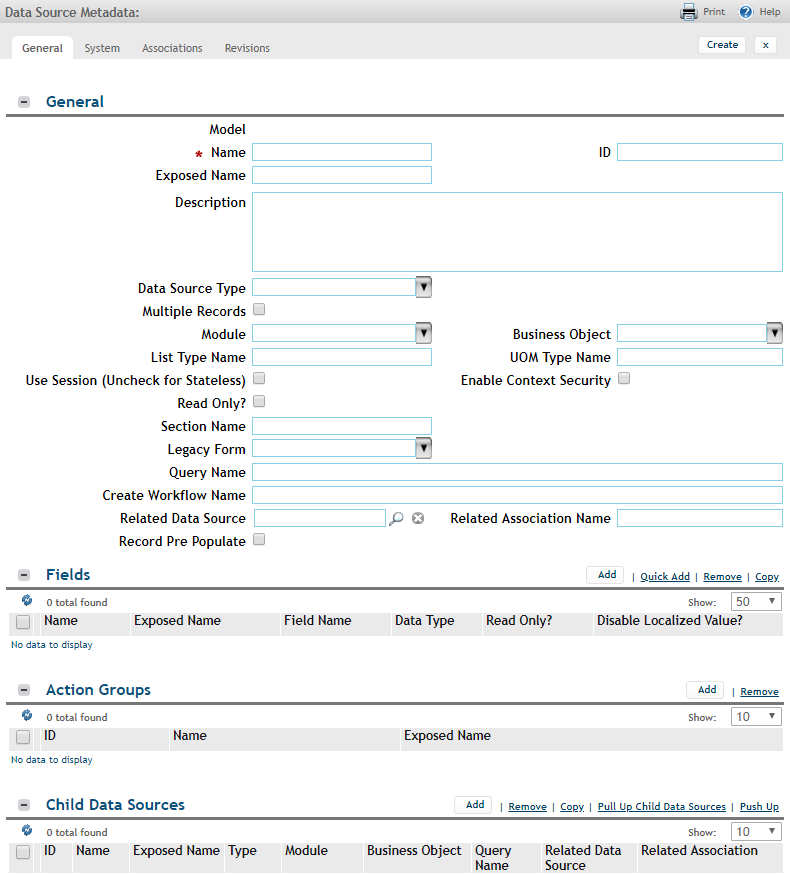
Here's an example of a blank data source metadata form, where you define your data source and add its fields, actions, and child data sources.
c. Data Source Metadata
V. Can we dig deeper into the UX view?
Sure! As I mentioned earlier, the view is used to render the interfaces or forms
. After
your models are in place, this is where you can design your views in whatever way you require
to satisfy your business scenarios. Even better, you're free to design any number of views for each
model.
Each view is made up of one or more JavaScript (JS) files. In turn, each JS file can be made up of the following components:
- Maximo Real Estate and Facilities components
- Custom components
- Polymer elements
- Traditional elements
Before we peek at a few screenshots, here are some deeper descriptions.
a1. Component Descriptions
| Component | Description |
|---|---|
| Maximo Real Estate and Facilities Components |
You can add Polymer-based components provided by Maximo Real Estate and Facilities to assemble all of the necessary data and metadata, or enable field-level interactions or information, in a rendered view. These Maximo Real Estate and Facilities components include a graphic and search field. Example tags include To access the full list of Maximo Real Estate and Facilities components and their related documentation, enter the following URL address: https://<workspace_id>.facilities.<mas_domain>/p/web/doc. Where <workspace_id> and <mas_domain> are the values for your Maximo Real Estate and Facilities environment. For example, just add /p/web/doc. |
| Custom Components |
You can add Polymer-based components customized by yourself to enable field-level interactions or information in a rendered view. These components might include a custom search field or custom people card view. Example tags might include |
| Polymer Elements |
Not only can you add components provided by Maximo Real Estate and Facilities or customized by yourself, you can also add elements provided by the Polymer library to provide field-level interactions or information in a rendered view. These Polymer elements include a check box, data field, number field, search field, and text field.
If you have any questions about Polymer, its concepts, or its elements, feel free to check out the Polymer website at www.polymer-project.org. |
| Traditional Elements |
You can also add traditional HTML elements such as containers, headings, or paragraphs. In addition, you can apply CSS styles to these traditional HTML elements as well as Maximo Real Estate and Facilities elements and Polymer elements. Example tags include |
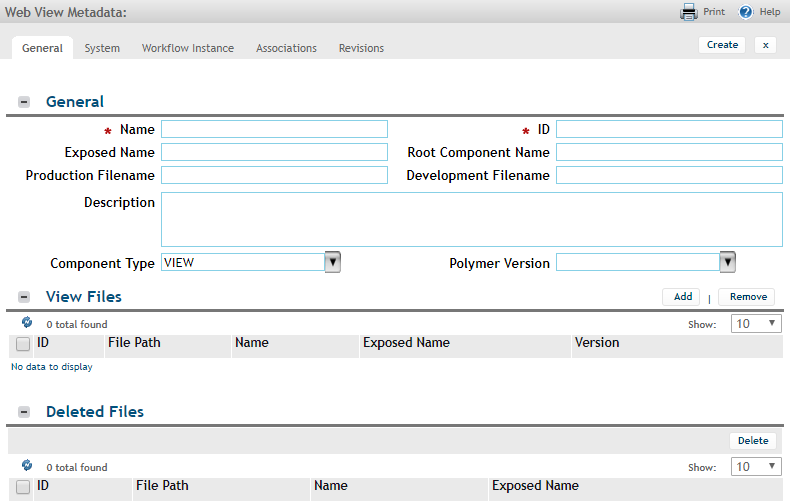
Next, here's an example of a blank view metadata form, where you define your view and add its JavaScript (JS) files. Later, we'll learn to add JS files.
b. Web View Metadata
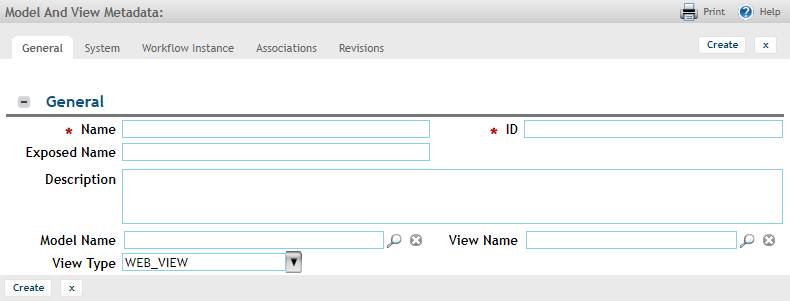
Here's an example of a blank model-and-view metadata form, where you tie your view to a model, and define your view type. More about this later.
c. Model and View Metadata
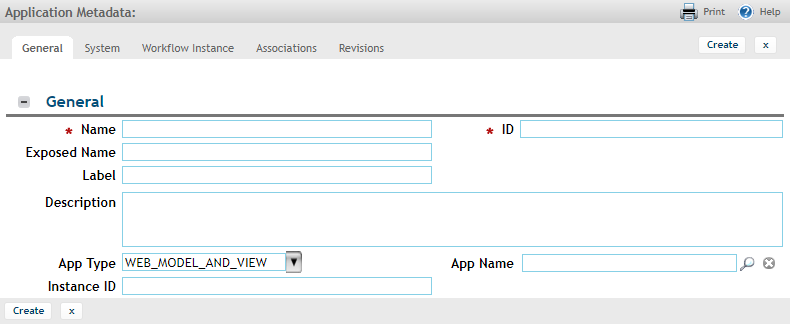
Finally, here's an example of a blank application metadata form, where you define your
application, app type, and app (source) name, such as a model-and-view. Why will UX use an
extra
metadata layer to connect the model-and-view to the application? Flexibility.
This extra layer allows the application to pull data from either a UX or non-UX source if
needed.
d. Application Metadata
VI. Can we build a simple UX application?
Yes, I think we can! After all, this is what you were waiting for, right? At this point, you should have a better idea of the concepts and components.
For our example, we'll build a simple 3-field 3-button application by (1) defining a model with a single data source, (2) defining the view connections to a model-and-view and application, and (3) defining and designing a view with a single JavaScript (JS) file. Sounds easy, huh?
Here are the basic steps:
- Define your model
- Optional: Add the business object
- 1: Add the model
- 2: Add the data source
- 3: Add a few fields for your data source
- Define your view connections
- 4: Add the view
- 5: Add the model-and-view
- 6: Add the application for your model-and-view
- Define your view
- 7: Install the NPM and Maximo Real Estate and Facilities tools
- 8: Add the main JS file for your view
- 9: Access the application
- Design your view
- 10: Start the tri-proxy tool
- 11: Add a paragraph element to your JS file
- 12: Add a few field elements to your JS file
- 13: Add a few button elements to your JS file
Define your model
Before you begin
In your web browser's address bar, enter the following URL address: https://<workspace_id>.facilities.<mas_domain>. Where <workspace_id> and <mas_domain> are the values for your Maximo Real Estate and Facilities environment. For example, if you're building the app locally: http://localhost:9080/dev
In Step 7, I'll ask you to contact your Maximo Real Estate and Facilities representative if you cannot access the download location of the Node.js Package Manager (NPM) tool. So be prepared for that.
Optional Step: Add the business object
If you're comfortable with using an existing business object, that's great! You can skip this step. But if you feel safer with a test BO, that's cool too.
From the navigation bar, select . Add your new module and BO with a prefix that's easy to identify. For our example, we'll add the jayUX module and jayUXBO business object. Add 3 fields to your BO and update the BO mapping. Then Publish BO.
a. Data Modeler
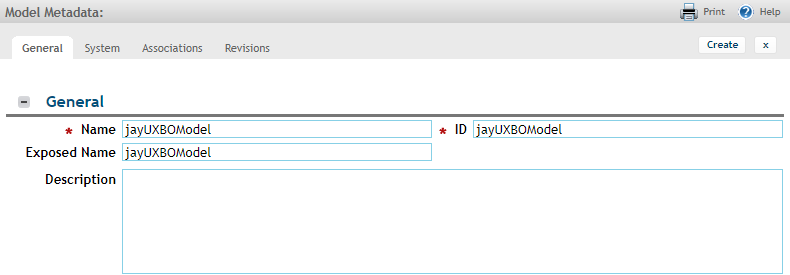
Step 1: Add the model
From the navigation bar, select . Click Add. Enter the name, exposed name, and ID of your model. The exposed name should be a browser-friendly string. For our example, we'll type jayUXBOModel and skip the description. Then click Create.
a. Model Metadata
Step 2: Add the data source
Next, in the Data Sources section of your model, click Add.
a. Model Metadata > Data Sources

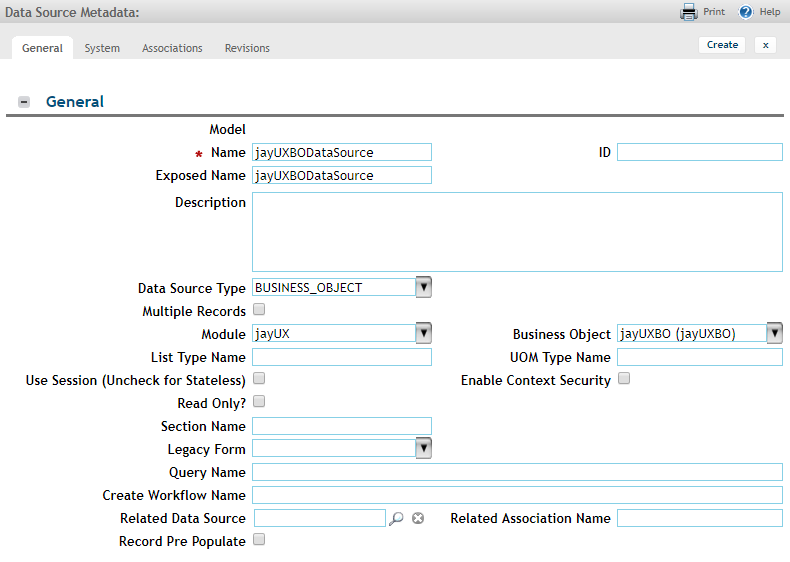
Enter the name and exposed name of your data source. Since we want to pull data from a record, select BUSINESS_OBJECT for the data source type. For our example, we'll type jayUXBODataSource and choose the jayUX module and jayUXBO business object. Then click Create.
b. Data Source Metadata
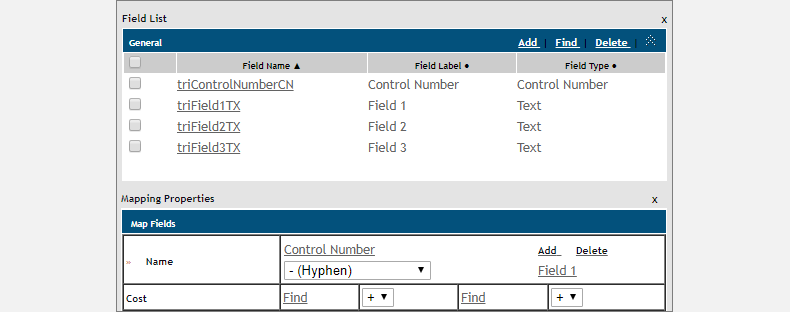
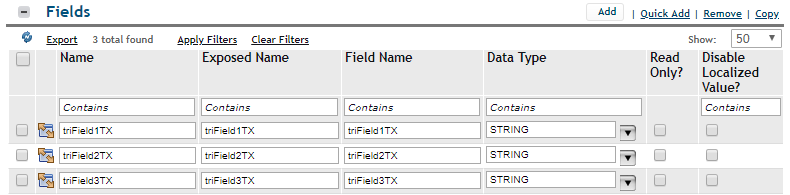
Step 3: Add a few fields for your data source
Next, in the Fields section of your data source, click Quick Add.
a. Data Source Metadata > Fields

Enter the name, exposed name, and field name of your data source field. Again, the exposed name should be a browser-friendly string. But the field name should match the field in your data source, like your BO. Be aware that the format of the field name depends on your data source type.
Repeat this for each field that you defined in your test BO or existing BO. For our example, we'll type triField1TX, triField2TX, and triField3TX for the first, second, and third field, respectively. Then click Save.
b. Data Source Metadata > Fields
Finally, Save & Close your model components -- data source and model. Guess what? We're done with the first part. You've defined your first model! Ready to move on to the next part?
Define your view connections
Step 4: Add the view
From the navigation bar, select . Click Add. Enter the name, exposed name, and ID of your view. The exposed name should include a dash (-). For our example, we'll type jayUXBOView for the name and ID, type jay-uxbo-view for the exposed name, and skip the description. Choose the VIEW component type and V3 version of Polymer. Click Create. Then Save & Close.
a. Web View Metadata
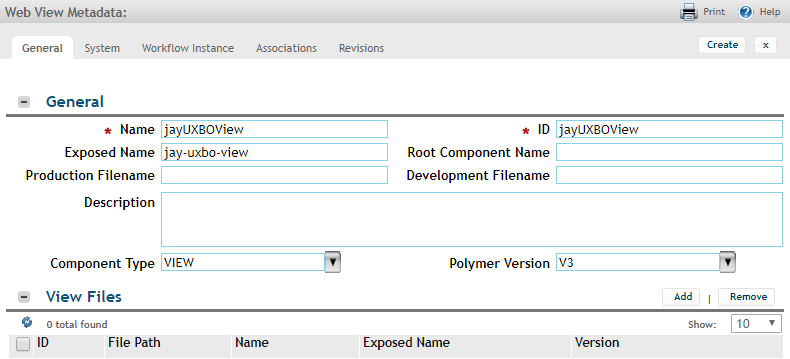
Why do we need a dash in the exposed name? In Polymer, custom element names must always contain a dash (-). This distinguishes custom elements from regular elements but also ensures forward compatibility when new tags are introduced. So, later in our example, when you design your JS view, your metadata will already reflect that dash.
Why are we skipping the View Files section? We're saving this part for later! So, for now, let's define the rest of the connections.
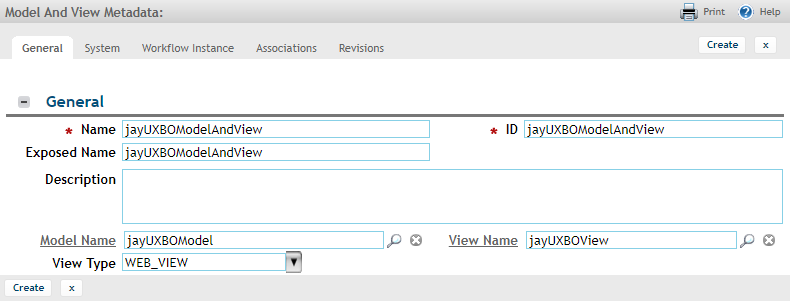
Step 5: Add the model-and-view
From the navigation bar, select . Click Add. Enter the name, exposed name, and ID of your model-and-view. For our example, we'll type jayUXBOModelAndView. Enter the names of the model and the view that you defined earlier. For the view type, select WEB_VIEW. Click Create. Then Save & Close.
a. Model and View Metadata
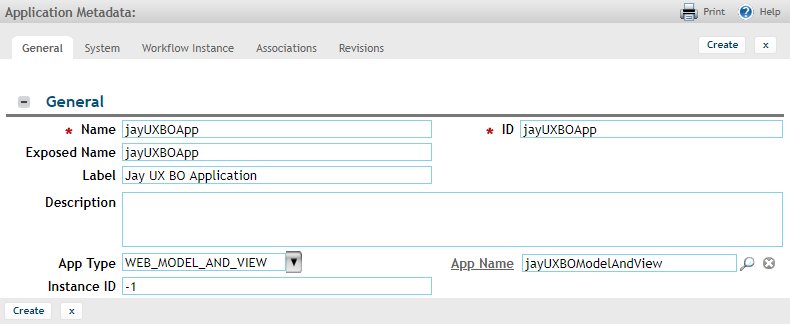
Step 6: Add the application for your model-and-view
From the navigation bar, select . Click Add. Enter the name, exposed name, and ID of your application. For our example, we'll type jayUXBOApp. For the label, type Jay UX BO Application.
For the app type, select WEB_MODEL_AND_VIEW. For the app (source) name, enter the name of the model-and-view that you defined earlier. For the instance ID, type -1 to generate a new record when the application is opened. Click Create. Then Save & Close.
a. Application Metadata
Guess what? We're done with the second part. You've defined your view connections! Ready to move on to the next part?
Define your view
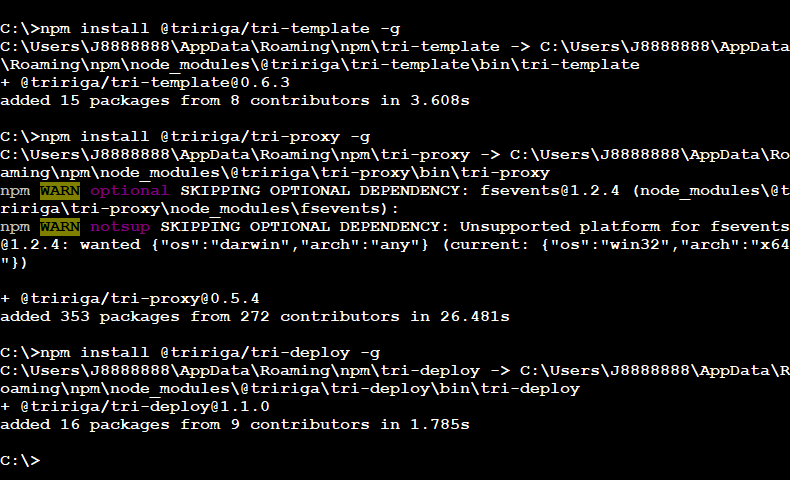
Step 7: Install the NPM and Maximo Real Estate and Facilities tools
Contact your IBM Maximo Real Estate and Facilities representative or business partner if you cannot access the download location of the Node.js Package Manager (NPM) tool. This NPM tool is used to install several Maximo Real Estate and Facilities tools which allow you to populate the JavaScript (JS) files in your view metadata, preview your JS changes, and sync (deploy) your JS changes with the JS files in your Maximo Real Estate and Facilities environment. Be aware that these tools are not officially supported at this time.
Download and install the Node/NPM file. For example: node-v8.12.0-x64.msi.
Next, open your command prompt. Run the following NPM commands to install the following Maximo Real Estate and Facilities tools.
If you see any NPM-related warnings (optional, unsupported, or deprecated), you can ignore them.
a. Maximo Real Estate and Facilities Tools
| Tool | Description |
|---|---|
tri-template |
|
tri-proxy |
|
tri-deploy |
|
tri-pull |
|
b. NPM > Install Maximo Real Estate and Facilities Tools
Step 8: Add the main JS file for your view
After you've installed the tools, it's time to add your main JS view file. If you remember, we skipped the View Files section of your view metadata. Now we'll auto-populate it.
First, manually create a folder with the same name as your view name. For our example, in the folder C:\tririga-ux\polymer-3\, we'll create the new folder name jay-uxbo-view. Next, in your command prompt, change directory to this new folder.
To go ahead and add your main JS view file, run the following tri-template
command: tri-template -t template-name -e
view-exposed-name where -t applies a starter template,
template-name is one of the available starter templates,
-e generates your starter view file, and
view-exposed-name is the exposed name of your view (with the
dash).
For our example, we'll use the template name starter-v3 and the view name
jay-uxbo-view.
a. NPM > tri-template > Add View
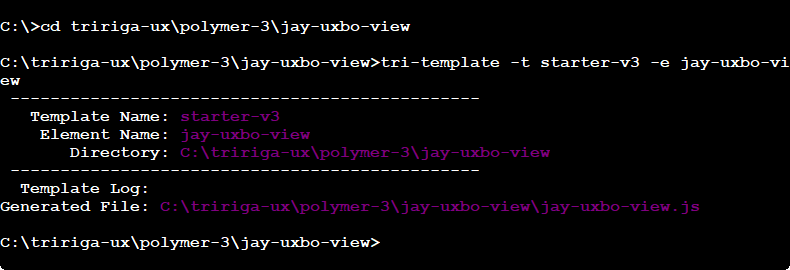
After your JS file is added, you'll see that the C:\tririga-ux\polymer-3\jay-uxbo-view folder now contains the jay-uxbo-view.js file that you started.
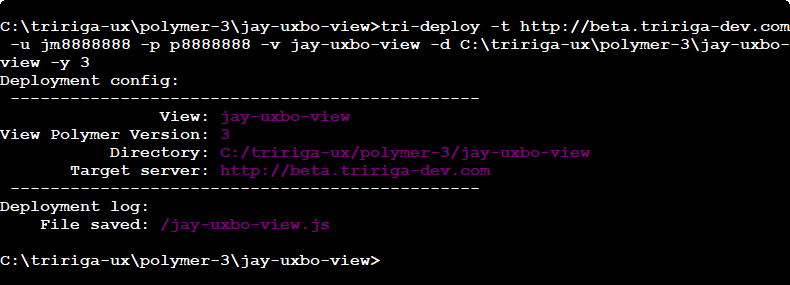
To deploy (or push) your view file to the server, run the following tri-deploy
command: tri-deploy -t https://<workspace_id>.facilities.<mas_domain> -u
username -p password -v view-exposed-name -d directory-path -y
3 where -t targets the server URL, -u applies your
Maximo Real Estate and
Facilities username, -p
applies your
Maximo Real Estate and
Facilities password,
-v deploys your view, view-exposed-name is the
exposed name of your view (with the dash), -d applies your local directory,
directory-path is the full local directory path of your view,
-y applies the Polymer version, and 3 is Polymer 3.
For our example, we'll use http://beta.tririga-dev.com (no context), the
view name jay-uxbo-view, and the full local directory path
C:\tririga-ux\polymer-3\jay-uxbo-view.
--basicuser
applies the username for basic authentication, and --basicpassword applies the
password for basic authentication. Feel free to check out the tri-deploy options and details.b. NPM > tri-deploy > Deploy View
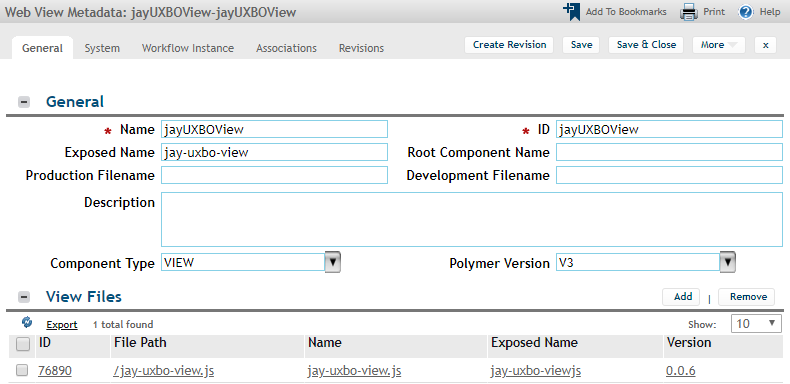
Next, to verify the view metadata, return to and the jayUXBOView view. You'll see that the View Files section is now populated with the jay-uxbo-view.js view file metadata.
c. Web View Metadata > View Files
Step 9: Access the application
In your web browser's address bar, enter the following URL address: https://<workspace_id>.facilities.<mas_domain>/p/web/[yourApp]. Where <workspace_id> and <mas_domain> are the values for your Maximo Real Estate and Facilities environment, and [yourApp] is the exposed name of your application.
If you can see the starter view, that's great! You've defined your first view and accessed your first application! Ready to move on to the best part?
a. UX App > Starter View

Design your view
Step 10: Start the tri-proxy tool
To start the listening
process so your local JS changes are previewed continuously (but
not deployed or synced permanently) with your
Maximo Real Estate and
Facilities environment,
return to the command prompt in the same folder as before. Run the following
tri-proxy command: tri-proxy -t
https://<workspace_id>.facilities.<mas_domain>/p/web/[yourApp] -v
view-exposed-name -d directory-path where
-v serves your local view, view-exposed-name is
the exposed name of your view, -d listens to your local directory for any file
changes (or saves), and directory-path is the full local
directory path of your view.
For our example, we'll use
http://beta.facilities.mref-dev.com/p/web/jayUXBOApp, the view name
jay-uxbo-view, and the full local directory path
C:\tririga-ux\polymer-3\jay-uxbo-view.
Notice that a new browser window opens your preview.
When you see the message Watching files..., it's time to design your view! But
be careful not to close the command prompt.
a. NPM > tri-proxy > Preview View

Step 11: Add a paragraph element to your JS file
In the new view folder that contains the new starter file that you added, open the JS file with the HTML/JS editor of your choice. In our example, we'll open jay-uxbo-view.js. For now, we'll skip the HTML/JS introductions and dive into editing the starter view.
First, add the import line at the top of your JS file to import the
Maximo Real Estate and
Facilities
triplat-ds (data source) component: import { TriPlatDs } from
"../triplat-ds/triplat-ds.js";
a. JS File > Import triplat-ds
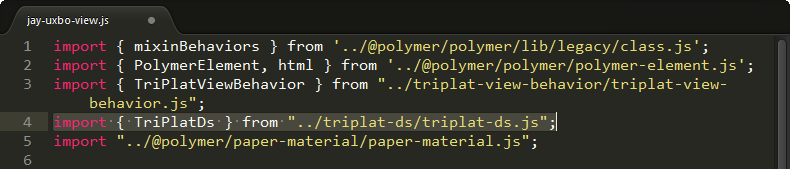
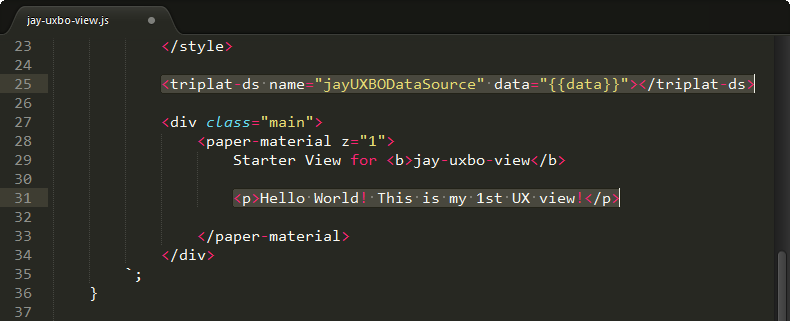
Next, add the <triplat-ds> tag to declare the
Maximo Real Estate and
Facilities
triplat-ds component: <triplat-ds name="jayUXBODataSource"
data="{{data}}"></triplat-ds> where name="jayUXBODataSource"
points to your defined data source.
Now, it's time to add the traditional <p> tag for the paragraph element.
Let's type: <p>Hello World! This is my 1st UX view!</p>
b. JS File > Declare triplat-ds
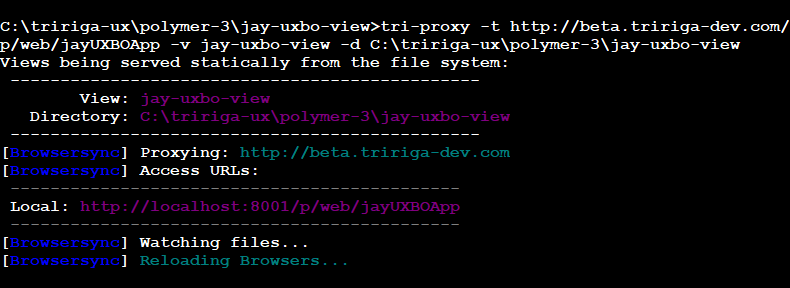
When you save the file, return to the command prompt. You'll see the message Reloading
Browsers... indicating that the changed jay-uxbo-view.js is reloaded
into your preview. In other words, each save will reload your preview.
c. NPM > tri-proxy > Reload View
Next, to verify the change, return to the UX view. Do you see your change? You've added your first element! Ready for more?
d. UX App > Preview Starter View

Step 12: Add a few field elements to your JS file
This time, we'll add the Polymer <paper-input> tag for a single-line text
field based on the material design language by Google. If you have any questions about Polymer, its
concepts, or its elements, feel free to check out the Polymer website at www.polymer-project.org.
If you remember, we added several fields to your data source. Now we'll use the
<paper-input> tag to create a data-binding relationship to each data source
field triField1TX, triField2TX, and triField3TX. Like before, make sure the
tri-proxy command is running in the command prompt. (At any time, you can also
run tri-deploy to push your updated view file to the server.)
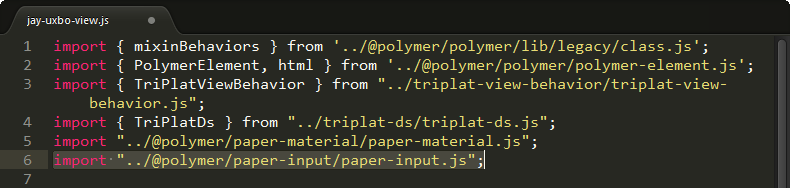
First, add the import line at the top to import the Polymer element:
import "../@polymer/paper-input/paper-input.js";
a. JS File > Import paper-input
Next, add the <paper-input> tag to declare the element:
<paper-input label="Field 1" floating-label
value="{{data.triField1TX}}"></paper-input>
b. JS File > Declare paper-input

Save the file and return to the UX view. Do you see your field? If you do, that's cool! Why not
add a couple more <paper-input> tags on your own?
c. UX App > Preview Starter View

Step 13: Add a few button elements to your JS file
This time, we'll add the Polymer <paper-button> tag for a button with a
ripple effect based on the material design language by Google. Like before, make sure the
tri-proxy command is running in the command prompt. (At any time, you can also
run tri-deploy to push your updated view file to the server.)
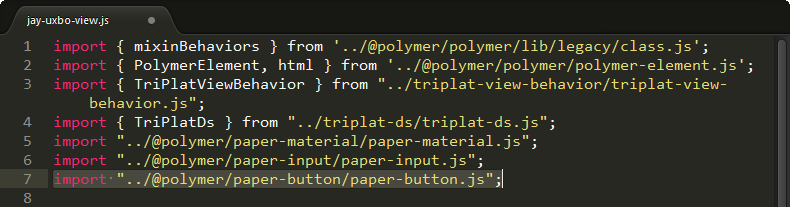
First, add the import line at the top to import the Polymer element:
import "../@polymer/paper-button/paper-button.js";
a. JS File > Import paper-button
Next, add the <paper-button> tag to declare the Polymer element:
<paper-button raised>UX rocks!</paper-button> where
raised adds a shadow.
b. JS File > Declare paper-button
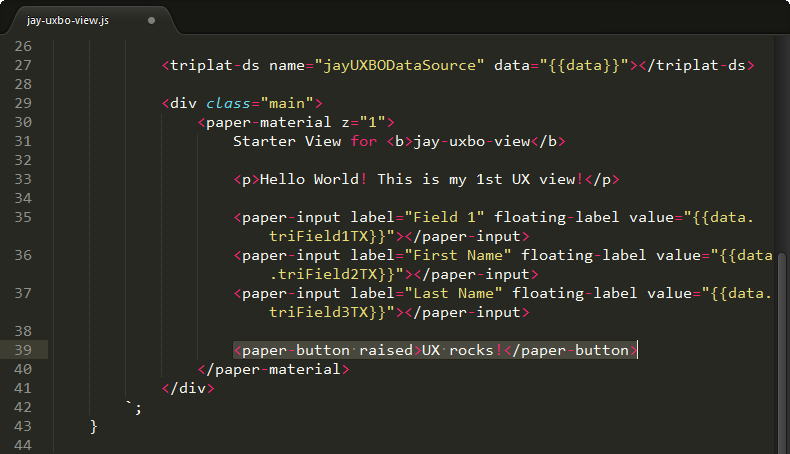
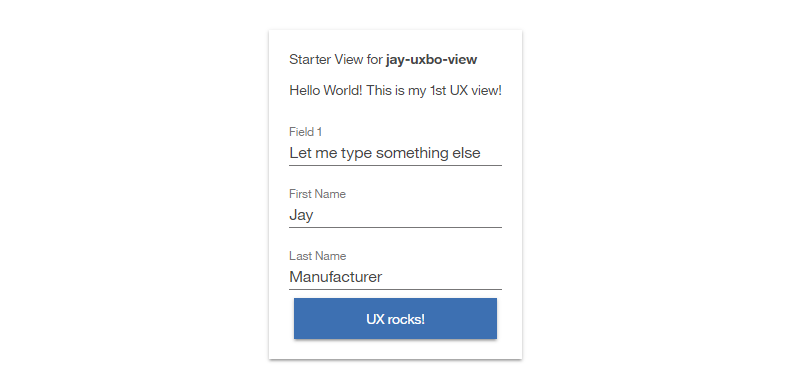
Save the file and return to the UX view. Do you see your button? If you do, feel free to add a
couple more <paper-button> tags on your own!
c1. UX App > Preview Starter View
With some creativity, you can try other Polymer <paper-button>
attributes.
d. JS File > Declare paper-button
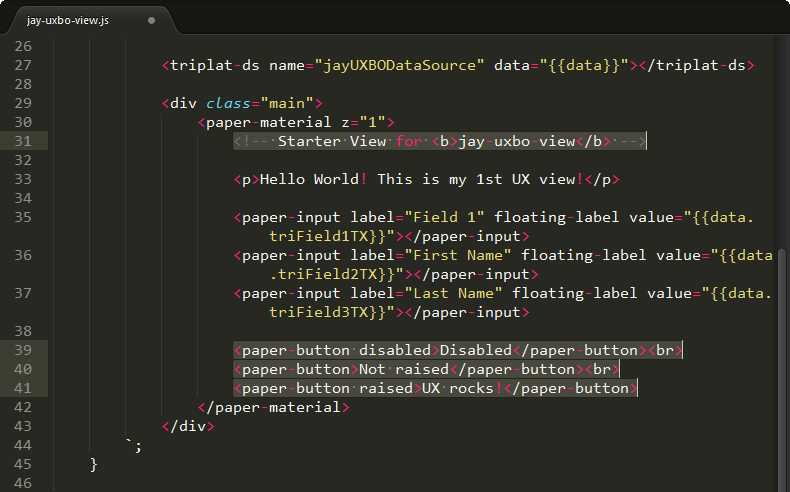
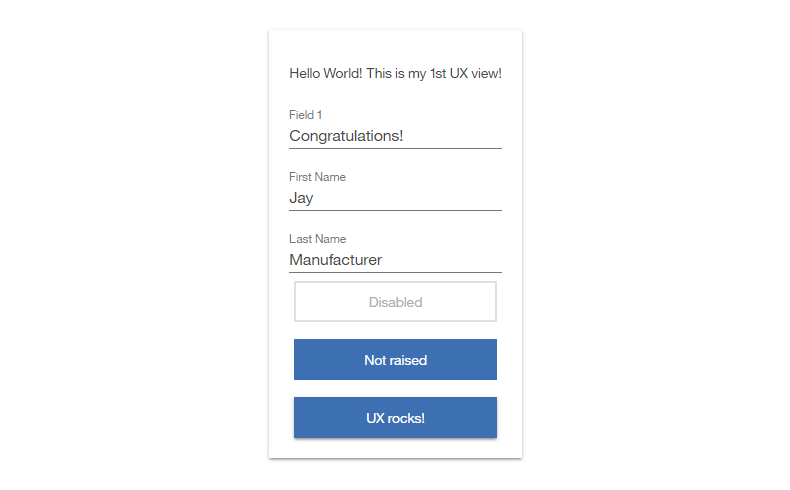
Guess what? We're done. As planned, we built a simple 3-field 3-button application. Congratulations! You've built your first UX application! (If you want, you can also run tri-deploy to push your updated view file to the server.)
e. UX App > Preview Starter View
VII. Still want more?
If you have any questions about UX that weren't answered in this article, feel free to reach out to your IBM Maximo Real Estate and Facilities representative or business partner. Or if you want, I'll go ask the team.