You can reconfigure and update a CP4BA deployment that is already installed. You can
modify the installed deployment, remove components, and add new components. An update to the custom
resource (CR) overwrites the deployed resources.
Before you begin
If you plan to remove capabilities, make sure that you back up all the data that you want to
keep.
Check that you have the following prerequisites before you change the CR:
- All the property files that you used to generate the current CR are available and stored in a
local folder that is accessible to the CP4BA scripts.
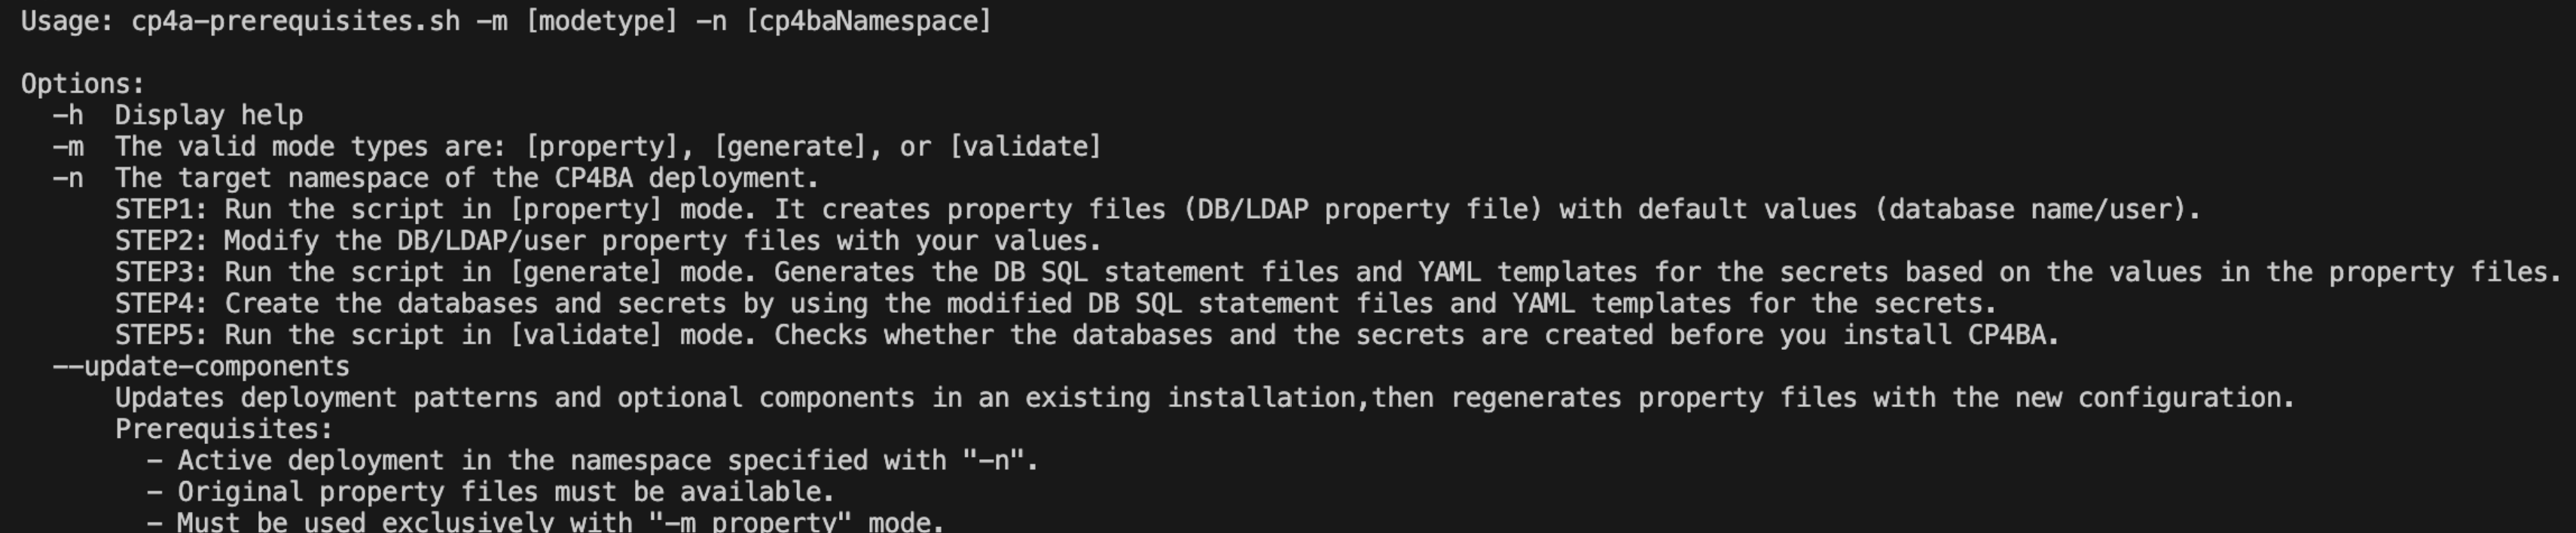
- The cp4a-prerequisites.sh script checks whether the certificates that are
generated during the initial run are added to the different certificate folders. If the script finds
the certificates, then the script keeps the certificates unchanged. If the script does find the
certificates, then you need to copy the certificate files to the corresponding SSL certificate
folders before you run the script in the
generate mode.
- Run the
help command on the cp4a-prerequisites.sh script
to check that the update-components parameter is
displayed../cp4a-prerequisites.sh --help
Warning: Whenever you modify your CP4BA multi-pattern deployment, always
use the top-level custom resource (CR) YAML file (ICP4ACluster). All the relevant
changes are passed down to the lower-level CRs. If you update, for example, the CCx CR YAML file
(Content) directly in your CP4BA multi-pattern deployment, then these changes are
overwritten when the ICP4ACluster CR is reconciled. To update data source sections
for the CCx capability in a CP4BA multi-pattern deployment, edit the ICP4ACluster
CR and the CP4BA operator then passes these changes to the lower-level operator.
About this task
The following progress bar shows you where you are in the installation process. You can click the
completed parts in the diagram to go back and check that you did everything that you needed to
do.
You can make your update to the custom resource file by running the deployment script if you used
the script to generate it. If you want to remove capabilities or optional components from your CP4BA
deployment, you must make sure that they are not a dependency of another capability. The following
scenarios describe some of the dependencies:
- If Business Automation Workflow and Content Cortex capabilities are installed, you
cannot remove the Content Cortex capability because some components are used by Workflow.
- If Automation Document Processing and Content Cortex capabilities are installed, you
cannot remove the Content Cortex capability because some components are used by Document
Processing.
- If Operational Decision Manager and Content Cortex capabilities are installed, you can
remove the Content Cortex capability because the components are not used by Operational
Decision Manager.
- If Decision Intelligence Client Managed Software and
Content Cortex capabilities are
installed, you can remove the Content Cortex capability because the
components are not used by Decision Intelligence Client Managed Software.
Restriction: The deployment script does not apply customizations that you added to your
deployment in an update. If you added a customization to any component that does not exist in the
simplified pattern templates, then the script does not apply these configurations. To keep your
customizations, apply them again after you make your updates to the custom resource.
Procedure
- Download the cert-kubernetes repository to a
Linux®-based machine (CentOS Stream/RHEL/MacOS).
- Change directory to the scripts folder under
cert-kubernetes.
- Log in to the target cluster.
Using the Red Hat®
OpenShift CLI:
oc login https://<cluster-ip>:<port> -u <cluster-user> -p <password>
On ROKS, if you are not already logged in:
oc login --token=<token> --server=https://<cluster-ip>:<port>
- Run the cp4a-prerequisites.sh script in the
"
property" mode with the "update-components" flag.
./cp4a-prerequisites.sh -m property -n $NAMESPACE --update-components
The $NAMESPACE is the target project for the CP4BA deployment.
Follow the prompts in the command window to enter the required information.
- The script checks for the property files in the
scripts/cp4a-prerequisites/$NAMESPACE/propertyfile folder. If the folder is not
found, you are asked to provide a folder path to locate the property files you used for the
deployment. If you are asked, then enter the correct path. The folder path that you provide must
contain all four property files.
The existing configuration is displayed before the script
continues.

- Enter "Yes" to change the capabilities in the deployment.
- The script then shows the list of capabilities that are already "
Installed"
- You can remove a capability by selecting the number that corresponds to it in the list.
If you
select a capability to remove and it conflicts with another selected capability then change your
selection. You can select first the installed capability that conflicts with your selection and then
select the second capability to remove.
- You can add a capability by selecting the number that corresponds to it in the list.
- The script then shows the list of optional components that are already selected with a checkmark.
- You can remove an optional component by selecting the number that corresponds to it in the list
that is already installed.
- You can add an optional component by selecting the number in the list that is not
installed.
- The LDAP and database details are ignored and the existing values in the property files are
reused.
- Add all the required SSL certificates to the property folder structure.
Note: The original
property files are stored in a folder named
original_property_files.
The folders are stored in the following
structure.

Note: If you selected Content Cortex AI Services, then the
propertyfile/cp4ba_ai_services.property file is also present.
- Make sure that you are in the propertyfile folder under
cp4ba-prerequisites/project/$NAMESPACE and edit the property files as indicated
by the NEXT ACTIONS from the script. Update the property files
(cp4ba_db_name_user.property and
cp4ba_user_profile.property)
with the values in your environment.
Most of the property files are likely to be completed for the existing deployment. However, you
must check the entire set of files for new properties that are added based on the selections that
you made when you ran the script with the update-components flag. The property
files for your LDAP and DB server probably do not need to be edited.
- Review the completion messages and note the next actions.
After the script creates the property files, it displays the following messages.
============== Created all property files for CP4BA ==============
[NEXT ACTIONS]
Enter the <Required> values in the property files under <extracted_cert-kubernetes_archive>/cert-kubernetes/scripts/cp4ba-prerequisites/project/<CP4BA_NAMESPACE>/propertyfile
[*] The key name in the property file is created by the cp4a-prerequisites.sh and is NOT EDITABLE.
[*] The value in the property file must be within double quotes.
[*] The value for User/Password in [cp4ba_db_name_user.property] [cp4ba_user_profile.property] file should NOT include special characters: single quotation "'"
[*] The value in [cp4ba_LDAP.property] or [cp4ba_External_LDAP.property] [cp4ba_user_profile.property] file should NOT include special character '"'
The propertyfile directory has the following structure.
├── cert
    ├── db
        └── <db_server_alias1>
        └── ...
    └── ldap
├── cp4ba_LDAP.property
├── cp4ba_db_name_user.property
├── cp4ba_db_server.property
├── cp4ba_user_profile.property
└── cp4ba_ai_services.property
Note: The db directory contains one or more db server alias names that you
specified.
- Run the script in generate mode.
./cp4a-prerequisites.sh -m generate -n $NAMESPACE
Note: If the script detects that property files do not have custom values, it stops and displays
messages to help identify missing values:
Change the prefix "<DB_ALIAS_NAME>" in propertyfile/cp4ba_db_name_user.property to assign which database is used by the component.
Found invalid value(s) "<Required>" in property file "propertyfile/cp4ba_db_name_user.property". Enter the correct value.
- Review the completion messages.
The following messages are displayed at the end of execution:
[INFO] The DB SQL statement files for CP4BA are in directory <extracted_cert-kubernetes_archive>/cert-kubernetes/scripts/cp4ba-prerequisites/project/<CP4BA_NAMESPACE>/dbscript, you can modify or use the default settings to create the database. (DO NOT CHANGE DBNAME/DBUSER/DBPASSWORD DIRECTLY)
[NEXT ACTIONS]
Enter the correct values in the YAML templates for the secrets under <extracted_cert-kubernetes_archive>/cert-kubernetes/scripts/cp4ba-prerequisites/project/<CP4BA_NAMESPACE>/secret_template
...
The /cp4ba-prerequisites/project/<CP4BA_NAMESPACE> directory has the
following structure (varies according to the selected capabilities):
├── create_secret.sh
├── dbscript
    ├── <component>
        ├── <database_type>
            ├── <db_server_alias>
                └── <sql_template>
├── propertyfile
├── secret_template
    ├── aiservices
        └── ibm-providers-config-secret.yaml
    ├── <component>
        └── <yaml_secret>
    └── ibm-ldap-bind-secret.yaml
Note: The ibm-providers-config-secret.yaml file is created only when Content Cortex AI Services is selected.
Another secret is also created when TLS is enabled (SSL_ENABLED=true) for the
provider, for example watsonx-lwe-ssl-secret is created for watsonx.ai LWE.
- Review the generated secret templates and understand the backup
labels.
Attention: The
cp4a-prerequisites.sh script generates secret templates
(
ibm-fncm-secret,
ibm-ban-secret, and
ibm-ldap-bind-secret) with the
cp4ba.ibm.com/backup-type=mandatory
label. This label helps backup the secrets as part of your disaster recovery strategy.
If you
create other secrets that contain TLS/SSL certificates for external services and you add them to the
trusted_certificate_list CR parameter, you must add the
cp4ba.ibm.com/backup-type=mandatory label to these secrets. If you replace the
default secret name icp4a-root-ca in the root_ca_secret CR
parameter, then you must add the label.
Run the following commands to add the label to your
secrets:
oc label -f - cp4ba.ibm.com/backup-type=mandatory --local -o yaml > my_secret.yaml
oc apply -f my_secret.yaml
Note: If you are enabling external secret management, all vault secrets are
stored under
secret_template/vault/secrets and
secret_template/vault/tls. The
secrets folder contains
regular vault secrets, and the
tls folder contains certificate-type vault
secrets. Each
SecretProviderClass file has a corresponding JSON file.
The
JSON file is used to create the secret for your external secret management. Each JSON file has a
_comment field. If you do not use the suggested secret name, the
secretPath in the corresponding SecretProviderClass must also
be changed.
Depending on the capabilities that you select for your deployment, you might need
to create some custom secrets that the cp4a-prerequisites.sh script does not
create. For more information about the secrets that the script creates, see Custom resource parameters for secrets stored in an external vault.
- Review the generated files for external PostgreSQL.
The
generate mode creates the following files under the
propertyfile folder for Zen and IM:
- zen_external_db/ibm-zen-metastore-edb-cm.yaml: Use this YAML file to create
a configMap.
- im_external_db/ibm-im-metastore-edb-cm.yaml: Use this YAML file to create a
configMap.
- zen_external_db/ibm-zen-metastore-edb-secret.sh: Use this script to create
the secret.
- im_external_db/ibm-im-metastore-edb-secret.sh: Use this script to create
the secret.
Important: If you are preparing a CP4BA deployment that targets All
Namespaces, the IM secret (im-datastore-edb-secret) and configMap
(im-datastore-edb-cm) must be created in the
"ibm-common-services" namespace. Edit the created IM templates to change the
namespace and apply them separately to the resources for the CP4BA deployment namespace.
- You or a database administrator must run the new DB scripts for any new capabilities that
you added against your database servers and use the YAML files to create the necessary new secrets
in your OpenShift Container Platform cluster.
Note: The existing databases can remain as they are, and the previously created SQL files do not
need to be executed again.
- If you want to validate the storage configuration and performance, use the steps 9 and 10
in Recommended: Preparing databases and secrets for your chosen capabilities by running a script. Then come back here.
- Go to Preparing your chosen capabilities to follow the steps you need to do for your new
capabilities. Then come back here.
- Run the deployment script and follow the prompts in the command window. Many of the
questions for the CR generation are skipped as the script is already aware of the answers you
provided in the original deployment.
Attention: The script generates a back up folder for the original CR and deletes any
custom resource files under the cert-kubernetes/scripts/generated-cr folder. It
is your responsibility to review the new CR and make any adjustments that need to be made.
cd cert-kubernetes/scripts
./cp4a-deployment.sh -n $NAMESPACE
A summary of your selection is displayed. Click "Yes" to verify that the information is
correct.
- Go to Checking and completing your custom resource to verify that the parameters for the
new capabilities are configured correctly. Then come back here.
-
When you are done with all the updates that you want to make, run the
apply
command to update the operator.
Attention: If you installed the initial CP4BA deployment with separation of duties and
it includes only Content Cortex, then you must scale down the
icp4a-foundation-operator before you apply the new CR.
Using the OpenShift CLI.
oc apply -f generated-cr/project/$NAMESPACE/ibm_cp4a_cr_final.yaml --overwrite=true
The operator reconciliation loop can take around an hour or even longer depending on the
capabilities that you selected in your custom resource.
Monitor the status of your pods by using the OpenShift CLI:
oc get pods -w
Warning: Depending on the new capabilities and optional components that you added, you
might need to manually modify other resources to make sure that the deployment is reconfigured
correctly. For example, if you added new object stores as the result of adding new component such as
BAW, then manually update the
initialization-config ConfigMap. The new object
stores are needed for the CP4BA operator to configure the newly added capabilities.
oc patch cm <cr_name>-initialization-config -n "$NAMESPACE" --type merge -p '{"data":{"cpe_initialized":"False"}}'
- If you removed the Business Automation Insights (BAI) optional component from a CP4BA
deployment
-
Deleting unused deployments from your cluster is good practice.
- If you removed the Business Automation Insights (BAI) optional component from a CP4BA deployment
that includes Content Cortex as the only capability
-
- Delete the
insightsEngineRequest from the namespace.
-
When all the pods are "Running", you can access the status of your services with the
status command.
Using the OpenShift CLI.
oc status
Results
Note: Sometimes, changes that you make in the custom resource YAML are not automatically propagated
to all pods. For example, modifications to data source information or changes to Kubernetes secrets
are not seen by running pods until the pods are restarted.
If changes applied do not provide the
expected result, restart the pods by scaling the impacted deployments down to 0. Scale the pods back
up to have Kubernetes (OpenShift) terminate the existing
pods and create new ones.
If you changed the IBM Navigator plug-ins, you
must restart the pod for the changes to show up.
