Configuring a catch flow to handle errors in your event-driven or API flows
You can use the error-catch handler mechanism to detect and handle expected or unexpected errors in event-driven or API flows in App Connect Designer.
The error-catch handler mechanism
Use the error-catch handler to add a catch flow as a secondary flow to handle errors or exceptions that the main flow produces. A catch flow is added to the canvas of the main flow as an Error catch block. An error on a node in the main flow triggers the Error catch block.

- Original payload details
- The original payload for the main flow is accessible to nodes that you add to the main flow or
the catch flow.When you add a node after the event node of an event-driven flow, the Request node of an API flow, or the On error node of a catch flow, you can use the Available mappings list to map to the event or request payload for the main flow.

The details in the payload depend on the type of event that triggered the main flow, or the request that was passed to the API flow.
- Error details
- Error details that are produced for a node in the main flow are passed to the catch flow as
input.

When you add a node after the On error node in the catch flow, you can populate the fields by mapping to the error details from the Available mappings list.
 The Error details object that is passed to the catch flow is a fixed structure regardless of the node that produces the error. The following data is provided about the error.
- The Catalog code is a unique code from the App Connect messages catalog, which is linked to a message that is emitted
by a specific connector. For example,
sf0012is a message from the Salesforce connector. - The Error message is the corresponding error message for the catalog
code, which identifies the problem. For example,
The value in one of your Salesforce input fields is too long. - The User action includes suggested actions that can help resolve the
error. For example,
Check that the value of the specified input field is within the limit that's allowed by Salesforce. Check if more detail is available for this error in the errorDetail field of the log. - The Error time is the time at which the error occurred.
- The Application name is the name of the node in the main flow, for which
the error was emitted. This name identifies the application or API. For example,
SalesforceorPetstore API. - The Action name is the name of the action, as it is displayed in the flow editor that resulted in the error.
- The Object name is the name of the object against which the error was
reported. For example,
Contact. - The Account name is the name of the account that stores the credentials
to connect to the application or API that is identified in the Application
name. For example,
Account 1. - The Error information provides extra detail about the error from the App Connect messages catalog. For example,
The following error message was returned by Salesforce: STRING_TOO_LONG: Last Name: data value too large: ... (max length=80). - The Error data provides extra detail about the error that is returned by
the target application. For example,
{"message":"Last Name: data value too large: ... (max length=80)","name":"STRING_TOO_LONG","errorCode":"STRING_TOO_LONG","fields":["LastName"]}.
- The Catalog code is a unique code from the App Connect messages catalog, which is linked to a message that is emitted
by a specific connector. For example,
- Flow details
- Flow details contain metadata about the main flow and are available in both the main flow and
catch flow.When you add a node after the event node of an event-driven flow, the Request node of an API flow, or the On error node of a catch flow, you can map to these flow details by using the Available mappings list.
 The Flow details object is a fixed structure that provides the following metadata about the main flow.
- The Flow name is the name of the flow for which the error was logged.
- The Flow invocation time is the time when the flow was started.
- The Transaction ID is an auto-generated ID that uniquely identifies the transaction or HTTP call that's associated with the error.
- The Instance ID is the unique identifier of the App Connect instance.

You can then click Expand
 to show
the catch flow again. To delete the Error catch block, click
Delete
to show
the catch flow again. To delete the Error catch block, click
Delete
 . No
confirmation is needed when you delete.
. No
confirmation is needed when you delete.
If you export a flow as a YAML or BAR file, the catch flow is included in the flow definition. You can also import an event-driven or API flow that includes a catch flow definition.
Configuring a catch flow to handle an error in an event-driven flow
If an error occurs when you run an event-driven flow, you can typically check the logs to see which error messages are returned. These errors are usually from the App Connect messages catalog, with extra error detail from the target application or API. For enhanced error handling, you can configure a catch flow to customize the detail that is written to your logs or selected apps.

- From the flow editor, open the options menu and click Add error catch to
add the Error catch block to the canvas.
 The Error catch block displays the starting On error input (or catch) node for a catch flow that you can configure to handle any errors from the main flow.
 If you click the On error node, you see details of available error data from the main flow, which you can reference in subsequent nodes in the catch flow.
At least one node is needed on the catch flow after the input node. You can add one or more applications, imported APIs, or toolbox utilities to handle the error.
- To add a node to the catch flow, click (+), then either select an action
for an application or API, or select a toolbox utility to provide specialized processing. This
example adds a Log node (from the Toolbox tab) to pass
the error details from the main flow to the logs.

- Populate the fields for the action or toolbox node with values for handing the error. You can
specify static data in plain text, or specify dynamic data by adding mappings for the error details
or flow metadata from the main flow. You can also apply functions (or JSONata expressions) to
transform your data, or use other built-in mechanisms to define custom values. To manually input
text, mappings, and JSONata expressions into the fields, or to define your own custom values, see
Configuring actions.This example adds a Log node with a log level of
Error. It also adds a custom message that contains static text and a mapping for the flow name, and error details from the main flow, which is written to the logs.
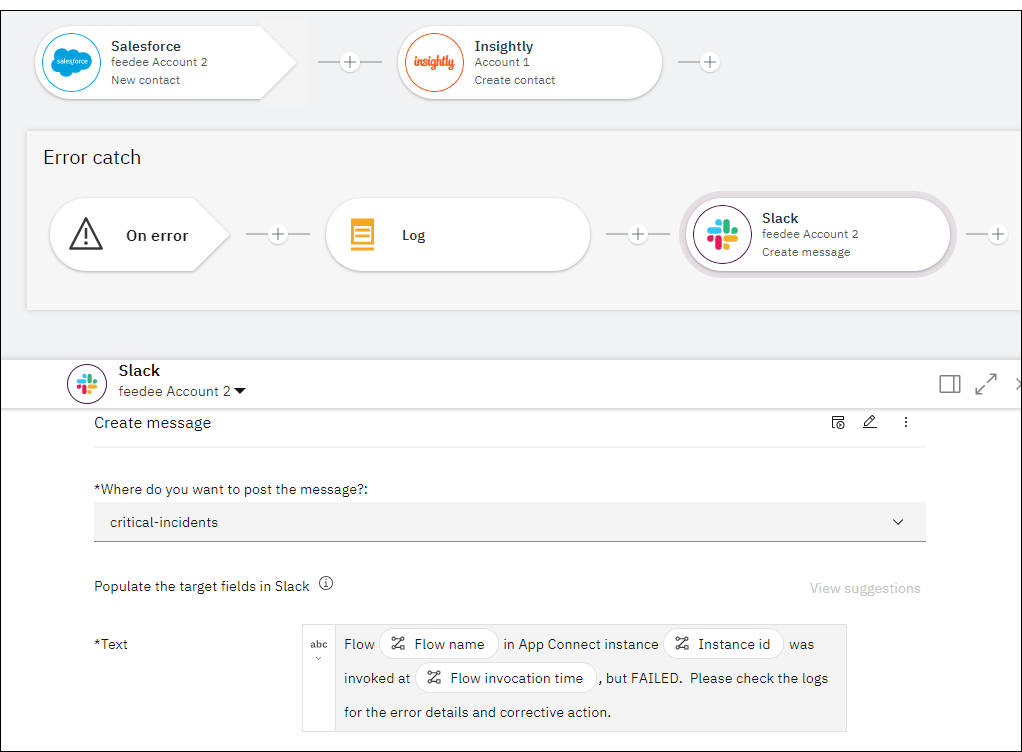
- Add further applications, APIs, or toolbox utilities if needed. This example adds a Slack node to add a notification message, including flow metadata, to a channel so that the error can be investigated.
- Test the main flow.
To check the behavior of the catch flow, this example creates a Salesforce contact with a last name (which is mandatory), but no first name (which isn't mandatory). An error is expected because a first name is mandatory for an Insightly contact. The catch flow is triggered automatically, and the error that was configured in the Log node is written to the logs.
{"message":"Error details for flow: Event-driven Error Handling","action":"None.","detail":"","url":"","data":{"user_catalogCode":"insightly0001","user_message":"We can't complete the specified event or action on Insightly, because you've provided incorrect data.","user_userAction":"Ensure you've provided valid data. Check if more detail is available for this error in the errorDetail field of the log.","user_errorTime":"2021-09-20T22:53:36.959Z","user_applicationName":"Insightly","user_accountName":"Account 1","user_objectName":"Contact","user_actionName":"Create contact","user_errorInfo":"Some of the probable reasons for the issue are: some mandatory data is missing, some data value is invalid, or the user account is deleted.","user_errorData":"{\"errorDetail\":\"{\\\"statusCode\\\":400,\\\"errorDetail\\\":[{\\\"FIELD_NAME\\\":\\\"FIRST_NAME\\\",\\\"MESSAGE\\\":\\\"First Name is required\\\"}]}\"}"},"ibm_messageId":"flow0028","ibm_datetime":"2021-09-20T22:53:37.029Z","module":"events-connector-provider-software","transactionId":"1bb81b1a-8557-4f55-a627-b9b1233957c8","flowId":"Event-driven Error Handling","instanceId":"12345","ibm_sequence":"262960394_13","logLevel":"ERROR","type":"ace_message"}

Configuring a catch flow to handle an error in an API flow
In API flows, one flow is implemented for each operation and if an error occurs, that error is returned as the API response. For enhanced error handling, you can configure a catch flow to customize the detail that is written to your logs and the response payload.

- From the flow editor for an operation, open the options menu and click Add catch
flow to add the Error catch block to the canvas.
 The Error catch block displays the starting structure for a catch flow that you can configure to handle any errors from the main flow. The On error input (or catch) node accepts the error details from the main flow for the operation, and a Response node serves as the final node. Depending on how you want the error to be handled, you can add one or more target applications, APIs, or toolbox utilities between these two nodes.
 If you click the On error node, you see details of available error data from the main flow, which you can reference in subsequent nodes in the catch flow.
- To add a node to the catch flow, click (+), then either select an action
for an application or API, or select a toolbox utility to provide specialized processing. This
example adds a Log node (from the Toolbox tab) to pass
the error details from the main flow to the logs.

- Populate the fields for the action or toolbox node with values for handing the error. You can
specify static data in plain text, or specify dynamic data by adding mappings for the error details
or flow metadata from the main flow. You can also apply functions (or JSONata expressions) to
transform your data, or use other built-in mechanisms to define custom values. To manually input
text, mappings, and JSONata expressions into the fields, or to define your own custom values, see
Configuring actions.This example adds a Log node with a log level of
Infoto provide a notification about the error, which is written to the logs.
- Add further applications, imported APIs, or toolbox utilities if needed. For example, you can add an If node to provide conditional processing that is based on which node the error was emitted for. For more information, see Adding special processing to a flow (Toolbox utilities).
- Click the Response node in the catch flow to define the response that is
returned about the error.
- In Status Code, select a response code of 400 (bad request) or 500 (internal server error), or choose Custom to specify a different value.
- In Message, specify a custom message to display for the error.
- In More information, specify any additional information to be displayed.
- In Reason code, specify a reason for the status code.

- Click Done, then test the flow.

POST /Contact operation
(which corresponds to the Create contact action in the main flow). Then click
Generate to provide sample data to pass in the request. Because Insightly
requires a first name for a contact, create an error condition by removing the
FirstName entry from the sample data. You can also remove the
ContactID entry, which is not mandatory for this request. 
