Getting started with the monitor model debugger (deprecated)
This page gives you the steps you need to use the monitor model debugger for the first time.
Step 1. Launch the debugger
Before starting the debugger, you must have a Monitor test environment server running in your development and test environment on Integration Designer. The monitor model must have no errors in the Problems view.
You do not need to generate Java EE projects for the monitor model being debugged nor add the projects to the server.
To launch the debugger, in the Project Explorer view, right-click the monitor model that you want to debug and click Debug Monitor Model.
The Debug perspective opens. The Monitor Model editor is shown in the lower part of the screen open to the Debug Source tab. You can click the tabs at the bottom to switch to the other pages of the Monitor Model editor. The Integrated Test Client opens in a tab behind the Debug Source view so that you can send events.
The debugger uses the server selected in the preferences window (), and starts the server if it is not already started.
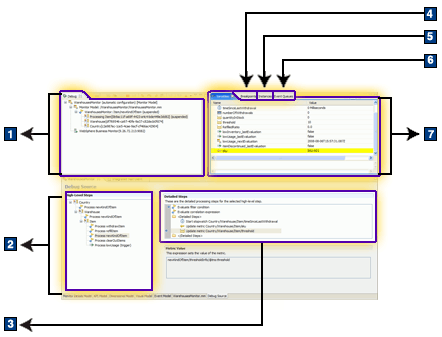
- Debug - shows the debug configuration, the server, and the monitoring context instance or instances, KPI context, or cube that is currently being updated. Nested monitoring contexts are shown in nesting order, with the current monitoring context at the top of the list and the parent and grandparent monitoring contexts under it.
- High-Level Steps - always shows all inbound event definitions, time-based trigger definitions, KPI context definitions, and cube definitions in the monitor model. Each of these defines a starting point for the detailed steps that may run as events are being processed.
- Detailed Steps - always shows the processing steps for each high-level step
- Breakpoints - shows any breakpoints you have added
- Instances - shows all monitoring context instances. This view is active only after an event has been delivered and a monitoring context instance has been created.
- Event Queues - shows the three event queues:
- The Input Queue tab shows the sequence of events that will be sent to the debugger after the current event has been processed. The input queue does not show the event that is currently being processed by the debugger (which can be seen in the Variables tab).
- The Retry Queue tab shows the events that failed because evaluating the correlation expression for an inbound event returned no matching instances and the event delivery option for no correlation matches specifies "Retry." You can send events from the retry queue to the input queue to resubmit them. (You will typically resubmit events only after first processing other events that create or update some monitoring contexts, so that the event can be retried successfully.)
- The Error Queue tab shows the events that failed because evaluating the correlation expression for an inbound event returned no matching instances, one matching instance, or multiple matching instances and the event delivery option for this outcome specified "Treat as error." The error queue also shows events that failed during processing for other reasons.
- Variables - when an inbound event has been received, shows the details of the inbound event, and, after the correlation expression has been evaluated, shows a target monitoring context instance to which the event was delivered. It also shows outbound events as they are being populated and prepared for emissions. The data shown in the Variables tab represents the complete set of data that can be used in expressions (such as metric value expressions, trigger conditions, and correlation expressions).
Step 2. Set a breakpoint
Set a breakpoint to suspend the processing flow, so that you can proceed step by step as each incoming event is processed.
- In the High-Level Steps list, click an inbound event definition for the event that you are going to test.
- In the Detailed Steps list, right-click the left margin of the Evaluate
filter condition step, and click Toggle Breakpoint,
or just double-click the margin. A breakpoint marker (
 ) is displayed in the left margin beside the step.Tip: If you set the breakpoint on the Evaluate filter condition step, the debugger will stop every time that an event is delivered to the model. If you are only interested in the results of a specific event, set the breakpoint on the Evaluate correlation expression step instead.
Step 3. Send an event
You can use the Integrated Test Client to send an event by completing the following steps:
- Click the Integrated Test Client tab behind the Debug Source view. (If the tab is not there, switch to the Business Monitoring perspective, right-click the monitor model in the Project Explorer view, and click Launch Integrated Test Client.)
- Select a monitoring context definition in the Monitoring context field and select the inbound event definition for which you want to create a sample event in the Event definition field.
- Add some values for the sample event. For Common Base Event data elements, enter values in the Values column of the Predefined data, Property data elements, or Extended data elements. For XSD-defined event parts, enter values in the Values column of the Event part details section under the Event details.
- To run the script and send the events,
click Run Script
 .
.
Initially, the status of the monitor model in the debugger (shown in the upper left pane) is waiting for inbound event. After an event is sent, the status changes to <model name>(running). When the debugger stops at the first breakpoint, the status changes to <model name>(suspended).
For more information about sending events, including how to send events from a file, see "Sending events to the debugger."
Step 4. Step through the running monitor model
- Click Step Into
 or press F5 to evaluate
the filter condition.
or press F5 to evaluate
the filter condition.- If the filter condition evaluates to false, the rest of the steps are skipped, and processing continues with the next inbound event definition.
- If the filter condition evaluates to true, processing continues with the next step in the list of detailed steps.
- Click Step Into or press F5 to evaluate
the correlation expression, which might result in the delivery of
the event to one or more monitoring context instances or to a KPI
context instance. If no matching instance is found, either because
the event is the first event that is processed or because it failed
to correlate with an existing instance, and the current inbound event
definition is set to create an instance in this case, then a new instance
is created and receives the event.
- If the event is not delivered to any instances, the rest of the detailed steps are skipped, and processing continues with the next inbound event definition. Processing of the event is suspended at the filter evaluation step of the next inbound event definition.
- If the event is delivered to at least one instance, continue with the next step.
- Continue to step through the detailed
event processing steps for each instance that was identified as a
receiver for the current event by correlation processing. At any time,
you can click Resume
 or press F8 to let
the processing continue to completion or until it reaches the next
breakpoint.
or press F8 to let
the processing continue to completion or until it reaches the next
breakpoint.
After you have completed the detailed steps that update an instance, processing continues with the next inbound event definition. Each incoming event is checked against all event definitions in the model, which happens at run time.