Add a timer intermediate event
In this lesson, you model an escalation path with an attached timer intermediate event to satisfy process requirements for the Standard HR Open New Position BPD.
About this task
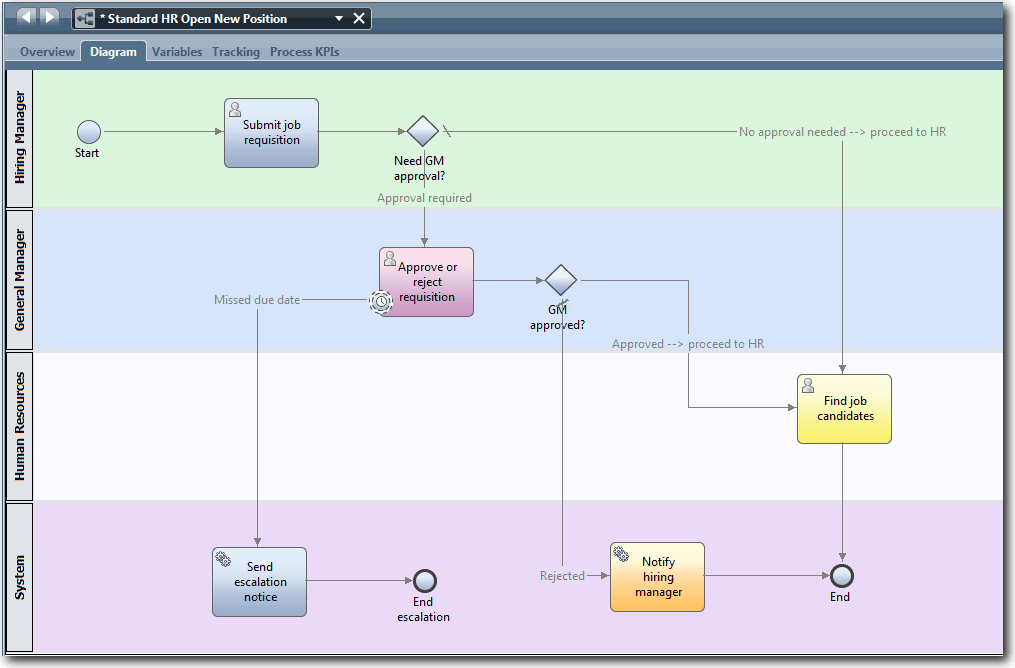
Based on the Process requirements, the General Manager (GM) evaluates the submitted job requisition and either approves it or rejects it. If the job requisition is not handled by the due date, the timer intermediate event is triggered and the system sends an escalation notice to the GM.
In this lesson, you add the timer intermediate event, and in the Hiring tutorial: Implement the process module, you implement the timer intermediate event.
| Concept | Description |
|---|---|
| intermediate event | Occurs between a start event and end event in the BPD. There are three types of intermediate events: timer, message, and error. Use the intermediate event to indicate a point in a service when you want Process Designer to capture the runtime data for reporting purposes. Intermediate events can be in a sequence flow or attached to the boundary of an activity. |
| timer intermediate event | Use a timer intermediate event to specify a time before or after an activity occurs. Timer intermediate events, which you use to model escalation paths or delays in the BPD, can occur either between activities or attached to an activity. |
| attached timer intermediate event | When a running process instance reaches an activity with an attached timer intermediate event, a timer starts. The interval for the timer is calculated according to the configuration that you specify in the implementation properties for the timer intermediate event. When the specified interval elapses, the process follows the path from the attached timer intermediate event to the subsequent activity. |
| message intermediate event | Used to model a message that is received or sent while a process is running. |
| error intermediate event | Used to identify exceptions that occur while a process runs and handle those exceptions by using an error handler activity, subprocess, or flow. |
Procedure
Add a timer intermediate event:
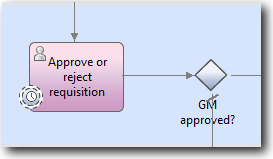
- Drag an intermediate event from the palette onto the lower-left
boundary of the Approve or reject requisition activity
and type Overdue approval as the name.

- In the Properties tab, select Implementation.
In the Boundary Event Details section, select Timer and
clear Interrupt activity. Keep Repeatable selected.
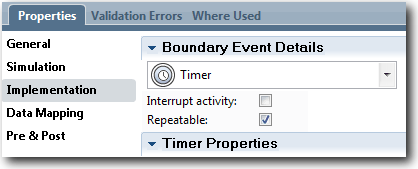 Note:You set the other properties during implementation. Notice how the intermediate event icon on the Approve or reject requisition activity now shows a timer.
- If the Interrupt activity is selected, the attached activity is closed when the timer event is triggered. For this tutorial, you clear Interrupt activity because the GM completes the activity upon receiving the escalation notice.
- If Repeatable is not selected, the escalation notice is sent only once. When the timer is set to Repeatable, an escalation notice is sent each time that the specified interval elapses until the activity is completed.
- Connect the attached timer intermediate event to the Send
escalation notice activity:
- Select the sequence flow icon from the palette.
- Connect the Overdue approval timer intermediate event to the Send escalation notice activity.
- Click the Selection Tool in the
palette or press Esc to switch back to the
normal selection mode in the process diagram.
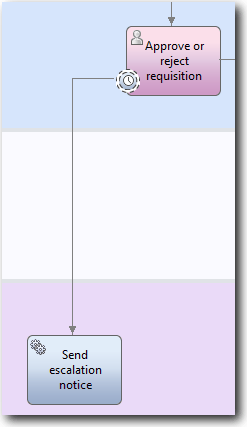
- Name the sequence flow line:
- Click the sequence flow between the Overdue approval timer intermediate event and Send escalation notice activity.
- In the Properties tab, type Missed due date as the name and select Name Visible box.
- In the Behavior section, for Line
Type select Exception Path.

- Connect the Send escalation notice activity
to the End escalation event. Tip: You can complete the escalation path by building an underlying service to implement the Send escalation notice activity. Typically, this activity is implemented as a send and chase design pattern that is modeled in a separate BPD.Your diagram matches the following image:
Lesson checkpoint
You added an attached timer event to the Standard HR Open New Position BPD.
- How to attach a timer intermediate event to an activity
- How to model an escalation path in a BPD
- How to add a system activity
- How to add an end event
In the next lesson, you create process variables.