Learn how to model an escalation path using an attached
timer event.
About this task
When a running process instance reaches an activity
with an attached timer event, a timer is started. The time interval
for the timer is calculated according to the configuration that you
specify in the implementation properties for the timer event. When
the specified time interval has elapsed, the process follows the sequence
flow that flows from the attached timer event to a subsequent activity.
The following example shows how to model an escalation path
using an attached timer event. In this example, if the activity takes
longer to complete than the defined period of time, the timer event
is triggered and the process follows the path from the attached timer
to the escalation activity.
For the following example,
you can use the Standard HR Open New Position BPD included in the
Hiring Sample process application. (If you do not see the Hiring Sample
process application in your list of applications in the Process Center Console,
ask your IBM® Business Process Manager administrator
to give you access.) To do so, clone the Hiring Sample process application
so that your edits do not affect other users of IBM Process
Designer.
When a BPD includes review and approval activities, you may want to
include escalation paths like the one in the following example to
help ensure timely completion of the overall process.
- Open the BPD in the Designer and click the Diagram tab.
- Drag an Intermediate Event from the palette to the Approve/reject
position activity.
The event is anchored to the activity.
To verify this, select the activity. If the activity's outline includes
the event, the event is properly attached.
- Select the attached Intermediate Event in the BPD diagram
and then click the Implementation option in the properties.
- Click the drop-down list and select Timer from
the from the Intermediate Event types.
- In the Boundary Event Details section,
clear the Interrupt Activity? check box.
This check box closes the attached activity when the timer
event is triggered, which is not the required behavior in this example.
In this example, the business user should complete the activity when
he or she receives the escalation notice.
- From the Trigger On drop-down list, select After
Due Date.
This selection causes the event
to trigger when the due date for the activity has elapsed. The due
date is calculated according to the work schedule for the BPD and
the priority settings for the activity. For more information, see Setting the due date and work schedule for a BPD.
Note: If you choose to trigger before or
after a custom date, you can enter the JavaScript to determine the
custom date in the Custom Date text box. Your script must return a
Date object, specifying when the timer is to be started.
- In the Before/After Difference text box, type 1 and
then select Days from the associated drop-down
list.
This causes the example event to trigger one day
after the activity's due date.
Note: To use a
variable to specify this value, click the variable icon next to the
text box and select the variable that you want.
- Leave the value in the Tolerance Level text box at 0.
The tolerance level enables you to delay the timer event
for a specified amount of time. For example, you could specify a tolerance
level of one hour if you wanted the escalation to occur one day and
one hour after the activity's due date.
Note: To
use a variable to specify this value, click the variable icon next
to the text box and select the variable that you want.
- Drag an activity from the palette into the system lane.
- While the activity is still selected, in the Step tab in
the properties, enter the name: Escalation Notification.
- Drag an End Event from the palette into the system lane
and position it directly after the activity created in the preceding
steps.
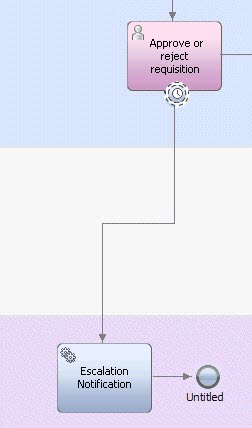
- From the palette, click to select the Sequence Flow tool
and then add a sequence flow from the attached timer event to the
new Escalation Notification activity, and from that activity to the
End Event as shown in the following image:
- You can complete the escalation path by building an underlying
service to implement the Escalation Notification activity.
- You can attach more than one timer event to an activity.
Using this example, you can attach another timer event to the activity
that triggers two days after the due date has passed, thereby providing
multiple notifications should the business user fail to perform the
task after the first notification is received.