Task 5: Deploying your decision service

You deploy your decision service to Rule Execution Server.

About this task

Rule Execution Server runs business rule applications. It provides management, performance, security, and logging capabilities. In Rule Designer, you create a deployment configuration in your decision service and use it to deploy a RuleApp to Rule Execution Server. You open the RuleApp to view its contents, and complete the task by removing the RuleApp.

Step 1: Creating a deployment configuration

Before you can deploy your decision service, you must create a deployment configuration that references the decision operation and lists a target server.

Procedure

  1. Right-click my decision service, and click New > Deployment Configuration.
  2. Enter my deployment as the name, and make sure /my decision service/deployment is the deployment folder.

    The name my deployment is used in this task. You can use a different name to avoid conflicts with other projects when you deploy the decision service. For example, you can prefix my deployment with your initials.

  3. Click Finish.
    The deployment overview opens.
  4. Make sure Nonproduction is selected for the type of deployment.
    You use Nonproduction because the decision service is destined for the cloud development environment. Production is used to deploy a decision service for use by client applications.
  5. Check that my_deployment is the RuleApp name, and that 1.0 is the version number.
    Rule Designer added the underscore to the RuleApp name.
  6. Click Include decision operations to select a decision operation.
  7. Click Add "" in Configured Decision Operations.
  8. Click Select existing decision operations, select my decision service, and then click Finish.
  9. In the Target Servers tab, click Add "", select Development Environment, and click Finish.
    Check that the URL for the Development Environment matches the address of the Rule Execution Server in your cloud development environment. The address starts with the URL that you use to connect to the cloud portal, and ends with /odm/dev/res, for example, https://<vhostname>.bpm.ibmcloud.com/odm/dev/res.
  10. Save your work.

Step 2: Deploying the decision service

You deploy the RuleApp from Rule Designer to Rule Execution Server. The RuleApp contains a ruleset that holds the rules in your decision service.

Procedure

  1. Right-click my decision service in the Rule Explorer.
  2. Click Rule Execution Server > Deploy.
    The RuleApp Deployment wizard opens. It shows my operation as the decision operation, the Development Environment as the target server, and /my decision operation/output as the deployed resources.
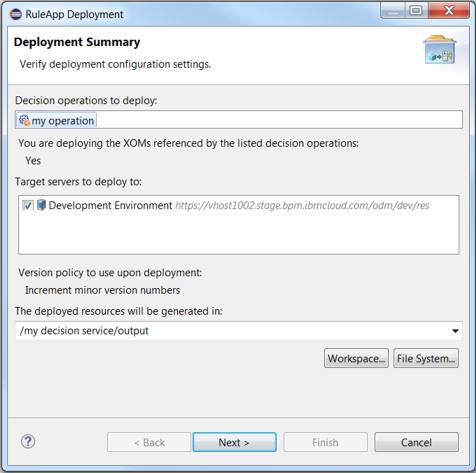
    Image shows RuleApp deployment wizard.
  3. Click Next.
    If you are not already authenticated, click Connect to authenticate your cloud connection. You must enter your cloud credentials when you authenticate your connection.
  4. Click Next. Verify the RuleApp and ruleset versions, and then click Finish.

    When the RuleApp is deployed, a deployment report is displayed in Rule Designer.
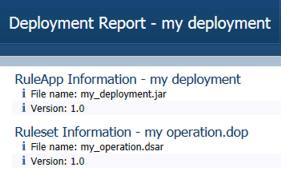
    Image shows the deployment report.

Step 3: Viewing the deployed RuleApp

You view the RuleApp in Rule Execution Server.

Procedure

  1. Sign in to your tenant of the cloud portal.
  2. Click Launch in the Rule Execution Server console section in the development environment to open the component.
    (In Express, the component is in the express environment.)
  3. Click the Explorer tab.
  4. In the Navigator, expand RuleApps, and then my_deployment/1.0.

    You see that Rule Execution Server contains version 1.0 of my_deployment, which contains version 1.0 of the my_operation ruleset.

  5. Click /my_operation/1.0 to view the details of the ruleset in the ruleset view.

    The ruleset view shows information about the ruleset, including its name, version number, and creation date, and provides commands for viewing performance information and adding elements such as properties. It also shows the version of the decision engine, and that the status of the ruleset is enabled, indicating that it can be run.

Step 4: Testing the ruleset by using the REST API

Before you publish your decision service to Decision Center, you run it in Rule Execution Server to see whether it produces the expected results.

Procedure

  1. In the Hosted Transparent Decision Services (HTDS) Options, click Retrieve HTDS Description File.
    The file retrieval page opens.
  2. Select REST, and click Test.
    The Hosted Transparent Decision Service opens.
  3. Select JSON in the Execution Request menu.
  4. Change the run request:
    • creditScore: 100
    • yearlyIncome: 70000
    • amount: 8000
    • duration: 12
    • yearlyInterestRate: 2.5
    • Remove lines 16-19

    Your run request looks as follows:
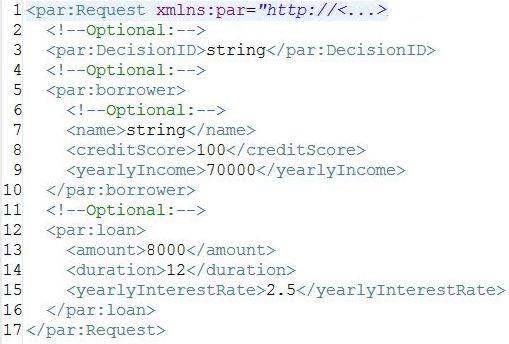
    Image shows the run request.
  5. Click Execute Request.
    You get the following server response:
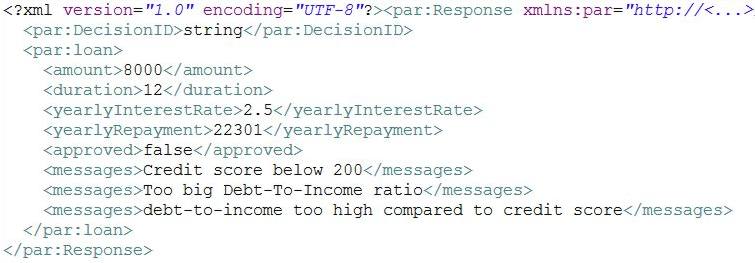
    Image shows the server response.

    The rule application produces the expected results. The loan is rejected, and messages explain that the dept-to-income ratio is to high when compared to the credit score.

Step 5: Removing the RuleApp

After you test the RuleApp, you no longer need it in Rule Execution Server and remove it.

Procedure

  1. Click RuleApps in the Navigator.
  2. Select the check box for my_deployment/1.0.
  3. Click Remove.
    Rule Execution Server deletes the RuleApp.

What to do next

In the next task, you share your rules with other business users by publishing your project to Decision Center.