

Virtual Private Endpoints (VPE)
This topic walks you through accessing IBM® MQ as a Service using Virtual Private Endpoints.
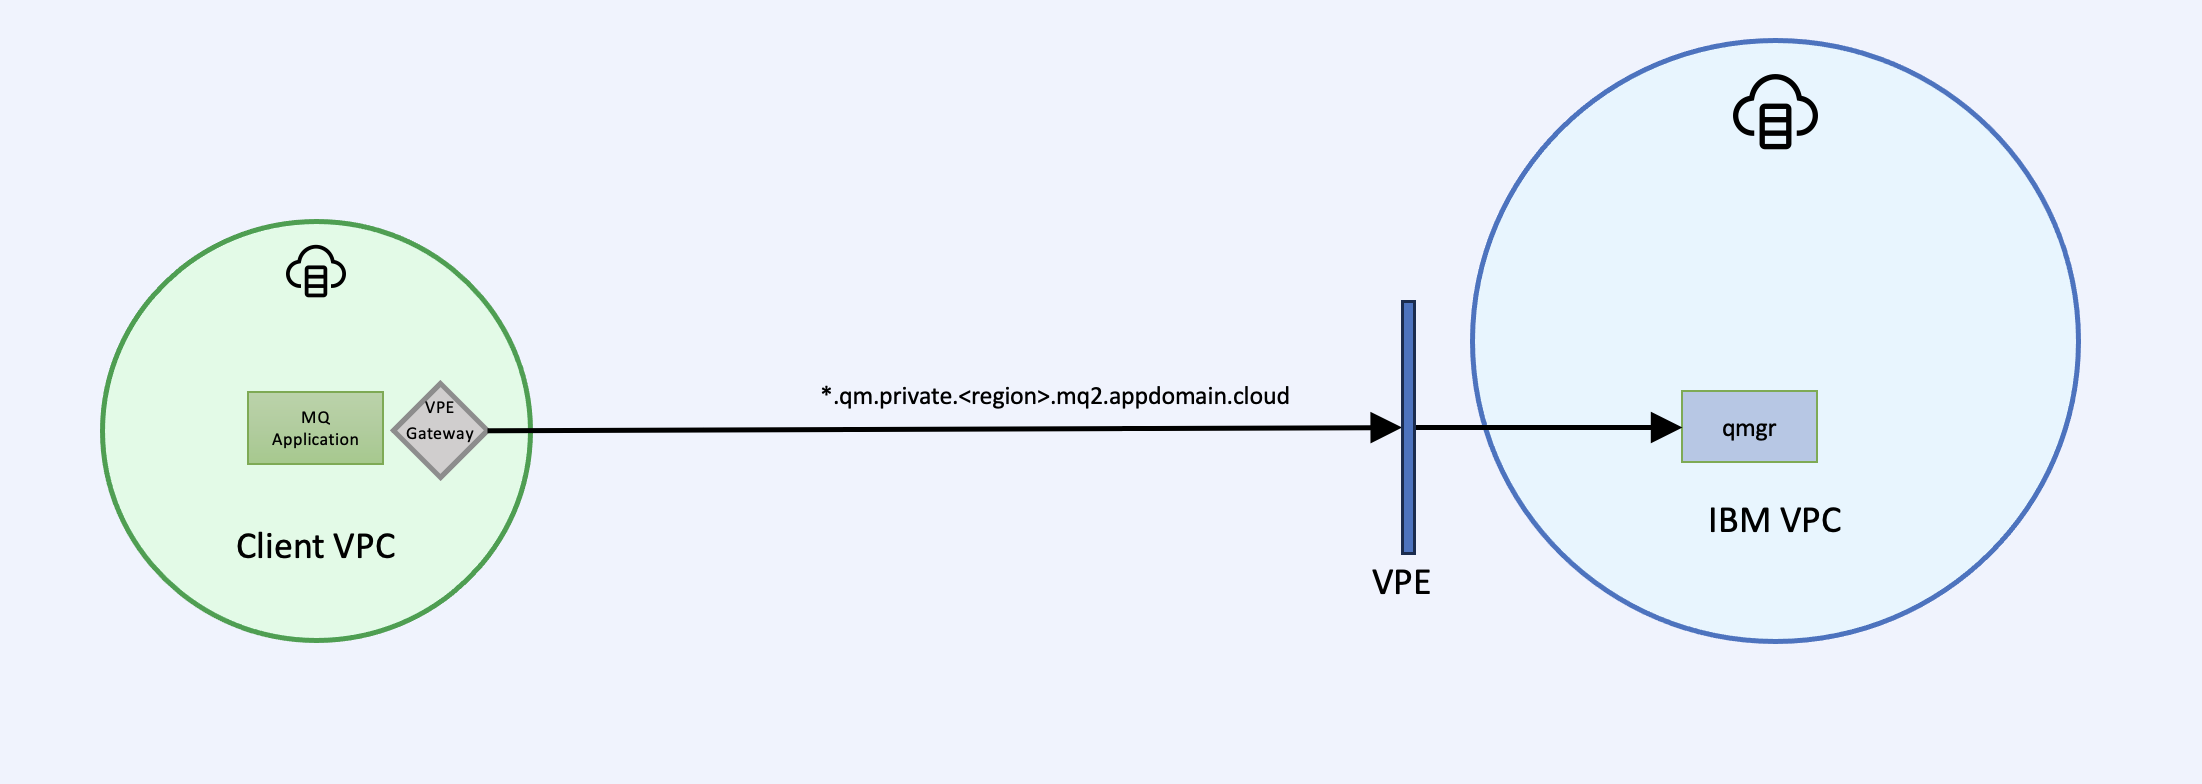
When using Virtual Private Cloud (VPC) you can access both the IBM MQ as a Service deployment APIs and queue managers over the private IBM network by configuring Virtual Private Endpoint Gateways.
How to access the deployment API
These steps describe how to create a private connection between a VPC and the IBM MQ as a Service deployment APIs.
# ACCESS_TOKEN - IAM access token for the MQ user credential
# REGION - Select to required region from running "ibmcloud regions"
# GUID - The GUID of the service instance

curl -X GET -H "Authorization: Bearer ${ACCESS_TOKEN}" "https://api.private.${REGION}.mq2.cloud.ibm.com/v1/${GUID}/options"
For more details on the IBM MQ as a Service deployment APIs see API documentation.
How to connect an IBM MQ client to a IBM MQ as a Service queue manager
-
Within a VPC, create a virtual private endpoint gateway for the IBM MQ VPE endpoint ending in mq2.appdomain.cloud.
-
Configure access for the IBM MQ client as described in Configuring access for connecting an application to a queue manager.
-
echo -e "SSL:\n AllowTLSV13=TRUE\n OutboundSNI=HOSTNAME" > ${HOME}/mqclient.ini export MQCLNTCF=${HOME}/mqclient.ini -
Configure and test the IBM MQ client as described in Connecting a sample application to a queue manager.
-
To administer the queue manager, see available options at Administering a queue manager.
How to connect an on-prem queue manager to an IBM MQ as a Service queue manager

-
Configure your on-prem to IBM Cloud® connectivity using VPN or IBM Cloud Direct Link.
-
Interconnect your VPC.
-
Create a virtual private endpoint gateway for the IBM MQ VPE endpoint ending in following these steps
-
Using runmqsc, themq2.appdomain.cloud web console, or the IBM MQ REST API configure the following on the cloud queue manager
* Receiver Channel DEFINE CHANNEL(CLIENT.TO.CLOUD) CHLTYPE(RCVR) TRPTYPE(TCP) SSLCIPH('ANY_TLS12_OR_HIGHER') SSLCAUTH(OPTIONAL) SET CHLAUTH('CLIENT.TO.CLOUD') TYPE(QMGRMAP) QMNAME('CLIENT01') ACTION(ADD) USERSRC(CHANNEL) REFRESH SECURITY(*) TYPE(CONNAUTH) * Server Channel DEFINE QLOCAL('TO.ONPREM') USAGE(XMITQ) DEFINE CHANNEL(CLOUD.TO.CLIENT) CHLTYPE(SVR) TRPTYPE(TCP) XMITQ('TO.ONPREM') SSLCIPH('ANY_TLS12_OR_HIGHER') CERTLABL('qmgrcert') SSLCAUTH(OPTIONAL) REFRESH SECURITY(*) TYPE(SSL) SET CHLAUTH('CLOUD.TO.CLIENT') TYPE(QMGRMAP) QMNAME('CLIENT01') ACTION(ADD) USERSRC(CHANNEL) REFRESH SECURITY(*) TYPE(CONNAUTH) * Remote Queue DEFINE QREMOTE (ONPREM.REMOTE.QUEUE) RNAME (DEV.QUEUE.1) RQMNAME ('CLIENT01') XMITQ ('TO.ONPREM') - Using runmqsc, the web console, or the IBM MQ REST API configure the following on the on-prem queue
manager
* Sender Channel
DEFINE QLOCAL('TO.CLOUD') USAGE(XMITQ)
DEFINE CHANNEL(CLIENT.TO.CLOUD) CHLTYPE(SDR) CONNAME('<cloudqm_hostname>(443)') TRPTYPE(TCP) XMITQ('TO.CLOUD') SSLCIPH('ANY_TLS12_OR_HIGHER')
SET CHLAUTH('CLIENT.TO.CLOUD') TYPE(QMGRMAP) QMNAME('CLOUDQM1') ACTION(ADD) USERSRC(CHANNEL)
REFRESH SECURITY(*) TYPE(CONNAUTH)
START CHANNEL('CLIENT.TO.CLOUD')

* Requester Channel
DEFINE CHANNEL(CLOUD.TO.CLIENT) CHLTYPE(RQSTR) CONNAME('<cloudqm_hostname>(443)') TRPTYPE(TCP) SSLCIPH('ANY_TLS12_OR_HIGHER') CERTLABL('qmgrcert')
REFRESH SECURITY(*) TYPE(SSL)

When initiating a connection from a cloud queue manager to an on-premise queue manager, an outbound private networking connection is required. The steps below describe how to connect a queue managers that exists in a reserved capacity instances, running on a VPC to a Private Path Service. Routing from the PPNLB back to on-premise will be up to your own implementation.
These steps require using the deployment APIs so ensure that the instructions above on accessing the deployment API have been followed. These steps allow connections to be initiated from the cloud queue manager only, in order to have a bi-directional connection you will also need to complete the inbound connection instructions above.
- Choose one of the reserved capacity plans and access its deployment API using the instructions above, this service instance will be referred to as the source
- Retrieve the unique CRN of the PPS. This can be found by selecting your PPS from the IBM Cloud UI
- Use the VPEG API to create a virtual private endpoint gateway
connecting the capacity plans to the PPS, for
example:
# ACCESS_TOKEN - IAM access token for the MQ user credential# REGION - Select to required region from running "ibmcloud regions"# GUID - The GUID of the source reserved capacity service instance# NAME - The name you want for you VPEG# TARGET_CRN - this is the CRN of the PPNLB/PPS created earlier curl -X POST -H "Content-Type: application/json" -H "Authorization: Bearer ${ACCESS_TOKEN}""https://api.private.${REGION}.mq2.cloud.ibm.com/v1/${GUID}/virtual_private_endpoint_gateway" -d '{ "name": ${NAME}, "target_crn": ${TARGET_CRN} }' - When successful, the API call returns details of the newly created VPEG
- Create a self-signed certificate/private key with a CN that matches the private path service,
import the cert/key into the target queue manager key store, and set it as default using
runmqsc:
Then import the self signed public certificate into the source queue manager trust store and refresh security using runmqsc:ALTER QMGR CERTLABL('targetqm') REFRESH SECURITY(*) TYPE(SSL)REFRESH SECURITY(*) TYPE(SSL) -
Using runmqsc, the web console, or the IBM MQ REST API, configure the following features on the queue manager:
DEFINE CHANNEL(SOURCEQM.TO.TARGETQM) CHLTYPE(RCVR) TRPTYPE(TCP) SSLCIPH('ANY_TLS12_OR_HIGHER') SSLCAUTH(OPTIONAL) REPLACE SET CHLAUTH('SOURCEQM.TO.TARGETQM') TYPE(ADDRESSMAP) ADDRESS(*) ACTION(ADD) USERSRC(CHANNEL) REFRESH SECURITY(*) TYPE(CONNAUTH) -
Using runmqsc, the web console, or the IBM MQ REST API, configure the following features on the queue manager:
DEFINE QLOCAL('SOURCEQM.TO.TARGETQM.XMIT') USAGE(XMITQ) DEFINE QREMOTE('TARGETQM.REMOTE') QREMOTE('DEV.QUEUE.1') RQMNAME('<qmgr1>') XMITQ('SOURCEQM.TO.TARGETQM.XMIT') SET AUTHREC PROFILE('TARGETQM.REMOTE') OBJTYPE(QUEUE) GROUP('mqwriter') AUTHADD(PUT,GET,BROWSE,INQ) DEFINE CHANNEL(SOURCEQM.TO.TARGETQM) CHLTYPE(SDR) TRPTYPE(TCP) XMITQ('SOURCEQM.TO.TARGETQM.XMIT') SSLCIPH('ANY_TLS12_OR_HIGHER') CONNAME('<PPS-ENDPOINT>(443)') HBINT(15) KAINT(15) REPLACE -
In the queue managers, set the auth and refresh security:
SET CHLAUTH('SOURCEQM.TO.TARGETQM') TYPE(ADDRESSMAP) ADDRESS(*) ACTION(ADD) USERSRC(CHANNEL) REFRESH SECURITY(*) TYPE(CONNAUTH) -
In the queue manager, start the sender channel and ensure it starts correctly:
 START CHANNEL('SOURCEQM.TO.TARGETQM')
 DISPLAY CHSTATUS('SOURCEQM.TO.TARGETQM')
How to connect an IBM MQ as a Service queue manager to another IBM MQ as a Service queue manager

When connecting instances in this way, Context Based Restriction (CBR) rules cannot be applied between capacity instances and by creating this connection you are explicitly allowing connectivity to be configured between any queue managers deployed in those instances.
No additional configuration steps are required when you are connecting a queue manager to another queue manager in the same reserved capacity instance. These instructions are for connecting across two different reserved capacity instances.
Inbound ConnectionsWhen connecting a cloud queue manager to another cloud queue manager running in a different VPC, an inbound private networking connection is required. In these instructions, one of these queue managers is the source of the connections and the other is the target and allows connections to be initiated from the source queue manager only. If you also require connections to be initiated from the target cloud queue manager (required for sender or cluster sender channels), then you will need to repeat these instructions whilst swapping which queue manager is the source and which is the target.
The following steps describe how to connect two queue managers that exist in two separate reserved capacity instances and are therefore running on two seperate VPCs. This requires using the deployment APIs so ensure that the instructions above on accessing the deployment API have been followed.
- Choose one of the reserved capacity plans and access its deployment API using the previous instructions, this service instance is referred to as the source
- Retrieve the unique CRN of the other reserved capacity plan, this service instance is referred
to as the target. This can be retrieved via the IBM Cloud Resources List. Selecting the row containing the
service instance displays a sidebar that shows the CRN. Alternatively, the IBM Cloud CLI can be
used:
ibmcloud resource service-instance <SERVICE_INSTANCE_NAME> - Use the VPEG API to create a virtual private endpoint gateway
connecting the two capacity plans, for
example:
# ACCESS_TOKEN - IAM access token for the MQ user credential# REGION - Select to required region from running "ibmcloud regions"# GUID - The GUID of the source reserved capacity service instance# NAME - The name you want for you VPEG# TARGET_CRN - The CRN of the target reserved capacity instance you are trying to connect to curl -X POST -H "Content-Type: application/json" -H "Authorization: Bearer ${ACCESS_TOKEN}""https://api.private.${REGION}.mq2.cloud.ibm.com/v1/${GUID}/virtual_private_endpoint_gateway" -d '{ "name": ${NAME}, "target_crn": ${TARGET_CRN} }' - When successful, the API call will return details of the newly created VPEG
- Using runmqsc, the web console, or the IBM MQ REST API, configure the following on the target queue
manager:
DEFINE CHANNEL(SOURCEQM.TO.TARGETQM) CHLTYPE(RCVR) TRPTYPE(TCP) SSLCIPH('ANY_TLS12_OR_HIGHER') SSLCAUTH(OPTIONAL) REPLACE SET CHLAUTH('SOURCEQM.TO.TARGETQM') TYPE(ADDRESSMAP) ADDRESS(*) ACTION(ADD) USERSRC(CHANNEL) REFRESH SECURITY(*) TYPE(CONNAUTH) - Using runmqsc, the web console, or the IBM MQ REST API, configure the following on the source queue
manager:
DEFINE QLOCAL('SOURCEQM.TO.TARGETQM.XMIT') USAGE(XMITQ) DEFINE QREMOTE('TARGETQM.REMOTE') QREMOTE('DEV.QUEUE.1') RQMNAME('<qmgr1>') XMITQ('SOURCEQM.TO.TARGETQM.XMIT') SET AUTHREC PROFILE('TARGETQM.REMOTE') OBJTYPE(QUEUE) GROUP('mqwriter') AUTHADD(PUT,GET,BROWSE,INQ) DEFINE CHANNEL(SOURCEQM.TO.TARGETQM) CHLTYPE(SDR) TRPTYPE(TCP) XMITQ('SOURCEQM.TO.TARGETQM.XMIT') SSLCIPH('ANY_TLS12_OR_HIGHER') CONNAME('<qmgr1_hostname>(443)') HBINT(15) KAINT(15) REPLACE - In both queue managers, set the auth and refresh
security:
SET CHLAUTH('SOURCEQM.TO.TARGETQM') TYPE(ADDRESSMAP) ADDRESS(*) ACTION(ADD) USERSRC(CHANNEL) REFRESH SECURITY(*) TYPE(CONNAUTH) - In the source queue manager, start the sender channel and ensure it starts
correctly:
 START CHANNEL('SOURCEQM.TO.TARGETQM')
 DISPLAY CHSTATUS('SOURCEQM.TO.TARGETQM')
Connections created by the instructions above are one way, so connections are only able to be initiated from the source queue manager. If you want this connection to be bi-directional the instructions need to be repeated, swapping which queue manager is the source and target.
How to create a Virtual Private Endpoint Gateway (VPEG)
The steps below describe how to create the virtual private endpoint gateway using the UI. For more details on using the CLI or API see this documentation.
- Access the IBM Cloud Console
- In the left side Navigation Menu, select .
- Click the Create button
- Under Location, select the Geography and Region that matches your IBM MQ as a Service instance.
- under Details:
- Enter a Name.
- Select a Resource Group or create a new one.
- Optionally add tags.
- Optionally add access management tags.
- Select your Virtual Private Cloud (VPC) from the drop-down list.
- Under Security groups:
- Select the Security Group you want to use for controlling inbound and outbound traffic.
- Update you security group rules to allow TCP traffic on port 443:
- Click on the security group.
- Click on the Rules tab.
- Under Inbound rules click the Create button.
- Select the Protocol TCP.
- Select Port Range and specify a min of
443and max of443. - Leave the Source Type as Any
- Click Create.
- Under Request connection to service:
- For Cloud service offerings select MQ.
- Select the Cloud service region that matches your IBM MQ as a Service instance
- Select the IBM MQ VPE endpoint that is required
- Under Reserved IP:
- For VPC endpoints select Select one for me.
- Enter a Name for the IP.
- Select a Subnet.
- Click Create virtual private endpoint gateway.
- To ensure multi-zone support an IP is required for each subnet in the VPC:
- In the list of virtual private endpoint gateways click the one you just created.
- Click the Attached Resources tab.
- For each subnet under Reserved IPs:
- Click the Reserve or bind IP button.
- For VPC endpoints select Select one for me.
- Name the IP.
- Select the subnet from the drop-down list.
- Click Reserve IP address.