Multiple queue manager topology for Managed File Transfer
You use multiple queue managers that act as the agent queue manager, command queue manager, and coordination queue manager.
Configuration details
You use three IBM® MQ as a Service queue managers named QMCOORD, QMSRC, and QMDEST used as coordination queue manager, source agent queue manager, and destination agent queue manager respectively. Also, you create two Managed file transfer agents and name them SRC_AGENT and DEST_AGENT.
- QMCOORD queue manager which acts as Coordination queue manager.
- QMSRC queue manager on IBM MQ as a Service which acts as source agent queue manager along with command queue manager.
- QMDEST queue manager on IBM MQ as a Service which acts as destination agent queue manager and command queue manager.
- SRC_AGENT source agent which is connected to QMSRC agent queue manager.
- DEST_AGENT destination agent which is connected to QMDEST agent queue manager.
- You configure the agent queue manager to be the command queue manager for both source and destination agents. This is general recommendation for MFT as this makes mft commands of a particular agent go to its own queue manager. MFT commands can be run against the Agent's queue manager.
- In this tutorial you are using three different Systems. System 1 is used to configure coordination queue manager, System 2 is used for configuring Source Agent queue manager and System 3 is used for configuring Destination Agent Queue manager.
- Coordination queue manager and agent queue manager have to be connected for various communication. All three queue managers can be connected using IBM MQ cluster or sender/receiver channels. This tutorial uses sender/receiver channel configuration.
- On all the systems, you use profiles with administrative privileges.
Prerequisites
- Create a new IBM MQ as a Service queue manager, and name it as QMCOORD and download Connection Details (save this file as coordinationQMgrConnectionDetails.json).
- Create a new IBM MQ as a Service queue manager, and name it as QMSRC and download its Connection Details (save this file as sourceAgentQMgrConnectionDetails.json).
- Create a new IBM MQ as a Service queue manager, and name it as QMDEST and download its Connection Details (save this file as destinationAgentQMgrConnectionDetails.json).
- You use three different computers, named as SYSTEM 1, SYSTEM 2, and SYSTEM 3. These systems are used for setting up the managed file transfer queue managers.

- Go to SYSTEM 1 terminal and open an admin terminal, (name it Terminal 1). Configure
QMCOORD as coordination queue manager.
- Specify coordination queue manager details as MQSERVER environment variable in the admin
terminal
The runmqsc CLI requires that an environment variable is set to identify the remote queue manager it should connect to. In the admin terminal, export the MQSERVER variable with the following command:
- For Windows:
SET MQSERVER=CLOUD.ADMIN.SVRCONN/TCP/<HOSTNAME>(<PORT>) - For Linux®:
export MQSERVER="CLOUD.ADMIN.SVRCONN/TCP/<HOSTNAME>(<PORT>)"<HOSTNAME>- this is 'hostname' in the file coordinationQMgrConnectionDetails.json.<PORT>- this is 'listenerPort' in the file coordinationQMgrConnectionDetails.json.
- For Windows:
- Enter the following command to configure the queue manager:
fteSetupCoordination -coordinationQMgr <queueManagerName> -coordinationQMgrHost <queueManagerHostname> -coordinationQMgrPort <queueManagerPort> -coordinationQMgrChannel <queueManagerChannel> -credentialsFile <filePath> -default<queueManagerName>- this is 'queueManagerName' in the file connection_info.txt.<queueManagerHostname>- this is the 'hostname' in the file connection_info.txt.<queueManagerPort>- this is the 'listenerPort' in the file connection_info.txt.<queueManagerChannel>- this is the 'adminChannelName' in the file connection_info.txt.<filePath>- this is the 'filePath' containing the credentials file, for example, Windows:C:\Users\Administrator\MQMFTCredentials.xml, Linux:/home/usr/MQMFTCredentials.xml.-default- Optional. Updates the default configuration options to those associated with the coordination queue manager specified in this command.
- for Windows:
fteSetupCoordination -coordinationQMgr QMCOORD -coordinationQMgrHost qmcoord-749b.qm2.us-preprod.appdomain.cloud -coordinationQMgrPort 31211 -coordinationQMgrChannel CLOUD.ADMIN.SVRCONN -credentialsFile "C:\Users\Administrator\MQMFTCredentials.xml" -default -f - for Linux:
fteSetupCoordination
-coordinationQMgr QMCOORD -coordinationQMgrHost qmcoord-749b.qm2.us-preprod.appdomain.cloud
-coordinationQMgrPort 31211 -coordinationQMgrChannel CLOUD.ADMIN.SVRCONN -credentialsFile
"/home/document/MQMFTCredentials.xml" -default -f
For a full list of command arguments for fteSetupCoordination, see fteSetupCoordination.
- Run runmqsc to connect to your remote queue manager:
runmqsc -c -u <ADMIN_MQ_USER> -w60 <QUEUE_MANAGER_NAME><ADMIN_MQ_USER>- this is 'mqUsername' in the file platformApiKey.json.<QUEUE_MANAGER_NAME>- this is 'queueManagerName' in the file coordinationQMgrConnectionDetails.json.-cinforms runmqsc it should connect to a remote queue manager using the MQSERVER variable
runmqsc -c -u mamgainp -w60 QMCOORD - Create the IBM MQ objects required by the queue manager
to work as a coordination queue manager that targets your IBM MQ as a Service queue manager.
An mqsc file was created at location
MQ_DATA_PATH\mqft\config\coordination_qmgr_name\<coordination_qmgr_name>.mqsc. Copy and paste the content of this file into your terminal.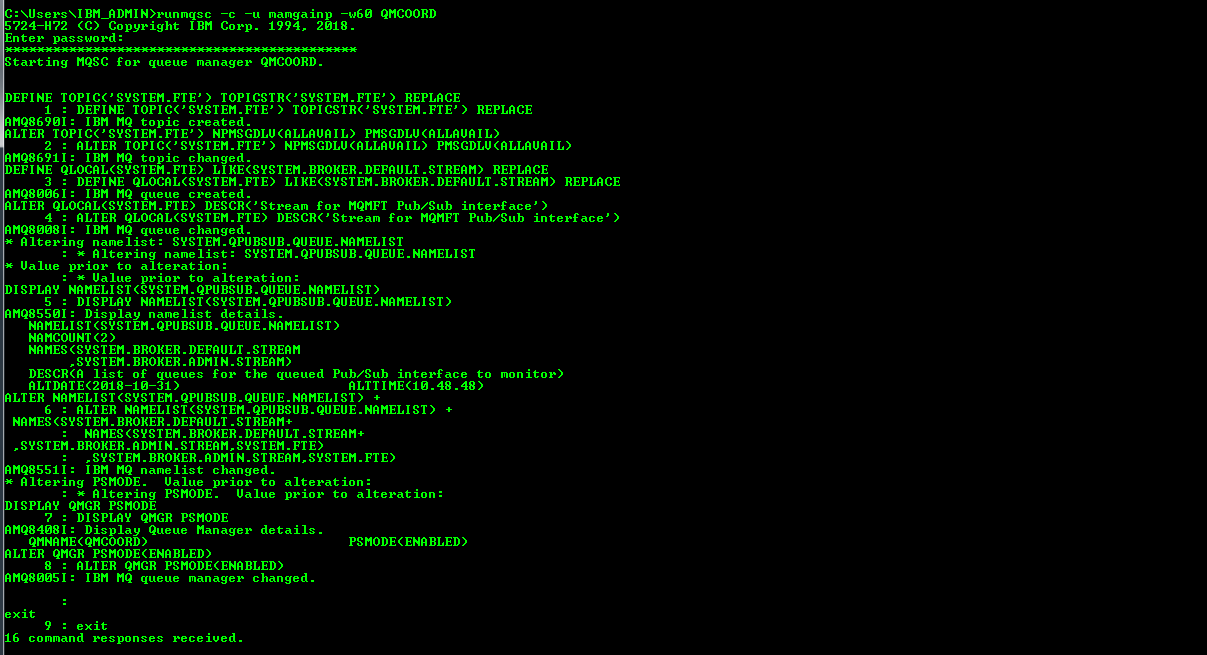
- Specify coordination queue manager details as MQSERVER environment variable in the admin
terminal
- Create Channels and required Objects on coordination queue manager, that is QMCOORD, for
communication between QMSRC and QMDEST. Complete all these steps using Terminal
1.
- Specify coordination queue manager details as MQSERVER environment variable in the admin
terminal. The runmqscCLI requires an environment variable be set to identify the
remote queue manager it should connect to. In the admin terminal, export MQSERVER variable
with the following command:
- for Windows:
SET MQSERVER=CLOUD.ADMIN.SVRCONN/TCP/<HOSTNAME>(<PORT>) - for Linux:
export MQSERVER="CLOUD.ADMIN.SVRCONN/TCP/<HOSTNAME>(<PORT>)"<HOSTNAME>- this is 'hostname' in the file coordinationQMgrConnectionDetails.json.<PORT>- this is 'listenerPort' in the file coordinationQMgrConnectionDetails.json.
- for Windows:
- Run runmqsc to connect to your remote queue manager:
runmqsc -c -u <ADMIN_MQ_USER> -w60 <QUEUE_MANAGER_NAME><ADMIN_MQ_USER>- this is 'mqUsername' in the file platformApiKey.json.<runmqscQUEUE_MANAGER_NAME>- this is 'queueManagerName' in the file coordinationQMgrConnectionDetails.json.-cinforms runmqsc it should connect to a remote queue manager using the MQSERVER variable.
runmqsc -c -u mamgainp -w60 QMCOORD - Run the following commands in the CLI:
DEF QL(QMSRC) USAGE(XMITQ)DEF QL(QMDEST) USAGE(XMITQ)DEF CHANNEL(QMCOORD_TO_QMSRC) CHLTYPE(SDR) CONNAME('<HOSTNAME_OF_QMSRC>(<PORT_OF_QMSRC>)') XMITQ(QMSRC) REPLACEFor example:
DEF CHANNEL(QMCOORD_TO_QMSRC) CHLTYPE(SDR)
CONNAME('qmsrc-749b.qm2.us-preprod.appdomain.cloud(30339)') XMITQ(QMSRC) REPLACE
DEF CHANNEL(QMSRC_TO_QMCOORD) CHLTYPE(RCVR) REPLACEDEF CHANNEL(QMCOORD_TO_QMDEST) CHLTYPE(SDR) CONNAME('<HOSTNAME_OF_QMDEST>(<PORT_OF_QMDEST>)') XMITQ(QMDEST) REPLACEFor example:
DEF CHANNEL(QMCOORD_TO_QMDEST) CHLTYPE(SDR) CONNAME('<HOSTNAME_OF_QMDEST>(<PORT_OF_QMDEST>)') XMITQ(QMDEST) REPLACEDEF CHANNEL(QMDEST_TO_QMCOORD) CHLTYPE(RCVR) REPLACE
Do not close this terminal as you need it to start the channels in later steps.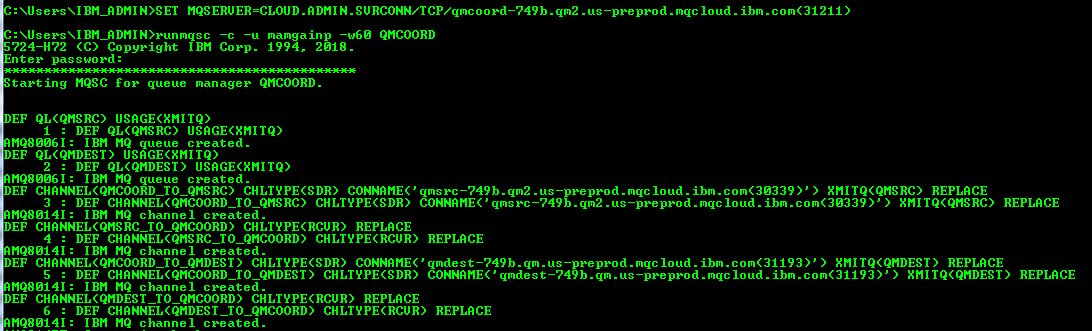
- Specify coordination queue manager details as MQSERVER environment variable in the admin
terminal. The runmqscCLI requires an environment variable be set to identify the
remote queue manager it should connect to. In the admin terminal, export MQSERVER variable
with the following command:
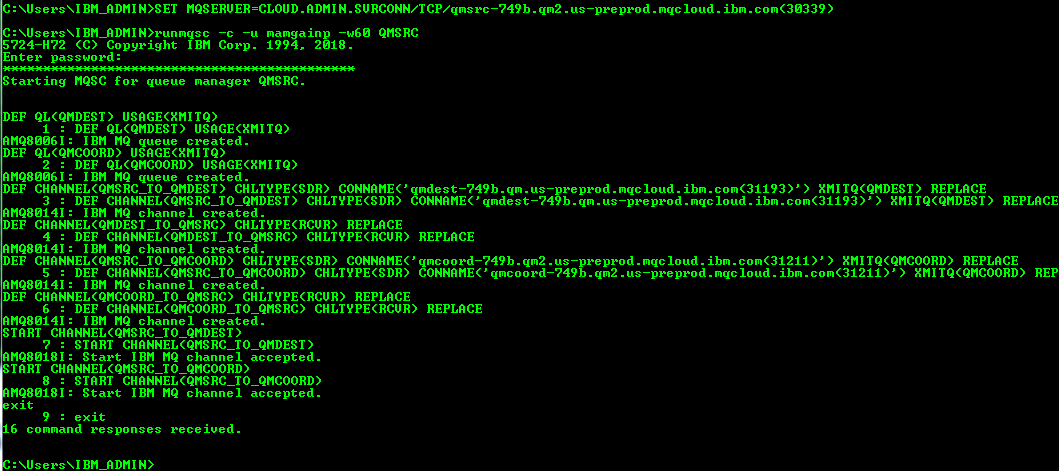
- Go to your System 2, open a new Terminal on your system and name it Terminal 2. Create
channels and required objects on QMSRC.
- Specify source agent queue manager details as MQSERVER environment variable in the admin
terminal
The runmqsc CLI requires that an environment variable is set to identify the remote queue manager it should connect to. In the admin terminal, export the MQSERVER variable with the following command:
- For Windows:
SET MQSERVER=CLOUD.ADMIN.SVRCONN/TCP/<HOSTNAME>(<PORT>) - For Linux:
export MQSERVER="CLOUD.ADMIN.SVRCONN/TCP/<HOSTNAME>(<PORT>)"<HOSTNAME>- this is 'hostname' in the file coordinationQMgrConnectionDetails.json.<PORT>- this is 'listenerPort' in the file coordinationQMgrConnectionDetails.json.
- For Windows:
- Run runmqsc to connect to your remote queue manager:
runmqsc -c -u <ADMIN_MQ_USER> -w60 <QUEUE_MANAGER_NAME><ADMIN_MQ_USER>- this is 'mqUsername' in the file platformApiKey.json.<QUEUE_MANAGER_NAME>- this is 'queueManagerName' in the file coordinationQMgrConnectionDetails.json.-cinforms runmqsc it should connect to a remote queue manager using the MQSERVER variable
runmqsc -c -u mamgainp -w60 QMSRC - Run the following commands in the CLI:
DEF QL(QMDEST) USAGE(XMITQ)DEF QL(QMCOORD) USAGE(XMITQ)DEF CHANNEL(QMSRC_TO_QMDEST) CHLTYPE(SDR) CONNAME('<HOSTNAME_OF_QMDEST>(<PORT_OF_QMDEST>)') XMITQ(QMDEST) REPLACEFor example:
DEF CHANNEL(QMSRC_TO_QMSRC) CHLTYPE(SDR)
CONNAME('qmdest-749b.qm.us-preprod.appdomain.cloud(31193)') XMITQ(QMDEST) REPLACE
DEF CHANNEL(QMDEST_TO_QMSRC) CHLTYPE(RCVR) REPLACEDEF CHANNEL(QMSRC_TO_QMCOORD) CHLTYPE(SDR) CONNAME('<HOSTNAME_OF_QMCOORD>(<PORT_OF_QMCOORD>)') XMITQ(QMCOORD) REPLACEFor example:
DEF CHANNEL(QMSRC_TO_QMCOORD) CHLTYPE(SDR)
CONNAME('qmcoord-749b.qm2.us-preprod.appdomain.cloud(31211)') XMITQ(QMCOORD)
REPLACE
DEF CHANNEL(QMCOORD_TO_QMSRC) CHLTYPE(RCVR) REPLACE
- Specify source agent queue manager details as MQSERVER environment variable in the admin
terminal
- Go to your System 3, open a new Terminal on your system and name it Terminal 3. Create
channels and required objects on QMDEST.
- Specify destinaton agent queue manager details as MQSERVER environment variable in the admin
terminal
The runmqsc CLI requires that an environment variable is set to identify the remote queue manager it should connect to. In the admin terminal, export the MQSERVER variable with the following command:
- For Windows:
SET MQSERVER=CLOUD.ADMIN.SVRCONN/TCP/<HOSTNAME>(<PORT>) - For Linux:
export MQSERVER="CLOUD.ADMIN.SVRCONN/TCP/<HOSTNAME>(<PORT>)"<HOSTNAME>- this is 'hostname' in the file coordinationQMgrConnectionDetails.json.<PORT>- this is 'listenerPort' in the file coordinationQMgrConnectionDetails.json.
- For Windows:
- Run runmqsc to connect to your remote queue manager:
runmqsc -c -u <ADMIN_MQ_USER> -w60 <QUEUE_MANAGER_NAME><ADMIN_MQ_USER>- this is 'mqUsername' in the file platformApiKey.json.<QUEUE_MANAGER_NAME>- this is 'queueManagerName' in the file coordinationQMgrConnectionDetails.json.-cinforms runmqsc it should connect to a remote queue manager using the MQSERVER variable
runmqsc -c -u mamgainp -w60 QMDEST - Run the following commands in the CLI:
DEF QL(QMSRC) USAGE(XMITQ)DEF QL(QMCOORD) USAGE(XMITQ)DEF CHANNEL(QMDEST_TO_QMSRC) CHLTYPE(SDR) CONNAME('<HOSTNAME_OF_QMSRC>(<PORT_OF_QMSRC>)') XMITQ(QMSRC) REPLACEFor example:
DEF CHANNEL(QMSRC_TO_QMDEST) CHLTYPE(SDR)
CONNAME('qmsrc-749b.qm2.us-preprod.appdomain.cloud(30339)') XMITQ(QMsrc) REPLACE
DEF CHANNEL(QMSRC_TO_QMDEST) CHLTYPE(RCVR) REPLACEDEF CHANNEL(QMDEST_TO_QMCOORD) CHLTYPE(SDR) CONNAME('<HOSTNAME_OF_QMCOORD>(<PORT_OF_QMCOORD>)') XMITQ(QMCOORD) REPLACEFor example:
DEF CHANNEL(QMDEST_TO_QMCOORD) CHLTYPE(SDR)
CONNAME('qmcoord-749b.qm2.us-preprod.appdomain.cloud(31211)') XMITQ(QMCOORD)
REPLACE
DEF CHANNEL(QMCOORD_TO_QMDEST) CHLTYPE(RCVR) REPLACE
- Specify destinaton agent queue manager details as MQSERVER environment variable in the admin
terminal
- Start channels on all the systems:
- go to Terminal 1, which is connected to QMCOORD (that is, the coordination queue manager)
and run the following commands:
START CHANNEL(QMCOORD_TO_QMSRC)START CHANNEL(QMCOORD_TO_QMDEST)

- go to Terminal 2, which is connected to QMSRC (that is, the source agent queue manager)
and run the following commands:
START CHANNEL(QMSRC_TO_QMDEST)START CHANNEL(QMSRC_TO_QMCOORD)
- go to Terminal 3, which is connected to QMDEST (that is, the destination agent queue
manager) and run the following commands:
START CHANNEL(QMDEST_TO_QMSR)START CHANNEL(QMDEST_TO_QMCOORD)

- go to Terminal 1, which is connected to QMCOORD (that is, the coordination queue manager)
and run the following commands:
- Go to terminal 2. Setup QMSRC as agent queue manager and command queue manager.
- The system needs to know the coordination queue manager it is connecting to. Run the following
command:
For example:fteSetupCoordination -coordinationQMgr <queueManagerName> -coordinationQMgrHost <queueManagerHostname> -coordinationQMgrPort <queueManagerPort> -coordinationQMgrChannel <queueManagerChannel> -credentialsFile <filePath> -defaultfteSetupCoordination -coordinationQMgr QMCOORD -coordinationQMgrHost qmcoord-749b.qm2.us-preprod.appdomain.cloud -coordinationQMgrPort 31211 -coordinationQMgrChannel CLOUD.ADMIN.SVRCONN -credentialsFile "C:\Users\Administrator\MQMFTCredentials.xml" -default -f - Configure QMSRC as command queue manager for the agent. Run the following command:
fteSetupCommands -p <configurationName> -connectionQMgr <sourceAgentQueueManagerName> -connectionQMgrHost <agentQueueManagerHost> -connectionQMgrPort <agentQueueManagerPort> -connectionQMgrChannel <queueManagerChannel> -credentialsFile <filePath> -fagentQueueManagerHost- Required. this is the ‘hostname’ in the file connection_info.txt of SourceAgentQueueManager.agentQueueManagerPort- Required. this is the ‘listenerPort’ in the file connection_info.txt of SourceAgentQueueManager.agentQueueManagerChannel- Required. this is the ‘adminChannelName’ in the file connection_info.txt of SourceAgentQueueManager.configurationOptions- by convention this is the name of a coordination queue manager.<filePath>- this is the 'filePath' where credentials file is present, for example, -C:\Users\Administrator\MQMFTCredentials.xml.-f- Optional. Forces the command to overwrite the existing configuration.
fteSetupCommands -p QMCOORD -connectionQMgr QMSRC -connectionQMgrHost qmsrc-749b.qm2.us-preprod.appdomain.cloud -connectionQMgrPort 30339 -connectionQMgrChannel CLOUD.ADMIN.SVRCONN -credentialsFile "C:\Users\Administrator\MQMFTCredentials.xml" -f
- In terminal 2 run following commands to create a SRC_AGENT (Source Agent):
fteCreateAgent -agentName <agentName> -agentQMgr <agentQueueManager> -agentQMgrHost <agentQueueManagerHost> -agentQMgrPort <agentQueueManagerPort> -agentQMgrChannel <agentQueueManagerChannel> -p <configurationOptions> -f -credentialsFile <filePath>agentName- Required. Name of the agent to create.agentQueueManager- Required. Name of the agents's queue manager. This is ’queueManagerName’ in the file connection_info.txt of SourceAgentQueueManager.agentQueueManagerHost- Required. this is the ‘hostname’ in the file connection_info.txt of SourceAgentQueueManager.agentQueueManagerPort- Required. this is the ‘listenerPort’ in the file connection_info.txt of SourceAgentQueueManager.agentQueueManagerChannel- Required. this is the ‘adminChannelName’ in the file connection_info.txt of SourceAgentQueueManager.configurationOptions- by convention this is the name of a coordination queue manage<filePath>- this is the 'filePath' where credentials file is present, for example,C:\Users\Administrator\MQMFTCredentials.xml.-f- Optional. Forces the command to overwrite the existing configuration.
fteCreateAgent -agentName SRC_AGENT -agentQMgr QMSRC -agentQMgrHost qmsrc-749b.qm2.us-preprod.appdomain.cloud -agentQMgrPort 30339 -agentQMgrChannel CLOUD.ADMIN.SVRCONN -p QMCOORD -credentialsFile "C:\Users\Administrator\MQMFTCredentials.xml" -f - Run runmqsc to connect to your remote queue manager:
runmqsc -c -u <ADMIN_MQ_USER> -w60 <QUEUE_MANAGER_NAME><ADMIN_MQ_USER>- this is 'mqUsername' in the file platformApiKey.json.<QUEUE_MANAGER_NAME>- this is 'queueManagerName' in the file coordinationQMgrConnectionDetails.json.-cinforms runmqsc it should connect to a remote queue manager using the MQSERVER variable
runmqsc -c -u mamgainp -w60 QMSRC - The terminal prompt you for a Password. This is your <ADMIN_API_KEY> = 'apiKey' in the file platformApiKey.json of QMSRC.
- The terminal now waits for input. Create the IBM MQ
objects required by the queue manager to work as an agent queue manager that targets your IBM MQ as a Service queue manager. An mqsc file was created at location
MQ_DATA_PATH\mqft\config\coordination_qmgr_name\agents\agent_name\agent_name_create.mqsc. Copy and paste the content of this file into your terminal 2. - Start the agent created above using following command:
fteStartAgent -p <configurationOptions> <agentName>configurationOptions- by convention this is the name of a coordination queue manageagentName- Required. name of the IBM MQ Managed File Transfer agent to start.
fteStartAgent -p QMCOORD SRC_AGENT
- The system needs to know the coordination queue manager it is connecting to. Run the following
command:
- Go to terminal 3 and repeat the same steps and create a DEST_AGENT (Destination
Agent):
- The system needs to know the coordination queue manager it is connecting to. Run the following
command:
For example:fteSetupCoordination -coordinationQMgr <queueManagerName> -coordinationQMgrHost <queueManagerHostname> -coordinationQMgrPort <queueManagerPort> -coordinationQMgrChannel <queueManagerChannel> -credentialsFile <filePath> -defaultfteSetupCoordination -coordinationQMgr QMCOORD -coordinationQMgrHost qmcoord-749b.qm2.us-preprod.appdomain.cloud -coordinationQMgrPort 31211 -coordinationQMgrChannel CLOUD.ADMIN.SVRCONN -credentialsFile "C:\Users\Administrator\MQMFTCredentials.xml" -default -f - Configure QMDEST as command queue manager for the agent. Run the following command:
fteSetupCommands -p <configurationName> -connectionQMgr <sourceAgentQueueManagerName> -connectionQMgrHost <agentQueueManagerHost> -connectionQMgrPort <agentQueueManagerPort> -connectionQMgrChannel <queueManagerChannel> -credentialsFile <filePath> -fagentQueueManagerHost- Required. this is the ‘hostname’ in the file connection_info.txt of DestinationAgentQueueManager.agentQueueManagerPort- Required. this is the ‘listenerPort’ in the file connection_info.txt of DestinationAgentQueueManager.agentQueueManagerChannel- Required. this is the ‘adminChannelName’ in the file connection_info.txt of DestinationAgentQueueManager.configurationOptions- by convention this is the name of a coordination queue manager.<filePath>- this is the 'filePath' where credentials file is present, for example,C:\Users\Administrator\MQMFTCredentials.xml.-f- Optional. Forces the command to overwrite the existing configuration.
fteSetupCommands -p QMCOORD -connectionQMgr QMDEST -connectionQMgrHost
      qmdest-749b.qm.us-preprod.appdomain.cloud -connectionQMgrPort 31193  -connectionQMgrChannel
      CLOUD.ADMIN.SVRCONN -credentialsFile "C:\Users\Administrator\MQMFTCredentials.xml"
    -f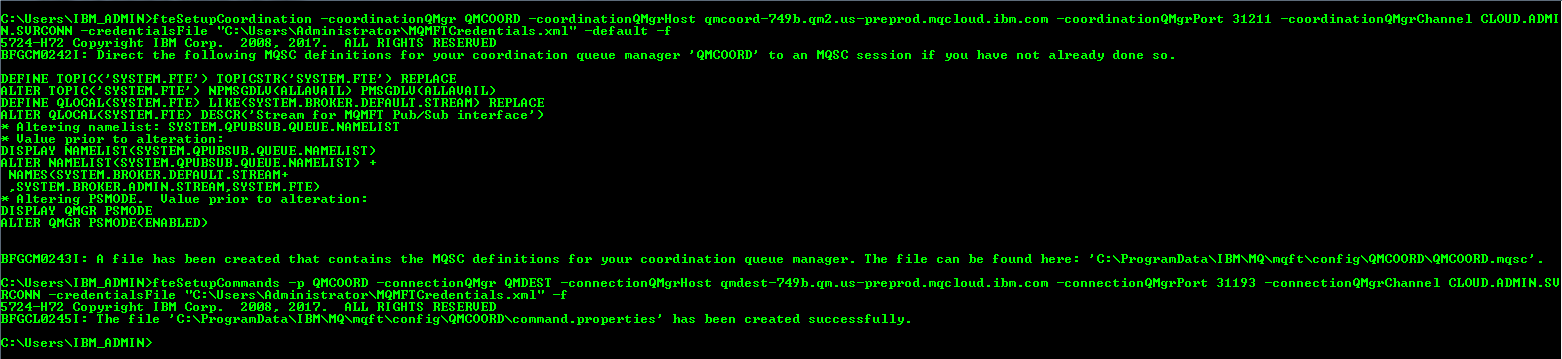
- In terminal 3 run following commands to create a DEST_AGENT (Destination Agent):
fteCreateAgent -agentName <agentName> -agentQMgr <agentQueueManager> -agentQMgrHost <agentQueueManagerHost> -agentQMgrPort <agentQueueManagerPort> -agentQMgrChannel <agentQueueManagerChannel> -p <configurationOptions> -f -credentialsFile <filePath>agentName- Required. Name of the agent to create.agentQueueManager- Required. Name of the agents's queue manager. This is ’queueManagerName’ in the file connection_info.txt of DestinationAgentQueueManager.agentQueueManagerHost- Required. this is the ‘hostname’ in the file connection_info.txt of DestinationAgentQueueManager.agentQueueManagerPort- Required. this is the ‘listenerPort’ in the file connection_info.txt of DestinationAgentQueueManager.agentQueueManagerChannel- Required. this is the ‘adminChannelName’ in the file connection_info.txt of DestinationAgentQueueManager.configurationOptions- by convention this is the name of a coordination queue manage<filePath>- this is the 'filePath' where credentials file is present, for example,C:\Users\Administrator\MQMFTCredentials.xml.-f- Optional. Forces the command to overwrite the existing configuration.
fteCreateAgent -agentName DEST_AGENT -agentQMgr QMDEST -agentQMgrHost qmdest-749b.qm.us-preprod.appdomain.cloud -agentQMgrPort 31193 -agentQMgrChannel CLOUD.ADMIN.SVRCONN -p QMCOORD -credentialsFile "C:\Users\Administrator\MQMFTCredentials.xml" -f - Run runmqsc to connect to your remote queue manager:
runmqsc -c -u <ADMIN_MQ_USER> -w60 <QUEUE_MANAGER_NAME><ADMIN_MQ_USER>- this is 'mqUsername' in the file platformApiKey.json.<QUEUE_MANAGER_NAME>- this is 'queueManagerName' in the file destinationQMgrConnectionDetails.json.-cinforms runmqsc it should connect to a remote queue manager using the MQSERVER variable
runmqsc -c -u mamgainp -w60 QMDEST - The terminal prompt you for a Password. This is your <ADMIN_API_KEY> = 'apiKey' in the file platformApiKey.json of QMDEST.
- The terminal now waits for input. Create the IBM MQ
objects required by the queue manager to work as an agent queue manager that targets your IBM MQ as a Service queue manager. An mqsc file was created at location
MQ_DATA_PATH\mqft\config\coordination_qmgr_name\agents\agent_name\agent_name_create.mqsc. Copy and paste the content of this file into your terminal 3. - Start the agent created above using following command:
fteStartAgent -p <configurationOptions> <agentName>configurationOptions- by convention this is the name of a coordination queue manageagentName- Required. name of the IBM MQ Managed File Transfer agent to start.
fteStartAgent -p QMCOORD DEST_AGENT
- The system needs to know the coordination queue manager it is connecting to. Run the following
command:
- Now both of your newly created agents should be in Active/Ready state. To check their status,
run the following
command:
fteListAgents -p <configurationOptions>configurationOptions- by convention this is the name of a coordination queue manage. For example:fteListAgents -p QMCOORD
You have now configured the IBM MQ Managed File transfer queue managers to transfer a file.