Example: creating a coach for tablets and smartphones
This example shows how to create a coach that changes how
it displays its contents according whether users see it in a desktop
browser, on a tablet, or on a smartphone.
This example creates a coach that is called Inspection Report. In the scenario, a
health and safety inspector arrives at a work site. The inspector uses a tablet or smartphone to
create the initial report. The inspector then saves the report as a draft. Later, the inspector
returns to the office and opens the report on a desktop or notebook computer. The inspector expands
on the initial comments with additional information. The inspector then submits the final report. To
support this scenario, the coach in the example changes its layout to accommodate the different
screen sizes of smartphones, tablets, and computers. The coach contains two views: Findings CV and
Inspection CV. The Findings CV contains the information that the inspector fills out for the
inspection while the Inspection CV contains information that does not change. To concentrate on the
user interface, this example does not contain any data.
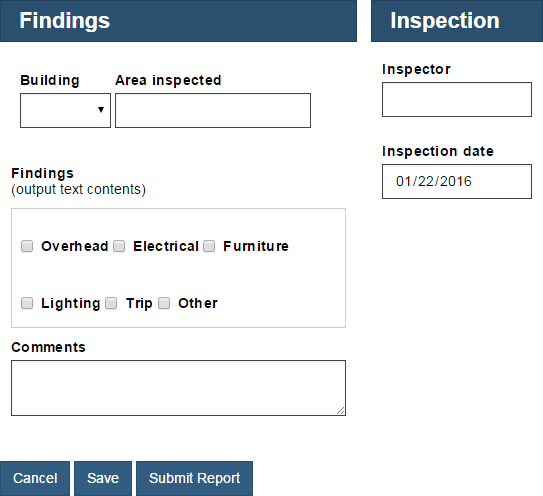
- For the computer, the inspector can see the entire Inspection Report
coach:

- For the tablet, the inspector can see the Findings part of the coach and the buttons. The
Inspection part of the coach is no longer visible.

- For a smartphone, the buttons stretch across the entire screen to make them easier to
select:

- Create the Findings CV view.
- Create a view labelled Findings CV.
- In the Layout page, add the following views in order from top to bottom:
- Section
- Output Text
- Section
- Text Area
By default, the layout arranges elements vertically so the views are stacked one on top of the other.
- Select the first section and change its Layout configuration to Horizontal. Repeat this step for the other section.
- In the first section, add a Single Select view and a Text view. Relabel the Select view to Building and rename the Text view to Area inspected.
- Relabel the Output Text view to Findings.
- In the second section, add six Check Box views. Relabel the Check Box views to Overhead, Electrical, Furniture, Lighting, Trip, and Other.
- Relabel the Text Area to Comments.
The layout of the view looks like the following screen capture:
- Modify the appearance of the view:
- Select the first section. In the general properties, set the Label visibility to Hide. Repeat this step for the other section.
- In the configuration properties of the first section, enable Automatic Wrap. Repeat this step for the other section. By setting this property, if there is not enough room to display all of the views side-by-side, the section moves some of them below the others instead of displaying scroll bars.
- Select the horizontal section that contains the check boxes. In its configuration options, enable .
- Click Save or Finish Editing.
- Create the Inspection CV view
- Create a view labelled Inspection CV.
- In the Variables page, add the following configuration options:
inspector(String)inspectionDate(Date)

- In the Layout page, add a Text view and a Date Time Picker view. Relabel the Text view to Inspector and relabel the Date Time Picker view to Inspection date.
- Select the Inspector view and, in its general properties, bind it to the
inspector variable.

- Click Save or Finish Editing.
- Create the Inspection client-side human service:
- Create the client-side human service labelled Inspection.
- In the client-side human service diagram, rename the coach to Inspection Report.

- Define the layout of the Inspection Report coach:
- In the Coaches page, select the Inspection Report coach and then select to start with a two column grid.
- Click Grid and then add a single column
grid below two column grid. Click the alignment button in the middle
of the cell to align its contents horizontally.
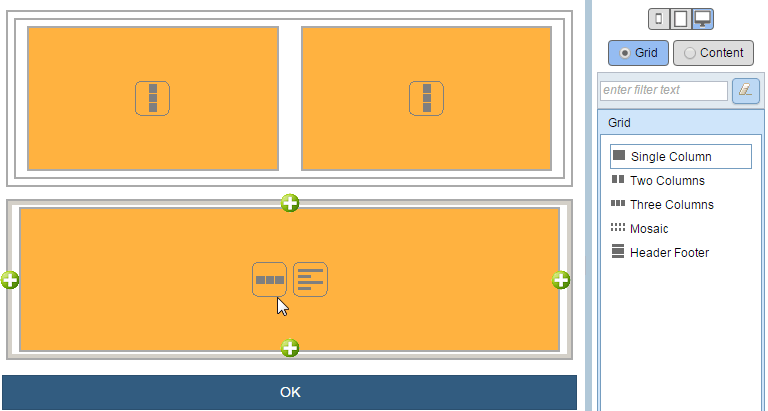
- In the two cell grid, drag the border between the two so that left cell occupies 8 of the 12 columns. The editor displays the columns when you start dragging the border.
- Click Content to switch to the content mode.
- Drag a section into the first cell and then drag another section
into the second cell. Rename the first section to Findings and the second section to Inspection.

- Add two buttons to the single cell grid and then drag the OK button
into the cell as well.

- Rename the first button to Cancel, the second to Save and OK button to Submit Report.
- In the Findings section, add the Findings CV view. In the Inspection section, add the Inspection
CV view.
- Click Save or Finish Editing.
- Run the Inspection human service. The web browser opens and displays
the coach.
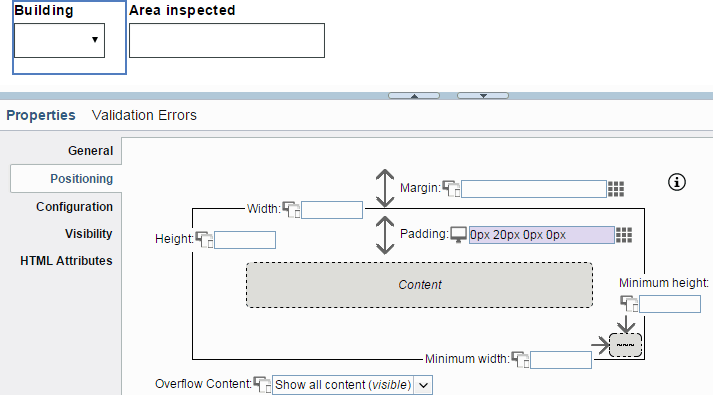
- Add more space between the Building and Area inspected views. The elements in the Findings view
must also align with each other.
- Open the Findings CV view and select the Building view.
- In the positioning properties, set the padding to 0px 20px 0px 0px. In
the Padding field, the first number is for the top padding, the second number
for the right padding, the third number is for the bottom padding, and the fourth number is for the
padding margin.
Alternatively, you can click the
 icon beside the Padding field. In the window that opens, type
20px in the Right field and 0px
in the other fields. Click OK.
icon beside the Padding field. In the window that opens, type
20px in the Right field and 0px
in the other fields. Click OK.
- To remove the Inspection section for viewing the coach on a tablet:
- Open the human service and switch to the medium screen by clicking
 on the palette.
 - Click Grid and select the Inspection cell. In the properties of the cell, set its Visibility to Hide. The palette displays the cell as an invisible item.
- Drag the border of the Findings cell so that it occupies the entire grid.
- Click Save or Finish Editing.
- Run the human service again. If the browser is wider than 1024 pixels wide, the Inspection
section is visible. If you reduce the width to 1024 pixels or less, the Inspection section
disappears.
- Open the human service and switch to the medium screen by clicking
- To make the buttons easier to use on a smart phone by stretching
them across the screen:
- Switch to the small screen by clicking
 on the palette.
 - Select the cell that contains the buttons. In the properties of the cell, set its Orientation to Vertical.
- Click Save or Finish Editing.
- Run the human service again. If the browser is less than 640 pixels wide, the buttons are
stacked vertically.
- Switch to the small screen by clicking